• Skip to secondary menu
  • Skip to main content
  • Skip to primary sidebar

Putting The Pretty In Preschool

Finding Beauty In Everyday Early Childhood Experiences

  • Home
  • About Me
  • Winter
  • Chinese New Year
  • Blog
  • Valentine’s Day
  • Contact Me
  • Easter Activities

art

Sunflower Heart Craft

October 2, 2021 by Annette Kaminsky Leave a Comment

A sunflower heart craft that makes a perfect addition to fall decor.

_______

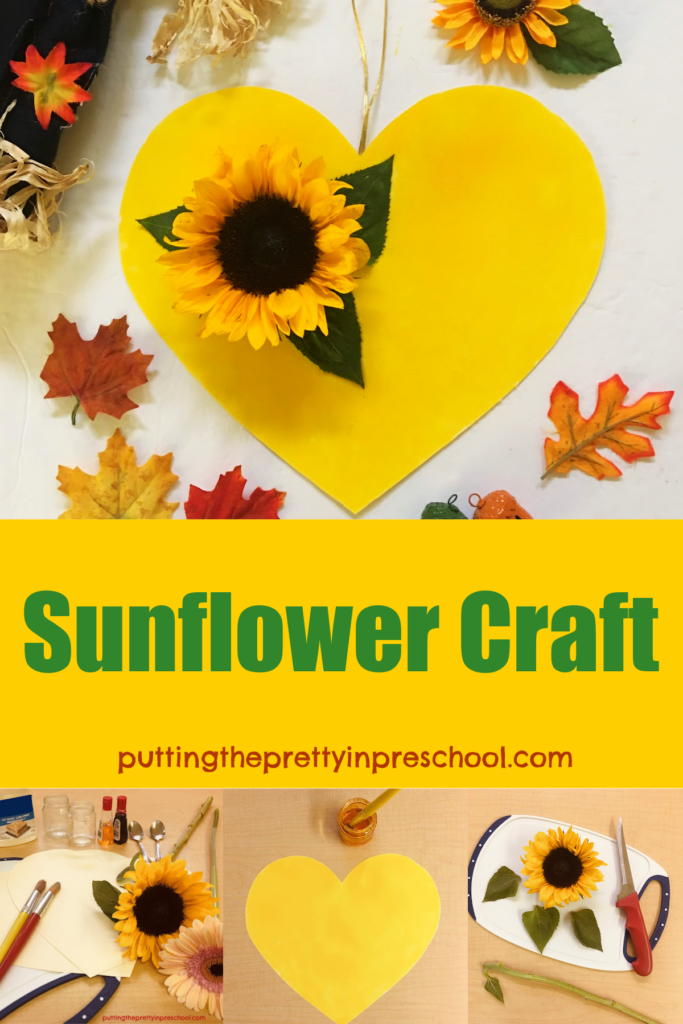
Sunflowers are a standout in any yard or garden. When the growing season ends and colder nights loom, their beautiful flower heads can be preserved in a sunflower heart craft.

Sunflowers come in a surprising array of colors, and are given catchy names such as “Lemon Queen”, “Moulin Rouge”, “Firecracker” or “Teddy Bear.” There are around 70 kinds of sunflowers in all, and they range in size from 2 feet to over 6 feet tall. This slide show from Country Living features 15 types of sunflowers that provide inspiration for the craft.

_______

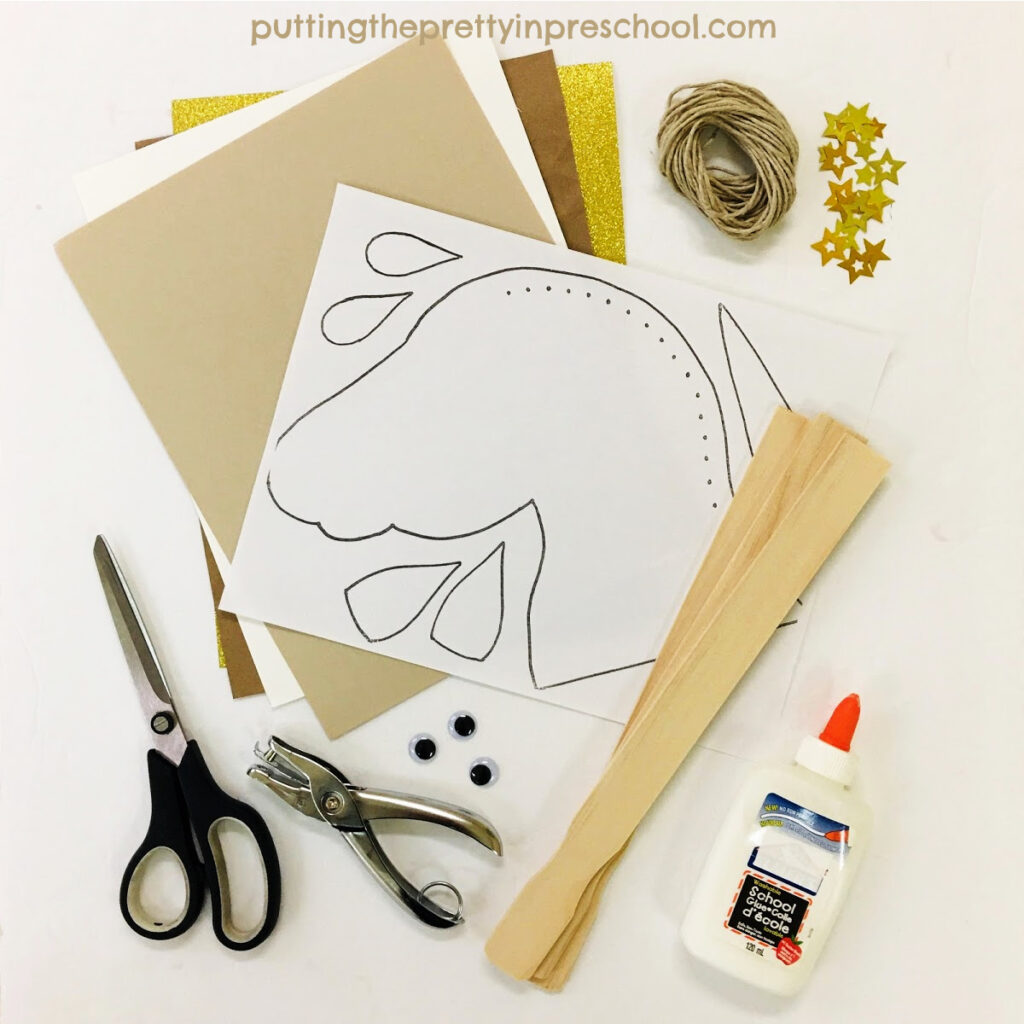
Craft Supplies To Collect
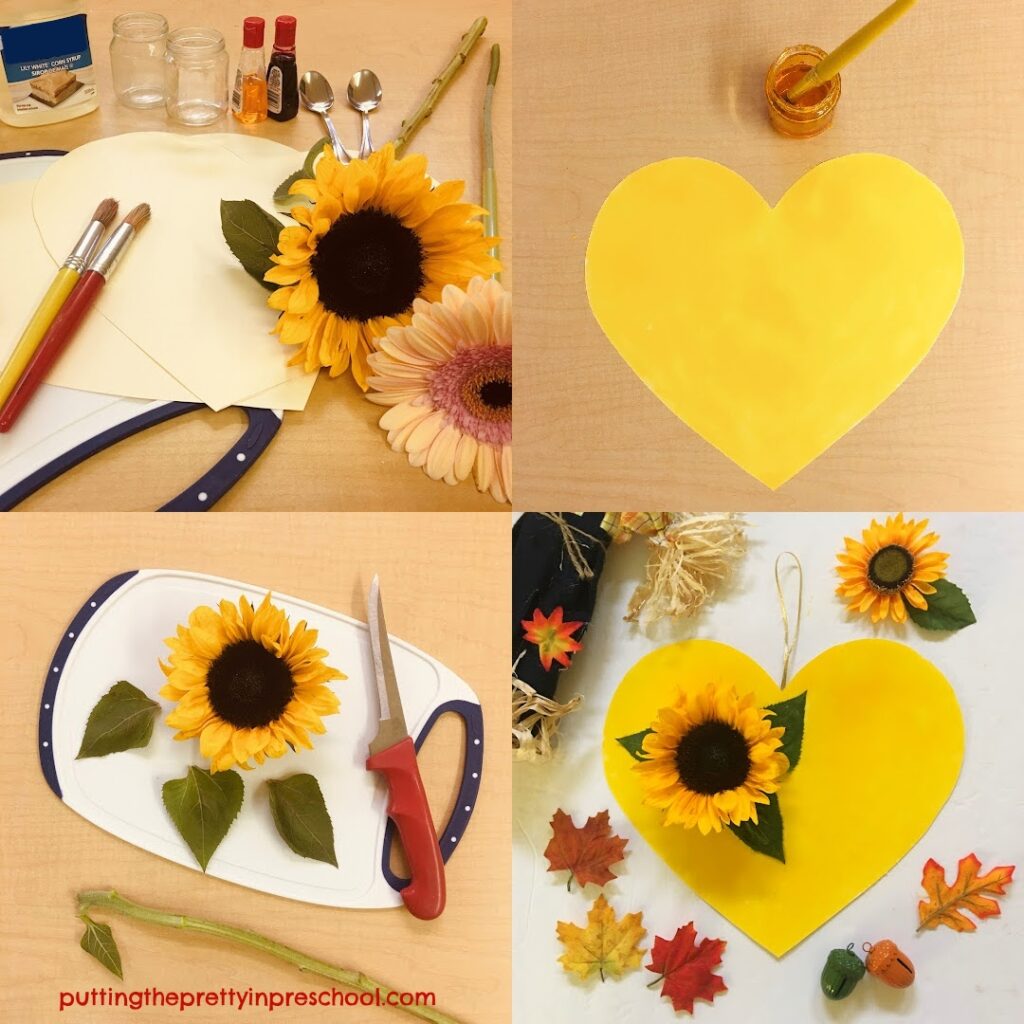
  • sunflower stem
  • white corn syrup
  • red and yellow food coloring
  • large heart cut from sturdy paper
  • thin ribbon
  • small paint jar
  • paintbrush
  • spoon
  • cutting board
  • knife
  • scissors
  • glue gun

_______

Making The Sunflower Heart Craft

Steps to making a sunflower heart fall craft.

_______

Pour the white corn syrup into a small paint container. Squirt in a few drops of yellow food coloring, and a tiny amount of red food coloring. Mix the colors into the syrup with a spoon. Adding a little red turns the yellow paint from lemon to golden.

Test the tacky paint on a piece of scrap paper to make sure it is the shade you want to offer.

Have your little learner use a paintbrush to cover the heart with the slimy corn syrup paint. The paint will be shiny and thick, providing a unique sensory experience.

Cut a sunflower head and three leaves from a plant or purchased sunflower stem from a flower shop.

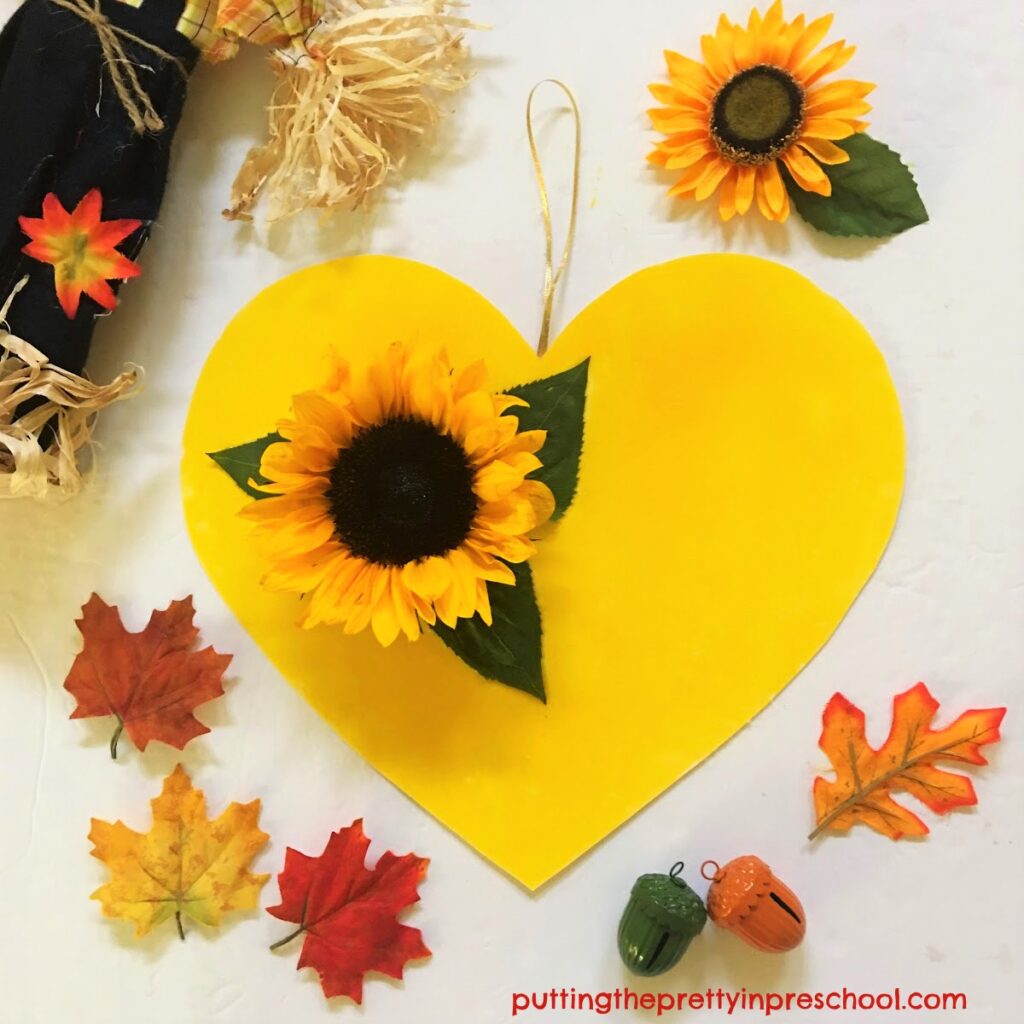
Help your little learner press the leaves onto the painted heart and add the sunflower head. A glue gun can be used by an adult to help secure the sunflower to the heart. The leaves will stick to the paint on their own.

Let the sunflower craft dry on a flat surface. It will take a few days to dry thoroughly.

Cut ribbon and hot glue it in a loop to the back of the embellished heart for display.

Oh so pretty sunflower heart craft that is easy for little learners to make.

_______

[Read more…] about Sunflower Heart Craft

Filed Under: art, fall, gardening, preschool Tagged With: fall crafts, painting, paper crafts, sunflowers

Earth Day Craft

April 24, 2021 by Annette Kaminsky Leave a Comment

Easy to do, eye-catching earth day craft with green and blue pony beads. The activity works well as a classroom or family creative project.

_______

Earth Day was first celebrated in the United States in 1970 and is now observed all over the world every year on April 22. It is a day to appreciate animals, plants, and earth’s majestic landscapes. It is also a time to do activities that show care for our beautiful planet. This beaded earth day craft was our activity of choice this year to recognize earth day. It works well as a cooperative activity at home or in the classroom.

_______

Supplies To Collect

Supplies to collect in order to make a stunning beaded earth day craft.

_______

  • pony beads in shades of blue and green
  • thin green yarn
  • scotch tape
  • 8 ½ x 11-inch green cardstock
  • 12 x 12-inch cardstock
  • 8 or 9-inch circular lid or flat disc with an edge
  • glue gun or white glue

_______

Follow me on Pinterest for more early learning ideas.

_______

Making the Beaded Earth Day Craft

Tie a pony bead onto one end of a long piece of yarn. Wrap a thin piece of scotch tape around the other end to prevent fraying.

Set the rest of the pony beads on a tray along with the yarn. Have students or family members take turns stringing beads. Or have one child string beads over time.

Invitation to string blue and green pony beads for an earth day craft.

_______

Next, cut a green cardstock circle to fit just inside a circular cookie tin lid or item with a similar shape. A disc-shaped dog toy turned out to be the perfect size in my stash of supplies!

Fit the circle into the mold. Then starting on the edge, glue down the strung beads in a tight spiral shape with white glue or a glue gun.

After the rim of the circle is beaded, take the cardstock shape out of the mold and tack down the rest of the beads. Trim off extra beaded yarn if necessary.

Steps to complete a beaded earth day craft with green and blue pony beads.

_______

Mount the bead project onto 12-inch x 12-inch cardstock and display.

An attractive classroom or family earth day craft project with green and blue pony beads.

_______

You might choose to use the mold as a frame.

Stunning, super easy beaded earth day craft. This piece is framed and ready for display.

_______

TIPS:

  • Be on the lookout for packages of beads in various shades of one color.
  • If the string of beads isn’t long enough to completely fill in the circle, carefully attach a new piece of yarn with a small piece of scotch tape. Then add more beads.
  • A smaller or thinner bead can be used for the center if a bigger one doesn’t fit.

_______

Exquisite earth day craft with green and blue pony beads. This easy-to-do activity works well as a classroom or family creative project.

_______

This earth day craft is inspired by the exquisite bead art of Canadian Métis artist Katherine Boyer. Her beautiful art can be viewed on her website @katherineboyerart.com.

_______

Earth Day Craft Video Tutorial

_______

25 Earth Day Activities

Doing an earth day craft is just one way to help little learners or your family honor the conservation-minded special day. Here is a list of 25 activities to choose from:

  • Clean up a park or playground.
  • Pick up litter at the beach.
  • Bike to work or school.
  • Plant a tree.
  • Start a vegetable or flower garden.
  • Compost fruit and vegetable scraps.
  • Plant wildflowers and native plants.
  • Grow plants that attract butterflies, bees, and birds.
  • Learn more about an animal you are afraid of.
  • Read books about animal care.
  • Go on a bug safari.
  • Take care of animals.
  • Invite in an animal specialist guest.
  • Take a field trip to a farm or zoo.
  • Go on a nature walk.
  • Have a nature scavenger hunt.
  • Read books about planet earth.
  • Study a globe or map.
  • Do a science experiment.
  • Discuss the four Rs: reduce, reuse, repair, recycle.
  • Put recyclables in a bin.
  • Visit a recycling center.
  • Create earth crafts using recycled materials.
  • Give away gently used toys.
  • Donate money to a conservation group.

_______

Of course, earth day activities are appropriate any time of the year. And the beaded earth craft also works beautifully as part of a Night And Day or Space theme.

Easy to do, eye-catching earth craft with green and blue pony beads. The activity works well as a classroom or family creative project.

_______

[Read more…] about Earth Day Craft

Filed Under: art, display, preschool, space Tagged With: bead art, earth craft, Earth Day

Unicorn Puppet Craft

April 8, 2021 by Annette Kaminsky Leave a Comment

An easy-to-make neutral-toned paper unicorn craft. Free pattern to download. A craft project the whole family can do.

_______

Unicorns are very popular in children’s clothing. As time goes on, I see this theme popping up more and more. After swooning over many a piece of clothing my preschoolers have worn, I decided to introduce a full-fledged unicorn theme. This unicorn puppet craft is one of the activities we will do.

The color scheme is neutral with a dose of gold. Over the past year, I collected a little treasure trove of unicorn toys and craft supplies. Most of them are in pink and pastel colors. The natural hues in this project will add variety.

You can have a go at making the craft too! There is a downloadable unicorn pattern further in the post to make it easy.

_______

Supplies To Collect

Craft supplies to collect in order to make a neutral-toned unicorn puppet craft.

_______

  • craft, beige, and winter white 8 ½ x 11-inch cardstock paper
  • gold cardstock paper
  • twine string
  • paint mixing stick
  • wiggly eyes
  • gold star-shaped confetti
  • scissors
  • white glue, glues stick, and glue gun
  • single-hole punch
  • pencil
  • black felt pen
  • unicorn pattern (downloadable below)

_______

Follow me on Pinterest for more early learning ideas.

_______

Making The Unicorn Puppet Craft

Trace and cut out a unicorn head and ears from cardstock. Feel free to download this pattern:

Pattern to download for making a paper unicorn puppet,

_______

Unicorn Puppet PatternDownload

This printable is for personal or one classroom use only.

_______

Punch holes along the neck.

Cut a horn and teardrop shape from gold cardstock.

Cut the twine string into 9-inch/23 cm strips.

Steps to assemble an adorable unicorn puppet craft.

_______

Loop twine pieces through the holes to create a unicorn mane.

Glue on a wiggly eye, golden horn, and ear shapes.

Draw a mouth.

Glue a paint stick handle on the back of the unicorn.

Add a few star confetti shapes for extra pizzazz.

An easy-to-make, neutral-hued unicorn puppet with gold accents.

_______

Craft more unicorn puppets in other neutral hues!

These gold-accented unicorn puppets in neutral tones balance crafts completed in dainty color hues.

_______

Tip: Check a Dollar Store for the paint sticks. I got my sticks at one, and they are much smoother than any I could have gotten from a hardware store. They didn’t require any sanding and came ready to use.

_______

Unicorn Puppet Craft Video Tutorial

_______

[Read more…] about Unicorn Puppet Craft

Filed Under: art, preschool, pretend play, unicorns Tagged With: puppets, unicorns

Silhouette Bunny Art

March 27, 2021 by Annette Kaminsky Leave a Comment

Colorful silhouette bunny art made by dabbing dot markers on a canvas. Free template included. An art project for the whole family. This quick and showy art project displays well.

_______

Easter kind of snuck up on me this year. I didn’t realize until mid-March how early the holiday dates are. I often have time to do Easter activities with my preschoolers in the first part of April, but this year we needed to complete them by March 26 (before Spring Break week.) And so this quick and showy silhouette bunny art project was perfect for our busy time. It is easy to make at home too.

_______

Supplies To Collect

  • 7-inch x 9-inch canvas panel
  • dot markers in bright spring colors
  • cardstock paper
  • bunny template
  • white pompom
  • white glue

_______

Making The Silhouette Bunny Art

_______

Select a canvas or use sturdy art paper for this project. (I purchased canvases at a dollar store for an economical price.) Then cut a bunny shape out of same-sized cardstock.

Feel free to download this bunny template for the art project.

Template for silhouette bunny art or another spring craft project.

_______

Bunny PrintableDownload

This bunny template is for individual or one classroom use only.

_______

Carefully center the cardstock with the bunny shape removed on the canvas.

Have your little learner pick a dot marker in a favorite color and dab dots all over the bunny shape, holding the template steady. You may want to help do this, as the cardstock design has a tendency to slip around. And this way you both can practice teamwork and co-operation.

Your early learner can glue on a pompom tail with a dab of white glue when the bunny is dry.

Pink silhouette bunny art made by dabbing dot markers on a canvas. This quick and showy art project displays well.

_______

You may wish to invite your little learner to create this art project in a few different spring colors or have family members each make one. The colorful bunnies display well together.

_______

Or you can ask your little learner to do the silhouette bunny art in two different ways. Then mount the canvasses side by side.

Silhouette bunny art made in two ways by dabbing spring-colored dot markers on a canvas. Free template included.

_______

Tag me on Instagram if you make this art project. I will share your bunny art in my stories!

_________

Adorable silhouette bunny art made by dabbing spring-colored dot markers on a canvas. Free template included. An art project for the whole family.

_______

[Read more…] about Silhouette Bunny Art

Filed Under: art, display, Easter, preschool, spring Tagged With: bunnies, dot markers

Bunny Rolling Pin Art

March 21, 2021 by Annette Kaminsky Leave a Comment

Oversized bunny rolling pin art to add variety to your program offerings. A wiggly eye and cotton ball tail are the finishing touches.

_______

It was so much fun making shamrock rolling pin art I decided to try the technique in different color schemes with oversized bunnies. The large size of the paper bunnies accommodates longer rolling pins and allows for a unique art experience. This bunny rolling pin art project displays well.

_______

Follow me on Pinterest for more ideas.

_______

Supplies To Collect

  • sturdy 12-inch x 18-inch paper
  • large bunny template
  • orange, pink, black, and white tempera paints
  • rolling pins
  • scissors
  • pencil
  • wiggly eyes
  • large cotton balls

_______

Making The Bunny Rolling Pin Art

Trace and cut out large bunnies from 12-inch x 18-inch sturdy paper. I use manilla paper for this activity…it holds paint well and stays pretty flat while drying. It is also inexpensive to buy.

Allow participants to spatter black and white paint over a bunny, and use a rolling pin to move the paint around in all directions.

A spatter-painted paper bunny ready to be finished with a rolling pin painting technique.

________

When dry, have everyone glue on a wiggly eye and cotton ball tail to their hoppy art.

Striking black and white painted bunny using a rolling pin painting technique.

_______

Black and white painted bunny using a rolling pin painting technique.

_______

For an entirely different and much softer color scheme, offer orange, pink, and white paints. Invite participants to decorate their bunny the same way.

Steps to creating rolling pin bunny art.

_______

Cute coral-painted bunny using a rolling pin painting technique.

_______

Sweet coral painted bunnies using a rolling pin painting technique.

_______

And to extend the bunny theme into sensory play, this spring bunnies rolling pin would be a beautiful tool to include in playdough activities.

_______

[Read more…] about Bunny Rolling Pin Art

Filed Under: art, Easter, preschool Tagged With: bunnies, Easter, painting

  • « Go to Previous Page
  • Page 1
  • Interim pages omitted …
  • Page 20
  • Page 21
  • Page 22
  • Page 23
  • Page 24
  • Interim pages omitted …
  • Page 34
  • Go to Next Page »

Primary Sidebar

Hi, I'm Annette Kaminsky, a preschool teacher who loves sharing learning through play activities for young children. Thanks for visiting my site. Feel free to stay awhile!

Subscribe Via Email

Recent Posts

  • Salt Painting Sensory Bin June 15, 2025
  • Dandelion Sensory Tray June 3, 2025
  • Bergenia Flower Sensory Bin May 31, 2025
  • Salt and Ice Science Experiment May 20, 2025
  • Airplane Rice Sensory Bin May 16, 2025
  • Salt Painting Planet Art May 3, 2025
  • Spring Bunny Sensory Bin April 19, 2025
  • Tin Foil Egg Printing April 17, 2025
  • Lentil Easter Bunny Sensory Bin April 15, 2025
  • Unicorn Store Dramatic Play Center March 25, 2025

Categories

Topics

block play bunnies butterflies Chinese New Year Christmas Christmas craft color colors dramatic play Easter flowers hearts holiday jewelry leaves leprechauns light table loose parts painting paper crafts playdough pretend play printables printmaking process art pumpkins rice bin scented playdough science experiment scissor skills sensory bin sensory play sensory tray shamrocks skeletons snakes snowflakes spiders spring St. Patrick's Day sunflowers tablescapes trees Valentine's Day water play

Copyright © 2025 · Lifestyle Pro on Genesis Framework · WordPress · Log in