• Skip to secondary menu
  • Skip to main content
  • Skip to primary sidebar

Putting The Pretty In Preschool

Finding Beauty In Everyday Early Childhood Experiences

  • Home
  • About Me
  • Winter
  • Chinese New Year
  • Blog
  • Valentine’s Day
  • Contact Me
  • Easter Activities

crafts

Salt Painting Planet Art

May 3, 2025 by Annette Kaminsky Leave a Comment

_______

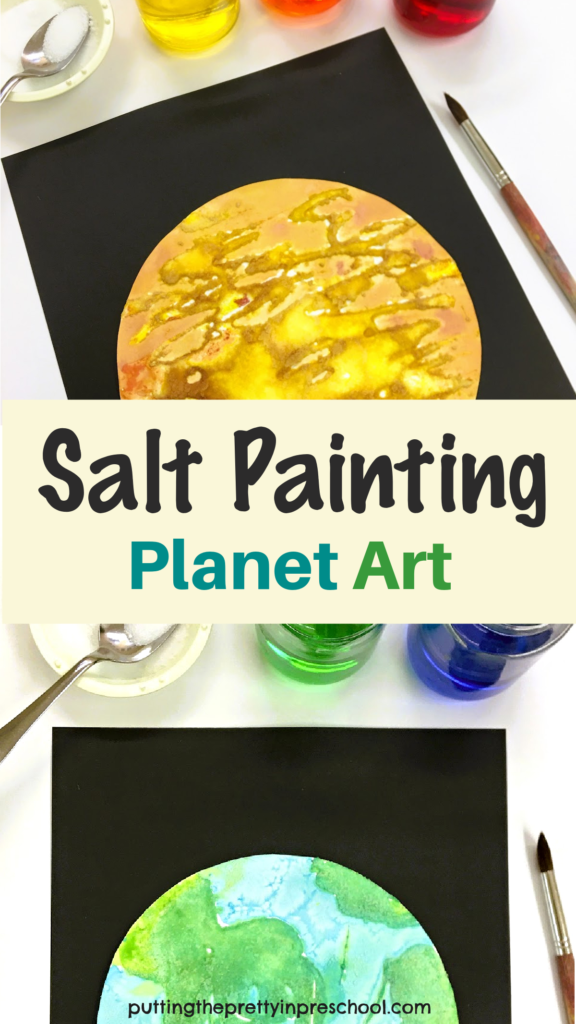
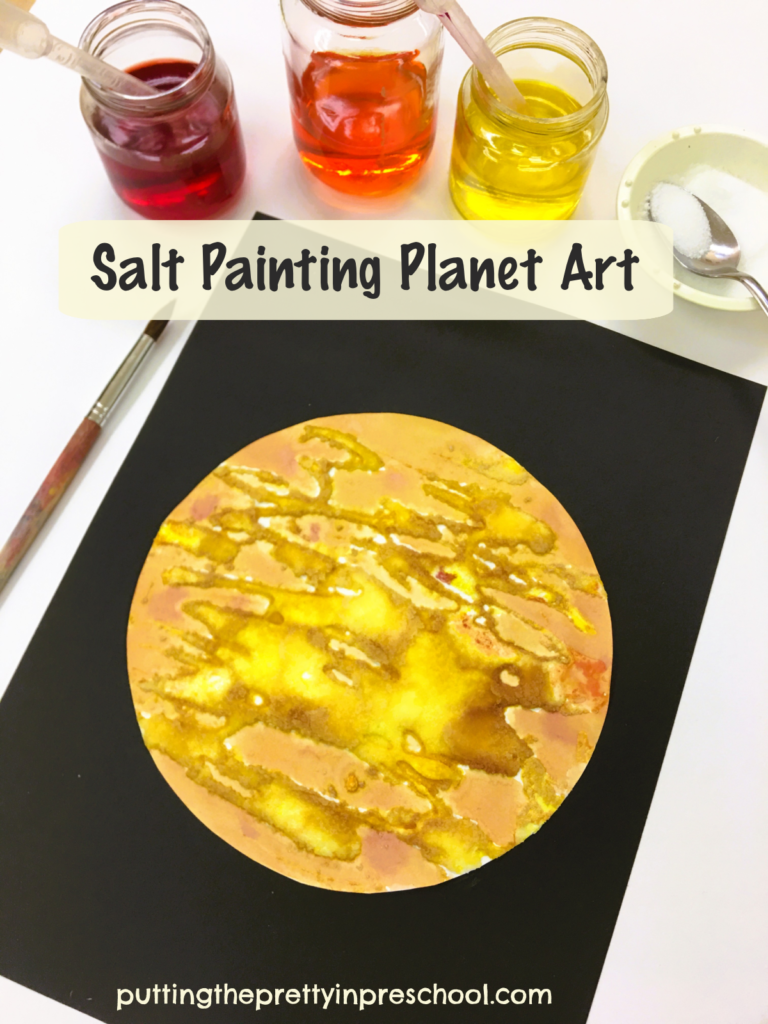
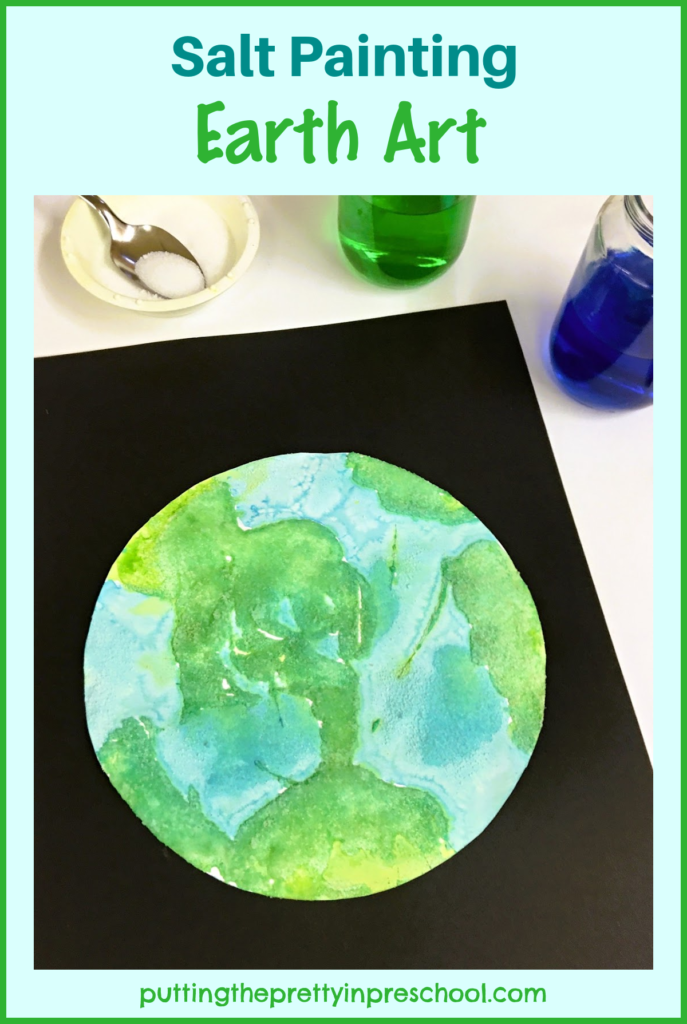
This salt painting planet art is super satisfying and oh so simple to do. The salt drip painting technique works well to create Earth or one of the other eight planets.

_______

Supplies to Collect

Gather the following supplies, which you probably have around your home, for this stunning planet art activity:

  • 8 ½ x 11-inch cardstock paper
  • table salt
  • white glue
  • glue paddle
  • food coloring
  • paint pots
  • eye droppers
  • paintbrush
  • teaspoon
  • disposable plate
  • scissors and pencil
  • glue stick or glue gun
  • washable table cover

_______

_______

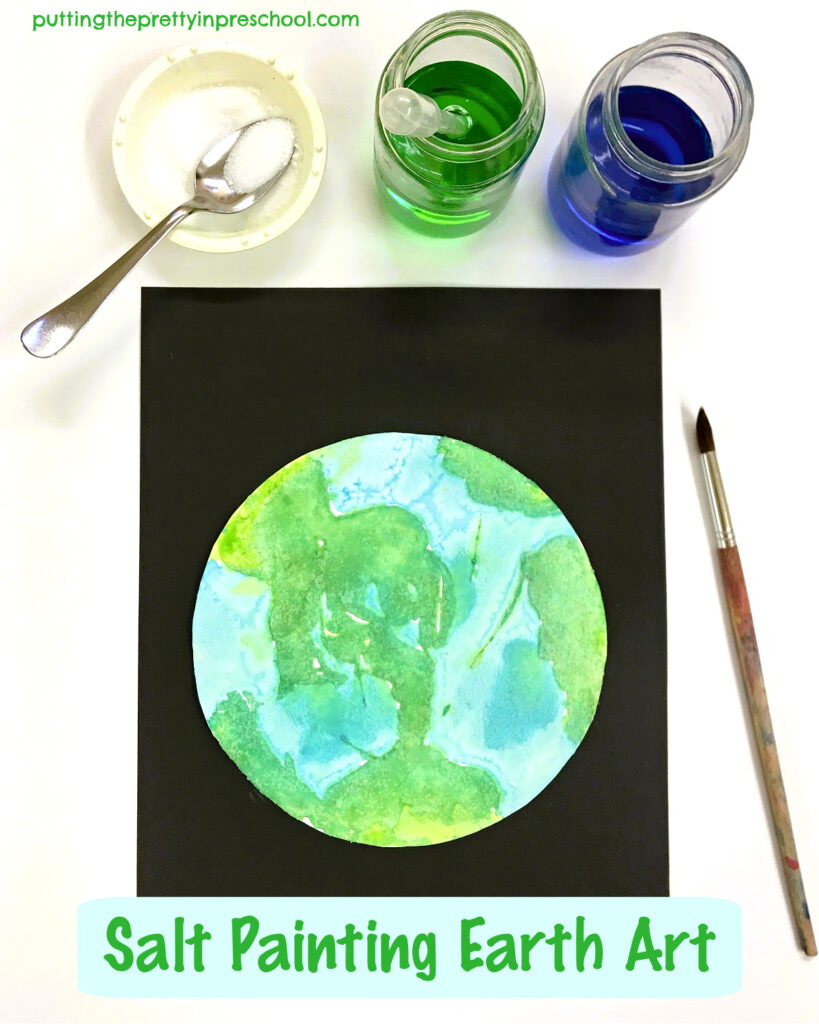
Salt Painting Earth Art

The first planet to create is our Earth as seen from outer space. Complete this salty art activity over two days.

Day One:

Protect an art table with a washable or disposable table cover.

Cut out a circle measuring 18 cm/7 inches from 8 ½ x 11-inch or 9 x 12-inch cardstock paper.

Pour white glue into a small container or paint pot.

Set the sturdy paper circle, pot with white glue, glue paddle, and disposable plate on the prepared art table.

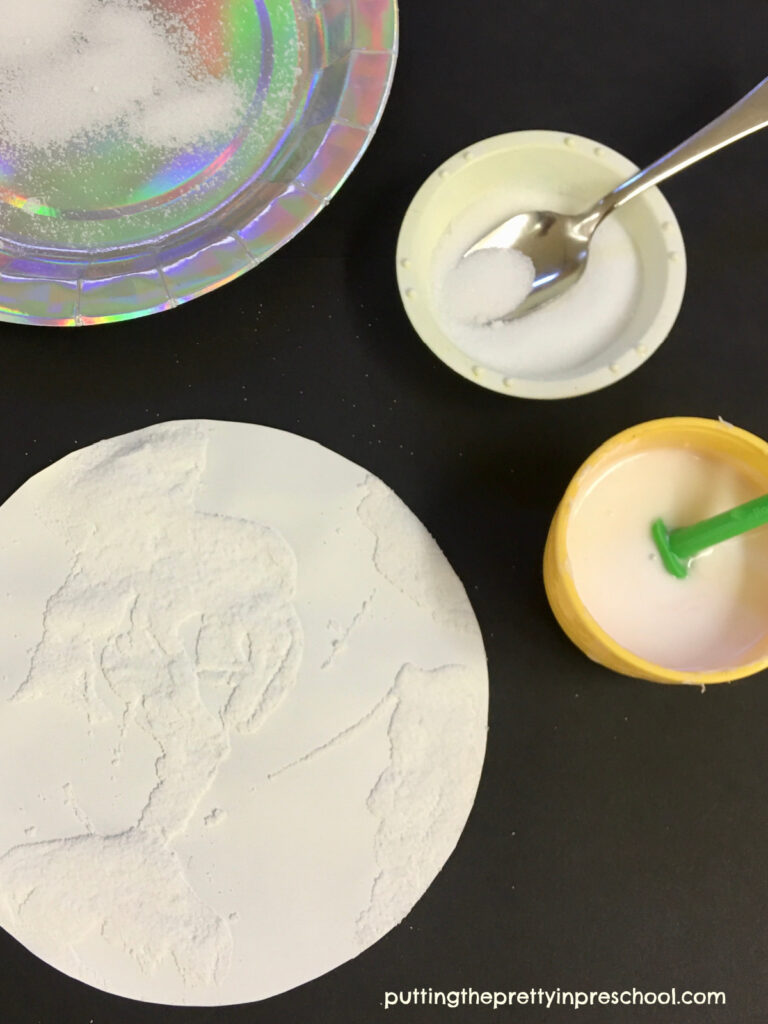
Dip the glue paddle into the white adhesive and spread it on the circle in shapes of land forms.

_______

Using a teaspoon, generously sprinkle salt over areas of the circle that contain glue.

Tip the circle sideways over a disposable plate and shake off excess salt. (The leftover spice can be used for more salt painting planet art projects.)

Let the gluey circle dry overnight.

_______

Day Two:

Cover an art table with a washable table cover.

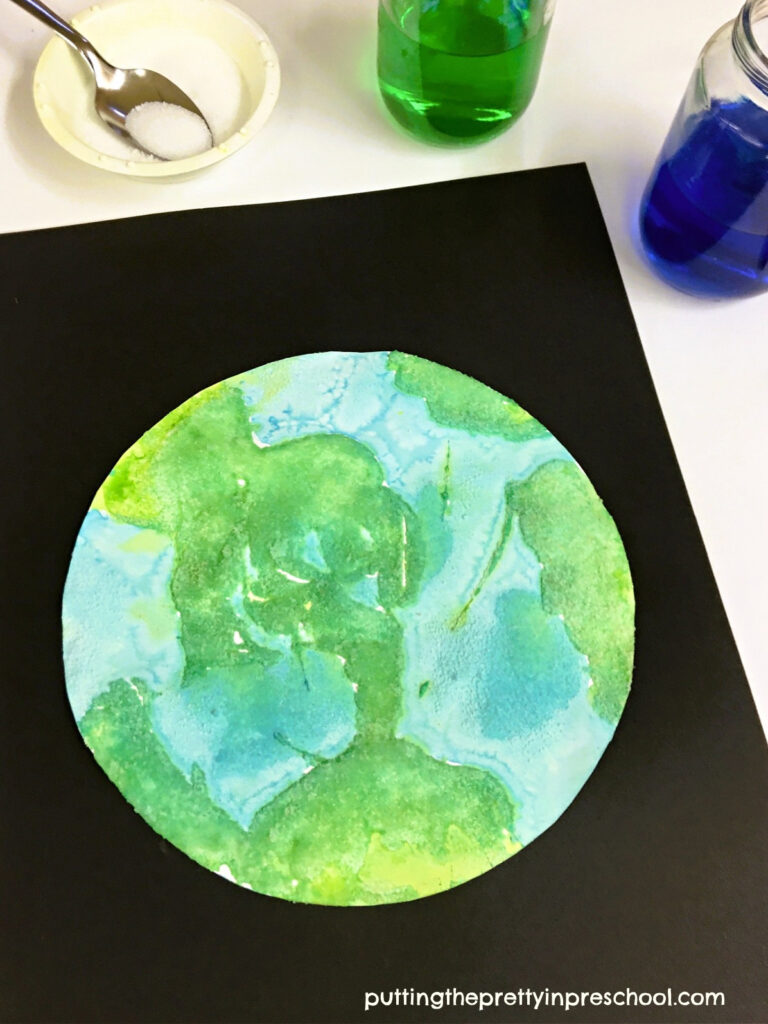
Prepare the watercolor paints: Mix a few drops of blue food coloring into a paint pot containing water and a few drops of green food coloring into a second water-filled pot. Or mix a lighter and darker hue in each color for more variety.

_______

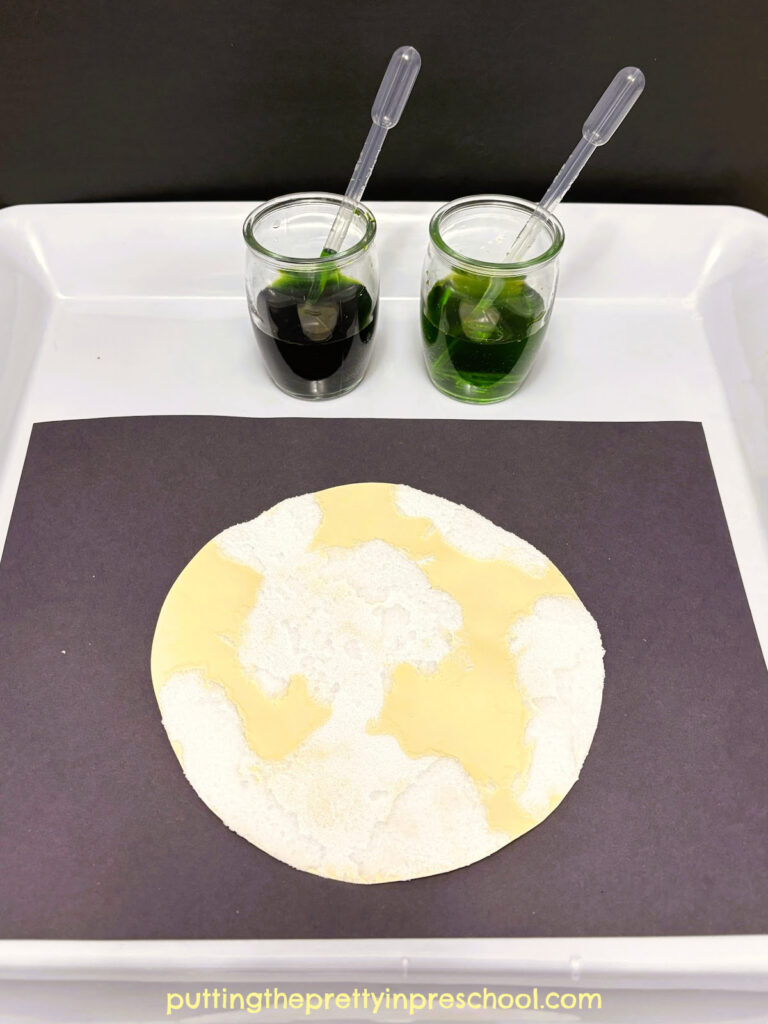
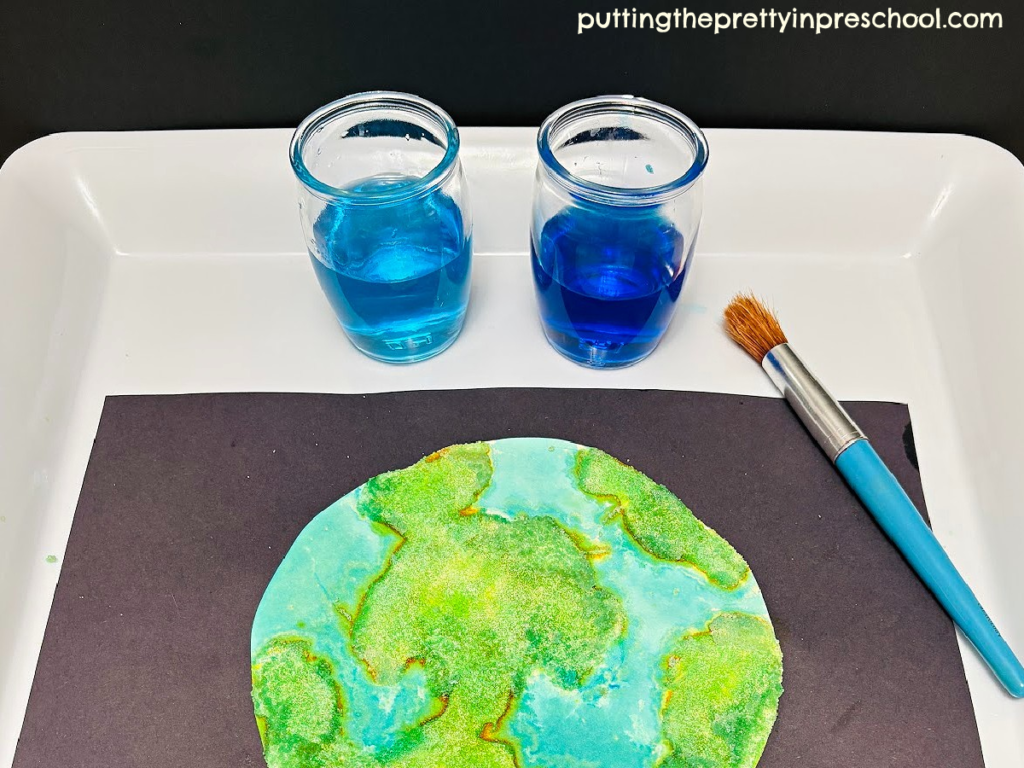
Set the raised salt circle on the art table with two hues of green food coloring. Add an eye dropper or pipette to each pot.

Using the droppers, carefully drip paint onto the salt-covered areas of the circle.

_______

Then, with a paintbrush, carefully brush blue watercolor paint around the raised salt land forms to represent water.

_______

Set the painted art project aside to dry.

The earth art looks stunning adhered with a glue stick or glue gun to a black or dark blue 8 ½ x 11-inch or 9 x 12-inch cardstock or construction paper background. Displayed in a group, this salt painting planet art project looks stunning.

_______

Follow me on Pinterest for more early learning activities.

_______

Salt Painting Jupiter Art

_______

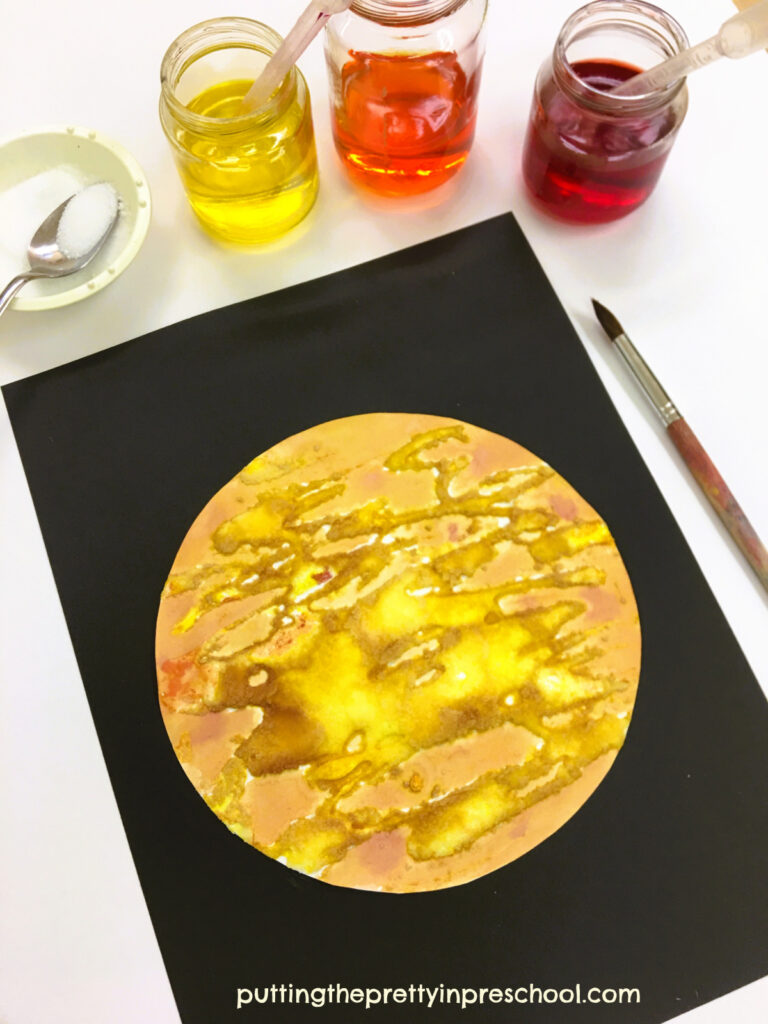
Jupiter also looks amazing in a salt painting planet art activity. To create planet Jupiter with this art technique, spread the glue in a stripy design to show Jupiter’s banded, cloud-covered look. Sprinkle on salt and shake it off next. After the spice-covered glue dries, drip red and yellow food coloring paint onto the raised salt areas. Then, carefully brush orange food coloring paint (or orange liquid watercolor paint diluted with water) between the raised salt areas for contrast.

_______

As with the salt painting planet Earth project, a group of arty Jupiter planets looks stunning when displayed on dark cardstock paper backgrounds.

_______

The salt painting art with an Earth theme is a great activity for Earth Day. Both art projects are welcome additions for a space theme.

Is this post helpful? Which planet would you create with this technique?

_______

[Read more…] about Salt Painting Planet Art

Filed Under: art, crafts, display, Earth Day, science, space Tagged With: earth craft, Earth Day, planets, process art, space

Origami Heart Wreath

February 28, 2025 by Annette Kaminsky Leave a Comment

_______

This origami heart wreath features skin-toned paper-folded hearts with a 3D effect. Make this exquisite wreath craft during Black History Month or save it for a Celebrate Diversity theme. Changing the color scheme makes it a standout Valentine’s Day craft.

_______

Origami Heart Wreath Supplies

_______

Gather the following supplies for this meaningful easy-to-make paper craft:

  • 6-inch x 6-inch origami paper in skin tones
  • 9-inch thin paper plate
  • 1 ½ inch wide wired craft ribbon
  • scissors
  • glue gun

_______

Making the Origami Heart Wreath

To create this heart wreath craft cut the middle out of a thin cardboard paper plate. This leaves a rim of about 1 ¾ inch wide.

_______

Next, gather 8 sheets of 6-inch x 6-inch origami paper in various skin-toned hues and fold the paper into origami hearts. An easy-to-follow YouTube video by EZOrigami shows how to make paper hearts.

Origami Heart (Folding Instructions)

_______

Afterward, adhere the hearts on the paper plate rim with a glue gun, leaving a little room on the bottom for a bow.

Finally, fold the wired craft ribbon into a bow and hot glue it on the wreath. 1 ½ inch wide craft ribbon with an animal print is showy and works nicely with the skin-toned hearts.

_______

Follow me on Pinterest for more early learning activities.

_______

Related: Origami Heart Valentines

_______

[Read more…] about Origami Heart Wreath

Filed Under: art, Black History Month, character, crafts, preschool, Valentine's Day Tagged With: Black History Month, hearts, paper crafts, wreaths

Black History Month Mixed Media Art

February 26, 2025 by Annette Kaminsky Leave a Comment

_______

Black History Month is observed in February in the United States and Canada. It is a time to celebrate the creativity and achievements of Black people and their communities by participating in activities and discussions. This Black History Month mixed media art project draws attention to the beauty of black women’s hair. The craft features a unique technique for creating curly hair.

_______

Supplies To Collect

For this mixed media art project that pays homage to Black History Month, gather the following:

  • black yarn
  • brown, orange, and green construction paper
  • 14-inch x 16-inch sheet of white construction paper
  • 1 ½ inch wide wired craft ribbon
  • white glue
  • black fine point marker
  • parchment paper
  • scissors and pencil
  • glue stick and glue gun
  • disposable plate
  • measuring cup
  • spoon
  • tray

_______

Starting the Mixed Media Art Project

_______

To begin this art project, draw a side view of a woman’s head on brown construction paper and cut it out.

Next, draw and cut out one ear from the same sheet of paper, and the top of a t-shirt from orange construction paper.

Then draw a few lines on the ear with a black fine-point marker to add detail.

After this step, cut two small triangles from green and orange sturdy paper to fit together as an earring.

Then cut two strips of wired craft ribbon, one measuring 12 inches long, and the other measuring 9 inches long.

Next comes the part that may be the most fun: creating the curly yarn hair. To fashion the hair, complete the following steps:

1) Draw a silhouette outline of the hair in the middle of a large sheet of parchment paper. Then place the parchment paper on a tray.

2) Mix one-half cup of white glue with one-half cup of water on a disposable plate.

3) Using a spoon, press down a long piece of black yarn in the gooey white mixture to completely cover it in glue.

_______

4) Slowly lift the yarn out of the thinned glue and spread it around the hair outline in swirls. Add a second layer of swirled yarn and gently press it down on the first layer so the yarn sticks to itself when dry. Add a few straight lines at the hairline.

5) Let the sculptured yarn hair dry for one or two days. When dry it lifts off the parchment paper easily.
Note: The glue-soaked yarn hair may look grey at first, but will appear black again as it dries.

This swirled yarn art process was a must-try for me after viewing an informative September 4. 2024 Instagram post by mykidsartbox.

_______

Follow me on Pinterest for more early learning ideas.

_______

Assembling the Black History Month Art

Now it is time to assemble the gorgeous art activity. Complete the following steps:

1) Select a large piece of sturdy paper to glue all the arty shapes onto. I feature paper cut to a 14-inch x 16-inch size.

2) Position the crafted pieces on the background paper and note where they look best. Drawing light pencil lines to mark the perfect spot for each shape makes this easier and the lines can be erased at the end.

_______

3) Use a glue stick to adhere the head, ear, triangular earring, and shirt portion to the paper.

4) Carefully affix the curly hair over and above the face with a glue gun.

_______

5) Fashion two strips of wired craft ribbon into a knotted headband. Cut the ribbon ends to the correct size and fold in the outer edges to fit around the yarn hair above the hairline.

6) Use the glue gun to adhere the headband over and above the bottom edge of the curly hair.

7) Add a caption for Black History Month if desired.

_______

When making the Black History Month mixed media art project, feel free to work with a color scheme of your choice. What do you think of this activity?

_______

Related: Black History Month Hair Decorating Art

_______

[Read more…] about Black History Month Mixed Media Art

Filed Under: art, Black History Month, crafts, preschool, sensory Tagged With: art, Black History Month

Pink Shirt Day Necklace Craft

February 20, 2025 by Annette Kaminsky Leave a Comment

_______

While paging through a small book with elephant facts, I realized that elephants are a glowing symbol of kindness. And since kindness is a theme of Pink Shirt Day, this Pink Shirt Day necklace craft was one of my activities for last year’s annual anti-bullying day.

Pink Shirt Day

Pink Shirt Day is held on the last Wednesday in February every year in many countries. It originated in Canada in 2007 when a boy was teased in school for wearing a pink shirt. In response, two other boys bought a host of pink shirts and gave them to classmates. The rosy t-shirts symbolized anti-bullying, and since then many people have worn pink shirts on Pink Shirt Day. Last year more than 110 countries celebrated the anti-bullying themed day.

Elephants Are Kind

Elephants are a symbol of kindness. They are super smart creatures and seem to have feelings similar to ours. They exchange hugs with their heads and trunks. They spread their ears wide when walking with their young, making sure they shield them from danger. They help other elephants who are sad, sick, or hurt.

_______

Follow me on Pinterest for more early learning ideas.

_______

Supplies to Collect

Along with pink shirts, a pink elephant necklace craft to symbolize kindness makes a great addition to Pink Shirt Day activities. To assemble the simple elephant necklace, collect the following:

  • pink craft foam sheet or cardstock
  • elephant template
  • adhesive gem stickers
  • necklace cord
  • scissors and pencil
  • hole punch

_______

Pink Shirt Day Necklace Craft Directions


_______

To make this kindness craft, start by tracing and cutting an elephant from pink cardstock or a sheet of pink craft foam.

Next, cut off a 26-inch strip (or longer) from the elastic necklace cord.

Then punch a hole in the upper middle of the elephant.

Loop the cord through the hole.

Then decorate the elephant with adhesive sticker gems.

Finally, securely tie the ends of the necklace cord, adjusting the length of the cord if necessary.

_______

Elephant Facts Printable

_______

To complement the kindness elephant necklace craft, here is a free printable to download. At preschool, I sent the handout home with the jewelry craft.

Elephant Facts PrintableDownload

This printable is for individual or one classroom use only.

_______

My preschoolers loved this necklace craft and were eager to wear it. One little boy wore his necklace many days during the remainder of the school year. Will you give this craft a try?

_______

Related: Pink Shirt Day Dramatic Play

_______

[Read more…] about Pink Shirt Day Necklace Craft

Filed Under: animals, character, crafts, preschool, science Tagged With: elephants, jewelry, Pink Shirt Day

Origami Heart Valentines

February 9, 2025 by Annette Kaminsky Leave a Comment

_______

Valentine’s Day is just a few days away! If you need a festive paper craft with plenty of charm, consider having your little charges make origami heart valentines. The simple craft is showcased in two different designs so everyone can experience success.

_______

Supplies To Collect

_______

Gather the following supplies for this Valentine’s Day paper craft:

  • origami paper
  • craft ribbon
  • metallic confetti
  • yarn
  • lace
  • buttons
  • white cardstock
  • markers
  • glue stick
  • white glue or a glue gun

_______

Follow me on Pinterest for more early learning activities.

_______

_______

Making the Origami Hearts

The first thing to do is select paper for this craft. You can use origami paper which comes in a square shape. Or pick out any kind of colored paper and cut off the ends if necessary to make squares.

There are two basic ways to paper fold a square into a heart. The first design is the easiest to create and is the best one for little learners to try. Here is a link to an excellent blog post by green kid crafts with clear instructions for making it.

Easy Origami Heart

This paper folded heart is the bigger of the two. If using a 6-inch x 6-inch paper square, the finished paper heart is 4 inches wide and 3 ½ inches tall.

_______

Once children master the first origami heart, they may wish to try a second method of paper folding a heart. An easy-to-follow YouTube video by EZOrigami shows how to make a beautiful heart with a few more paper folds.

Origami Heart (Folding Instructions)

The finished paper heart is compact and keeps its shape nicely. It is a little smaller than the first design. When using 6-inch x 6-inch origami paper, the heart is 3 inches wide and 2 ½ inches tall.

_______

Decorating the Origami Heart Valentines

_______

Once the origami hearts are completely formed, they are ready to be decorated to become valentines. Craft supply scraps are perfect for decorating since you only need a few bits and baubles to fancy up the hearts.

Use white glue, a glue stick, or a glue gun to

  • fashion string and craft ribbons into bows and adhere them to the hearts.
  • add bits of lace or metallic confetti to the paper folded shapes.
  • add paper-punched shapes or buttons to the crafted hearts.
  • use markers to write messages and adhere them to the hearts.

______

The decorated origami hearts make sweet valentines, but can also be used in garlands and mobiles. And they make pretty bookmarks or gift toppers.

_______

_______

More Valentine’s Day Crafts

Woolly Sheep Valentine’s Day Craft

Dinosaur Valentine Craft

Heart Doily Gnome Valentines

Ladybug Wand Craft

Valentine’s Day Owl Craft

_______

[Read more…] about Origami Heart Valentines

Filed Under: art, crafts, preschool, Valentine's Day Tagged With: hearts, origami, paper crafts, Valentine's Day

Paper Chain Snake Craft

January 29, 2025 by Annette Kaminsky Leave a Comment

_______

This paper chain snake craft is a perfect hands-on creative activity. It helps young children develop fine motor skills, recognize colors, practice measurement, and make patterns. The activity suits a reptile, jungle, or Chinese New Year “Year of the Snake” theme.

_______

Supplies To Collect

Gather the following basic supplies you probably already have on hand to make this slithery chain-link friend:

  • light cardstock paper
  • ruler and pencil
  • wiggly eyes
  • scissors
  • tape
  • glue stick
  • glue gun

_______

Follow me on Pinterest for more early learning ideas.

_______

Steps to Make a Paper Chain Snake Craft

_______

To start making a paper chain snake select a sturdy paper in two or more colors. Construction paper or light cardstock is a good choice because it isn’t too heavy to curve into a loop and holds up well for display.

_______

Next, cut the paper into strips. To make the strips the same-sized width and length, use a pencil and ruler to draw light lines on the paper first. My strips are about 1 ¼ inch wide and 8 ½ inches long. You can make yours shorter and thinner or longer and wider depending on how big you would like the snake to be.

Afterward, form a loop with one paper strip and tape or glue the ends together.

Then add the next link by threading a paper strip through the first loop. Form it into a loop and tape or glue the ends together.

Keep adding paper strips in the same way to make the chain the desired snake body length.

Then draw and cut out a snake head and tail from cardstock. Fold both pieces in half leaving a little section in the middle.

_______

Afterward, draw a forked tongue on a contrasting color of cardstock and glue it to the bottom of the snake head.

Then glue two wiggly eyes to the head.

Finally, use a glue gun to affix the head to one end of the paper chain snake body and tail to the other.

_______

Inspired By Chinese Culture

The paper chain snakes in this blog post are inspired by colors spotted in Chinese festivals and artwork. Turquoise, orange, and yellow are hues seen in lion dance performances.

Blue and white color schemes are popular in Chinese ceramics, with flower motifs being common. So as a finishing touch, this next snake is embellished with paper-punched flowers.

________

Red and white decorations are feature colors in Chinese New Year celebrations. Red symbolizes celebration and white provides a nice contrast. White paper flowers enhance the snake below too.

_______

This Chinese New Year signifies “The Year of the Snake“, and the snake craft fits in well with the theme.

_______

Benefits of The Paper Chain Snake Craft

This slithery snake craft has many benefits for young children. It helps them

  • develop fine motor control and finger muscle strength as they tape or glue paper strips into loops.
  • recognize colors and make patterns.
  • observe and/or help use a glue gun.

The snakes can be measured with a string or a long ruler. They make great pretend pets for little learners.

_______

_______

More Activities With Snakes

Chinese New Year Chickpea-based Bin

Black Playdough Snakes

Reptile Theme Activities

Reptile Egg Science

String Painting Snake Art

_______

_______

You may also like:

Unicorn Playdough Tray

Set up this magical unicorn playdough tray early learners will love. The best homemade playdough recipes are featured.

_______

Teacup and Peony Sensory Tray

This beautiful teacup and peony sensory tray allows for practice with scissors skills and eye-hand coordination. Peony facts are included.

_______

Don’t forget to share this post on Pinterest or your favorite social media channel. Sharing is caring!

_______

© Annette Kaminsky January 29, 2025

_______

Filed Under: art, Chinese New Year, crafts, Math, preschool, reptiles Tagged With: color, Lunar New Year, paper crafts, snakes

Gnome Christmas Stocking Craft

December 23, 2024 by Annette Kaminsky Leave a Comment

_______

It’s all about the beard in this cozy gnome Christmas stocking craft. It is so easy to make and super cute to display. Make one (or two or three) to include in your holiday decorating scheme.

Gnomes are lovable, little mythical creatures with large noses and pointed hats. They are super popular in home décor. I love seeing them displayed in stores when I’m out and about around town. Tailored for every holiday season, they come in all sorts of colors and designs. The cheeky, whimsical characters provide endless inspiration for simple crafts to make.

_______

Supplies To Collect

Gather the following supplies for this charming gnome craft:

  • construction or cardstock paper
  • thick yarn
  • thin ribbon
  • large pom pom
  • craft punches
  • double-sided tape
  • scissors and pencil
  • glue stick and glue gun

_______

_______

Follow me on Pinterest for more early learning ideas.

_______

The Gnome Christmas Stocking Craft

To make this gnome Christmas stocking craft, start by picking out two complementary colors of cardstock or construction paper.

Next, draw on and cut out a Christmas stocking from an 8 ½ inch x 11-inch sheet of construction paper.
Then draw and cut out a cuff from paper in a coordinating color.

_______

Afterward, line the top of the paper stocking with double-sided tape, adding more small pieces to the center.

Next, select white or cream-colored yarn and loop it on the stocking, pressing the yarn onto the double-sided tape. Thick, fluffy yarn works well for this craft.

Then stick on a large light brown pom pom nose.

Secure the cuff to the top of the stocking with hot glue, and add a small loop to one of the upper edges for hanging.

Finally, glue on one or more foam or paper-punched holiday shapes to give the stocking extra flair.

_______

Once you’ve crafted one cozy character, you just might want to make more! This gnome Christmas stocking craft would make a fun family or classroom activity with everyone designing their own. The festive yarn and paper gnomes would display beautifully on a garland.

_______

Related:
Heart Doily Gnome Valentines
St. Patrick’s Day Gnome Craft

_______

More Christmas Arts and Crafts

Click on the pictures below for more Christmas art and crafts ideas.

Washi Tape Christmas Pots
Sparkly Painted Christmas Trees
Christmas Sweater Sheep Craft
Octopus Bell Christmas Craft
Paper Bag Christmas Ornaments
Paper Airplane Christmas Craft
Christmas Turtle Craft
Elegant Angel Christmas Craft
Squish Painted Christmas Dove
Pretty Angel Christmas Craft
Christmas CD Craft
Monochromatic Christmas Trees

_______

[Read more…] about Gnome Christmas Stocking Craft

Filed Under: art, Christmas, crafts, preschool Tagged With: gnomes, paper crafts

Paper Bag Grinch Craft

December 22, 2024 by Annette Kaminsky Leave a Comment

_______

This cute and colorful paper bag Grinch craft doubles up as an aromatic Christmas present to give to someone special over the holiday season.

It’s tradition for me to visit a nearby greenhouse during the holiday season to view the beautifully decorated Christmas trees. The trees all have gorgeous, coordinated decorations that complement each other in color and theme. The decorations are the inspiration for crafts to make. At the end of my visit, I pick out a lemon cypress plant to take home and often select other items to purchase.
.
Lemon cypress plants look like miniature Christmas trees and are often decorated with tiny ornaments as a space-saving holiday sensory activity. They have light green feathery foliage that grows in a cone shape. When the leaves are rubbed or crushed, they smell like lemon. The tip of the lemon grass plant reminds me of the tuft of hair on Dr. Seuss’s storybook character “The Grinch.” That’s why they are paired in this paper bag craft and gift.

_______

Supplies To Collect

Collect the following supplies for this Grinchy green and yellow craft:

  • lemon cypress plant
  • paper lunch bags
  • green and yellow tempera paint
  • paint pot and brush
  • yellow and black construction paper
  • red and black markers
  • scissors and pencil
  • glue stick and tape
  • yarn and single hole punch
  • waterproof tablecloth

_______

Follow me on Pinterest for more early learning ideas.

_______

The Paper Bag Grinch Craft


To make this paper bag Grinch craft, start by pouring light green or neon green tempera paint into a paint pot.

_______

Next, set out the paint, paintbrush, and a paper bag on a table covered with a waterproof tablecloth.
Paint one side of the bag and let it dry. Paint the other three sides, allowing the paint to dry on each side before continuing. The drying process may take a few hours.

Note: An alternative is to stand the bag on the art table and place a few sheets of crumpled scrap paper inside. Paint a thin layer of tempera all over the bag and let it dry. Then remove the inserted paper.

When the painted lunch bag is dry, fold it into its original shape.

Then cut two large almond-shaped eyes from yellow construction paper and line the outside edges with a black marker.

Cut small circles from black sturdy paper and glue them to the yellow eyes.

Afterward, thoroughly add glue to the back of the crafted eyes with a glue stick, and affix the peepers to the bag in a slanted position.

_______

Next, use the black marker to draw a small nose and a deep curved mouth on the bag.

Then draw eyelashes around the eyes and give the paper bag face slanted eyebrows.

Cut a small rectangle from yellow construction paper and write the words “Merry Grinchmas” on it with a red marker.

Next, punch a hole in the edge of the paper greeting and tie on a section of yarn.

Finally, tape the yarn inside the tip of the bag and carefully set in a small potted lemon cypress plant.

_______

Variation of the Paper Bag Grinch Craft

_______

To simplify this festive craft, use a bright green crayon to color the bag instead of painting it. The green hue will not be as bright as the painted version but the craft will be just as delightful.

_______

This lemon cypress plant-filled paper bag Grinch craft would make a cute gift from a child to a parent or grandparent. Who will you give your Grinch craft to?

Merry Grinchmas!!!

More Christmas Art and Crafts

Click on the pictures below for more Christmas art and craft projects.

Washi Tape Christmas Pots
Sparkly Painted Christmas Trees
Christmas Sweater Sheep Craft
Octopus Bell Christmas Craft
Paper Bag Christmas Ornaments
Paper Airplane Christmas Craft
Christmas Turtle Craft
Elegant Angel Christmas Craft
Squish Painted Christmas Dove
Pretty Angel Christmas Craft
Christmas CD Craft
Monochromatic Christmas Trees

_______

[Read more…] about Paper Bag Grinch Craft

Filed Under: art, book theme, Christmas, crafts, preschool, science, sensory Tagged With: Christmas craft, Christmas tree, Dr. Seuss, gardening, paper bag crafts

Paint Chip Christmas Card

December 20, 2024 by Annette Kaminsky Leave a Comment

_______

Paint chips, available at hardware stores, come in a glorious array of colors and shades with equally splendid names. The rows and rows of paint color samples offer many choices for painting walls and other items. Teachers love to use recycled or donated paint chips for educational purposes such as sorting and matching activities. Creators love them for craft projects. The many-hued paint color samples add beauty to any activity or project and look pretty in this paint chip Christmas card with a tree theme.

Artificial Christmas trees also come in a huge array of colors. In addition to traditional green, you can now purchase a tree in your favorite color. Many come pre-lighted and ready for ornaments to be strung…so easy! This festive homemade card features paint chip swatches in five colors.

_______

Supplies To Collect

Gather the following supplies for this simple handmade Christmas card:

  • 8 ½ x 11-inch white cardstock
  • donated or recycled paint chips
  • adhesive gemstone stickers
  • pencil and scissors
  • marker
  • glue stick

_______

Follow me on Pinterest for more early learning ideas.

_______

_______

Making the Paint Chip Christmas Card

To make this tree-themed Christmas card, fold an 8 ½ x 11-inch piece of cardstock in half. I chose a creamy white color for the cardstock as I like it better than pure white.

_______

Next, draw and cut out a Christmas tree from cardstock to be your tracer. The tree should be slightly smaller than your paint chip samples. A cardstock scrap works fine for this.

Then pick out five donated or recycled paint chips in varied colors for the trees. This is the most fun!

Using the tracer as a guide, trace and cut out small trees from the paint color cards.

Afterward, arrange the tree cutouts on the front of the folded white cardstock sheet, and glue them on using the glue stick. Leave a little space to add a holiday message such as “Merry Christmas” or “Happy Holidays.”

_______

As a finishing touch pick one tree to add adhesive gemstone stickers to. I had silver gemstone stickers handy, so they were my choice for the dose of glam.

Pen a greeting inside the tree-themed paint chip Christmas card and it is ready to give to someone special during the festive holiday season.

_______

More Christmas Tree Activities

Color Explosion Science Experiment

Build A Christmas Tree Steam Activity

Christmas Tree Decorating Center

Candy Cane Tree Experiment

_______

More Christmas Art and Crafts Activities

Click on the pictures below to access more Christmas art and crafts activities.

Washi Tape Christmas Pots
Sparkly Painted Christmas Trees
Christmas Sweater Sheep Craft
Octopus Bell Christmas Craft
Paper Bag Christmas Ornaments
Paper Airplane Christmas Craft
Christmas Turtle Craft
Elegant Angel Christmas Craft
Squish Painted Christmas Dove
Pretty Angel Christmas Craft
Christmas CD Craft
Monochromatic Christmas Trees

_______

[Read more…] about Paint Chip Christmas Card

Filed Under: Christmas, crafts, preschool, trees, winter Tagged With: paper crafts, tree art

Remembrance Day Butterfly Art

November 6, 2024 by Annette Kaminsky Leave a Comment

_______

Remembrance Day is celebrated each year on November 11 in many countries. It is a day to remember the end of World War I and the many soldiers who died in battle. In Canada, it is also a day to recognize and appreciate the people who serve in the army today.

_______

The Red Poppy and Remembrance Day

Wearing a red poppy has become a tradition on Remembrance Day, and the days leading up to it. After noticing the abundance of red poppies that sprouted up among the graves of fallen soldiers when World War I ended, a Canadian doctor wrote the now-famous poem “In Flanders Field”. Not long afterward, a United States teacher named Moina Michael wrote a poem called “We Shall Keep the Faith” in response and decided to wear a red poppy to remember the soldiers who served in the war. Noting that returning disabled soldiers had trouble caring for themselves, she started selling red poppies to raise money for their needs. The poppy flower soon became a symbol of the service of past and present soldiers.

_______

Since butterflies are seen as a symbol for inspiring good deeds, they go together well with poppies in a Remembrance Day butterfly art project.

_______

Follow me on Pinterest for more activities.

_______

Remembrance Day Butterfly Art Supplies

_______

Gather the following supplies for this meaningful art activity:

  • 8 ½ x 11-inch cardstock paper
  • dot markers
  • pencil and scissors
  • pipe cleaners
  • pony beads
  • pom poms
  • artificial red poppies
  • white glue or glue gun

_______

Follow me on Pinterest for more early learning ideas.

_______

Remembrance Day Butterfly Art Project

This creative project is a simpler version of squish-painted poppy-enhanced Remembrance Day butterflies featured a few years ago.

For the remembrance art project, start by tracing and cutting out large butterflies from 8 ½  x 11-inch white or cream-colored cardstock paper. Manila tag cardstock works well for this activity and is economical to buy.

_______

Set the paper butterflies on a table with red, orange, and black dot markers and invite participants to decorate their winged creatures. Using a black dot marker for finishing touches is recommended so that the red and orange colors remain dominant in the designs.

Tip: Dot marker designs dry quickly, which is one thing I love about them. If the decorated butterflies curl a little after drying, allow time to flatten them under a stack of books or a heavy object.

Afterward, invite everyone to string black pony beads onto same-colored pipe cleaners. When the pipe cleaners are folded in half, there should be enough strung beads to cover the abdomen and head of the dot-marked butterflies.

_______

After participants finish beading their pipe cleaner, have them fold it in half and twist the unbeaded ends together to create two antennae.

Glue a pom pom to each pipe cleaner antenna with white glue or a glue gun, and then affix the beaded pieces to the middles of the butterflies.

Finally, glue an artificial red poppy with the pin removed onto each dotted insect.

Note: Older participants can independently glue on the beaded pipe cleaners, pom poms, and poppies.

_______

This Remembrance Day butterfly art project is simple but striking and is bound to be appreciated.  Having the opportunity to include beads is a highlight of the activity.

_______

[Read more…] about Remembrance Day Butterfly Art

Filed Under: art, crafts, preschool, Remembrance Day Tagged With: butterflies, poppies, Remembrance Day

  • Page 1
  • Page 2
  • Page 3
  • Interim pages omitted …
  • Page 6
  • Go to Next Page »

Primary Sidebar

Hi, I'm Annette Kaminsky. I am a preschool teacher who loves to share easy and fun early learning activities. Thanks for visiting my blog. Feel free to stay awhile!

Subscribe Via Email

Recent Posts

  • Salt and Ice Science Experiment May 20, 2025
  • Airplane Rice Sensory Bin May 16, 2025
  • Salt Painting Planet Art May 3, 2025
  • Spring Bunny Sensory Bin April 19, 2025
  • Tin Foil Egg Printing April 17, 2025
  • Lentil Easter Bunny Sensory Bin April 15, 2025
  • Unicorn Store Dramatic Play Center March 25, 2025
  • Easter Store Dramatic Play Center March 23, 2025
  • Origami Heart Wreath February 28, 2025
  • Black History Month Mixed Media Art February 26, 2025

Categories

Topics

block play bunnies butterflies Chinese New Year Christmas Christmas craft color colors dramatic play Easter flowers hearts holiday jewelry leaves leprechauns light table loose parts painting paper crafts playdough pretend play printables printmaking process art pumpkins rice bin scented playdough science experiment scissor skills sensory bin sensory play sensory tray shamrocks skeletons snakes snowflakes spiders spring St. Patrick's Day sunflowers tablescapes trees Valentine's Day water play

Copyright © 2025 · Lifestyle Pro on Genesis Framework · WordPress · Log in