• Skip to secondary menu
  • Skip to main content
  • Skip to primary sidebar

Putting The Pretty In Preschool

Finding Beauty In Everyday Early Childhood Experiences

  • Home
  • About Me
  • Winter
  • Chinese New Year
  • Blog
  • Contact Me
  • Black History Month
  • SHOP
  • Valentine’s Day

Christmas

Washi Tape Christmas Pots

December 18, 2021 by Annette Kaminsky Leave a Comment

Tweet
Share
Share
Pin
Make these washi tape Christmas pots filled with festive pine cone Christmas trees.

_______

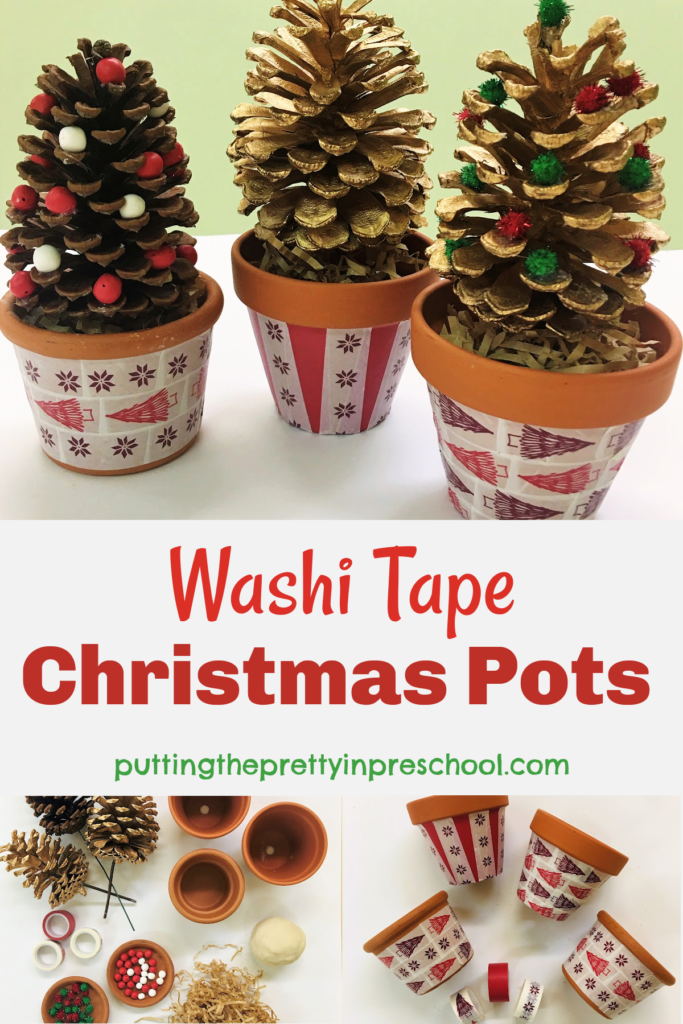
A few years ago, I purchased Christmas-themed washi tape, not yet knowing how I would use it. Craft ideas came and went, but the tape remained unused due to my busy schedule. After seeing a decorative pot in a home décor shop this past summer, I knew exactly how I would use the festive tape…in crafting washi tape Christmas pots!

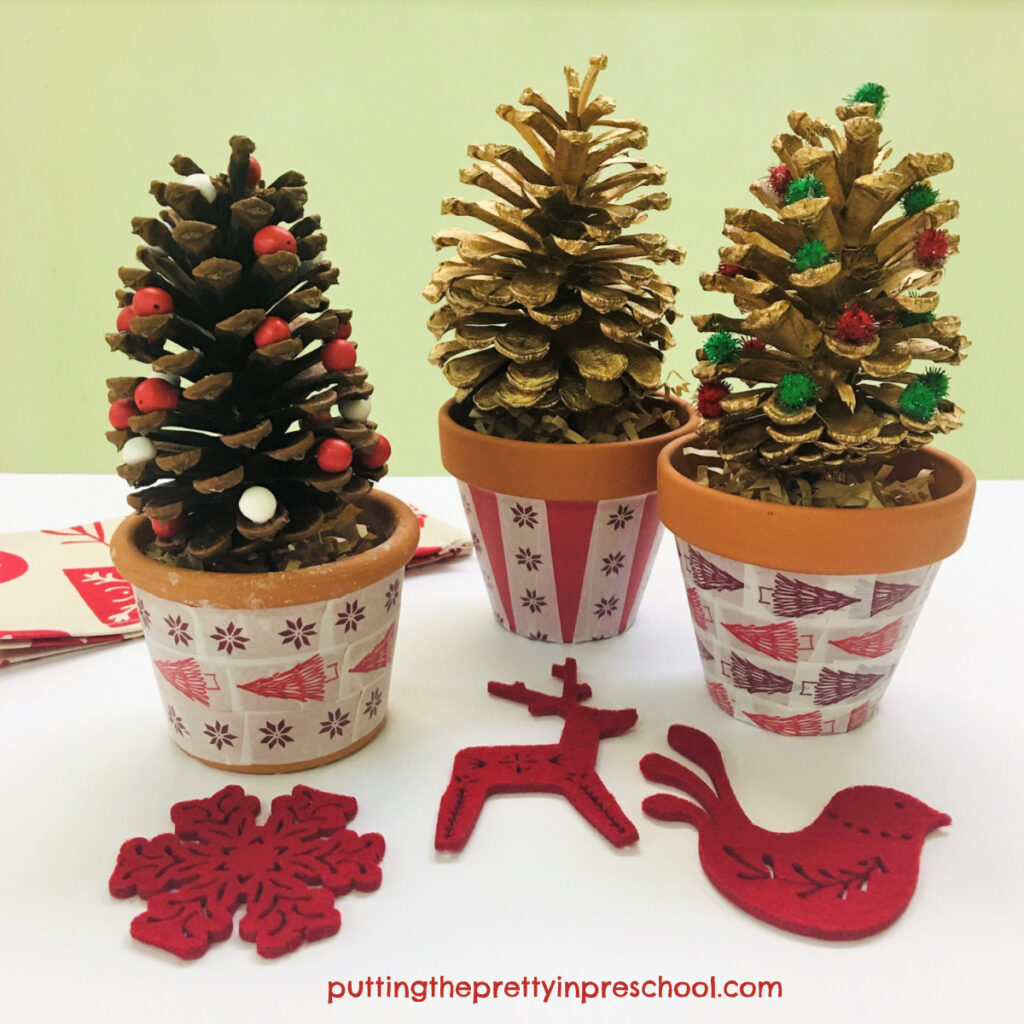
With the addition of pine cone Christmas trees, the embellished pots display well on a shelf or fireplace mantle during the holiday season. And the craft is suitable for all ages, so why not get the whole family to make one!

_______

Christmas Pot Supplies To Collect

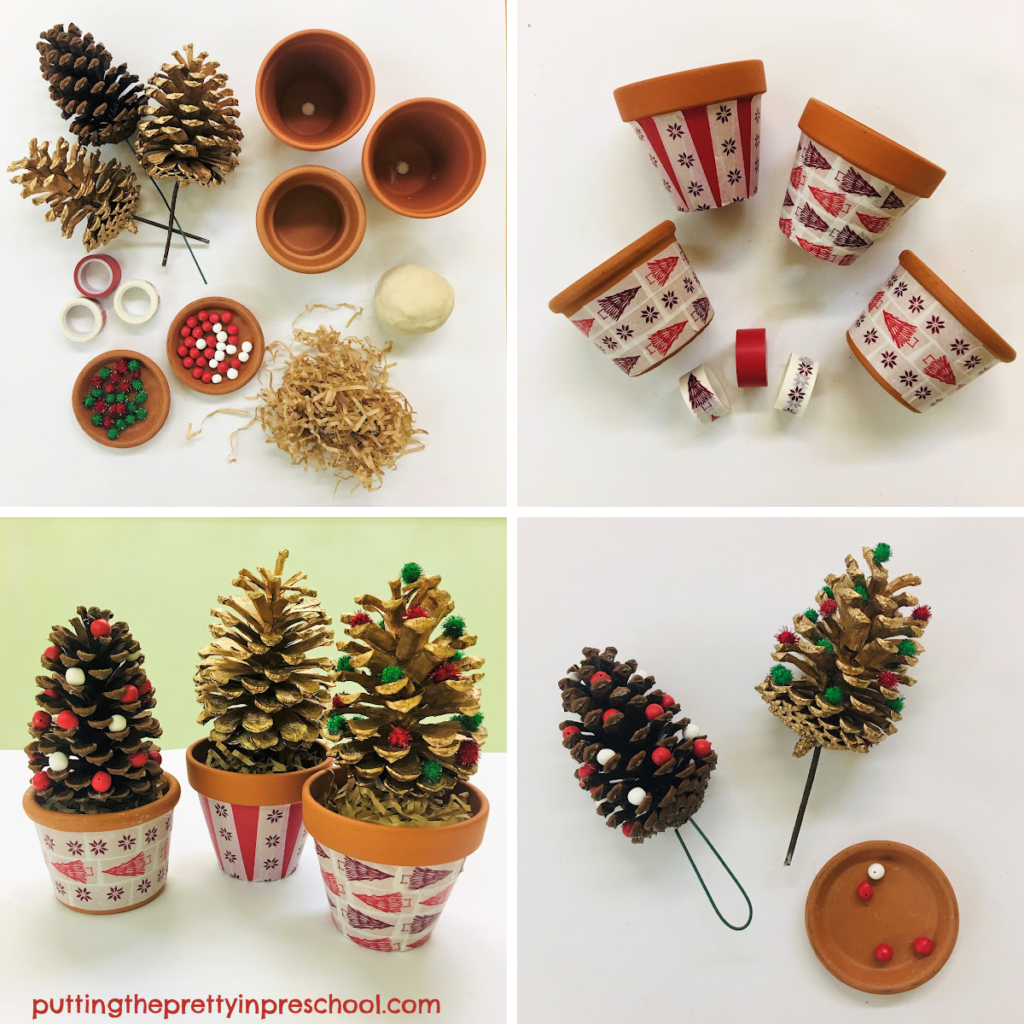
Gather the following supplies for this craft:

  • Christmas-themed washi tape
  • three-inch terracotta clay pots
  • scissors
  • large pine cone picks
  • glitter pom poms
  • small round beads
  • playdough
  • brown shredded paper
  • wire cutters
  • white glue or hot glue gun
  • glue paddles

_______

Creating the Washi Tape Christmas Pots

Steps to making washi tape Christmas-themed pots.

_______

Cut washi tape into small pieces. Stick the tape around each pot horizontally in rows. Or layer the washi tape vertically in a pattern.

Then decorated pine cone “Christmas trees” can be added to the pots:

Use wire cutters to snip the wire on each pine cone to a length that fits into the pot size of choice.

Add a ball of playdough to each pot, and stick in a pine cone pick. Then fill the pots with brown shredded paper.

Next, adhere the beads and pom poms to the pine cone trees with white glue or a hot glue gun.

Easy to make Christmas-themed washi tape pots.

_______

I feature two super-sized metallic gold pine cone picks, and a natural one. One of the gold pine cones is decorated with tiny red, green, and white beads, and the other is left as is. The natural pine cone is decorated with small glitter pom poms.

Little learners will enjoy getting in on decorating the pine cones and Christmas pots. They will especially love the chance to use tape in a craft project.

Craft these festive washi tape pots with a Christmas theme.

_______

[Read more…] about Washi Tape Christmas Pots
Tweet
Share
Share
Pin

Filed Under: Christmas, crafts, preschool Tagged With: Christmas craft

Turtle Christmas Craft

December 18, 2021 by Annette Kaminsky Leave a Comment

Tweet
Share
Share
Pin
Adorable turtle Christmas paper craft inspired by the delightful picture book "Mossy" by author Jan Brett.

_______

This cheeky turtle Christmas craft is inspired by Jan Brett’s beautiful picture book titled “Mossy.” The colorful papercraft is easy to make, especially if you download the free printables below.

In the story, an eastern box turtle named Mossy is scooped up from a pond area and taken to a museum by biologist Dr. Carolina. Mossy is unique…she has a lush garden of moss and flowers growing on her shell due to the moist home she grew up in. At the museum, Mossy is given an impressive glass-encased place to live, and her carapace garden continues to grow. Many visitors come to view Mossy, and she makes the museum famous. But over time, Mossy grows very sad. She misses her pond home, and especially her new friend Scoot, who she had just met before being captured. Dr. Carolina’s niece Tory notices how sad Mossy gets. Eventually, a portrait of Mossy in her pond environment is made for the museum, and the garden-decorated turtle is released back to the same place where she was found.

Jan Brett’s artwork in the picture book is as exquisite as usual. And the illustrated borders on pages feature creatures and artifacts commonly found in museums, such as flowers, insects, butterflies, fossils, tree parts, algae, geodes, and feathers.

_______

Craft Supplies To Collect

Supplies to make a festive turtle Christmas paper craft inspired by the delightful picture book "Mossy" by author Jan Brett.

_______

Gather the following supplies for this festive turtle craft:

  • green, red, and pink cardstock paper in different shades
  • cream cardstock
  • mini self-adhesive gold pearls
  • glue stick
  • wiggly eye
  • felt pen
  • scissors

_______

Making The Turtle Christmas Craft

Festive turtle Christmas paper craft inspired by the delightful picture book "Mossy" by author Jan Brett.

_______

Cut Christmas-themed flowers and leaves from sturdy paper. Fade-resistant cardstock or construction paper is preferable, but any paper will work fine.

Cut a turtle from cream-colored cardstock.

Invite your little learner to paste flowers and leaves to the shell of the turtle using a glue stick. Mini adhesive gold pearls can be added to some of the flowers.

Download these patterns to use for the craft.

Turtle template for art and craft activities.
Turtle Template

_______

Turtle Craft PrintableDownload

This printable is for individual or one classroom use only.

_______

Use this Christmas flower template for paper crafting.
Christmas Flower Template

_______

Christmas Flower PrintableDownload

This printable is for individual or one classroom use only.

_______

Make this festive turtle Christmas paper craft inspired by the delightful picture book "Mossy" by author Jan Brett.

_______

Turtle Craft Extensions

Jenn Brett’s website is filled with activities and coloring sheets to go along with her picture books. A turtle pond coloring page goes with the book “Mossy,” and can be downloaded at janbrett.com.

_______

Related: Painted Turtle Art Activity

_______

[Read more…] about Turtle Christmas Craft
Tweet
Share
Share
Pin

Filed Under: art, book theme, Christmas, crafts, preschool, reptiles Tagged With: Christmas craft, paper crafts, picture books, turtles

Easy S’Mores Bars

November 28, 2021 by Annette Kaminsky Leave a Comment

Tweet
Share
Share
Pin
Easy s'mores bars to make indoors year-round for family and friends. Just three ingredients are needed for this gooey, melty dessert

_______

This easy s’mores bars recipe comes from having forgotten to add wrapped round chocolates to October treat bags. Orange and purple don’t naturally transition into November activities, so I decided to use the chocolates in this melty dessert.

To add versatility to the recipe, I also feature chocolate coins and chocolates wrapped in Christmas style.

S’mores bars were originally classic campfire treats. Made indoors they can be enjoyed year-round. And little learners love to help make them!

_______

S’mores Bars Supplies To Collect

Just three ingredients are needed for this melty, tasty, indoor s'mores bars recipe.

_______

Gather the following ingredients and baking supplies:

  • toasted coconut marshmallows
  • coin-shaped chocolates
  • graham wafers or gluten-free crackers
  • parchment or wax paper
  • 2 cookie sheet pans

_______

Making These Easy S’Mores Bars

Steps to make an easy sheet pan s'mores dessert recipe.

_______

Preheat an oven to 350 degrees.

Spread the graham wafers onto two sheet pans lined with parchment or wax paper.

Place a toasted coconut marshmallow on top of each wafer on one pan. Set unwrapped chocolates on the wafers on the other pan.

Heat both pans in the oven for three to five minutes. Watch carefully as the square halves can easily be overbaked.

Sandwich wafers with chocolate together with marshmallow wafers and place on a dessert plate. Serve when slightly cooled.

Delicious s'mores bars recipe using just three ingredients.

_______

Stacked s'mores bars made with an easy, three-ingredient recipe.

_______

Variations Of This S’Mores Bars Recipe

My recipe features gluten-free graham crackers. Graham wafers are a traditional choice.

Regular or mini marshmallows can be substituted for toasted coconut ones.

Creamy Hershey’s chocolate bar squares can be used instead of wrapped chocolates. And why not experiment with one of Hershey’s festive flavors, such as “Strawberries ‘n’ Cream, “Birthday Cake”, or “Cookies ‘n’ Mint.”

_______

Seasonal Recipes

If you wish to go seasonal and are up for a bit more challenge, try one of these ingenious s’mores bars recipes:

Fall S’mores (Recipe at southernfatty.com)

Christmas S’mores (Recipe at darcyandbrian.com)

Snowman S’mores (Recipe at kitchenfunwithmythreesons.com)

Valentine’s Day S’mores (Recipe at prettyinpistachio.com)

Easter Peeps S’mores (Recipe at domesticsuperhero.com)

_______

Or surround this gooey, three-ingredient s’mores bars dessert with seasonal décor.

Make this easy, three-ingredient s'mores bars recipe that takes a classic campfire treat indoors. Serve surrounded by festive decor at Christmas time.

_______

[Read more…] about Easy S’Mores Bars
Tweet
Share
Share
Pin

Filed Under: autumn, camping, Christmas, desserts, party, preschool Tagged With: baking, camping, Christmas, desserts, s'mores

Color Explosion Science Experiment

January 1, 2021 by Annette Kaminsky Leave a Comment

Tweet
Share
Share
Pin
A simple color explosion science experiment with dramatic results. Just three kitchen supplies are needed to carry out this experiment.

_______

This dramatic color explosion science experiment is one of the simplest ones you will find. It uses ingredients you probably have in your home, is easy to set up, and shows stunning, instant results.

_______

Supplies To Collect

  • serving tray
  • milk
  • food coloring (1 – 4 colors)
  • liquid dish soap
Kitchen supplies to carry out the color explosion milk experiment.

_______

Conducting The Experiment

Pour a thin layer of milk into a serving tray placed on a table. I use an inexpensive 12-inch x 12-inch tree-shaped vegetable tray to add interest to the experiment. About three cups of milk will provide a nice layer in a serving tray this size.

Squeeze drops of food coloring in different parts of the tray. Use one, two, three, or even four colors. Primary colors work well.

Squirt a little dish soap in a few color pools.

_______

Pools of food coloring in the color explosion milk experiment.

_______

The food coloring immediately explodes to the tray edges, blending and making new colors.

Try adding a bit more food coloring, and one more squirt of dish soap. I add a little more blue, red, and yellow to the bottom right section because most of the color has moved to other areas of the tray. I squirt a tad more soap on top. There isn’t a noticeable change right away. In fact, after the initial color burst, nothing much seems to happen.

A second dose of food coloring and dish detergent are added in this color explosion milk experiment.

_______

But wait! The experiment doesn’t end here. Leave the tray on the table undisturbed, and check back a few times over the next half-hour. The food coloring slowly moves through the milk and fills the tray.

Each time you look, new color designs are visible on the surface of the milk.

A monster appears in this color explosion milk experiment.

_______

Gradually, the whole tray is color-infused.

Red, blue, yellow, and green colors fill the tray in this color explosion milk experiment.

_______

This color explosion science experiment is perfect for introducing to a group of early learners. At preschool, I like to set it out just before snack time and have students take a second look at what has happened after they are done eating. Then everyone has another look at the tray just before going home.

_______

Related: Pumpkin Color Changing Milk Experiment

_______

Color Explosion Experiment Take Two

In the above demonstration of the science project, I use 2% milk. Below, I show the results of the same experiment done with 1% milk. This time I add drops of color and a squirt of dish soap only once. The food coloring added is generous.

Food coloring pools in the color explosion milk experiment.

_______

In checking back in ten minutes after the initial explosion, the color has moved away from the edge of the tray towards the center.

Bright colors start to spread from the edges of the tray in this color explosion milk experiment.

_______

In twenty minutes the tray looks like this:

Color spreads on the surface of a milk filled tray after dish detergent and fat molecules bond. The food coloring shows the movement of the molecules.

_______

The colors spread further.

Bright colors take over in this color explosion milk experiment.

_______

Finally, they settle in pastel shades.

Pastel colors settle in this color explosion milk experiment.

_______

Tip: Save milk that has expired for this experiment. I successfully use milk five weeks past the expiration day for this second demo.

_______

The Science Behind The Color Explosion Experiment

Although milk is made of mostly water, it also contains fat and protein. These are both sensitive to changes in the milk. When dish soap is added to the tray, it breaks up the surface tension of the milk and is attracted to the fat molecules. The fat molecules try to scurry away but end up bonded with the soap molecules. The movement of the food coloring makes this process visible. As more and more soap and fat molecules bond, the color movement slows down and eventually stops.

Since fat content in milk is super important in this experiment, homo milk works the best. But as seen above, 2% and 1% milk (which I had handy) also show stunning results.

Color-changing experiment using milk, food coloring, and dish detergent.

_______

[Read more…] about Color Explosion Science Experiment
Tweet
Share
Share
Pin

Filed Under: Christmas, preschool, science, sensory, trees Tagged With: colors, experiment, trees

Christmas Tree Decorating Center

December 23, 2020 by Annette Kaminsky Leave a Comment

Tweet
Share
Share
Pin
This festive Christmas tree decorating center for early learners features mini trees and child-friendly, nonbreakable decorations.

_______

This Christmas tree decorating center has been a staple in my preschool classroom for many years. I introduce it every year in place of setting up a large Christmas tree. The center is effortless to put up, and the supplies store in one tub. During the festive holiday season, decorations on the tree get put up and taken down by little learners on a regular basis.

In preparation for this tactile center I purchased a variety of small Christmas trees one year just after Christmas Day. They were deeply discounted…around $5.00 Canadian per tree. Now every December I place them on a table covered with a soft white tablecloth and add child-friendly decorations.

_______

Setting Up The Christmas Tree Decorating Center

After arranging the branches on the Christmas trees, I gather small baskets and fill them with non-breakable Christmas decorations.

Baskets of child-friendly decorations for a Christmas tree decorating center.

_______

Making the cut are:

  • red, silver, and gold bells
  • Scandinavian bells
  • bell garland
  • pine cones
  • gold and red apples
  • foam hearts
  • metal toys
  • elves and Santas
  • metallic glitter flower clip ons
  • angel craft tree toppers

You might notice that there are lots of bells on the list. I love including opportunities for musical exploration.

A string of lights on the table adds ambiance.

Mini Christmas trees set up for early learners to decorate with child-friendly decorations.

_______

A rich, thick garland embellishes this red tree.

Red Christmas tree decorated with lots of garlands.

_______

To see a closeup of all the trees view this Christmas Tree Decorating Center video.

_______

Most people already have their trees up and decorating completed by now. But sale shopping opportunities are just around the corner. Keep a lookout for economical mini trees and child-friendly decorations to set up a Christmas tree decorating center dazzling with your own flair.

_______

Decorated Christmas trees at an early learning center.

_______

[Read more…] about Christmas Tree Decorating Center
Tweet
Share
Share
Pin

Filed Under: Christmas, display, preschool, sensory, trees Tagged With: Christmas, Christmas tree, sensory play, trees

  • « Go to Previous Page
  • Page 1
  • Interim pages omitted …
  • Page 6
  • Page 7
  • Page 8
  • Page 9
  • Page 10
  • Page 11
  • Go to Next Page »

Primary Sidebar

Hi, I'm Annette Kaminsky, a preschool teacher who loves sharing learning through play activities for young children. Thanks for visiting my site. Feel free to stay awhile!

Subscribe Via Email

Recent Posts

  • Earth Day Spin Painting April 21, 2026
  • Easter Bunny Scavenger Hunt April 4, 2026
  • Celebrate Diversity Coloring Pages March 1, 2026
  • Lunar New Year Lantern Craft February 11, 2026
  • Black History Month Positive Affirmations Art January 29, 2026
  • Snowflake Cafe Dramatic Play Set January 19, 2026
  • Pastel Christmas Letterhead and Envelope December 20, 2025
  • December Kindness Activities November 30, 2025
  • Fall Forest Sensory Bin November 30, 2025
  • DIY Turkey Bowling Game November 25, 2025

Categories

Topics

apples bunnies butterflies Chinese New Year Christmas Christmas craft color colors dramatic play Easter fall flowers hearts holiday jewelry leaves leprechauns light table loose parts painting paper crafts playdough pretend play printables printmaking process art pumpkins rice bin scented playdough science experiment scissor skills sensory bin sensory play sensory tray shamrocks skeletons snakes snowflakes spiders spring St. Patrick's Day sunflowers tablescapes Valentine's Day water play

Copyright © 2026 · Lifestyle Pro on Genesis Framework · WordPress · Log in