• Skip to secondary menu
  • Skip to main content
  • Skip to primary sidebar

Putting The Pretty In Preschool

Finding Beauty In Everyday Early Childhood Experiences

  • Home
  • About Me
  • Winter
  • Chinese New Year
  • Blog
  • Valentine’s Day
  • Contact Me
  • Easter Activities

butterflies

Remembrance Day Butterfly Art

November 6, 2024 by Annette Kaminsky Leave a Comment

_______

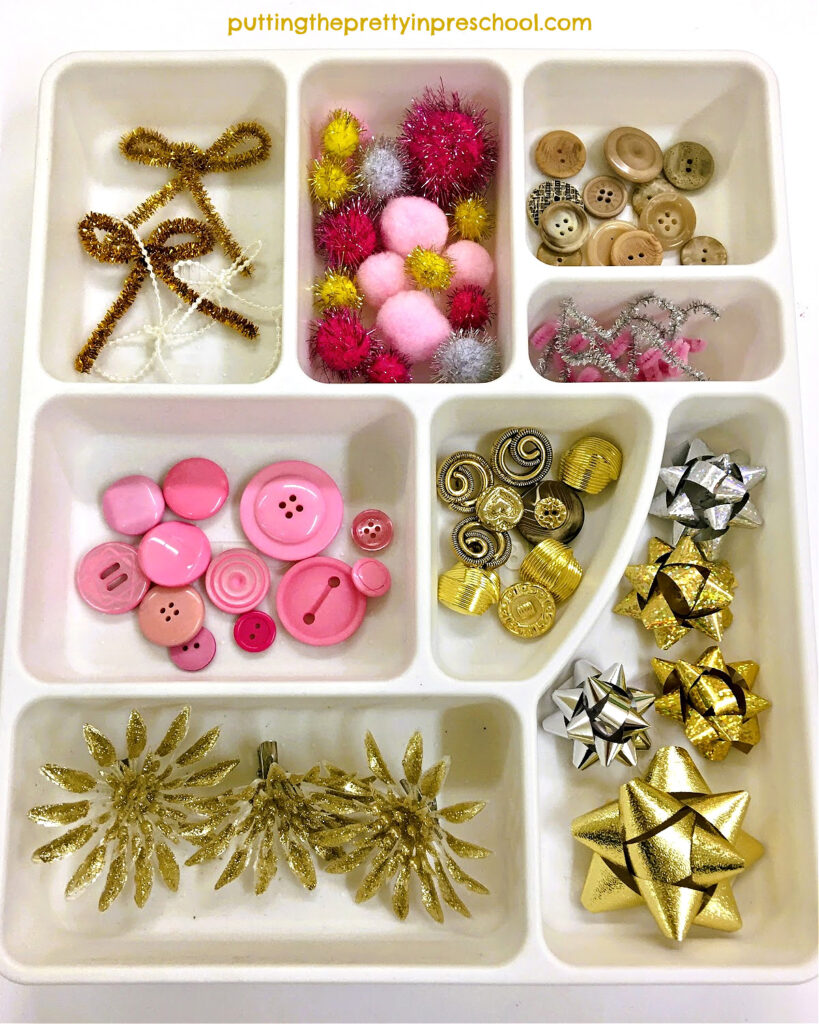
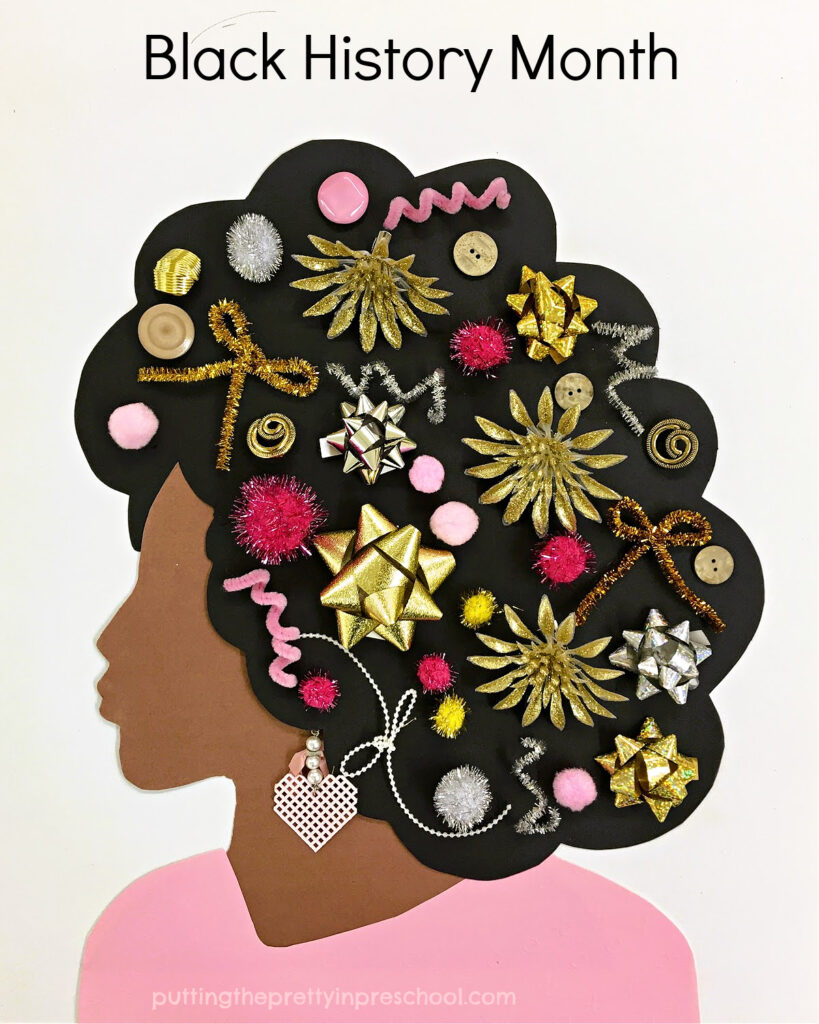
Remembrance Day is celebrated each year on November 11 in many countries. It is a day to remember the end of World War I and the many soldiers who died in battle. In Canada, it is also a day to recognize and appreciate the people who serve in the army today.

_______

The Red Poppy and Remembrance Day

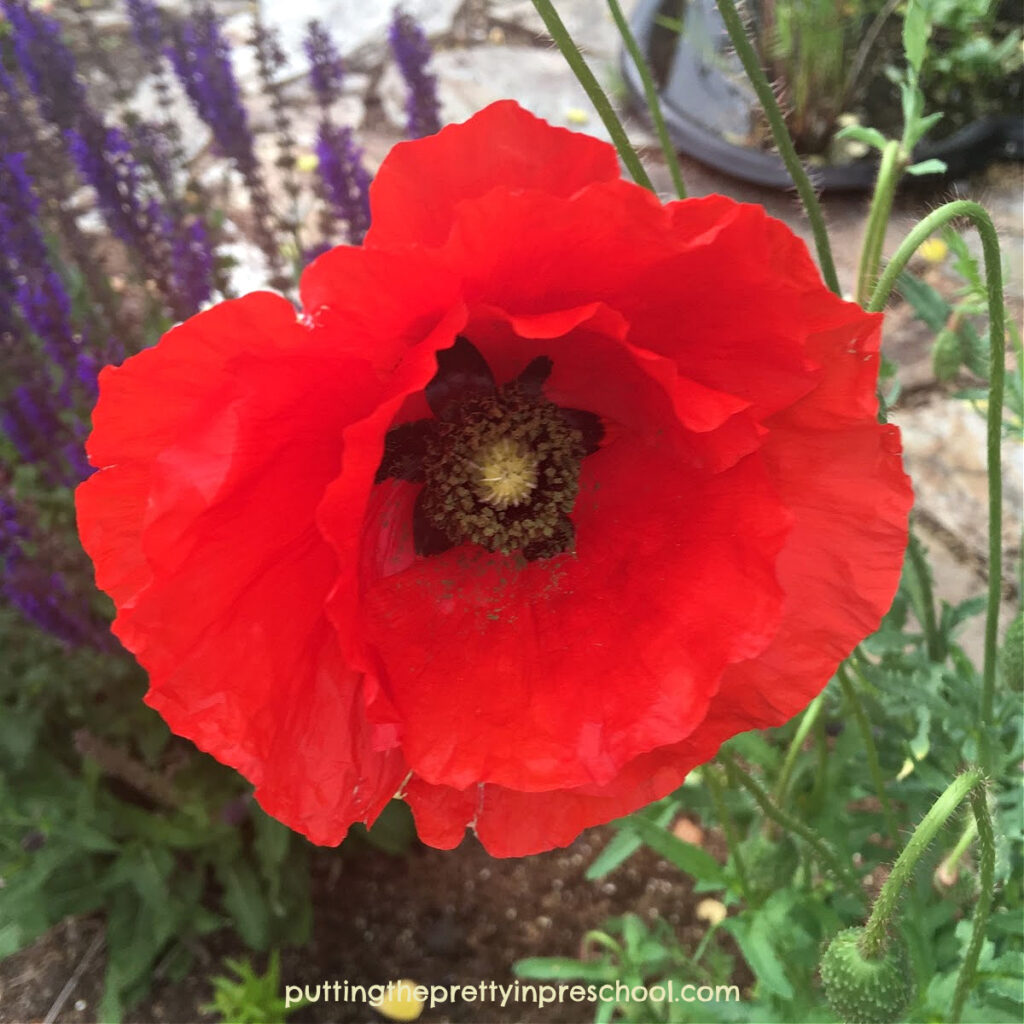
Wearing a red poppy has become a tradition on Remembrance Day, and the days leading up to it. After noticing the abundance of red poppies that sprouted up among the graves of fallen soldiers when World War I ended, a Canadian doctor wrote the now-famous poem “In Flanders Field”. Not long afterward, a United States teacher named Moina Michael wrote a poem called “We Shall Keep the Faith” in response and decided to wear a red poppy to remember the soldiers who served in the war. Noting that returning disabled soldiers had trouble caring for themselves, she started selling red poppies to raise money for their needs. The poppy flower soon became a symbol of the service of past and present soldiers.

_______

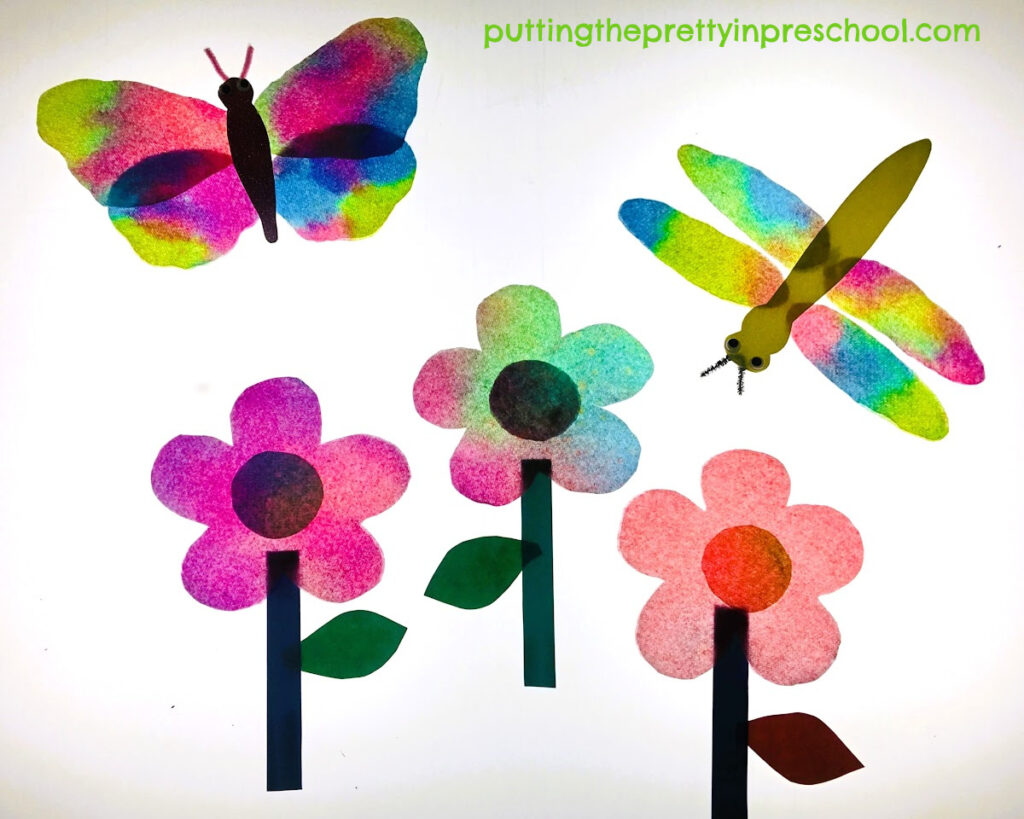
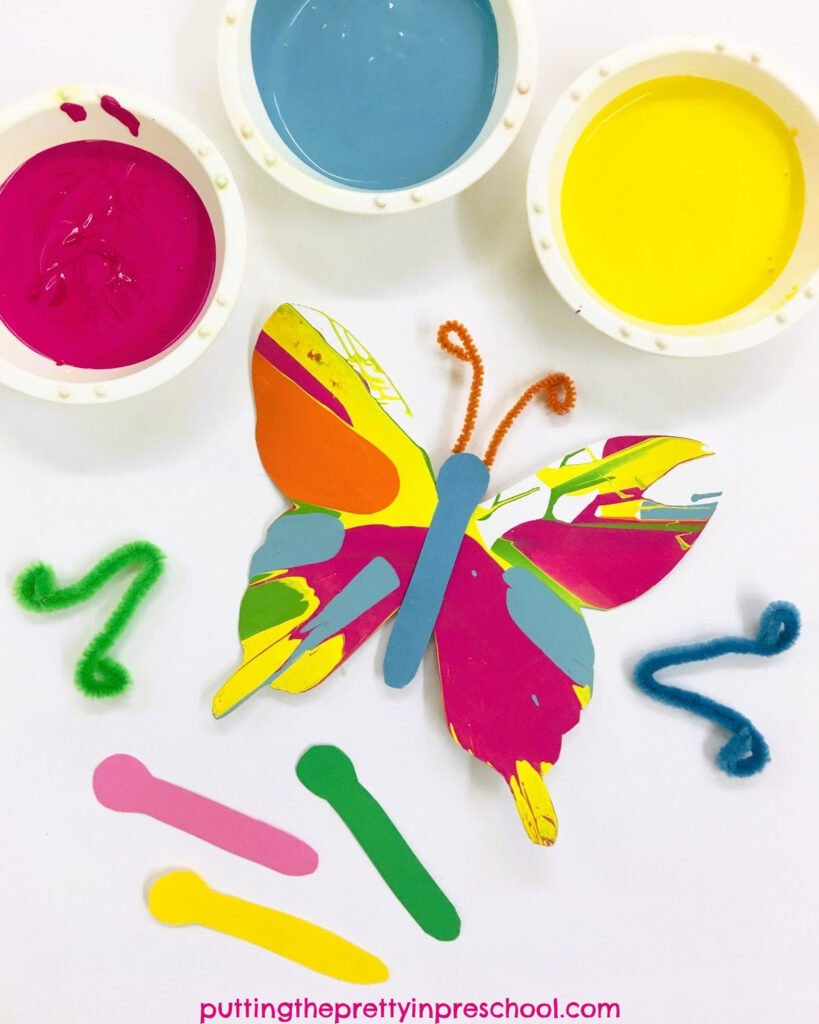
Since butterflies are seen as a symbol for inspiring good deeds, they go together well with poppies in a Remembrance Day butterfly art project.

_______

Follow me on Pinterest for more activities.

_______

Remembrance Day Butterfly Art Supplies

_______

Gather the following supplies for this meaningful art activity:

  • 8 ½ x 11-inch cardstock paper
  • dot markers
  • pencil and scissors
  • pipe cleaners
  • pony beads
  • pom poms
  • artificial red poppies
  • white glue or glue gun

_______

Follow me on Pinterest for more early learning ideas.

_______

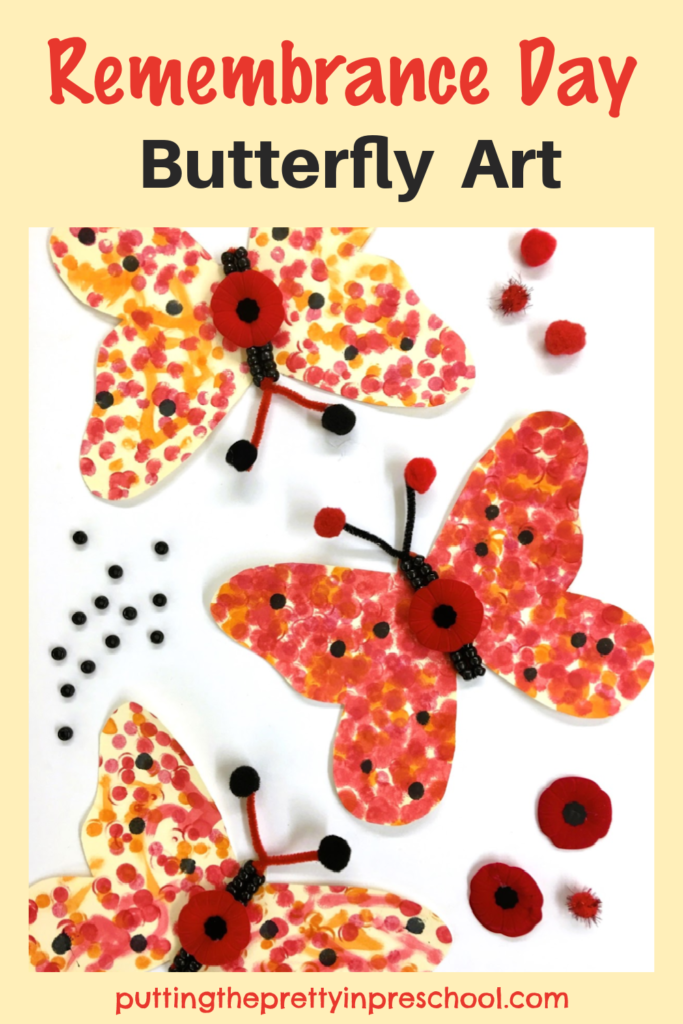
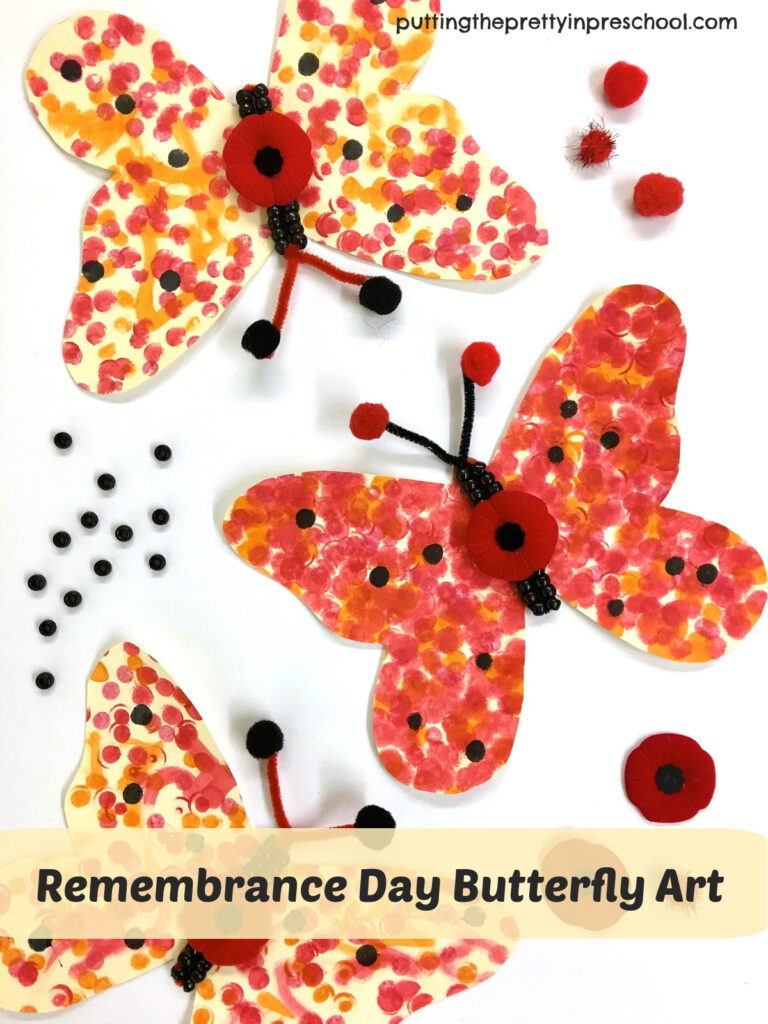
Remembrance Day Butterfly Art Project

This creative project is a simpler version of squish-painted poppy-enhanced Remembrance Day butterflies featured a few years ago.

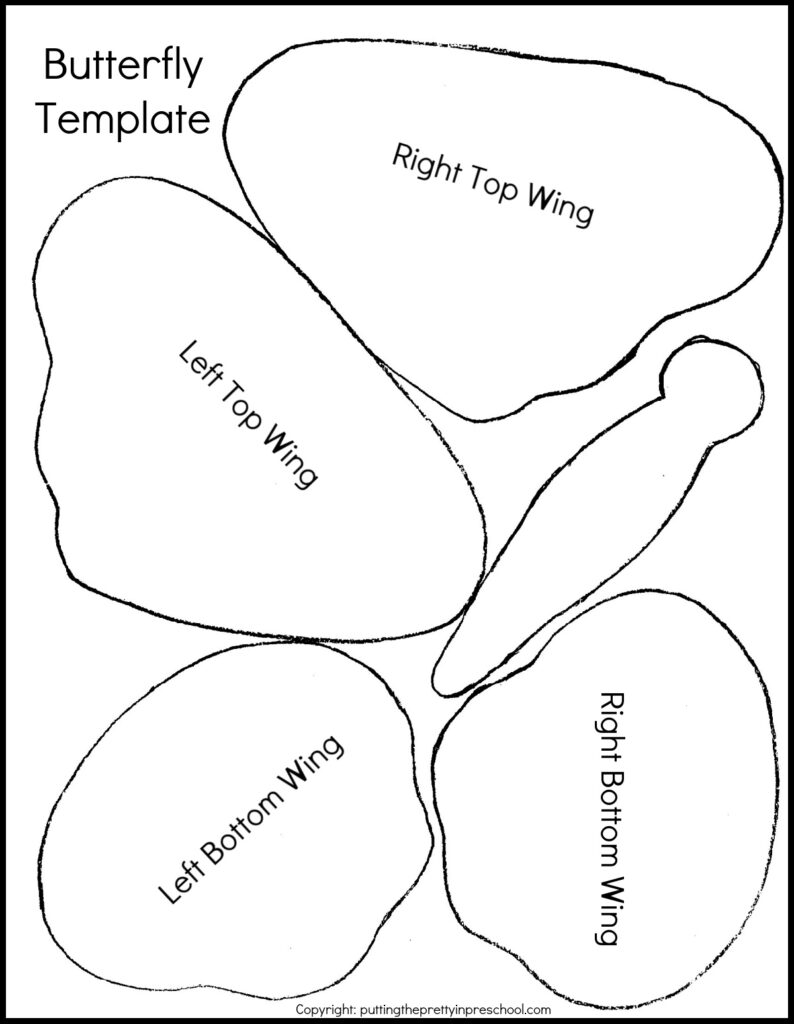
For the remembrance art project, start by tracing and cutting out large butterflies from 8 ½  x 11-inch white or cream-colored cardstock paper. Manila tag cardstock works well for this activity and is economical to buy.

_______

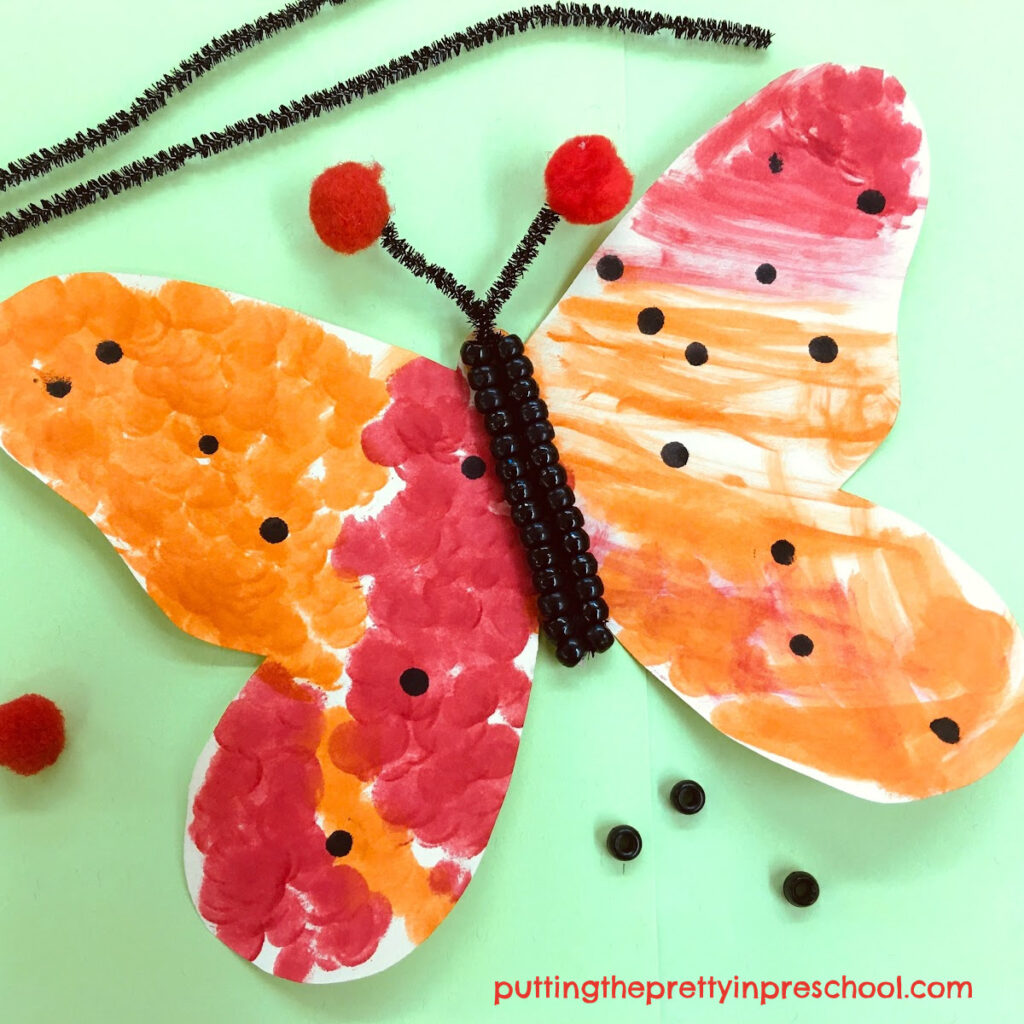
Set the paper butterflies on a table with red, orange, and black dot markers and invite participants to decorate their winged creatures. Using a black dot marker for finishing touches is recommended so that the red and orange colors remain dominant in the designs.

Tip: Dot marker designs dry quickly, which is one thing I love about them. If the decorated butterflies curl a little after drying, allow time to flatten them under a stack of books or a heavy object.

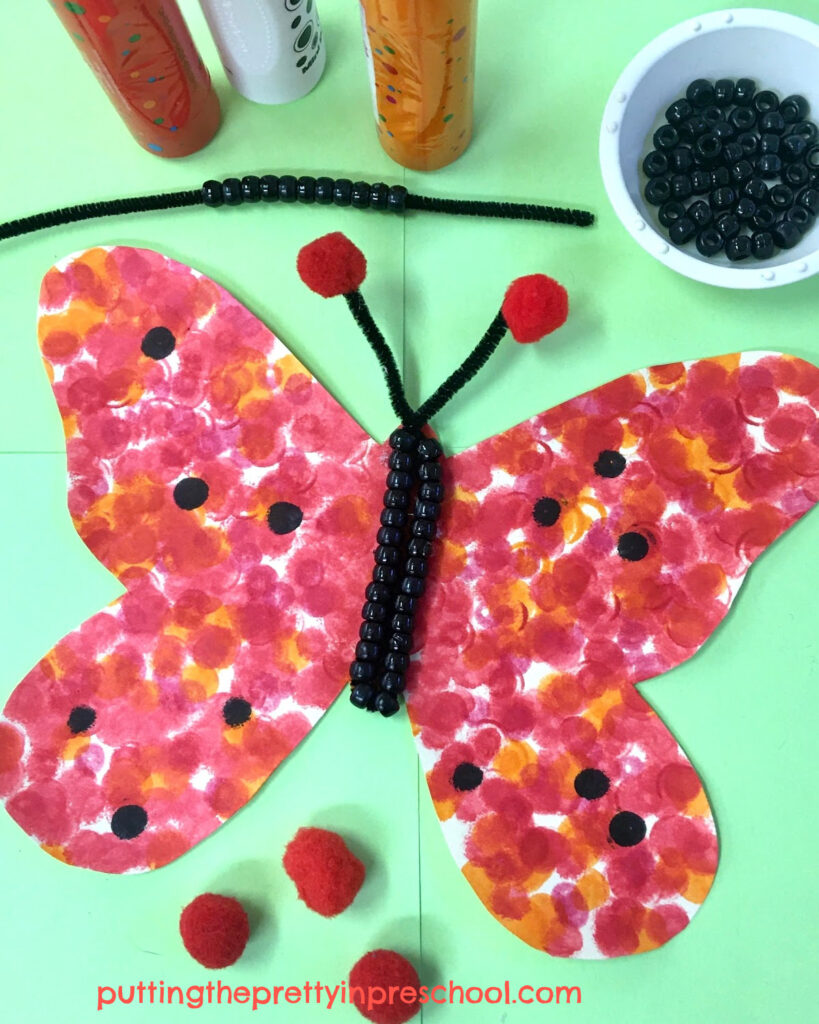
Afterward, invite everyone to string black pony beads onto same-colored pipe cleaners. When the pipe cleaners are folded in half, there should be enough strung beads to cover the abdomen and head of the dot-marked butterflies.

_______

After participants finish beading their pipe cleaner, have them fold it in half and twist the unbeaded ends together to create two antennae.

Glue a pom pom to each pipe cleaner antenna with white glue or a glue gun, and then affix the beaded pieces to the middles of the butterflies.

Finally, glue an artificial red poppy with the pin removed onto each dotted insect.

Note: Older participants can independently glue on the beaded pipe cleaners, pom poms, and poppies.

_______

This Remembrance Day butterfly art project is simple but striking and is bound to be appreciated.  Having the opportunity to include beads is a highlight of the activity.

_______

[Read more…] about Remembrance Day Butterfly Art
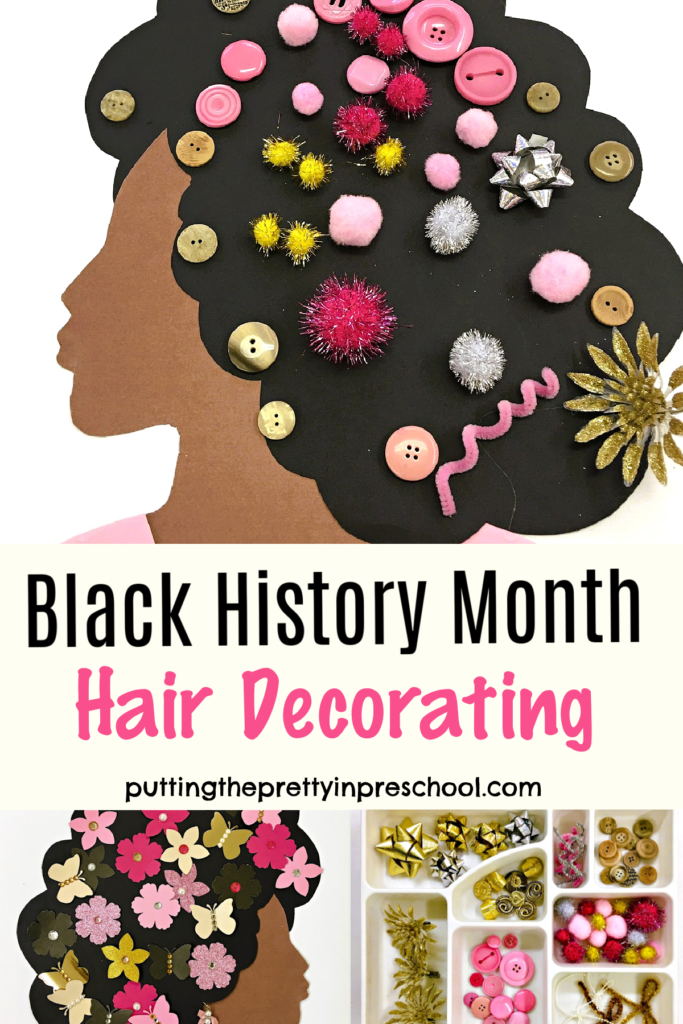
Filed Under: art, crafts, preschool, Remembrance Day Tagged With: butterflies, poppies, Remembrance Day

Black History Month Hair Decorating Art

February 24, 2024 by Annette Kaminsky 2 Comments

_______

These Black History Month hair decorating art invitations are inspired by the photos of beautifully decorated classroom doors that frequently go viral online and a recyclable shopping bag design. The two art invitations are easy for little learners to participate in and are suited for people of all ages.

_______

Follow me on Pinterest for more early learning ideas.

_______

Black History Month has been celebrated in the US every year since 1926. Classroom door artwork displaying beautiful hairstyles with embellishments is a stunning way to draw attention to the celebration. Often, the artwork is accompanied by pictures and information about past role models and their contributions.

_______

_______

Black History Month Transient Art

A variety of craft supplies in gold, silver, pink, white, and tan hues provide the color scheme for a simple Black History Month transient art hair decorating invitation.

_______

Supplies To Collect

  • 18 x 24-inch sturdy white paper
  • 12-inch x 18-inch black fadeless construction paper
  • brown and pink construction or scrapbook paper
  • gift bows
  • pipe cleaners
  • bead garland strips
  • clip on tree decorations
  • buttons
  • pom poms
  • dangling earring
  • glue stick and glue gun
  • glue stick
  • pencil and scissors
  • compartment tray

_______

Black History Month Transient Art Set Up

For this glitzy art invitation, start by selecting the above easy-to-find supplies in a color scheme of choice, and placing them in a compartment tray. My color scheme has plenty of gold and silver, which black people wear so well. It is balanced by neutral and light pink hues.

_______

Cut and wrap pipe cleaner pieces around a pencil to make curly adornments, and tie other pipe cleaners and bead garland strips into bows.

Next, draw and cut a side view of a human head from brown construction paper, hair from black construction paper, and the shoulders of a top from fabric or colored construction paper. Fadeless construction paper or cardstock holds color the best.

Afterward, using a glue stick or glue gun, adhere the profile head, top, and hair onto a large sheet of construction or art paper. Slide in a dangling earring if desired.

Note: You may want to trim a small piece off the upper edge of the paper background to eliminate unnecessary white space.

_______

The Hair Decorating Transient Art Invitation

_______

Once the design is glued together, set out the compartment tray and invite one or two children at a time to pick supplies and decorate the hair of the arty profile. Make sure to snap a picture of each child with their finished design before you invite someone new to embellish the profile image.

_______

Children may decide to decorate the clothing in addition to the hair.

_______

After everyone has a chance to participate in the Black History Month transient art activity, give each child an opportunity to contribute a few pieces to the design. Afterward, use a glue gun to affix the shapes permanently. You will have a beautiful wall art piece to display.

_______

Hair Decorating With Flowers and Butterflies

This second Black History Month hair decorating invitation gives participants a chance to complete a finished art project to take home, using a similar profile image as above.

_______

Supplies To Collect

  • 14-inch x 17-inch art paper
  • craft flowers and butterflies
  • construction paper
  • flower and butterfly paper punches
  • self-adhesive gem stickers
  • scissors and pencil
  • glue stick

_______

For this next black History Month art invitation, put together a smaller-sized profile image for each child participating. A 14-inch x 17-inch sized background piece of paper is a good fit for the project.

Paper punch flowers and butterflies from a few different colors of cardstock paper, and add self-adhesive sticker gems. Or use purchased craft flowers and butterflies.

Note: I am a huge fan of paper punches and use them all the time. They save oodles of preparation time and give art projects a professional touch.

Set out a profile image and butterflies and flowers on an art table for each child participating. Invite everyone to use a glue stick to embellish the hair of their paper person with the craft supplies.

_______

Related: Black History Month Mixed Media Art

_______

More Black History Month Activities

Three Black History Month Crafts

Five Black History Month Crafts

_______

[Read more…] about Black History Month Hair Decorating Art

Filed Under: art, Black History Month, crafts, literacy, preschool Tagged With: Black History Month, butterflies, flowers, paper crafts, recycled craft, transient art

Gorgeous Eye Dropper Art

August 27, 2023 by Annette Kaminsky Leave a Comment

Beautiful paper towel eye dropper art. Do the process art activity on its own or turn the art into dragonfly, butterfly, and flower designs.
Baeutiful paper towel eye dropper art . Do the process art activity on its own or turn the art into dragonfly, butterfly, and flower designs.

_______

What do dragonflies, butterflies, and flowers have in common? Aside from appearing during the summer season, they all look spectacular in eye dropper art. This easy-to-do, oh-so-satisfying process art technique is one of children’s favorite ways to paint.

_______

Follow me on Pinterest for more early learning ideas.

_______

Supplies To Collect

For this stunning art activity, gather the following:

  • liquid watercolors or food coloring
  • roll of absorbent paper towels
  • pipette eye droppers
  • paint containers
  • waterproof tablecloth

_______

The Eye Dropper Art Process

Create gorgeous eye dropper art with liquid watercolors on paper towle sheets. An all-ages process art activity.

_______

Things might get very wet with this art technique, so the first thing to do is cover the working surface with a waterproof tablecloth.

Next, tear off sheets from a paper towel roll. If you have a choice, pick a thicker brand, as it will be more absorbent. But any kind of paper towel will work fine.

Then pour water into paint pots, and mix a few drops of liquid watercolors or food coloring in each one.

Set up an art station with a paper towel sheet and paint pots with eyedropper pipettes for each participant.

Invite children to squeeze paint on their paper towel canvas with the droppers.

Create gorgeous eye dropper art with liquid watercolors on paper towle sheets. An all-ages process art activity.

_______

When the arty paper towel sheets are thoroughly covered in paint, set them aside to dry.

_______

Eye Dropper Paint Crafts

Eye dropper painting is a well-loved process art activity, and participating artists will likely want to decorate a few paper towels. In this case, send some of the paper towel art home, and save a few sheets for crafts or other activities. The paper towel art looks beautiful in the following three crafts.

Paper Towel Dragonflies

Create a gorgeous dragonfly with a super fun eye dropper painting technique. A paper craft that looks stunning displayed.

_______

The large wings of mosquito-munching dragonflies have a moment with the eye dropper art technique. To craft the dragonflies, cut two pairs of long wings out of painted paper towel sheets, and a one-piece head, thorax, and abdomen from complementary-toned regular or glitter cardstock. Use a glue stick to affix the dragonfly wings to the back of the cardstock shapes. Finally, use a glue gun to add folded pipe cleaner antennae and wiggly eyes to the heads.

Tip: Paper towel rolls are often two-ply. If the layers in your cutouts separate while you are working, dab a little glue in a few spots between them so they stay in place.

Create gorgeous dragonflies with a super fun eye dropper painting technique. A paper craft that looks stunning displayed.

_______

Download this free dragonfly template to make the craft.

Download this free dragonfly template for art or craft activities.

_______

Dragonfly PrintableDownload

_______

This printable is for individual or one classroom use only.

_______

Paper Towel Butterflies

Create a gorgeous, dainty butterfly with a super fun eye dropper painting technique. A paper craft that looks stunning displayed.

_______

Butterflies look fantastical in any kind of art technique, and the wings look especially dainty when crafted from painted paper towels. To create the butterflies, snip two pairs of butterfly wings from a colored paper towel. Then cut a one-piece head, thorax, and abdomen from cardstock. As with the dragonflies, affix the wings to the back of the cardstock bodies. With a glue gun, attach a folded pipe cleaner antennae and two small wiggly eyes to the heads.

Create gorgeous, dainty butterflies with a super fun eye dropper painting technique. A paper craft that looks stunning displayed.

_______

Download this free butterfly template to make the craft.

Download this free butterfly template for art or craft activities.

_______

Butterfly TemplateDownload

_______

This printable is for individual or one-classroom use only.

_______

Paper Towel Flowers

Create a beautiful flower with a super fun eye dropper painting technique. A paper craft that looks stunning displayed.

_______

A third art project is to create paper towel flowers. Cut the flowers and circular centers from painted paper towel sheets, and add cardstock or construction paper stems and leaves.

Create beautiful flowers with a super fun eye dropper painting technique. A paper craft that looks stunning displayed.

_______

Download this free flower template to make the craft.

Download this free flower template for art or craft activities.

_______

Flower PrintableDownload

This printable is for individual or one-classroom use only.

_______

Light Table Play

The eye dropper paper towel dragonflies, butterflies, and flowers look especially beautiful displayed on a light table.

Eyedropper art dragonfly, butterfly, and flowers display beautifully on a light table.

_______

As an alternative, eye dropper-painted geometric shapes cut from paper towel sheets also illuminate wonderfully and offer opportunities to create original designs.

Eye dropper art on geomtric shapes look beautiful on a light table and provide an invitation to create interesting new designs.

_______

Related:

Earth Day Heart Art

Eye Dropper Leaf Art

Spider Theme Activities

Ladybug Wand Craft

_______

Eye dropper art on geomtric shapes look beautiful on a light table and provide an invitation to create interesting new designs.

_______

[Read more…] about Gorgeous Eye Dropper Art

Filed Under: art, crafts, gardening, insects, light table, preschool, summer Tagged With: butterflies, dragonflies, flowers, light table, painting, paper crafts, process art

Spin Painting Butterflies

May 19, 2023 by Annette Kaminsky Leave a Comment

Create beautiful spin painting butterflies with a salad spinner. This is an all-ages, no-fail, super fun process art activity.
Create beautiful spin painting butterflies with a salad spinner. This is an all-ages, no-fail, super fun process arty activity.

_______

There are few art projects that are more exciting and fun than spin painting. And using a salad spinner is an easy and low mess way to create spin art. I’ve featured this painting technique in a few projects on my blog. In this post, I feature spin painting butterflies.

_______

Follow me on Pinterest for more early learning ideas.

_______

Supplies To Collect

Gather the following supplies for this art x science painting activity:

  • salad spinner
  • butterfly template
  • cardstock paper
  • pipe cleaners
  • tempera paint
  • paint pots
  • spoons
  • tape
  • white glue or glue gun

_______

Creating Spin Painting Butterflies

To create the spin art butterflies, design a butterfly template and trace it onto cardstock paper in the color of your choice. It is optimal for the butterflies to be the size of the bottom of the salad spinner. To help figure out the correct size, trace the bottom of the salad spinner basket onto a piece of paper. Lay the butterfly template on the circle and adjust its size if needed.

Then add a little piece of rolled-up tape to the bottom of one paper butterfly, and position it securely in the salad spinner basket.

Next, pour tempera paint colors of choice into paint pots. Add a little white or yellow paint to brighten up the colors if desired.

Afterward, spoon blobs of paint in a variety of colors onto the butterfly.

Create beautiful spin painting butterflies with a salad spinner. This is an all-ages, no-fail, super fun process arty activity.

_______

Then spin the salad spinner at a moderate rate. It is ideal for the butterfly to remain on the bottom of the spinner. Spinning it super fast may loosen the butterfly resulting in it sticking to the side of the basket. This will smudge up the paint.

Next, open the spinner and carefully lift out the butterfly. Remove the tape and let it dry.

Finally, cut out a one-piece butterfly head, thorax, and abdomen from a complementary piece of sturdy paper, and bend a pipe cleaner length into antennae. Glue both to the center of the butterfly using white glue or a glue gun.

Oh-so-fun salad spinner butterfly art activity. An easy-to-do, all-ages art activity.

_______

Invite each person participating in this activity to create one or two spin art butterflies.

_______

Spin Painting Butterfly Variations

After spinning the salad spinner the first time, you can choose to drop in more paint and spin again.

Create this spin painting butterfly in a few easy steps. This is a process art activity everyone in the family will love.

_______

After the first spin cycle, the butterfly in the above picture turned out mostly yellow. With a little more paint added and another round or two of spinning, the butterfly is more colorful.

If the butterfly does stick to the side and the paint is smudged, make a print with it on a new piece of paper. Cut the butterfly out and use doubled sided tape to secure it onto a new piece of paper for a 3D effect. Add a cardstock frame for a finishing touch.

Butterfly paint prints look stunning when displayed on a cardstock background.

_______

Butterfly paint prints look stunning when displayed on a cardstock background.

_______

And gluing a painted butterfly, ribbon, and bead garland to a dowel makes an awesome butterfly wand.

Beautiful spin painitng butterfly wand craft your little learners will love. An all-ages process art project.

_______

The Science Behind Salad Spinner Art

Centrifugal force is used in creating salad spinner art. When the salad spinner is spun around, centrifugal force pushes the paint away from the center to the edges of the butterfly.

_______

How to create beautiful spin painting butterflies with a salad spinner. This is a super fun process art activity everyone will enjoy.

_______

Related:

Spin Painting Maple Leaf Art

Salad Spinner Heart Art

_______

[Read more…] about Spin Painting Butterflies

Filed Under: art, preschool, science, spring, summer Tagged With: butterflies, painting, spin art

Five Black History Month Crafts

January 28, 2023 by Annette Kaminsky Leave a Comment

Five gorgeous Black History Month crafts that celebrate diversity. Easy-to-make crafts the whole family can do.

_______

Black History Month, a time set aside to remember notable black people and their achievements, is just around the corner. It is celebrated in the United States and Canada during the month of February. Here are five Black History Month crafts to help children engage in the celebration.

_______

Follow me on Pinterest for more early learning ideas.

_______

Celebrate Diversity Butterflies

To make these striking butterflies that represent celebrating diversity, gather the following supplies:

  • metallic gold and bronze tempera paint
  • pink, black, and white paint
  • light pink, black, bronze, and gold glitter
  • black pipe cleaners and pony beads
  • white cardstock paper
  • black cardstock paper
  • pie tins or disposable plates
  • white glue
  • glue gun

_______

Steps to make a handprint butterfly craft to recognize and celebrate Black History Month.

_______

Making The Handprint Butterflies

To start off, pour skin-toned tempera paints into pie tins or disposable plates. You may want to add a little white to the black paint to soften its hue.

Have participants dip a hand in a paint color and press it onto white cardstock paper. I use metallic gold and bronze for two of the skin tone shades. Regular tempera paints in these hues would work fine too.

If you have the shades available, sprinkle a similar color glitter onto each handprint.

After the handprints dry and extra glitter is shaken off, cut around the edges.

Next, cut long narrow ovals from black cardstock paper to represent butterfly abdomens.

Bend black pipe cleaners in half and have participants string black beads onto them, leaving a little section open for the butterfly antennae. Twist the pipe cleaners just above the beads to make sure they stay on.

Assembling The Butterflies

Make this gorgeous handprint butterfly craft to recognize Black History Month and celebrate diversity.

_______

Using white glue or a hot glue gun, add black or pink pompoms to the antennae.

Then use white glue or a hot glue gun to affix four handprint “wings” onto each abdomen. The butterflies can be designed in different kinds of color combinations.

Next, glue the beaded pipe cleaners to the butterfly abdomens. Now the “celebrate diversity” butterflies are ready to be displayed!

Make these gorgeous handprint butterfly crafts to recognize Black History Month and celebrate diversity.

_______

Celebrate Diversity Yarn Heart

Different shades of skin-toned yarn represent diversity in this textured yarn heart craft.

Make this gorgeous skin-toned yarn heart craft to recognize Black History Month and celebrate diversity.

_______

Supplies to Collect

  • yarn in a variety of thicknesses and skin tones
  • 8 ½ x 11-inch golden-brown cardstock paper
  • white glue or hot glue gun
  • double-sided tape
  • ruler
  • scissors
  • heart template

_______

Steps to make a gorgeous skin-toned yarn heart craft to recognize Black History Month and celebrate diversity.

_______

To make this gorgeous yarn heart craft, start by cutting skin-toned yarn into 7 ½ inch strips. Using different thicknesses of yarn adds variety to the craft.

Next, glue the strips of yarn in rows onto a sheet of 8 ½ x 11-inch cardstock using white glue or a glue gun. Leave a small border around the edge of the paper.

Then add pieces of double-sided tape around the edges of the paper.

Afterward, cut a large heart in the center of a second piece of cardstock.

Finally, gently position the cardstock paper with the heart cut out on top of the yarn-covered piece, making sure the double-sided tape adheres to it.

_______

Kindness Heart Wreath

This kindness heart wreath with cardstock skin-toned hearts and a geometric bow communicates that all lives matter and that everyone should be treated with kindness.

Black History Month ribbon and skin-toned hearts are the highlights of this easy-to-make "kindness" wreath craft.

_______

Black History Month Heart Banner

In this craft, skin-toned hearts are used to decorate an attractive, geometric ribbon-edged banner honoring Black History Month.

Black History Month ribbon and skin-toned paper hearts are the highlights of this easy-to-make banner craft.

_______

Black History Month Ribbon Heart

This heart craft takes full advantage of vibrant, geometrically patterned ribbon, and looks striking on display.

Make this stunning Black History Month heart craft to honor this important annual celebration.

_______

Which one of these five Black History Month crafts will you try? Let me know in a comment below.

_______

[Read more…] about Five Black History Month Crafts

Filed Under: art, Black History Month, crafts, preschool Tagged With: Black History Month, butterflies, hearts, papercrafts, wreaths

White Lilacs And Black Playdough

June 11, 2022 by Annette Kaminsky Leave a Comment

Try this unexpected combination of white lilacs and black playdough. It goes well with cookie cutters and white and transparent loose parts.
Try this unexpected white lilac and black playdough combination. It goes well with cookie cutters and white and transparent loose parts.

_______

When I first decided to make black playdough, it was for a space theme. And lilacs were going to be used in a sensory play tub. Some white lilacs did end up in a sensory tub along with a generous supply of purple ones, and I used black playdough for the space theme as planned. But I also discovered that white lilacs and black playdough make an interesting and unexpected combination.

Follow me on Pinterest for more early learning ideas.

For the black playdough in this post, I use a recipe featured in a blog post by Left Brain Craft Brain. It is easy to make, and produces super black playdough!

_______

White Lilacs And Black Playdough Tray

Set up this unexpected white lilac and black playdough tray. Striking creations will surely be the result.

_______

The supplies gathered for this effortless playdough tray are:

  • white lilac sprigs
  • clear gems
  • transparent hair ties
  • reusable transparent star ice cubes
  • white pony beads
  • wired white leaves
  • flower, bug, and butterfly cookie cutters
  • scissors
  • rolling pin

Set out on a serving tray with compartments, the supplies make for an aromatic play invitation.

The lilac sprigs can be snipped and kneaded into the playdough.

Loose parts and tiny lilac petals are available to embellish playdough shapes.

The flower, insect, and butterfly cookie cutters are unexpected and result in striking creations.

White lilac and black playdough creations using flower, butterfly, and bug coolie cutters and white and transparent loose parts.

_______

Black playdough and white lilacs make the perfect combination for a dynamic playdough invitation.

_______

Alternatively. the lilac and black playdough work wonderfully for a space theme. Star-shaped gems and reusable ice cubes, grey painted rocks, white pony beads, clear acrylic gems, and an astronaut and spaceship are included in the play invitation below.

A sure-to-please space playdough setup.

_______

Black And White Playdough Tray

Set up this striking black and white playdough tray for your little learners to explore today!

_______

If you decide to forgo using lilacs, black playdough works well on its own with white and transparent loose parts and cookie cutters. Gathered for the tray above are:

  • striped black and white straws
  • white buttons
  • black and white game pieces
  • bottle caps
  • baby bottle lids
  • white beads
  • pizza lid box stands
  • flower, butterfly, and bug cookie cutters
An striking black and white playdough theme with flower, bug, and butterfly cookie cutter shapes.

_______

Spider, bat, and skeleton loose parts are also a good fit for this playdough.

_______

A sure-to-please outer space playdough setup.

_______

Set up this striking black and white playdough tray for your little learners to explore today!

_______

_______

More Activities With Flowers

Balloon Painting Flower Art

Tea Set Water Play

Dish Wand Print Flowers

_______

Contact Paper Flower Art

Petunia Flower Sensory Tray

Eye Dropper Flower Art

Create a beautiful flower with a super fun eye dropper painting technique. A paper craft that looks stunning displayed.

_______

[Read more…] about White Lilacs And Black Playdough

Filed Under: playdough, preschool, sensory, space, spring, summer Tagged With: butterflies, flowers, insects, loose parts, playdough, sensory play, space

Flower Planting Sensory Play

May 10, 2022 by Annette Kaminsky Leave a Comment

Bring spring inside by introducing these four flower planting sensory play activities to your little learners.

_______

One of the best things to do in spring is to visit greenhouses, pick flowers, and then plant them in gardens and pots. Little learners can experience this indoors in flower planting sensory play activities.

A few easy-to-gather supplies are all that is needed for children to engage in spring planting sensory activities. Featured are four sensory tray ideas.

_______

Follow me on Pinterest for more ideas.

_______

Seed Tray Flower Planting

Set up this no-fuss flower planting sensory activity today!

_______

Seed trays are the perfect size for planting miniature flower figurines.

Supplies To Collect:

  • small seed starter trays
  • flower figurines
  • dried black beans

Set out the seed starter trays, along with a bowl of black beans and flower figurines. Invite little learners to plant flowers in black bean “dirt.”

_______

Flower Planting Sensory Tray

Miniature flower and butterfly figurines take center stage in this easy-to-set-up flower planting sensory activity.

_______

The low edge in serving trays makes them ideal for little learners to reach in and explore sensory materials.

Supplies To Collect

  • small seed starter trays
  • dessert cups
  • flower and butterfly figurines
  • spoons
  • serving tray

Spread a layer of black beans in an edged serving tray. Set in dessert cups and spoons.

Then place containers with flowers and butterflies next to the tray.

Invite little learners to scoop and pour black beans, plant flowers, and add butterflies to their designs.

_______

Book-Inspired Construction Zone Tray

A bean-based sensory bin inspired by the storybook "The Digger And the Flower" by Joseph Kuefler.

_______

This book-inspired sensory tray features an unlikely pairing: a construction vehicle and flower figurines.

Supplies To Collect

  • picture Book: The Digger And The Flower
  • black beans
  • rocks
  • flower figurines
  • serving tray

Read the endearing picture book called “The Digger And The Flower” by Joseph Kuefler. It’s a keeper!

Then layer a base of black beans in a serving tray.

Next set in a construction vehicle digger, rocks, and a few flowers.

Afterward, invite students to take turns exploring the tray.

_______

Rice Bin Flower Planting

Miniature flower figurines take center stage in this easy-to-set-up flower planting rice bin.

_______

Rice makes an economical sensory base in this bin.

Supplies To Collect:

  • brown rice
  • seed starter trays
  • flower and butterfly figurines
  • wooden scoops
  • plastic bin

Spread brown rice in a bin. I feature a food service bin that accommodates two to three children.  Add in seed starter trays, flower figurines, and wooden scoops for little learners to use in the bin.

_______

Note: Eaten raw, black beans and rice are toxic. Supervision is important when offering these activities. If your little charges are prone to sticking things in their mouths, consider using an edible sensory base.

_______

These four flower planting sensory play invitations take only minutes to set up. With slight variations in supplies, the flower and butterfly figurines can be explored in new ways.

_______

Related: Carrot Paint Prints

_______

[Read more…] about Flower Planting Sensory Play

Filed Under: construction vehicles, gardening, preschool, sensory, spring, summer Tagged With: bean bin, butterflies, flowers, rice bin, sensory bin, sensory play, sensory tray

Remembrance Day Butterfly Craft

November 11, 2020 by Annette Kaminsky Leave a Comment

Remembrance Day butterfly craft. Squish painted butterfly accented with beadwork, glitter, and a poppy.

_______

This Remembrance Day butterfly craft combines squish painting and beadwork and is accented with a poppy. It’s easy and satisfying for little learners to do.

Remembrance Day is celebrated in Canada on November 11 each year. On this day, people remember the many soldiers who died to give us freedom. The efforts of present-day soldiers are acknowledged and supported.

Red poppies are a symbol of Remembrance Day: people wear them and/or display poppy-themed arts and crafts on this notable day.

_______

Follow me on Pinterest for more early learning ideas.

_______

Poppy butterfly Remembrance Day craft.

________

Supplies To Collect

  • white cardstock butterfly
  • red and black tempera paint
  • red glitter
  • paint containers
  • spoons
  • black beads
  • black pipe cleaners
  • hot glue gun
  • red craft poppies

_______

Making The Remembrance Day Butterfly Craft

Squish painted butterfly with a poppy and beadwork for Remembrance Day.

_______

Set out paper butterflies that have been folded in half, and then reopened.

Have your early learners dribble red paint on their butterflies with a spoon, and add blobs of black.

Help them fold one side of their butterfly over the other, and rub over the top side of the paper.

The children will enjoy seeing the symmetrical paint designs when the paper butterflies are unfolded.

Sprinkling red glitter on the wet paint adds sparkle.

Let the squish paintings dry.

Ask your little learners to string black beads on pipe cleaners. (24 beads were used for each butterfly featured in this post.)

Fold the beaded pipe cleaners in half, and glue them onto the butterflies with a hot glue gun.

Hot glue a poppy with the pin removed onto each butterfly, on top of the beaded middles.

Display the poppy accented butterflies to remember the efforts of past and present soldiers.

_______

"We Remember" butterfly craft for Remembrance Day. Squish painted butterfly accented with beadwork, glitter, and a poppy.

_______

Poppy artwork is one way for children to acknowledge Remembrance Day. More activities are suggested on CBC Kids: 8 Things You Can Do For Remembrance Day.

_______

More Remembrance Day Art Projects

Remembrance Day Poppy Prints

Remembrance Day Coffee Filter Poppy Art Project

_______

[Read more…] about Remembrance Day Butterfly Craft

Filed Under: art, display, preschool, Remembrance Day Tagged With: butterflies, poppies, Remembrance Day

Primary Sidebar

Hi, I'm Annette Kaminsky. I am a preschool teacher who loves to share easy and fun early learning activities. Thanks for visiting my blog. Feel free to stay awhile!

Subscribe Via Email

Recent Posts

  • Salt and Ice Science Experiment May 20, 2025
  • Airplane Rice Sensory Bin May 16, 2025
  • Salt Painting Planet Art May 3, 2025
  • Spring Bunny Sensory Bin April 19, 2025
  • Tin Foil Egg Printing April 17, 2025
  • Lentil Easter Bunny Sensory Bin April 15, 2025
  • Unicorn Store Dramatic Play Center March 25, 2025
  • Easter Store Dramatic Play Center March 23, 2025
  • Origami Heart Wreath February 28, 2025
  • Black History Month Mixed Media Art February 26, 2025

Categories

Topics

block play bunnies butterflies Chinese New Year Christmas Christmas craft color colors dramatic play Easter flowers hearts holiday jewelry leaves leprechauns light table loose parts painting paper crafts playdough pretend play printables printmaking process art pumpkins rice bin scented playdough science experiment scissor skills sensory bin sensory play sensory tray shamrocks skeletons snakes snowflakes spiders spring St. Patrick's Day sunflowers tablescapes trees Valentine's Day water play

Copyright © 2025 · Lifestyle Pro on Genesis Framework · WordPress · Log in