• Skip to secondary menu
  • Skip to main content
  • Skip to primary sidebar

Putting The Pretty In Preschool

Finding Beauty In Everyday Early Childhood Experiences

  • Home
  • About Me
  • Winter
  • Chinese New Year
  • Blog
  • Contact Me
  • Black History Month
  • SHOP
  • Valentine’s Day

display

CD Case Christmas Craft

December 24, 2021 by Annette Kaminsky 2 Comments

Tweet
Share
Share
Pin
Make this cozy CD case Christmas craft in a variety of festive color schemes. A fun craft for the whole family to do.

_______

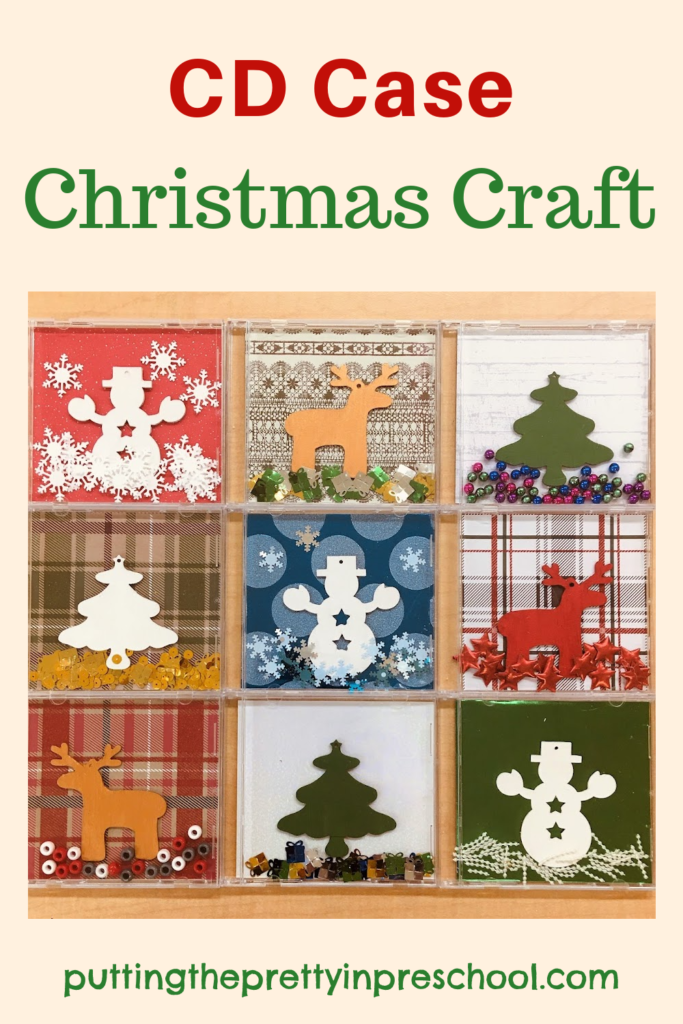
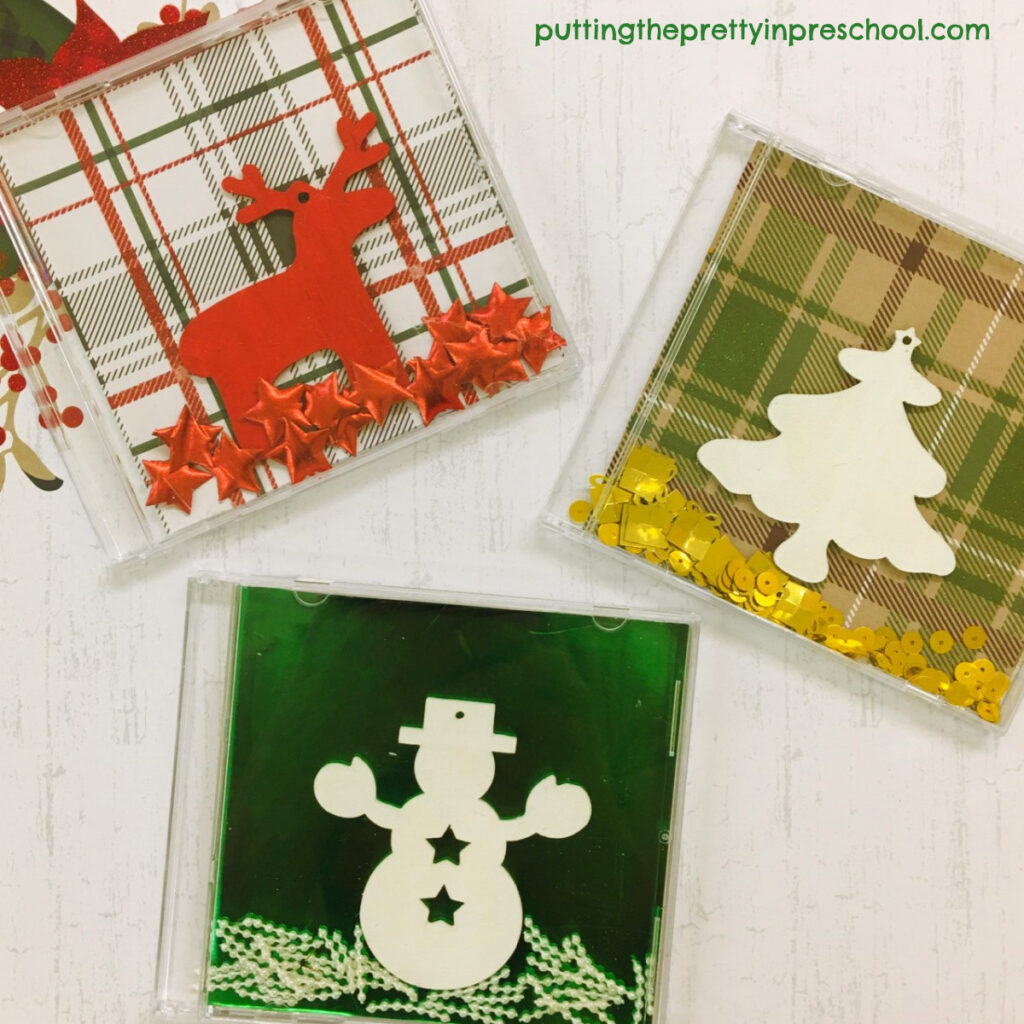
An empty or used empty CD case can be turned into a beautiful art or craft project. There are many creative ideas to try. For this blog post, I’m choosing to feature a CD case Christmas craft.

_______

Follow me on Pinterest for more creative ideas.
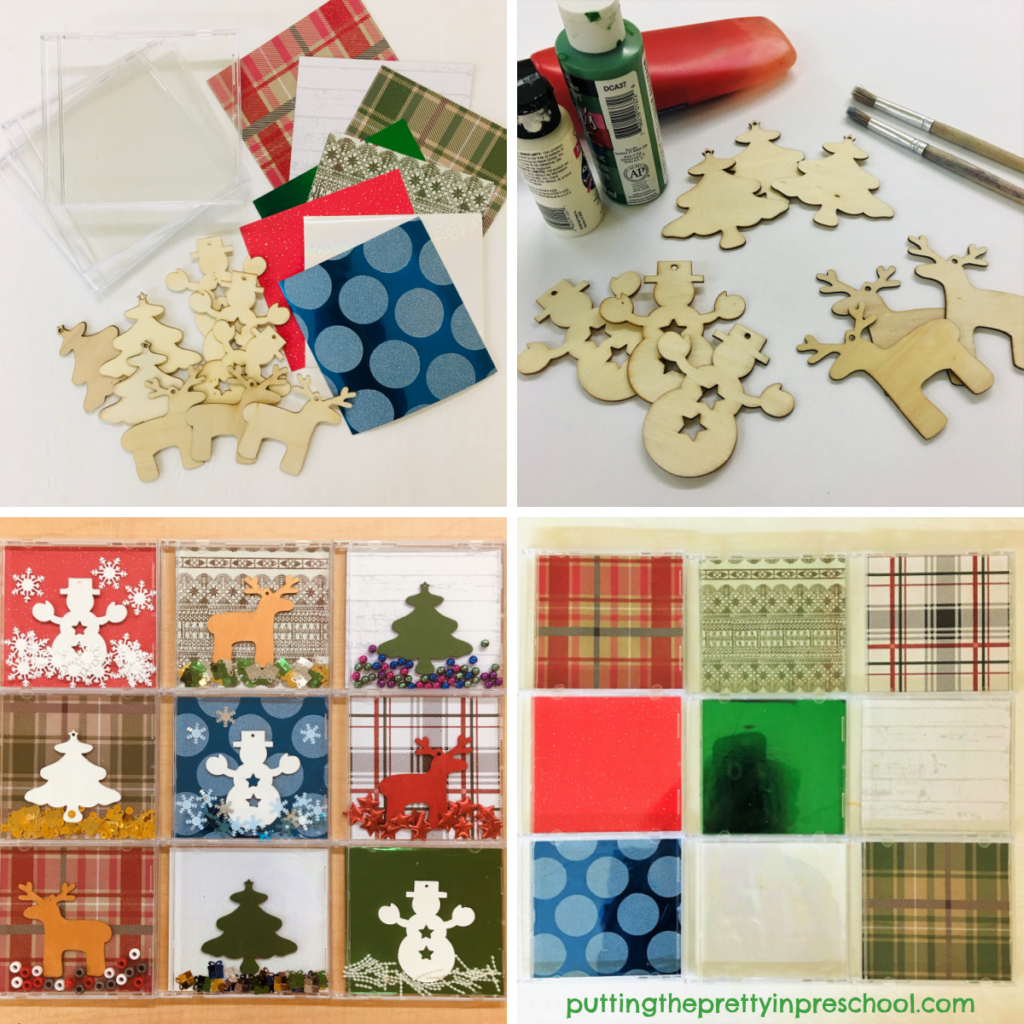
_______

Supplies To Collect

Gather the following for this seasonal craft:

  • clear CD jewel case
  • thin unpainted wood holiday decoration
  • festive cardstock
  • acrylic craft paint
  • scissors
  • ruler
  • glue stick
  • white glue or glue gun
  • craft bits: pony beads, holiday confetti, garland strips, sequins, punched paper snowflakes

_______

Assembling The CD Case Christmas Craft

Steps to making a CD case Christmas craft. An all-ages craft the whole family can do.

_______

Carefully remove the tray from a clear CD case.

Trim the cardstock pattern of choice to the size of the case.

With the case open, use a glue stick to adhere the cut cardstock to the bottom right section.

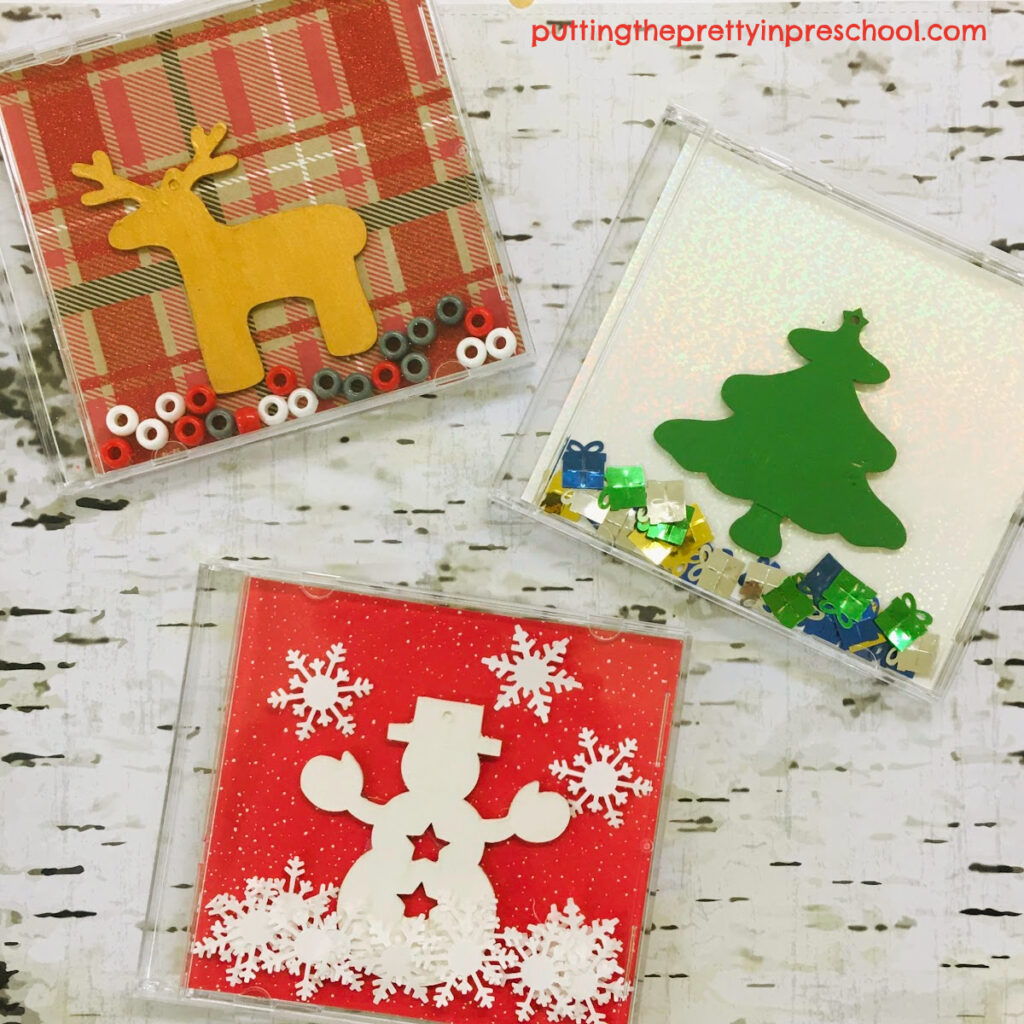
Paint a thin holiday-themed wood decoration with acrylic paint and let it dry. The paint and decoration can easily be found at dollar stores.

Note: Acrylic paint dries quickly and comes in a large variety of colors. It’s so fun to use!

Glue the painted wood shape to the cardstock.

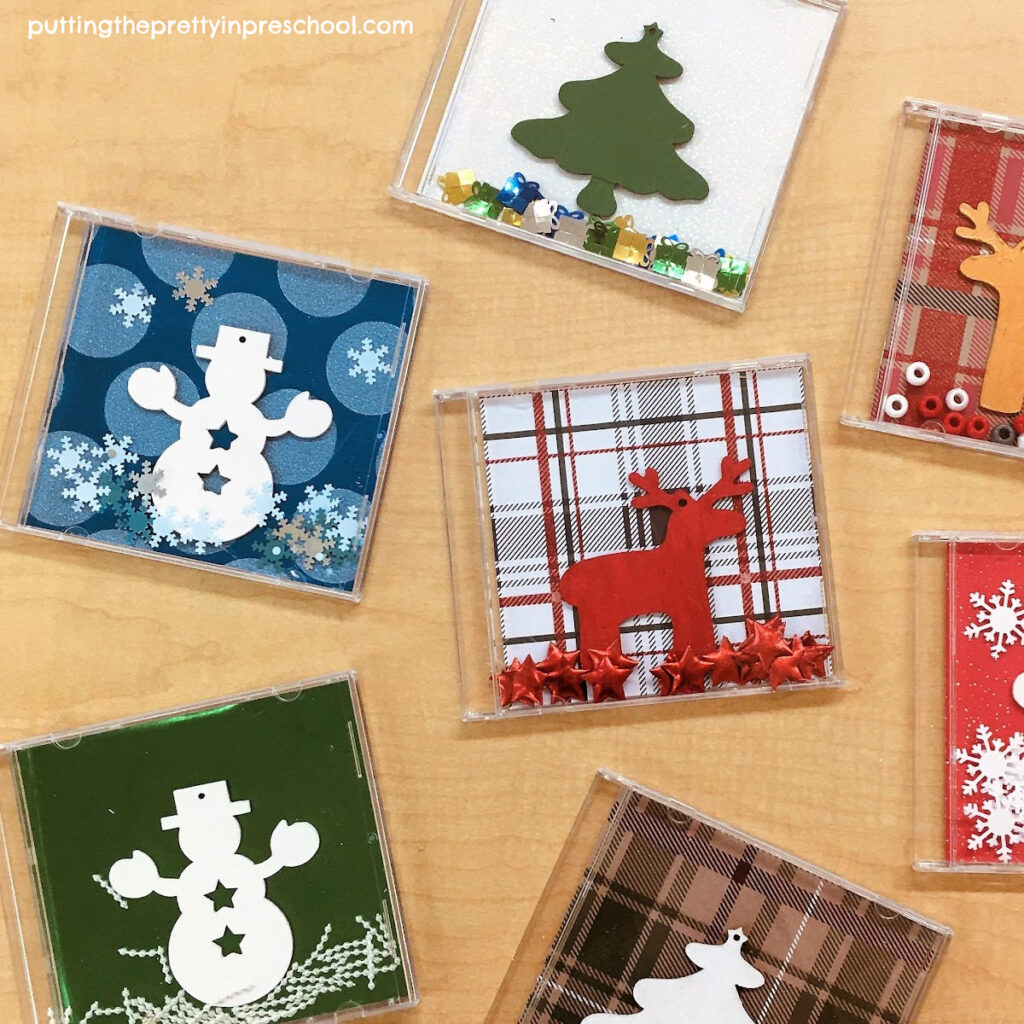
Add craft bits of choice.

Close the case snugly.

Make this easy and fun holiday-themed CD craft today!

_______

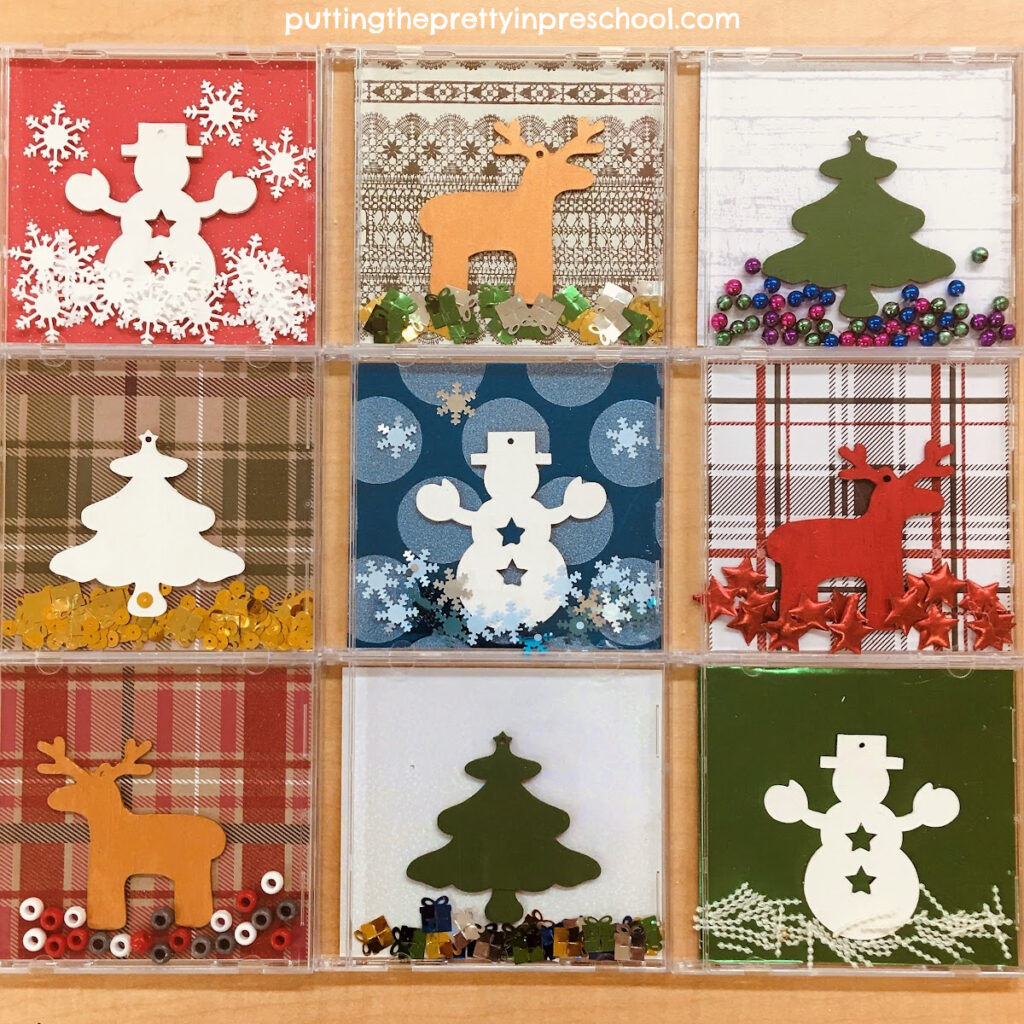
Display on a shelf or wall in the classroom or your home.

Tips: The craft bits can be glued down so they are stationary or left movable.

These holiday-themed CD case crafts are a lot of fun to make. Have the whole family create one!

_______

These charming CD case Christmas crafts are perfect for displaying during the holiday season.

_______

If desired, add a clear seal to keep the CD case closed.

You may wish to make this CD case Christmas craft in a variety of holiday and winter themes. The craft lends itself to being showcased in groups.

Make this cozy CD case Christmas craft in a variety of festive color schemes. An all-ages family craft.

_______

Of course, little learners can get in on making this creative craft. The activity could be a cooperative one for a parent/teacher/caregiver and child.

_______

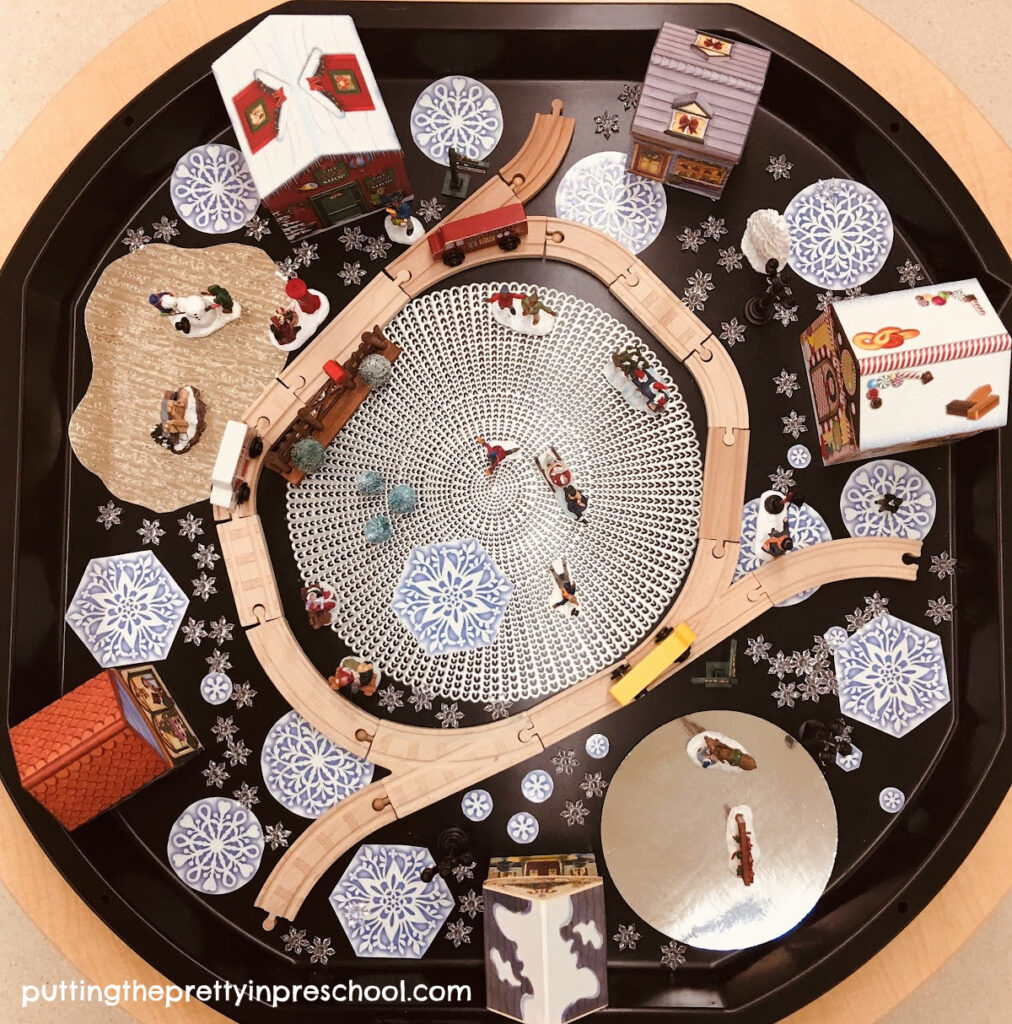
CD Case Christmas Blocks

Instead of displaying the crafted CD jewel cases, include them on a table with blocks for little learners to use in construction play. This is an idea I look forward to exploring in the future.

_______

Make this winter-themed snowman CD case craft today! It's easy and fun to do.

_______

[Read more…] about CD Case Christmas Craft
Tweet
Share
Share
Pin

Filed Under: art, block play, Christmas, crafts, display, preschool, sensory, winter Tagged With: Christmas crafts, crafts, holiday, reindeer, snowflakes, snowmen

Christmas Village Tuff Tray

December 22, 2021 by Annette Kaminsky Leave a Comment

Tweet
Share
Share
Pin
An inviting, snowy pioneer Christmas village tuff tray filled with people participating in outdoor winter activities.

_______

This Christmas Village tuff tray is filled with people figurines participating in outdoor activities. It’s the perfect winter play invitation to include in holiday celebrations.

A tuff tray is a sturdy, portable tray that can be used on a table, on the floor, or outside on the ground. Although it stores easily, it can also be set on a stand. I recently purchased a tuff tray online at Education Station, and love using it for this snowy activity.

_______

Supplies To Collect

A winter-themed pioneer village tuff tray filled with people participating in outdoor winter activities during the Christmas season.

_______

For the holiday tuff tray set up, gather the following:

  • wooden train tracks and train
  • wooden vehicles
  • silver and white placemats
  • tin foil disposable lid
  • snowflake window cling sheet
  • gem snowflakes
  • Christmas village-themed gift boxes
  • winter-themed people and animal figurines
  • miniature village signpost, mailbox, light post, fence, bench, and tree props

_______

Setting Up The Christmas Village Tuff Tray

_______

Place a large, round silver placemat in the center of the tray to represent a skating rink. Or add a circle cut from tin foil.

Lay wooden train tracks around the circular placemat.

Set in another snowy or icy area by trimming a white or silver rectangular placemat into a curved shape.

Add a round tin foil or white cardstock disposable container lid to suggest a third outdoor play space.

Then arrange the gift box buildings around the edge of the tray. These can easily be found at a dollar store.

Cut out large window cling snowflakes, leaving the backs on. Set them in open areas in the tray.

Next, put winter-themed people figurines and miniature village props on and around the “snow” and “ice.”

Generously sprinkle in gem snowflakes.

Finally, set a wooden train on the track. Or add community helper vehicles.

_______

_______

Your little learners will be excited to investigate this Christmas Village tuff tray. If some of the figurines and props you choose to use are breakable, they need to be used carefully by little ones. The holiday play invitation must be supervised by an adult at all times!

This tuff tray setup is non-messy, so can easily be added to a session where there are ample other activity choices.

_______

[Read more…] about Christmas Village Tuff Tray
Tweet
Share
Share
Pin

Filed Under: Christmas, display, dramatic play, preschool, pretend play, sensory, winter Tagged With: Christmas, sensory tray, tuff tray

Earth Day Craft

April 24, 2021 by Annette Kaminsky Leave a Comment

Tweet
Share
Share
Pin
Easy to do, eye-catching earth day craft with green and blue pony beads. The activity works well as a classroom or family creative project.

_______

Earth Day was first celebrated in the United States in 1970 and is now observed all over the world every year on April 22. It is a day to appreciate animals, plants, and earth’s majestic landscapes. It is also a time to do activities that show care for our beautiful planet. This beaded earth day craft was our activity of choice this year to recognize earth day. It works well as a cooperative activity at home or in the classroom.

_______

Supplies To Collect

Supplies to collect in order to make a stunning beaded earth day craft.

_______

  • pony beads in shades of blue and green
  • thin green yarn
  • scotch tape
  • 8 ½ x 11-inch green cardstock
  • 12 x 12-inch cardstock
  • 8 or 9-inch circular lid or flat disc with an edge
  • glue gun or white glue

_______

Follow me on Pinterest for more early learning ideas.

_______

Making the Beaded Earth Day Craft

Tie a pony bead onto one end of a long piece of yarn. Wrap a thin piece of scotch tape around the other end to prevent fraying.

Set the rest of the pony beads on a tray along with the yarn. Have students or family members take turns stringing beads. Or have one child string beads over time.

Invitation to string blue and green pony beads for an earth day craft.

_______

Next, cut a green cardstock circle to fit just inside a circular cookie tin lid or item with a similar shape. A disc-shaped dog toy turned out to be the perfect size in my stash of supplies!

Fit the circle into the mold. Then starting on the edge, glue down the strung beads in a tight spiral shape with white glue or a glue gun.

After the rim of the circle is beaded, take the cardstock shape out of the mold and tack down the rest of the beads. Trim off extra beaded yarn if necessary.

Steps to complete a beaded earth day craft with green and blue pony beads.

_______

Mount the bead project onto 12-inch x 12-inch cardstock and display.

An attractive classroom or family earth day craft project with green and blue pony beads.

_______

You might choose to use the mold as a frame.

Stunning, super easy beaded earth day craft. This piece is framed and ready for display.

_______

TIPS:

  • Be on the lookout for packages of beads in various shades of one color.
  • If the string of beads isn’t long enough to completely fill in the circle, carefully attach a new piece of yarn with a small piece of scotch tape. Then add more beads.
  • A smaller or thinner bead can be used for the center if a bigger one doesn’t fit.

_______

Exquisite earth day craft with green and blue pony beads. This easy-to-do activity works well as a classroom or family creative project.

_______

This earth day craft is inspired by the exquisite bead art of Canadian Métis artist Katherine Boyer. Her beautiful art can be viewed on her website @katherineboyerart.com.

_______

Earth Day Craft Video Tutorial

_______

25 Earth Day Activities

Doing an earth day craft is just one way to help little learners or your family honor the conservation-minded special day. Here is a list of 25 activities to choose from:

  • Clean up a park or playground.
  • Pick up litter at the beach.
  • Bike to work or school.
  • Plant a tree.
  • Start a vegetable or flower garden.
  • Compost fruit and vegetable scraps.
  • Plant wildflowers and native plants.
  • Grow plants that attract butterflies, bees, and birds.
  • Learn more about an animal you are afraid of.
  • Read books about animal care.
  • Go on a bug safari.
  • Take care of animals.
  • Invite in an animal specialist guest.
  • Take a field trip to a farm or zoo.
  • Go on a nature walk.
  • Have a nature scavenger hunt.
  • Read books about planet earth.
  • Study a globe or map.
  • Do a science experiment.
  • Discuss the four Rs: reduce, reuse, repair, recycle.
  • Put recyclables in a bin.
  • Visit a recycling center.
  • Create earth crafts using recycled materials.
  • Give away gently used toys.
  • Donate money to a conservation group.

_______

Of course, earth day activities are appropriate any time of the year. And the beaded earth craft also works beautifully as part of a Night And Day or Space theme.

Easy to do, eye-catching earth craft with green and blue pony beads. The activity works well as a classroom or family creative project.

_______

[Read more…] about Earth Day Craft
Tweet
Share
Share
Pin

Filed Under: art, display, preschool, space Tagged With: bead art, earth craft, Earth Day

Silhouette Bunny Art

March 27, 2021 by Annette Kaminsky Leave a Comment

Tweet
Share
Share
Pin
Colorful silhouette bunny art made by dabbing dot markers on a canvas. Free template included. An art project for the whole family. This quick and showy art project displays well.

_______

Easter kind of snuck up on me this year. I didn’t realize until mid-March how early the holiday dates are. I often have time to do Easter activities with my preschoolers in the first part of April, but this year we needed to complete them by March 26 (before Spring Break week.) And so this quick and showy silhouette bunny art project was perfect for our busy time. It is easy to make at home too.

_______

Supplies To Collect

  • 7-inch x 9-inch canvas panel
  • dot markers in bright spring colors
  • cardstock paper
  • bunny template
  • white pompom
  • white glue

_______

Making The Silhouette Bunny Art

_______

Select a canvas or use sturdy art paper for this project. (I purchased canvases at a dollar store for an economical price.) Then cut a bunny shape out of same-sized cardstock.

Feel free to download this bunny template for the art project.

Template for silhouette bunny art or another spring craft project.

_______

Bunny PrintableDownload

This bunny template is for individual or one classroom use only.

_______

Carefully center the cardstock with the bunny shape removed on the canvas.

Have your little learner pick a dot marker in a favorite color and dab dots all over the bunny shape, holding the template steady. You may want to help do this, as the cardstock design has a tendency to slip around. And this way you both can practice teamwork and co-operation.

Your early learner can glue on a pompom tail with a dab of white glue when the bunny is dry.

Pink silhouette bunny art made by dabbing dot markers on a canvas. This quick and showy art project displays well.

_______

You may wish to invite your little learner to create this art project in a few different spring colors or have family members each make one. The colorful bunnies display well together.

_______

Or you can ask your little learner to do the silhouette bunny art in two different ways. Then mount the canvasses side by side.

Silhouette bunny art made in two ways by dabbing spring-colored dot markers on a canvas. Free template included.

_______

Tag me on Instagram if you make this art project. I will share your bunny art in my stories!

_________

Adorable silhouette bunny art made by dabbing spring-colored dot markers on a canvas. Free template included. An art project for the whole family.

_______

[Read more…] about Silhouette Bunny Art
Tweet
Share
Share
Pin

Filed Under: art, display, Easter, preschool, spring Tagged With: bunnies, dot markers

Paper Plate Ocean Drum

March 6, 2021 by Annette Kaminsky Leave a Comment

Tweet
Share
Share
Pin
This DIY paper plate ocean drum can be personalized with a picture of a family member and/or pet.

_______

Ocean drums are versatile musical instruments that imitate the soothing sound of gentle waves hitting the shore. Your early learner can help create a paper plate ocean drum to make water sounds and will be able to use it in many other ways. The drum can be personalized and will look awesome displayed.

_______

Follow me on Pinterest for more ideas.

_______

Supplies To Collect

  • two 9-inch paper plates
  • 9 x 12-inch white cardstock
  • transparency film or clear file folder
  • photo of a child, family, or a pet
  • small beads
  • cinnamon candy hearts
  • alphabet letter beads
  • adhesive gems
  • scissors
  • glue gun
  • glue stick or glue tape

_______

Making The Paper Plate Ocean Drum

Steps to create a personalized paper plate ocean drum.

_______

Cut out the middle part of one paper plate.

Print a favorite photo onto cardstock paper. Or use a picture from a vintage calendar or magazine. Trace a 15.5 cm / 6 1/8 inch circle around the part of the picture chosen for the drum. Cut the circle out and use glue tape or a glue stick to paste it on the center of the second plate.

Cut the same sized circle from a clear file folder or sheet of transparency film.

Use a glue gun to attach the clear circle to the cut plate.

Sprinkle cinnamon candy hearts, letter beads, and small round beads onto the photo-enhanced plate. Alphabet letter beads that spell love or the name of a child or pet would work well.

Glue the edges of the two plates together with a glue gun.

If desired, decorate the paper frame of the drum with adhesive gems.

This paper plate ocean drum can be personalized with a picture of a family member and/or pet.

_______

Playing The Ocean Drum

The crafted drum can be played many different ways, creating a variety of sounds:

Tilt the drum in all directions by rolling your wrist slowly while holding the instrument by its frame. The encased beads and candies will roll over the bottom and mimic the relaxing sound of waves lapping the shore.

Stop and start playing the instrument suddenly to make the sound of crashing waves.

Hold the drum over your head and tilt it.

Move the drum around your body.

Tap the drum gently with a drumstick.

Scrape the drum.

Use the percussion instrument as a shaker.

Make loud, soft, fast, and slow sounds.

Tap or shake a pattern of sounds.

This paper plate ocean drum can be personalized with a picture of a favorite pet.

_______

[Read more…] about Paper Plate Ocean Drum
Tweet
Share
Share
Pin

Filed Under: art, display, music, ocean, pets, preschool Tagged With: drums, musical instruments, paper crafts, pets

  • « Go to Previous Page
  • Page 1
  • Interim pages omitted …
  • Page 4
  • Page 5
  • Page 6
  • Page 7
  • Page 8
  • Go to Next Page »

Primary Sidebar

Hi, I'm Annette Kaminsky, a preschool teacher who loves sharing learning through play activities for young children. Thanks for visiting my site. Feel free to stay awhile!

Subscribe Via Email

Recent Posts

  • Expanding Balloon Science Experiment May 18, 2026
  • Earth Day Spin Painting April 21, 2026
  • Easter Bunny Scavenger Hunt April 4, 2026
  • Celebrate Diversity Coloring Pages March 1, 2026
  • Lunar New Year Lantern Craft February 11, 2026
  • Black History Month Positive Affirmations Art January 29, 2026
  • Snowflake Cafe Dramatic Play Set January 19, 2026
  • Pastel Christmas Letterhead and Envelope December 20, 2025
  • December Kindness Activities November 30, 2025
  • Fall Forest Sensory Bin November 30, 2025

Categories

Topics

apples bunnies butterflies Chinese New Year Christmas Christmas craft color colors dramatic play Easter fall flowers hearts holiday jewelry leaves leprechauns light table loose parts painting paper crafts playdough pretend play printables printmaking process art pumpkins rice bin scented playdough science experiment scissor skills sensory bin sensory play sensory tray shamrocks skeletons snakes snowflakes spiders spring St. Patrick's Day sunflowers tablescapes Valentine's Day water play

Copyright © 2026 · Lifestyle Pro on Genesis Framework · WordPress · Log in