• Skip to secondary menu
  • Skip to main content
  • Skip to primary sidebar

Putting The Pretty In Preschool

Finding Beauty In Everyday Early Childhood Experiences

  • Home
  • About Me
  • Winter
  • Chinese New Year
  • Blog
  • Valentine’s Day
  • Contact Me
  • Easter Activities

science experiment

Salt and Ice Science Experiment

May 20, 2025 by Annette Kaminsky Leave a Comment

_______

This salt and ice science experiment is simple to set up and fun to do. Just a few supplies are needed for this ice-cold science activity. It’s perfect on a hot day, and makes a good pirate theme or Mother’s Day activity.

_______

Supplies to Collect

Gather the following supplies for this ice and salt science experiment:

  • food storage trays
  • food coloring
  • acrylic gems
  • bowl with salt
  • teaspoons
  • paint pot with water
  • eye droppers or pipettes
  • play tweezers
  • tray
  • safety glasses
  • waterproof table cover

_______

_______

Preparing the Salt and Ice Science Experiment

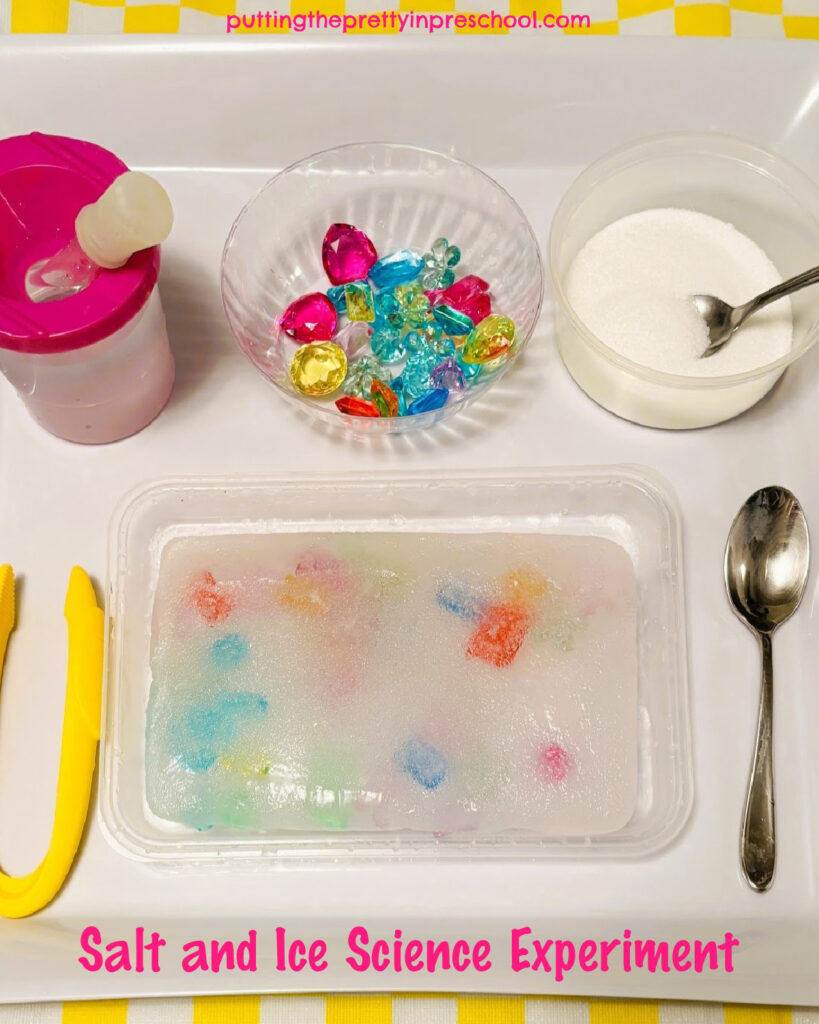
To prepare this science experiment, freeze gems in ice for two or three days.

Start by adding a layer of water with a few squirts of food coloring stirred in to the bottom of a food storage tray.  Liquid watercolor paint also works well to tint the water.

Next, spread a handful of acrylic gems in the liquid. Then, carefully set the tray in the freezer.

Remove the tray from the freezer and add more water and gems the following day. Freeze the tray overnight again.

The third day, the ice is ready for the science and sensory activity. Many gems will be near the surface of the ice, and some may be sticking out a little. This is fine for younger children.

_______

To add more challenge for older children, pour a thin layer of water over the frozen gem-filled ice and freeze the tray again before setting out the activity.

_______

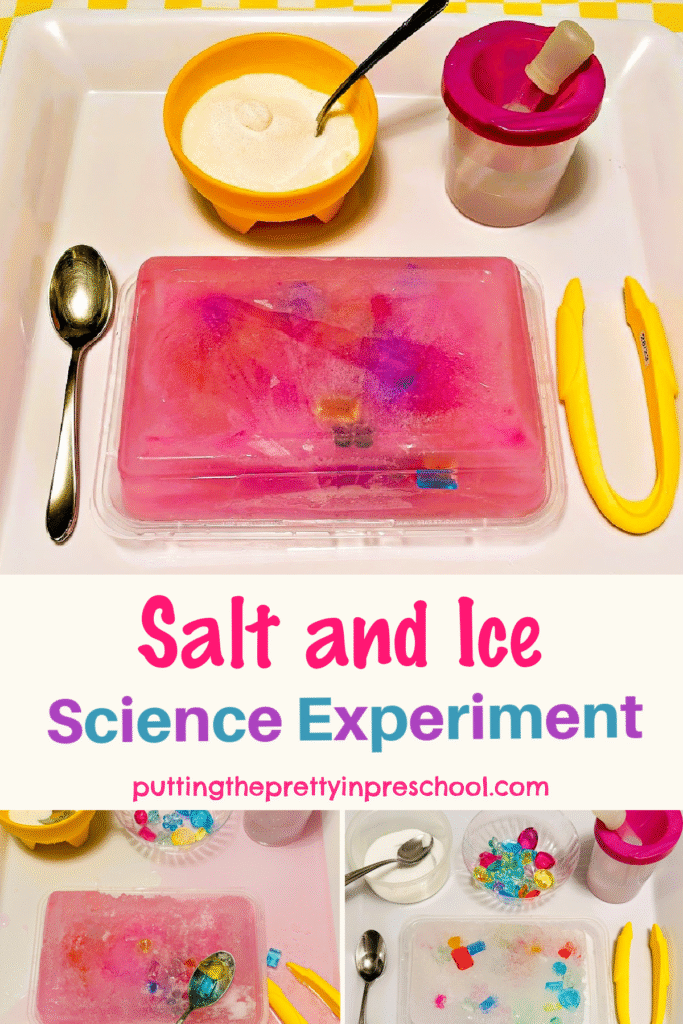
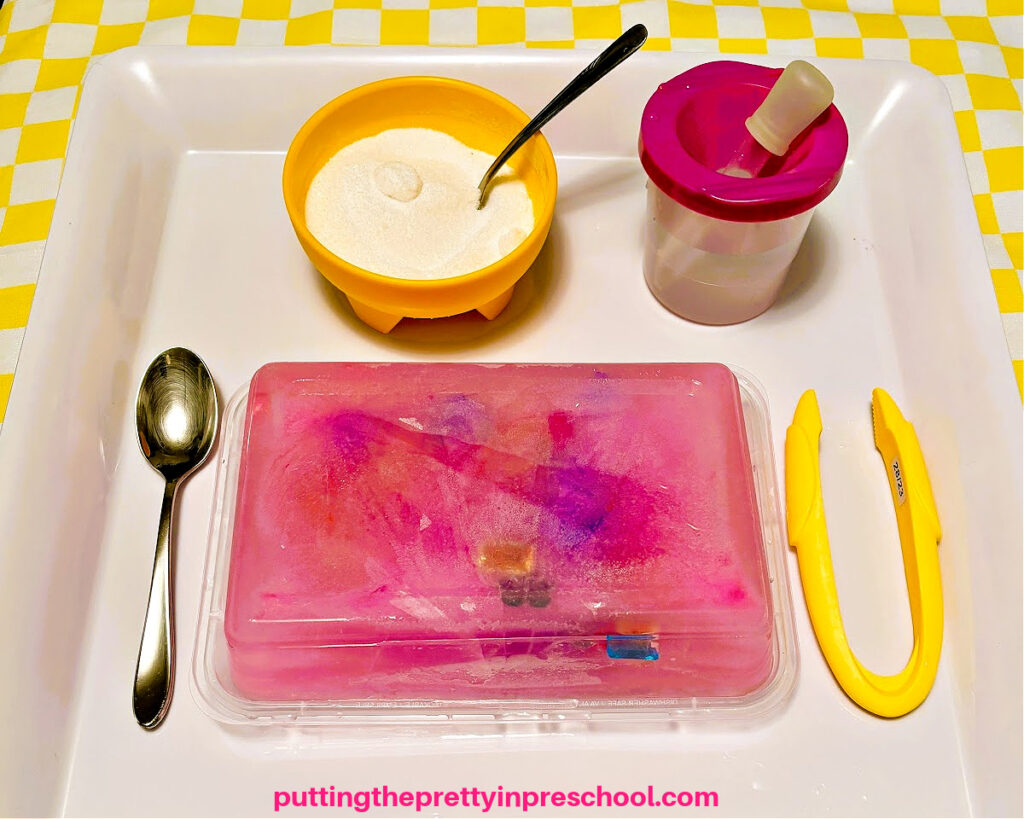
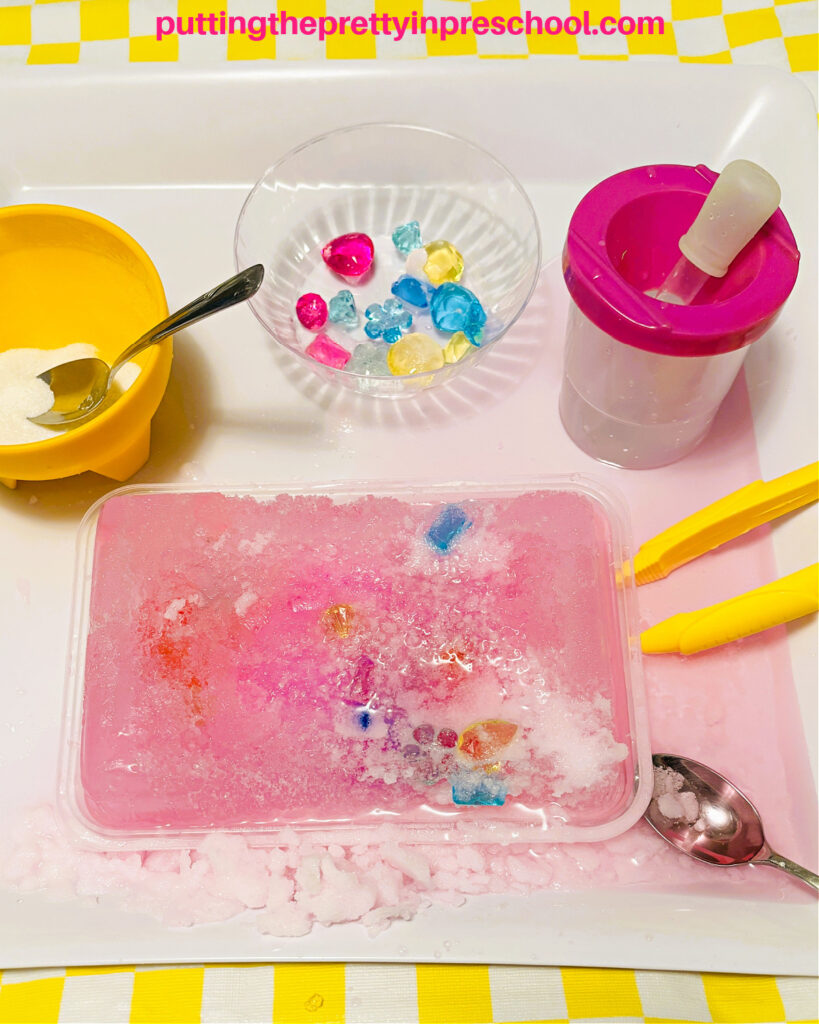
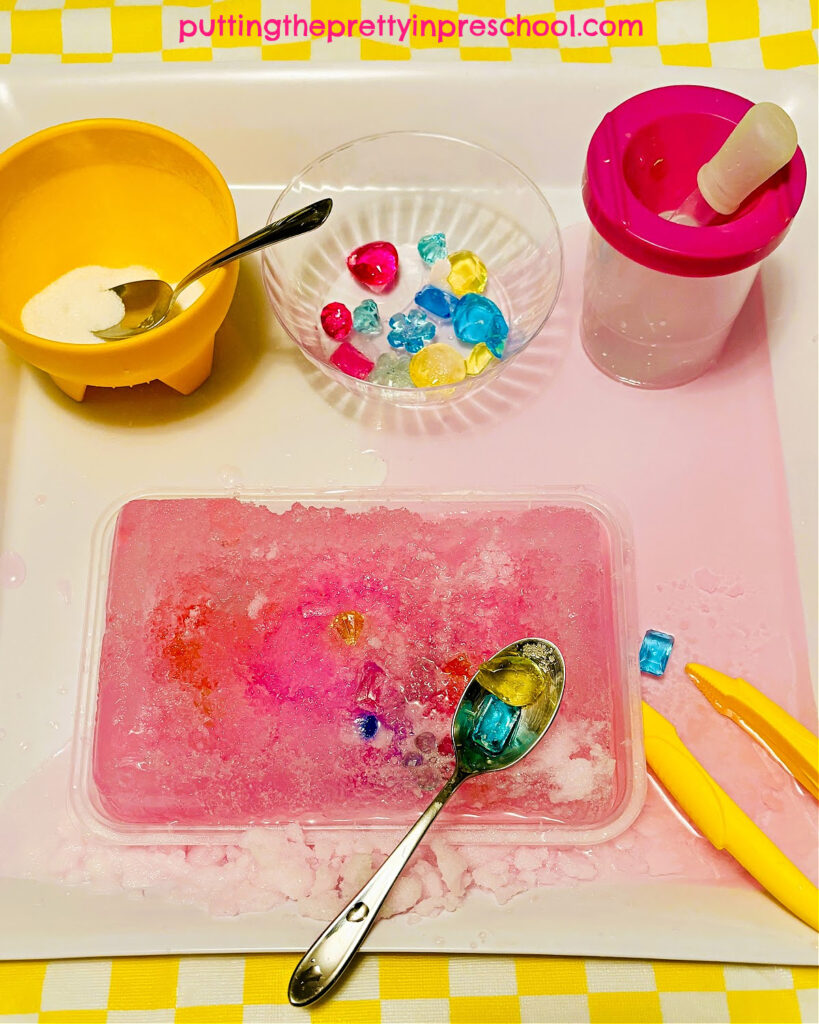
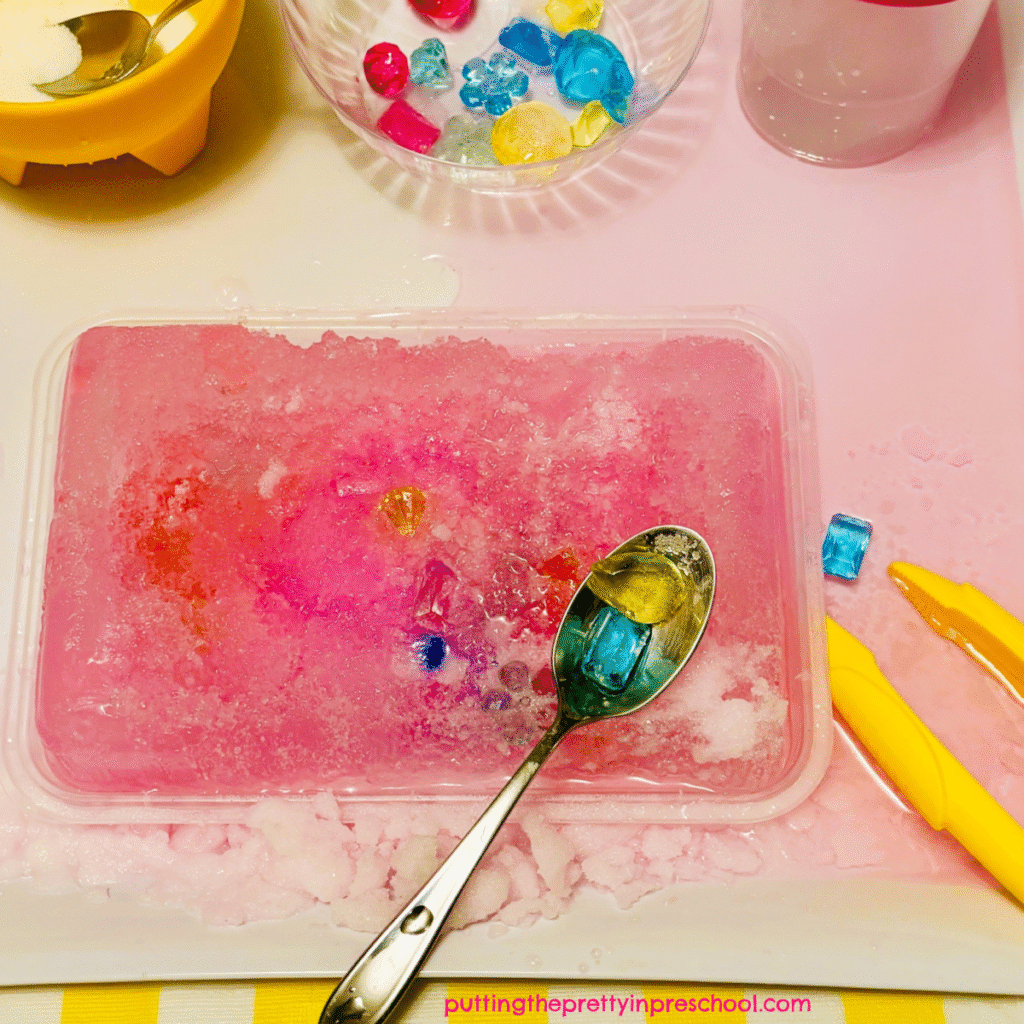
The Salt and Ice Science Experiment

When the layers of water are frozen, remove the ice from the food storage tray and set it on a large, edged tray placed on a table protected with a waterproof table cover.

_______

Add a bowl of salt with a teaspoon, an eye dropper or pipette in a paint pot filled with water, and a small bowl ready for freed gems. Include a set of play tweezers and a second teaspoon on the tray.

Drip water and sprinkle salt on the ice, and pry out the gems using teaspoons and tweezers. The salt and ice help melt the ice, making the removal of gems quicker and easier. Note: Safety glasses are recommended for this activity as gems may pop out of the ice. Check freed gems for broken edges and discard them.

_______

Follow me on Pinterest for more early learning ideas.

_______

Variations of the Salt and Ice Science Experiment

For variety or to use supplies on hand, replace the acrylic gems in this salt and ice science experiment with pom poms or animal figurines. Ocean animal figurines are a popular choice for this activity.

_______

Skip adding food coloring to the water during the freezing process. Note: The ice will be a little clearer if you use filtered or distilled water.

Offer the activity to a group of children by freezing four or more trays of gem-filled water and setting the supplies for each participant in a large active world tray.

_______

Explaining the Salt and Ice Science Experiment

Salt lowers the temperature of water. For this to happen, it must be in a solution with liquid water. The salt and water solution created in this experiment melts the ice quicker than letting the ice liquify on its own.

_______

Tying In Mother’s Day

This salt and ice science experiment is a perfect Mother’s Day activity. After freeing gems from ice, allow participants to pick one to glue to a Mother’s Day greeting that says “Mom, you’re a gem.” Allow them to save more gems in a small container to add to their treasure collection.

_______

More Activities With Ice

Hockey Game Small World

Paint Pour Ice Cake Sensory Play

Ice Drum Musical Instruments

Painting Ice and Snow

_______

[Read more…] about Salt and Ice Science Experiment

Filed Under: Mother's Day, preschool, science, sensory, winter Tagged With: ice, science experiment, sensory play, sensory tray

Candy Cane Wreath Experiment

December 20, 2023 by Annette Kaminsky Leave a Comment

_______

It’s tradition for me to do a candy cane science experiment every December, and each year I arrange the candy canes in a new way or change up the sizes and colors of the sweet treat. In this post, I debut my latest design, a candy cane wreath experiment.

_______

Follow me on Pinterest for more early learning ideas.

_______

Supplies to Collect

Gathering supplies for this simple science experiment couldn’t be any easier. Just select an edged waterproof tray, and purchase a package of candy canes. You may have some on hand already. Then fill a pitcher or large glass with water and you are good to go.

_______

The Candy Cane Wreath Experiment

To perform this inexpensive color science experiment, arrange candy canes around the edge of a waterproof tray in a wreath-like shape.

_______

If you look closely, you’ll notice one or two broken candy canes in the tray and a few oddly shaped ones. This science experiment is the perfect use for them, as I wouldn’t have wanted to hand those out as treats.

Next, slowly pour water into the tray until the candy canes are just covered in liquid.

Then watch what happens. You’ll see the candy cane colors slowly spread through the water.

_______

Note: The color changes happen quickly. Stay by the science experiment and have your camera ready to snap a few pictures.

_______

_______

_______

After a little while, you can carry on with other activities and periodically check in on the experiment to see even more color changes and view the candy canes melting away.

_______

The Science Behind This Candy Cane Color Experiment

Candy canes are made of sugar. The water breaks the sugar molecules apart. Then the food colors move through the water away from areas of higher sugar concentration (near the candy) to areas with less sugar. When the sugar concentration is the same in all areas, the colors stop moving.

_______

More Candy Cane Activities

Candy Cane Playdough Tray

Mini Candy Cane Tree Experiment

Christmas Peppermint Sensory Bin

Blue Candy Cane Science Experiment

_______

[Read more…] about Candy Cane Wreath Experiment

Filed Under: Christmas, preschool, science, sensory Tagged With: candy canes, candy science, science experiment

Melted Candy Gingerbread Ornaments

December 12, 2023 by Annette Kaminsky Leave a Comment

_______

Making melted candy gingerbread ornaments was something I’ve wanted to try ever since viewing a beautiful four-sided, sweet-tasting red and white gingerbread house on Twitter a few years ago. It’s an eye-pleasing baking activity and a festive science experiment so I highly recommend giving the activity a go.

_______

Follow me on Pinterest for more early learning activities.

_______

Melted Candy Ornament Supplies

_______

Gather the following supplies for this simple candy science activity:

  • red and/or green striped round peppermint candies
  • metal gingerbread cookie cutters
  • no-stick cooking spray
  • parchment or wax paper
  • cookie pans
  • cutting board
  • knife
  • vegetable oil
  • wooden skewer

_______

Melted Candy Gingerbread Ornament Tips

Before trying this minty STEAM activity, I read a few blog posts about making melted peppermint candy designs. This detailed Melted Peppermint Candy Ornaments post by onelittleproject.com was particularly helpful and had great tips.

_______

Making The Melted Candy Christmas Ornaments

_______

To make the melted gingerbread candy ornaments, start by picking out metal cookie cutters for the task. Generously sized gingerbread people and a house were my cookie cutters of choice.

Spray the cookie cutters with no-stick cooking spray.

Next, add parchment paper to one or more cookie pans and set the greased cookie cutters on the pans.

Then insert unwrapped red or green striped peppermint candies inside the cookie cutter shapes. For larger spaces, cut candies into halves or quarters on a cutting board and use the smaller pieces to fill in the gaps.

_______

Baking The Melted Candy Gingerbread Ornaments

To bake the candy gingerbread ornaments, set the oven temperature to 350 degrees.

Next, put the peppermint candy-filled cookie cutters in the oven and heat them for around six minutes.

Stay by the oven and make sure to turn the oven light on to view the candies melting. It’s okay to take a peek…the sweet creations won’t jump out of the oven. But they will melt down if they are in the oven too long.

When the candies are joined together and a little of the melted candy starts seeping around the cookie cutter edges, take the baking pans out of the oven.

_______

After around two minutes, dip a wooden skewer in vegetable oil and carefully make a little hole near the top of each decoration so a string can be drawn through.  Then let the eye-catching creations cool for around fifteen minutes.

Before the ornaments cool completely, carefully pull away the sides of the cookie cutters from the candy shapes and gently push them out. Oh-so-carefully break off melted bits around the peppermint ornaments if there are any.

Let the beautiful striped ornaments cool completely.

_______

How The Melted Gingerbread Ornaments Turned Out

This is where I need to come clean. My candy gingerbread ornaments didn’t turn out perfectly. Each one had one broken bit. The red and white gingerbread person had two broken bits.

_______

But as a first try at making melted candy ornaments, I considered it a success. I determined afterward that I had left the candied shapes in the oven just a little too long (probably eight minutes) and needed to be even more careful in removing them from the cookie cutters after baking. So a second attempt would likely be more successful.

The activity did turn out well enough that I would confidently be able to introduce it to family members or a group of preschool students. The patterned ornaments were fun to put back together as mini puzzles, and they would be tasty treats broken down into small bits and shared. Broken ornaments could be crushed and infused with playdough or baked in a peppermint cookie recipe when the science experiment was over. And there could be a conversation about stripes, patterns, halves, quarters, and the smell and taste of peppermint.

Striped peppermint candies are economical to buy, and I’ll surely give this stunning melted candy gingerbread ornaments STEAM activity another go. How about you? Will you give it a try?

_______

More Peppermint Candy Activities

Christmas Peppermint Sensory Bin

Candy Cane Tree Experiment

_______

[Read more…] about Melted Candy Gingerbread Ornaments

Filed Under: Christmas, Food Art, preschool, science, sensory Tagged With: decorations, gingerbread, science experiment

Dyed Peony Science Experiment

July 2, 2023 by Annette Kaminsky Leave a Comment

This simple dyed peony science experiment shows how water travels through plants. An all-ages activity everyone will enjoy.

_______

Peony plants have large, bold flowers that grow profusely during the blossoming season. It’s always sad to see them go so I try to snap a few pictures before they drop off.

Don’t get scared off by the ants in this picture I took! Ants eat peony nectar and help keep peonies safe by attacking bud-eating insects.

Pretty light pink peony flowers and buds. Peony blooms are showstoppers during the summer season.

_______

After taking a peony and thrifted vintage teacup photo, I realized that a saved flower in a jar of water would provide the perfect opportunity for a dyed peony science experiment. Peony flowers have a dense cluster of petals, similar to carnations, so I wondered if the experiment would turn out as well. It worked wonderfully, so I highly recommend giving it a try.

A pretty in pink peony bloom complements a thrifted vintage teacup.

_______

Follow me on Pinterest for more learning ideas.

_______

Supplies To Collect

All you need is a few supplies to perform this oh-so-easy, nature science experiment. Gather the following:

  • peony flower stem with leaves
  • clear jar or vase with water
  • neon blue food coloring
  • spoon

_______

The Dyed Peony Science Experiment

To perform this simple science experiment, fill a small, clear jar at least half full of water.

Add 10 or more drops of neon blue food coloring and stir it in. I use a blue hue, but any color of food coloring would work nicely.

Try this easy-to-do dyed peony science experiment today. This activity shows how water travels up peony stems and flows through leaves and petals.

_______

Set the sprig in the colored water overnight and observe it the next day. You’ll notice that the edges of the peony flower petals have turned blue.

Check the plant once a day after that to spot more color changes.

This simple dyed peony science experiment shows how water travels through plants. An all-ages activity everyone will enjoy.

_______

Try this easy-to-do dyed peony science experiment today. This activity shows how water travels up peony stems and flows through leaves and petals.

_______

Tell your little charges that coloring the water blue helps us see how water travels up the stem of a plant into the flower leaves and petals.

Note: The leaves and stems of my peony plant are dark, so it is difficult to see water travel up them. Choosing a plant with lighter leaves would show water travel through these plant parts better.

Large, light pink peony blooms are showstoppers during the summer season.

_______

The Importance of Water For Plants

Along with light, air, and good soil, water is super important to a plant’s growth and survival:

  • Plants are made of mostly water, and it helps them stay firm.
  • Plants cool down by releasing water from their stems and leaves. This helps them regulate their temperature.
  • Water carries important nutrients that help plants grow.
  • Sunlight, carbon dioxide from the air, and water are necessary for photosynthesis, which is how the leaves of plants create energy to survive.

_______

This simple dyed peony science experiment shows how water travels through plants. An all-ages activity everyone will enjoy.

_______

If you have an abundance of peonies, why not try this dyed peony science experiment with a variety of food coloring hues? Or you could perform it with carnations, which are easy to find and economical to buy.

Related:

Celery Science Experiment

_______

[Read more…] about Dyed Peony Science Experiment

Filed Under: gardening, preschool, science, sensory, summer Tagged With: color experiment, flowers, science experiment

Snowman Theme Color Experiment

February 17, 2023 by Annette Kaminsky Leave a Comment

Try this magic creamer color experiment using half-and-half coffee cream. An easy-to-do science experiment with stunning results.

_______

It’s been a while back, but I promised to try the always-fun magic milk experiment with homo milk or cream. So here’s a post about a magic creamer snowman theme color experiment.

_______

Follow me on Pinterest for more early learning ideas.

_______

Watch the colors swirl and change in this stunning magic creamer color experiment. This is a crowd-pleasing science experiment.

_______

Supplies Collected

Collected in this winter-themed version is:

  • snowman cake pan
  • half-and-half (10% milk fat) creamer
  • red, yellow, and blue food coloring
  • liquid dish soap

_______

The Snowman Theme Color Experiment

Watch the colors swirl and change in this stunning magic creamer color experiment. This easy-to-do science experiment is sure to be a topic for conversation.

_______

To perform this easy science experiment, pour a layer of half and half (10% milk fat) creamer into a cake pan or small bin. My pick for this experiment is a snowman cake pan. It is medium-sized and fits the amount of liquid I have on hand.

Note: Half and half cream is equal parts whole milk and light cream. It isn’t near as creamy as whipping cream but is creamier than the milk I’ve featured in past experiments. It is commonly used as a coffee creamer.

Next, add drops of red, yellow, and blue food coloring around the pan.

Then add drops of liquid dish soap onto some of the food coloring patches. The colors will immediately swirl around and make new color designs.

Close up, the color changes look super stunning.

A close-up view of the immerging designs created in a magic creamer color experiment. This easy science experiment is a crowd-pleaser.

_______

After the color movement slows down, check back occasionally and you will see new color patterns immerge. The color designs will keep changing for at least half an hour.

Watch the colors swirl and change in this stunning magic creamer color experiment. This easy-to-do science experiment is sure to be a topic for conversation.

_______

At this time, try adding a few more drops of food coloring. I try to make a snowman face and buttons.

Add more dish detergent drops and watch the colors move and change again.

Try this magic creamer color experiment using half-and-half coffee cream. An easy-to-do science experiment with stunning results.

_______

Interpreting This Color-Changing Science Experiment

Although half-and-half (10% milk fat) creamer is made of a significant amount of water, it also contains fat and protein. These are both sensitive to changes in the liquid. When dish soap is added to the pan, it breaks up the surface tension of the half-and-half liquid and is attracted to the fat molecules. The fat molecules try to scurry away but end up bonding with the soap molecules. The movement of the food coloring makes this process visible. As more and more soap and fat molecules bond, the color movement slows down and eventually stops.

Watch the colors swirl and change in this stunning magic creamer color experiment. This is a crowd-pleasing science experiment.

_______

Fat content in the half-and-half creamy liquid is super important in this science experiment.

The colors in the half-and-half coffee creamer experiment move at a slightly slower rate than 2% or 1 % milk, both of which I’ve tried successfully before. All three liquids show stunning color-swirling results.

_______

Related:

Color Explosion Science Experiment

_______

[Read more…] about Snowman Theme Color Experiment

Filed Under: preschool, science, sensory, winter Tagged With: color, color experiment, science experiment, snowmen

Candy Cane Tree Experiment

December 20, 2022 by Annette Kaminsky Leave a Comment

This mini candy cane tree experiment is a must-try. Just three supplies are needed for the simple science activity everyone will love.

_______

This candy cane tree experiment is easy to set up and is sure to be a conversation piece. It works well as a Christmas science activity, and also fits a forest theme.

_______

Follow me on Pinterest for more early learning ideas.

_______

Supplies To Collect

_______

For this simple science experiment, gather the following four supplies:

  • package of mini candy canes
  • one round striped candy
  • large flat white or cream-colored plate
  • flask of warm water

    _______

    The Candy Cane Tree Experiment

    Design a tree on a plate with mini candy canes. Pour water into the plate and watch what happens. Your audience will be wowed!

    _______

    To perform this showy science experiment, start by arranging mini candy canes on a plate in a Christmas/coniferous tree design. The colorful and fruity candy canes above were a great find at a Dollar Store.

    Next, set a round candy on top of the tree to be the tree topper.

    Then fill a flask with warm water.

    Carefully set the plate with the tree design on a table.

    Now the experiment is ready to be performed. Invite participants to gather around the candy tree. Slowly pour water from the flask into the plate and invite everyone to watch what happens. It’s that simple!

    Participants will be wowed at how the colors in the candy canes quickly spread through the water, making beautiful designs.

    Watch the colors explode from the candy cane tree in this super simple science experiment everyone will love.

    _______

    Color changes will be instant. Over time the colors and their intensity will change.

    Watch the colors move and change in this super simple science experiment everyone will love. The activity is a must-try.

    _______

    Note: This tree-shaped experiment can be done with standard-sized candy canes in a large ridged serving tray.

    _______

    The Science Behind The Candy Cane Tree Experiment

    The candy canes are made of sugar. The water breaks the sugar molecules apart. Then the food colors move through the water from areas of higher sugar concentration (near the candy) to areas with less sugar (the center and rim of the tray.) When the sugar concentration is the same in all areas, the colors stop moving.

    Water temperature is a variant in this experiment. Sugar dissolves more quickly in warm water, and food coloring moves at a faster pace.

    Candy Cane Color Experiment Variations

    Watch the stunning color changes in this super simple mini candy cane science experiment. Try it today!

    _______

    You can forgo making a tree shape with the candy canes, and spread a few around a plate instead. The color movement is just as interesting in this more basic version.

    Watch beautiful colors emerge in this super simple science experiment with a serious WOW factor. Just thee supplies are needed to perform the experiment.

    _______

    Watch beautiful colors emerge in this super simple science experiment with a serious WOW factor. Just thee supplies are needed to perform the experiment.

    _______

    And if you have been following my blog for a while, you may have discovered that I have done a few other candy/candy cane color experiments. Here are more variations:

    Candy Cane Science Experiment

    Blue Candy Cane Science Experiment

    Shamrock Dissolving Candy Experiment

    _______

    This mini candy cane color experiment is a must-try. Just three supplies are needed for the simple science activity everyone will love.

    _______

    [Read more…] about Candy Cane Tree Experiment

    Filed Under: Christmas, preschool, science, sensory, trees Tagged With: candy canes, Christmas tree, science experiment, trees

    Color Magic Milk Experiment

    October 8, 2022 by Annette Kaminsky Leave a Comment

    Try this mesmerizing color magic milk experiment today! A maple leaf frame adds an artistic twist to the kitchen science experiment.
    Try this mesmerizing color magic milk experiment today! A maple leaf frame adds an artistic twist to the kitchen science experiment.

    _______

    Have you ever done the color magic milk experiment? It is quick and easy to do, and participants are always in awe of the results. In this version, I add artistic flair by giving the experiment a leafy twist.

    _______

    Follow me on Pinterest for more early learning ideas.

    _______

    Supplies To Collect

    Just a few supplies are needed for this simple but stunning kitchen science experiment. Gather the following:

    • 2 liters milk  
    • red, yellow, and blue food coloring
    • dish detergent
    • large round serving tray
    • maple leaf frame (optional)

    _______

    The Color Magic Milk Experiment

    Effortlessly perform this color magic milk experiment in four easy steps. A maple leaf frame enhances the kitchen science experiment.

    _______

    To do this experiment, start by pouring a layer of milk into a food tray. Using homo milk is recommended, but 1% and 2% will also work.

    Note: Outdated milk is a great choice for this experiment.

    Next, float a maple leaf frame on the milk. (My frame is a cardboard cutout purchased at a dollar store.)

    Note: The leaf-themed frame adds interest to the experiment, but is not necessary for it to work.

    Then drip yellow, red, and blue food coloring inside the frame.

    This next step is where the magic happens… Squirt a drop of dish detergent onto each pool of colors. Watch the colors instantly race to the edge of the frame, swirling around as they go.

    After the initial color burst, check back after ten minutes and you will see a variety of hues slowly starting to fill in the maple leaf shape.

    Watch the color magically spread around the maple leaf frame in this kitchen science experiment.

    _______

    At this point, you can add a little more food coloring and a tiny bit of dish detergent for more color play.

    The colors slowly fill out the maple leaf frame in this color magic milk experiment with an artistic twist.

    _______

    View this maple leaf color magic science experiment as a video.

    _______

    The Science Behind This Color Experiment

    Although milk is made of mostly water, it also contains fat and protein. These are both sensitive to changes in the milk. When dish soap is added to the tray, it breaks up the surface tension of the milk and is attracted to the fat molecules. The fat molecules try to scurry away but end up bonded with the soap molecules. The movement of the food coloring makes this process visible. As more and more soap and fat molecules bond, the color movement slows down and eventually stops.

    Since the fat content in milk is super important in this experiment, homo milk works the best. But 2% and 1% milk (which I often have handy) also show stunning results.

    _______

    Try this mesmerizing color magic milk experiment today! A maple leaf frame adds an artistic twist to the kitchen science experiment.

    _______

    Related: Color Explosion Science Experiment

    _______

    More Leaf Activities

    Five Leaf Art Activities

    Fall Leaf Salad Spinner Art

    Light Table Leaf Exploration

    Eye Dropper Leaf Art

    Maple Leaf Activities

    _______

    [Read more…] about Color Magic Milk Experiment

    Filed Under: autumn, fall, preschool, science, sensory, trees Tagged With: color, leaves, science experiment

    Glow Art Words Of Affirmation

    September 20, 2022 by Annette Kaminsky Leave a Comment

    This black light "words of affirmation" glow art activity is a must-try. It is a science, art, and language self-esteem-building project.
    This black light "Words Of Affirmation" Glow Art activity is a must-try. It is a science, art, and language self-esteem-building project.

    _______

    Words are powerful, and they can be super uplifting to early learners. At the beginning of the school year, supportive, self-esteem-building words help students get off to a good start. A creative and oh-so-easy way to introduce them is by inviting little learners to use highlighters to color around positive ones printed in heart shapes. Afterward, the fancied-up words can be viewed and discussed in a “Glow Art Words Of Affirmation” language and science activity.

    _______

    Follow me on Pinterest for more early learning ideas.

    _______

    Supplies To Collect

    For this confidence-boosting glow art activity, gather the following supplies:

    • chisel-tipped highlighters in a variety of colors
    • white cardstock paper
    • black felt marker
    • scissors
    • tape
    • portable black light fluorescent tube and holder
    • small coffee table

    _______

    Glow Word Art

    First, draw heart shapes on white cardstock paper with a black felt marker, and add a word of affirmation to each one. Or design the project digitally. The words chosen for my art project are:

    • creative
    • friendly
    • kind
    • brave
    • helpful
    • teachable
    • awesome
    • unique
    • cherished
    Steps to perform a black light "words of affirmation" glow art activity. The art project is perfect for the beginning of the year, the end of the year, or anytime in between.

    _______

    Next, invite little learners to decorate a word heart with highlighter markers, and then cut their hearts out. Leaving some parts of the designs uncolored is fine, as white will glow too.

    Note: Highlighter ink is a tiny bit toxic, but using it is not considered a health risk. If your little charges are prone to sticking things in their mouths and/or coloring on themselves, it is advisable to choose another art medium for this activity.

    When decorated, tape the embellished hearts to a wall in a room that can be made totally dark.

    Afterward, place a fluorescent tube black light on a small table next to the art wall, and turn it on.

    Then invite everyone to the room to view the art with all lights on. Discuss how the words apply to your little learners.

    This "positive words" glow art activity incorporates language and science. It is a confidence-boosting art project perfect for any time of the year.

    _______

    Lastly, make the room dark and leave just the black light on. Students will be wowed by the glowing, worded hearts.

    This "positive words" glow art activity incorporates language and science. It is a confidence-boosting art project perfect for any time of the year.

    _______

    Safety Tip: Tell children that they should only be near a black light for a short period of time. Prolonged exposure may lead to eye and skin damage.

    _______

    Discussing The Glow Art Words Of Affirmation

    Here are some ideas for discussing decorated word hearts with the children:

    • Assure early learners that they are brave in coming to school and meeting new friends.
    • Affirm the specialness of each child by saying they are “unique, awesome, and cherished.”
    • Compliment students for being creative and teachable.
    • Highlight that being “friendly, helpful, and kind” are ways to work as a team and get along with each other.
    This black light "Words Of Affirmation" Glow Art activity is a must-try. It is a science, art, and language self-esteem-building project.

    _______

    The Science Behind Black Light

    Black lights are designed to block out visible light and emit invisible, ultraviolet (UV-A) light. They illuminate natural and man-made materials that contain phosphors. Phosphors convert the energy in UV radiation to visible light by re-emitting it at a different wavelength, one that our eyes can see.

    The dyes from highlighter pens contain phosphors. When highlighter art is positioned in a dark room near a black light, it glows.

    This black light character trait art activity incorporates language and science. It is a confidence-boosting art project perfect for any time of the year.

    _______

    Glowing Names

    Instead of focussing on words of affirmation, invite your little learners to color around their names with highlighters. This is also a terrific beginning of the year activity. And it works well at the end of the school term to remind children that they have been valued members of the class.

    _______

    Related: Scented Moon Playdough

    _______

    [Read more…] about Glow Art Words Of Affirmation

    Filed Under: art, display, fall, friends, literacy, preschool, science Tagged With: art, black light, light, science experiment, self-esteem

    Felt Marker Color Exploration

    May 1, 2022 by Annette Kaminsky Leave a Comment

    Create beautiful hues with this felt marker color exploration invitation. The activty is easy and economical to set up!
    Create beautiful hues with this felt marker color exploration invitation. The activty is easy and economical to set up!

    _______

    So – many – beautiful – hues! That‘s what your little learners will create while engaging in this felt marker color exploration invitation. The activity is easy and economical to set up and the science experiment is as interesting to children as any other project out there.

    _______

    Follow me on Pinterest for more early learning ideas.

    _______

    Supplies to Collect

    Gather the following supplies. Most can be found in the kitchen, so you probably already have them!

    • plastic tablecloth
    • water-based felt markers
    • office paper
    • craft foam
    • paper towels
    • clear plastic or white styrofoam egg cartons
    • compartment trays
    • scissors
    • jug of water

    _______

    Create beautiful hues with this felt marker color exploration invitation. The activity is easy and economical to set up!

    _______

    The Felt Marker Color Exploration Set Up

    First, cover a table with a plastic tablecloth.

    Next cut paper, paper towels, and craft foam into 2-inch x 3-inch strips.

    For each participant, fill sections of an egg carton with water. Or add water to empty tempera block trays.

    Then set up stations with strips of paper and foam, and a water-filled egg carton or compartment tray.

    Add a set of water-based felt markers to each spot.

    _______

    Exploring Color With Felt Pens And Markers

    An easy and economical felt marker color exploration activity your children will love to do!

    _______

    Invite participants to decorate foam and paper strips with felt markers, and then dip the strips into egg carton sections. The water will turn a variety of colors, resulting in exquisite transient art. Such a fun science experiment with an artistic flair!

    The colored water in the clear egg cartons below is the work of several students. I was so impressed with the many colors they created. The plastic egg cartons are set on a light table so the hues display clearly. Aren’t they gorgeous?

    So many beautiful hues can be created with this felt marker color exploration activity.

    _______

    Related:

    • Color Explosion Science Experiment
    • Candy Cane Science Experiment
    • Shamrock Dissolving Candy Experiment

    _______

    [Read more…] about Felt Marker Color Exploration

    Filed Under: art, light table, preschool, science, sensory Tagged With: colors, felt markers, science experiment, sensory play

    Floating Egg Science Experiment

    March 25, 2022 by Annette Kaminsky Leave a Comment

    How to perform a simple floating egg science experiment with easy-to-gather supplies. Decorated eggs add artistic flare to this activity.
    How to perform a simple floating egg science experiment with easy-to-gather supplies. Decorated eggs add artistic flare to this activity.

    _______

    In a whole range of egg colors with expressive faces drawn on, this floating egg science experiment includes a dose of art and drama. The experiment is simple to do and promises to be a huge hit with your little learners.

    _______

    Supplies To Collect

    The supplies for this dramatic science experiment are easy to procure, as you probably already have them in your home. Gather the following:

    • eggs
    • salt
    • pitcher of water
    • egg carton
    • two 500 ml glass jars
    • tablespoons
    • egg dipper
    • store-bought egg dying kit
    • black permanent felt pen

    _______

    Follow me on Pinterest for more early learning ideas.

    _______

    Performing The Floating Egg Science Experiment

    Steps to perform a simple floating egg science experiment with easy-to-gather supplies. Drawing and egg coloring are included in this activity.

    _______

    With a permanent felt pen, carefully draw chick feet and a worried face on one side of the eggs selected for the experiment. Draw feet and a happy face on the other side of each egg.

    Note: Crayons can be used instead to decorate the eggs.

    Then dye the eggs in different colors. I use color tablets from a store-bought kit for the eggs, but you could use a home recipe.

    Carefully drop the color-dyed eggs back in the egg carton, using an egg dipper if available. Let the eggs dry.

    Pour 1½ cups water into two jars.

    Add 3 tablespoons salt to one jar, and stir it into the liquid. Add no salt to the other.

    Pick a decorated egg to gently drop into the unsalted jar of water. Observe if it floats or sinks. Then scoop the egg out of the liquid and have participants pick the feeling the “chick egg” might be experiencing: (worried, scared.)

    Simple and fun floating egg science experiment with easy-to-gather supplies. Egg decorating adds an artistic element to this activity.

    _______

    Carefully drop the same egg into the saltwater jar. Observe if the egg now floats or sinks again. Have participants pick the feeling the “chick egg” is probably experiencing: (relief, happiness.)

    Simple and fun floating egg science experiment with easy-to-gather supplies. Egg decorating adds an artistic element to this activity.

    _______

    Try this science experiment with other colored eggs. Participants may enjoy picking an egg in their favorite color to drop in the jars.

    _______

    Related: Reptile Egg Science Experiment

    _______

    The Science Behind This Experiment

    An egg is denser than water, so it sinks. But when salt is added to water, it increases the density of the liquid. When enough salt is added, a raw egg will float.

    How to perform a simple floating egg science experiment with easy-to-gather supplies. Decorated eggs add artistic flare to this activity.

    _______

    Floating Egg Experiment Extensions

    This floating egg experiment could be extended by:

    • using large and small-sized eggs, and recording how much salt needs to be added to a jar for each one to float.
    • dying the eggs in different methods.
    • reading a picture book about feelings before or after performing the experiment.

    _______

    [Read more…] about Floating Egg Science Experiment

    Filed Under: art, Easter, literacy, preschool, science, sensory Tagged With: eggs, feelings, science experiment, sensory play

    • Page 1
    • Page 2
    • Go to Next Page »

    Primary Sidebar

    Hi, I'm Annette Kaminsky. I am a preschool teacher who loves to share easy and fun early learning activities. Thanks for visiting my blog. Feel free to stay awhile!

    Subscribe Via Email

    Recent Posts

    • Salt and Ice Science Experiment May 20, 2025
    • Airplane Rice Sensory Bin May 16, 2025
    • Salt Painting Planet Art May 3, 2025
    • Spring Bunny Sensory Bin April 19, 2025
    • Tin Foil Egg Printing April 17, 2025
    • Lentil Easter Bunny Sensory Bin April 15, 2025
    • Unicorn Store Dramatic Play Center March 25, 2025
    • Easter Store Dramatic Play Center March 23, 2025
    • Origami Heart Wreath February 28, 2025
    • Black History Month Mixed Media Art February 26, 2025

    Categories

    Topics

    block play bunnies butterflies Chinese New Year Christmas Christmas craft color colors dramatic play Easter flowers hearts holiday jewelry leaves leprechauns light table loose parts painting paper crafts playdough pretend play printables printmaking process art pumpkins rice bin scented playdough science experiment scissor skills sensory bin sensory play sensory tray shamrocks skeletons snakes snowflakes spiders spring St. Patrick's Day sunflowers tablescapes trees Valentine's Day water play

    Copyright © 2025 · Lifestyle Pro on Genesis Framework · WordPress · Log in