• Skip to secondary menu
  • Skip to main content
  • Skip to primary sidebar

Putting The Pretty In Preschool

Finding Beauty In Everyday Early Childhood Experiences

  • Home
  • About Me
  • Winter
  • Chinese New Year
  • Blog
  • Valentine’s Day
  • Contact Me
  • Easter Activities

preschool

Spin Painting Poinsettia Craft

December 17, 2023 by Annette Kaminsky Leave a Comment

_______

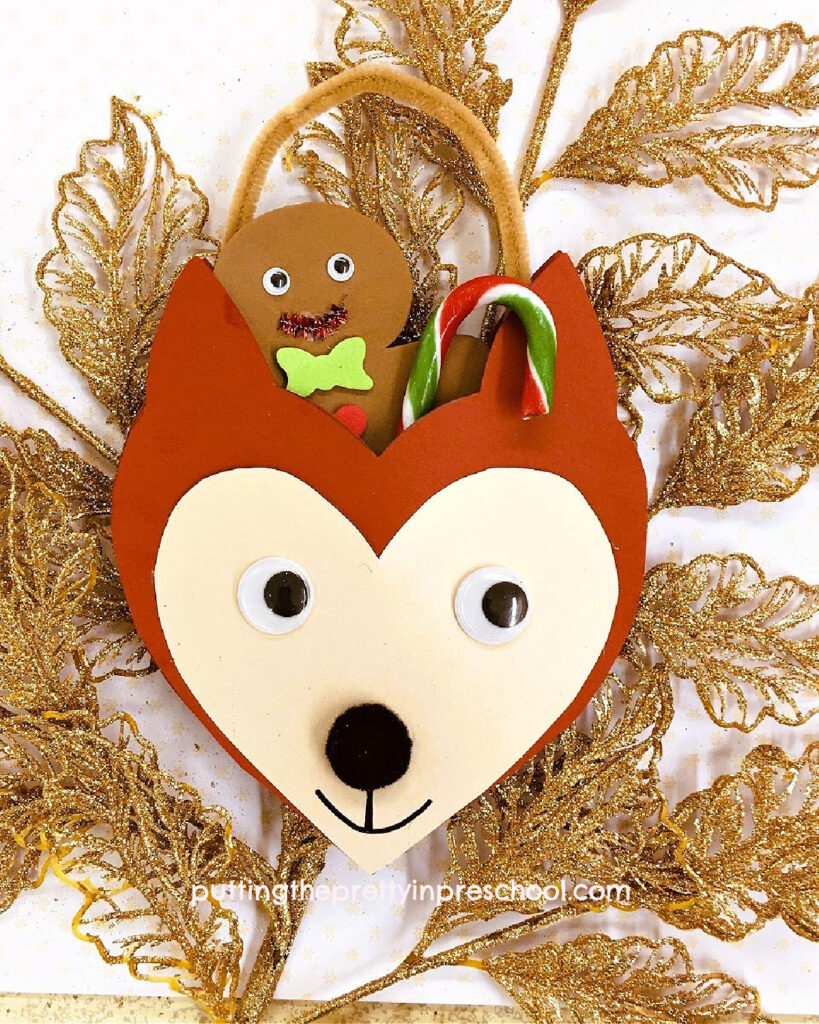
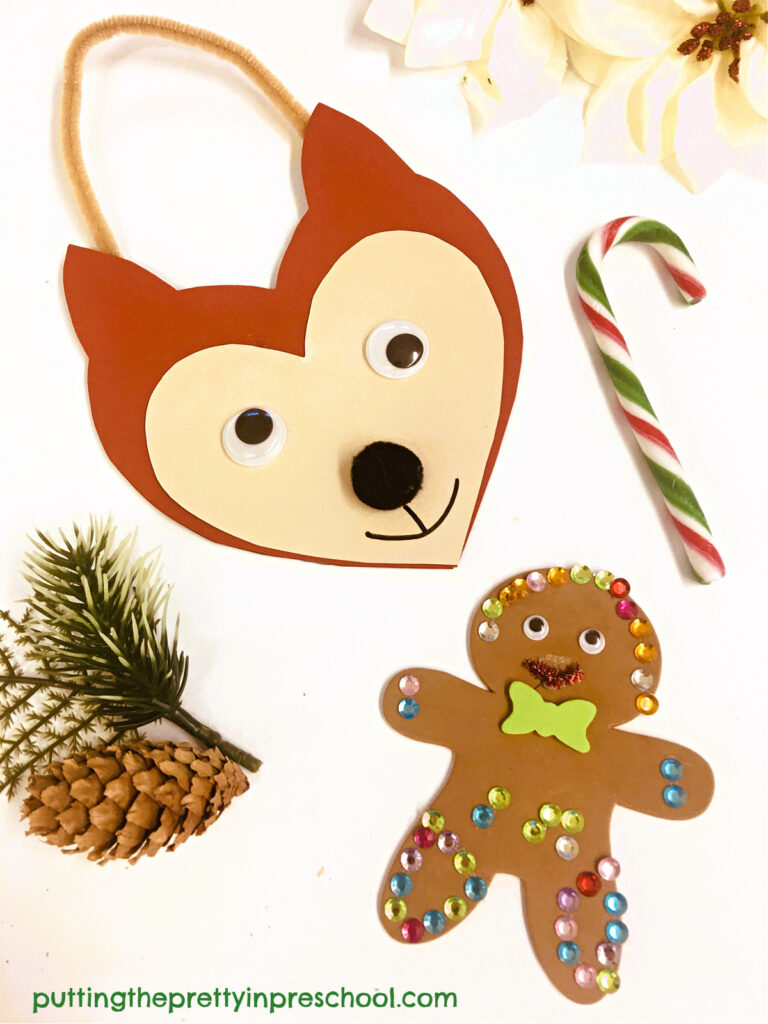
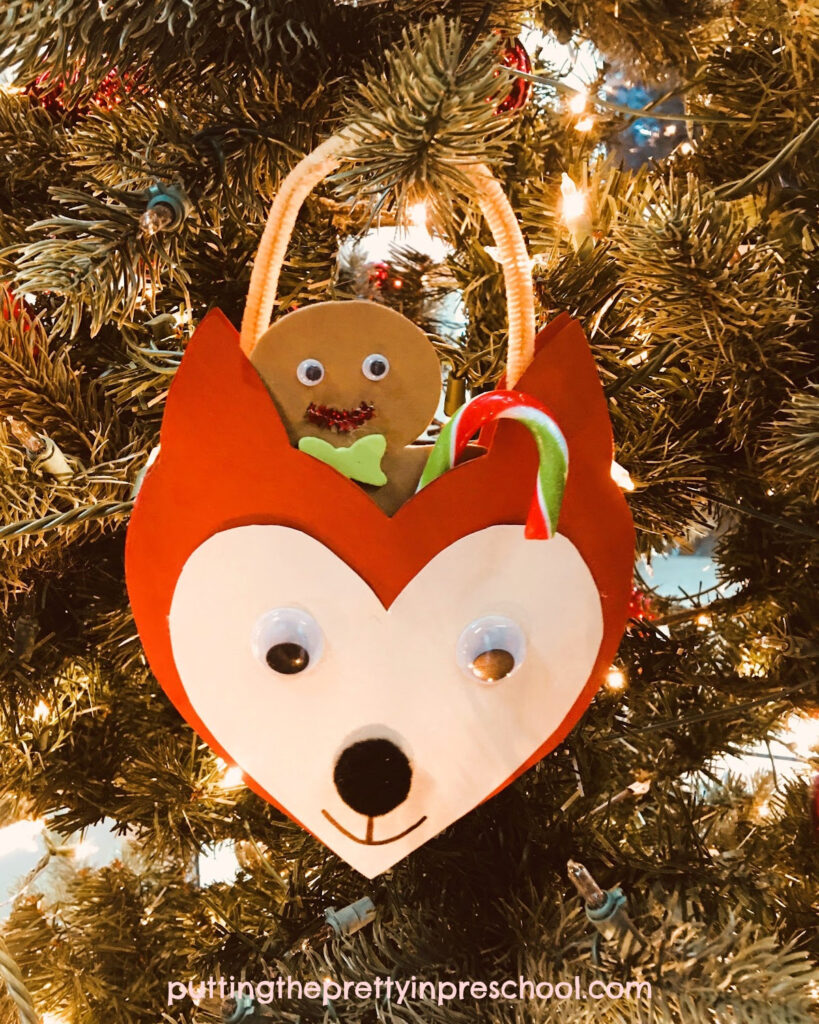
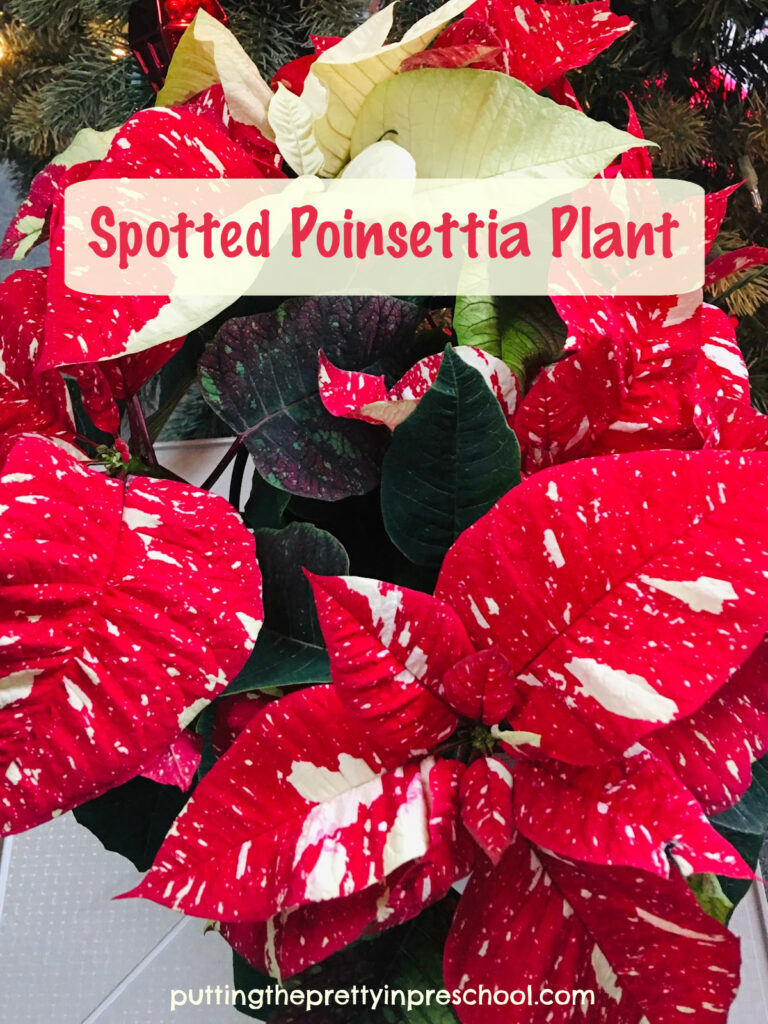
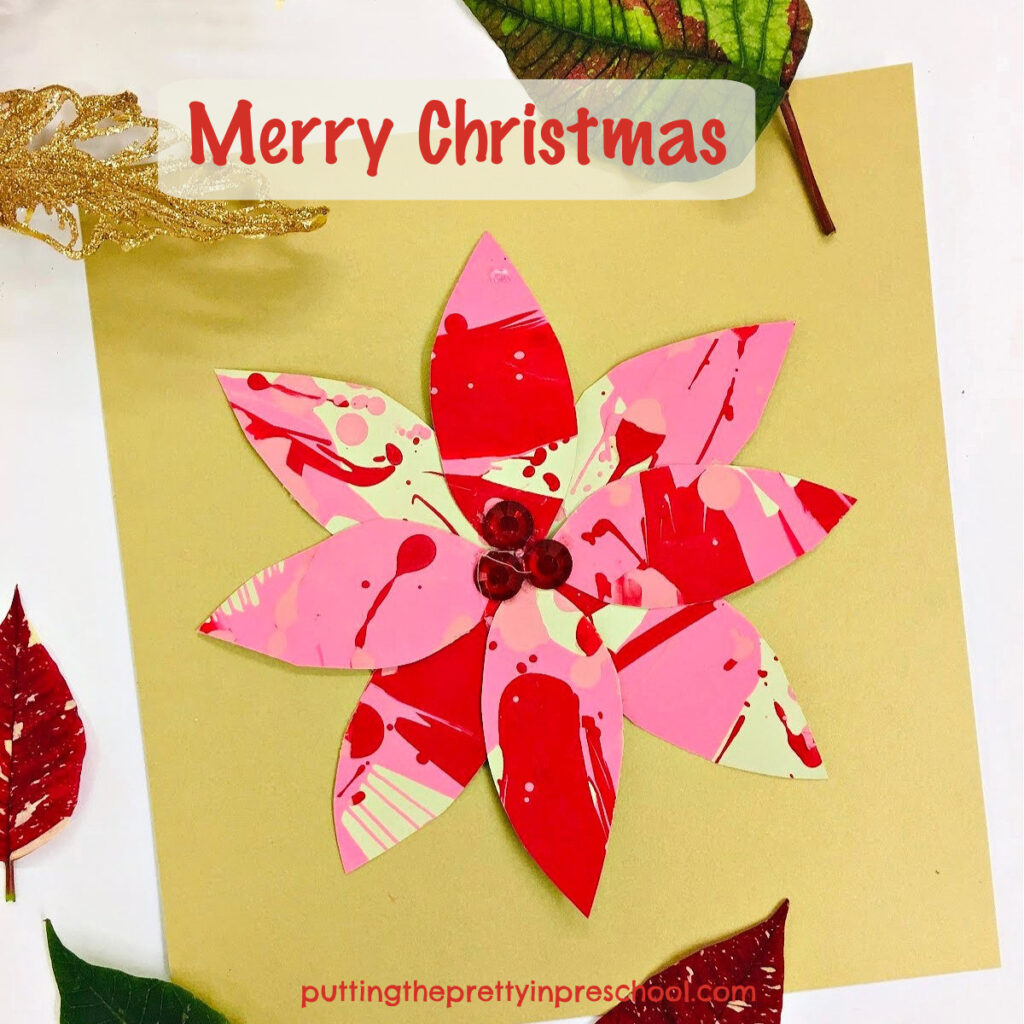
Gorgeous new poinsettia varieties have been developed in recent years, and this spin painting poinsettia craft is based on a spotted poinsettia newcomer. Native to Mexico, poinsettias are prevalent during the Christmas season, and this craft is a beautiful way to include them. The craft gives children an opportunity to participate in two well-loved process art activities: spin painting and spatter painting.

_______

Follow me on Pinterest for more early learning ideas.

_______

Supplies To Collect

Just a few supplies are needed for this simple speckled poinsettia craft:

  • pale green or creamy white cardstock paper
  • decorative cardstock paper
  • red and pink tempera paint
  • paint pots and spoons
  • old toothbrushes
  • salad spinner
  • scissors and pencil
  • glue stick or glue gun
  • adhesive gem stickers
  • art tablecloth

_______

_______

Starting The Spin Painting Poinsettia Craft

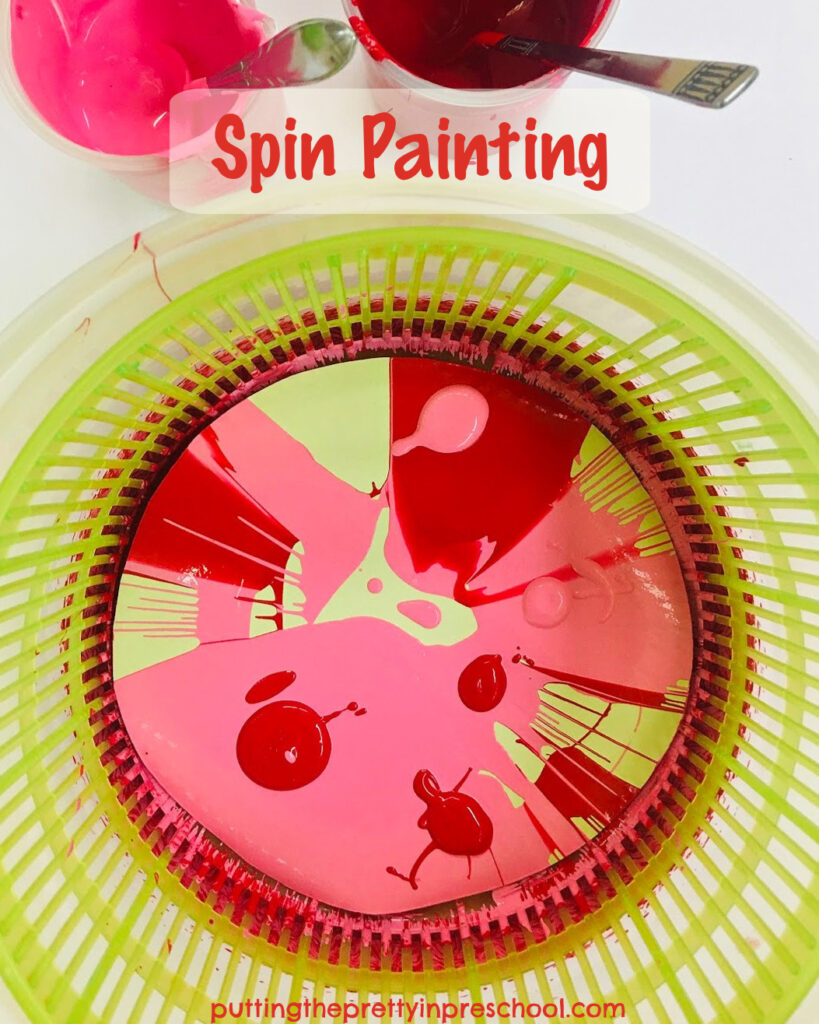
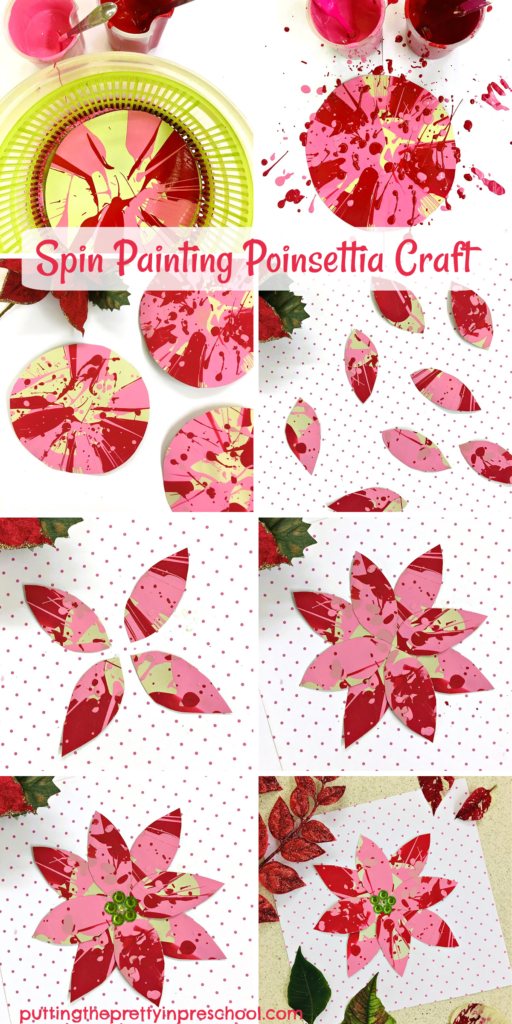
To make this beautiful spin painting poinsettia craft, start by cutting a circle from pale green or creamy white cardstock. It should fit just inside the bottom of your salad spinner basket.

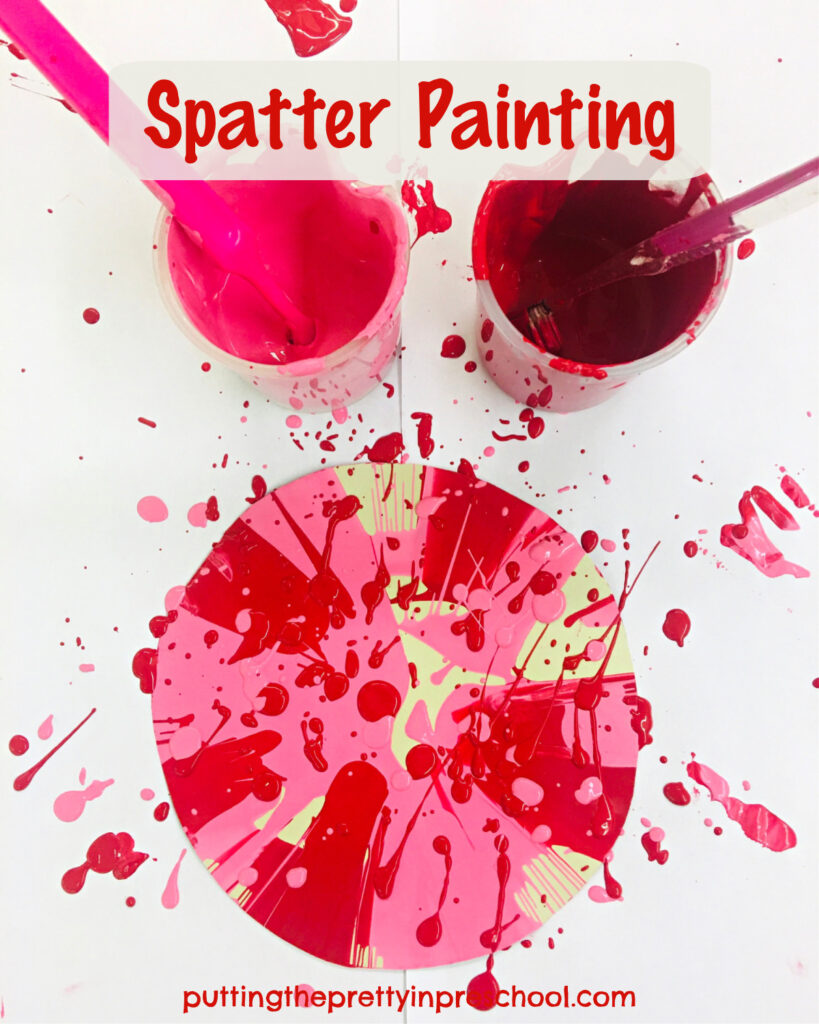
Next, place the circle at the bottom of the salad spinner. On a table covered with an art tablecloth, use spoons to drop in red and pink tempera paint.

Tip: If you do not have pink tempera paint, mix a little white tempera into a pot of red and you’ll have a nice pink color to use.

Give the salad spinner a good spin and take a peek. You can choose to add more spoonfuls of paint if you wish and give it another spin.

_______

Afterward, take the paint-filled circle out of the spinner and spatter pink and red paint on it using toothbrushes. Then let the process art project thoroughly dry.

_______

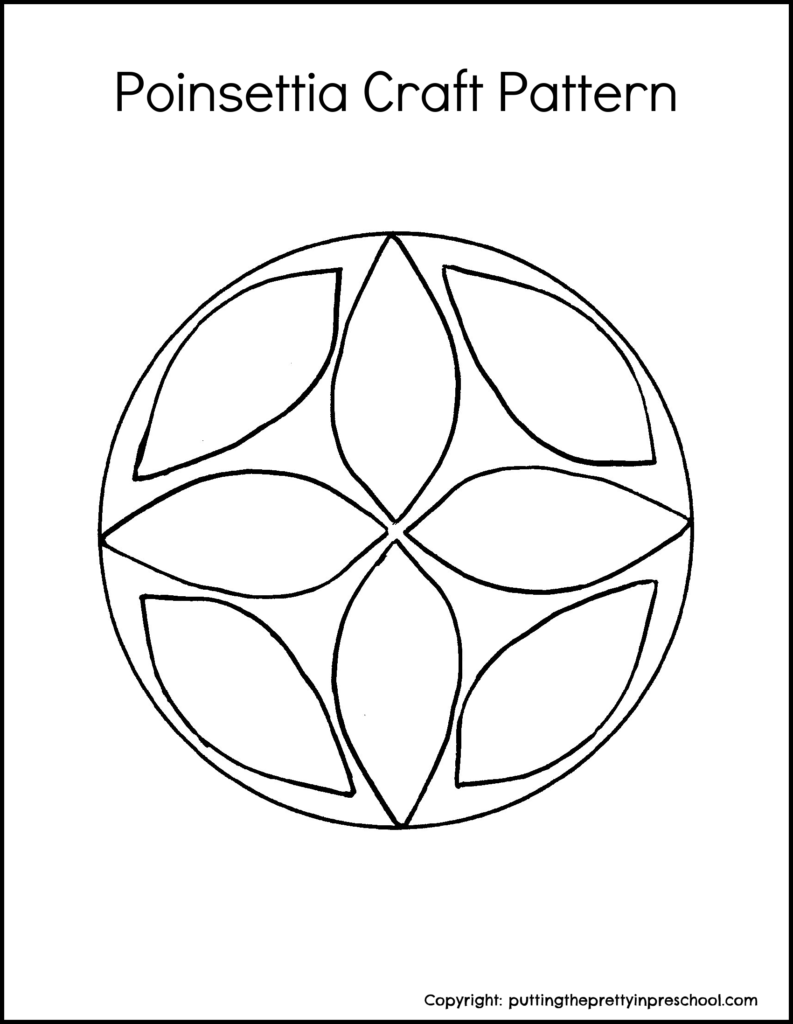
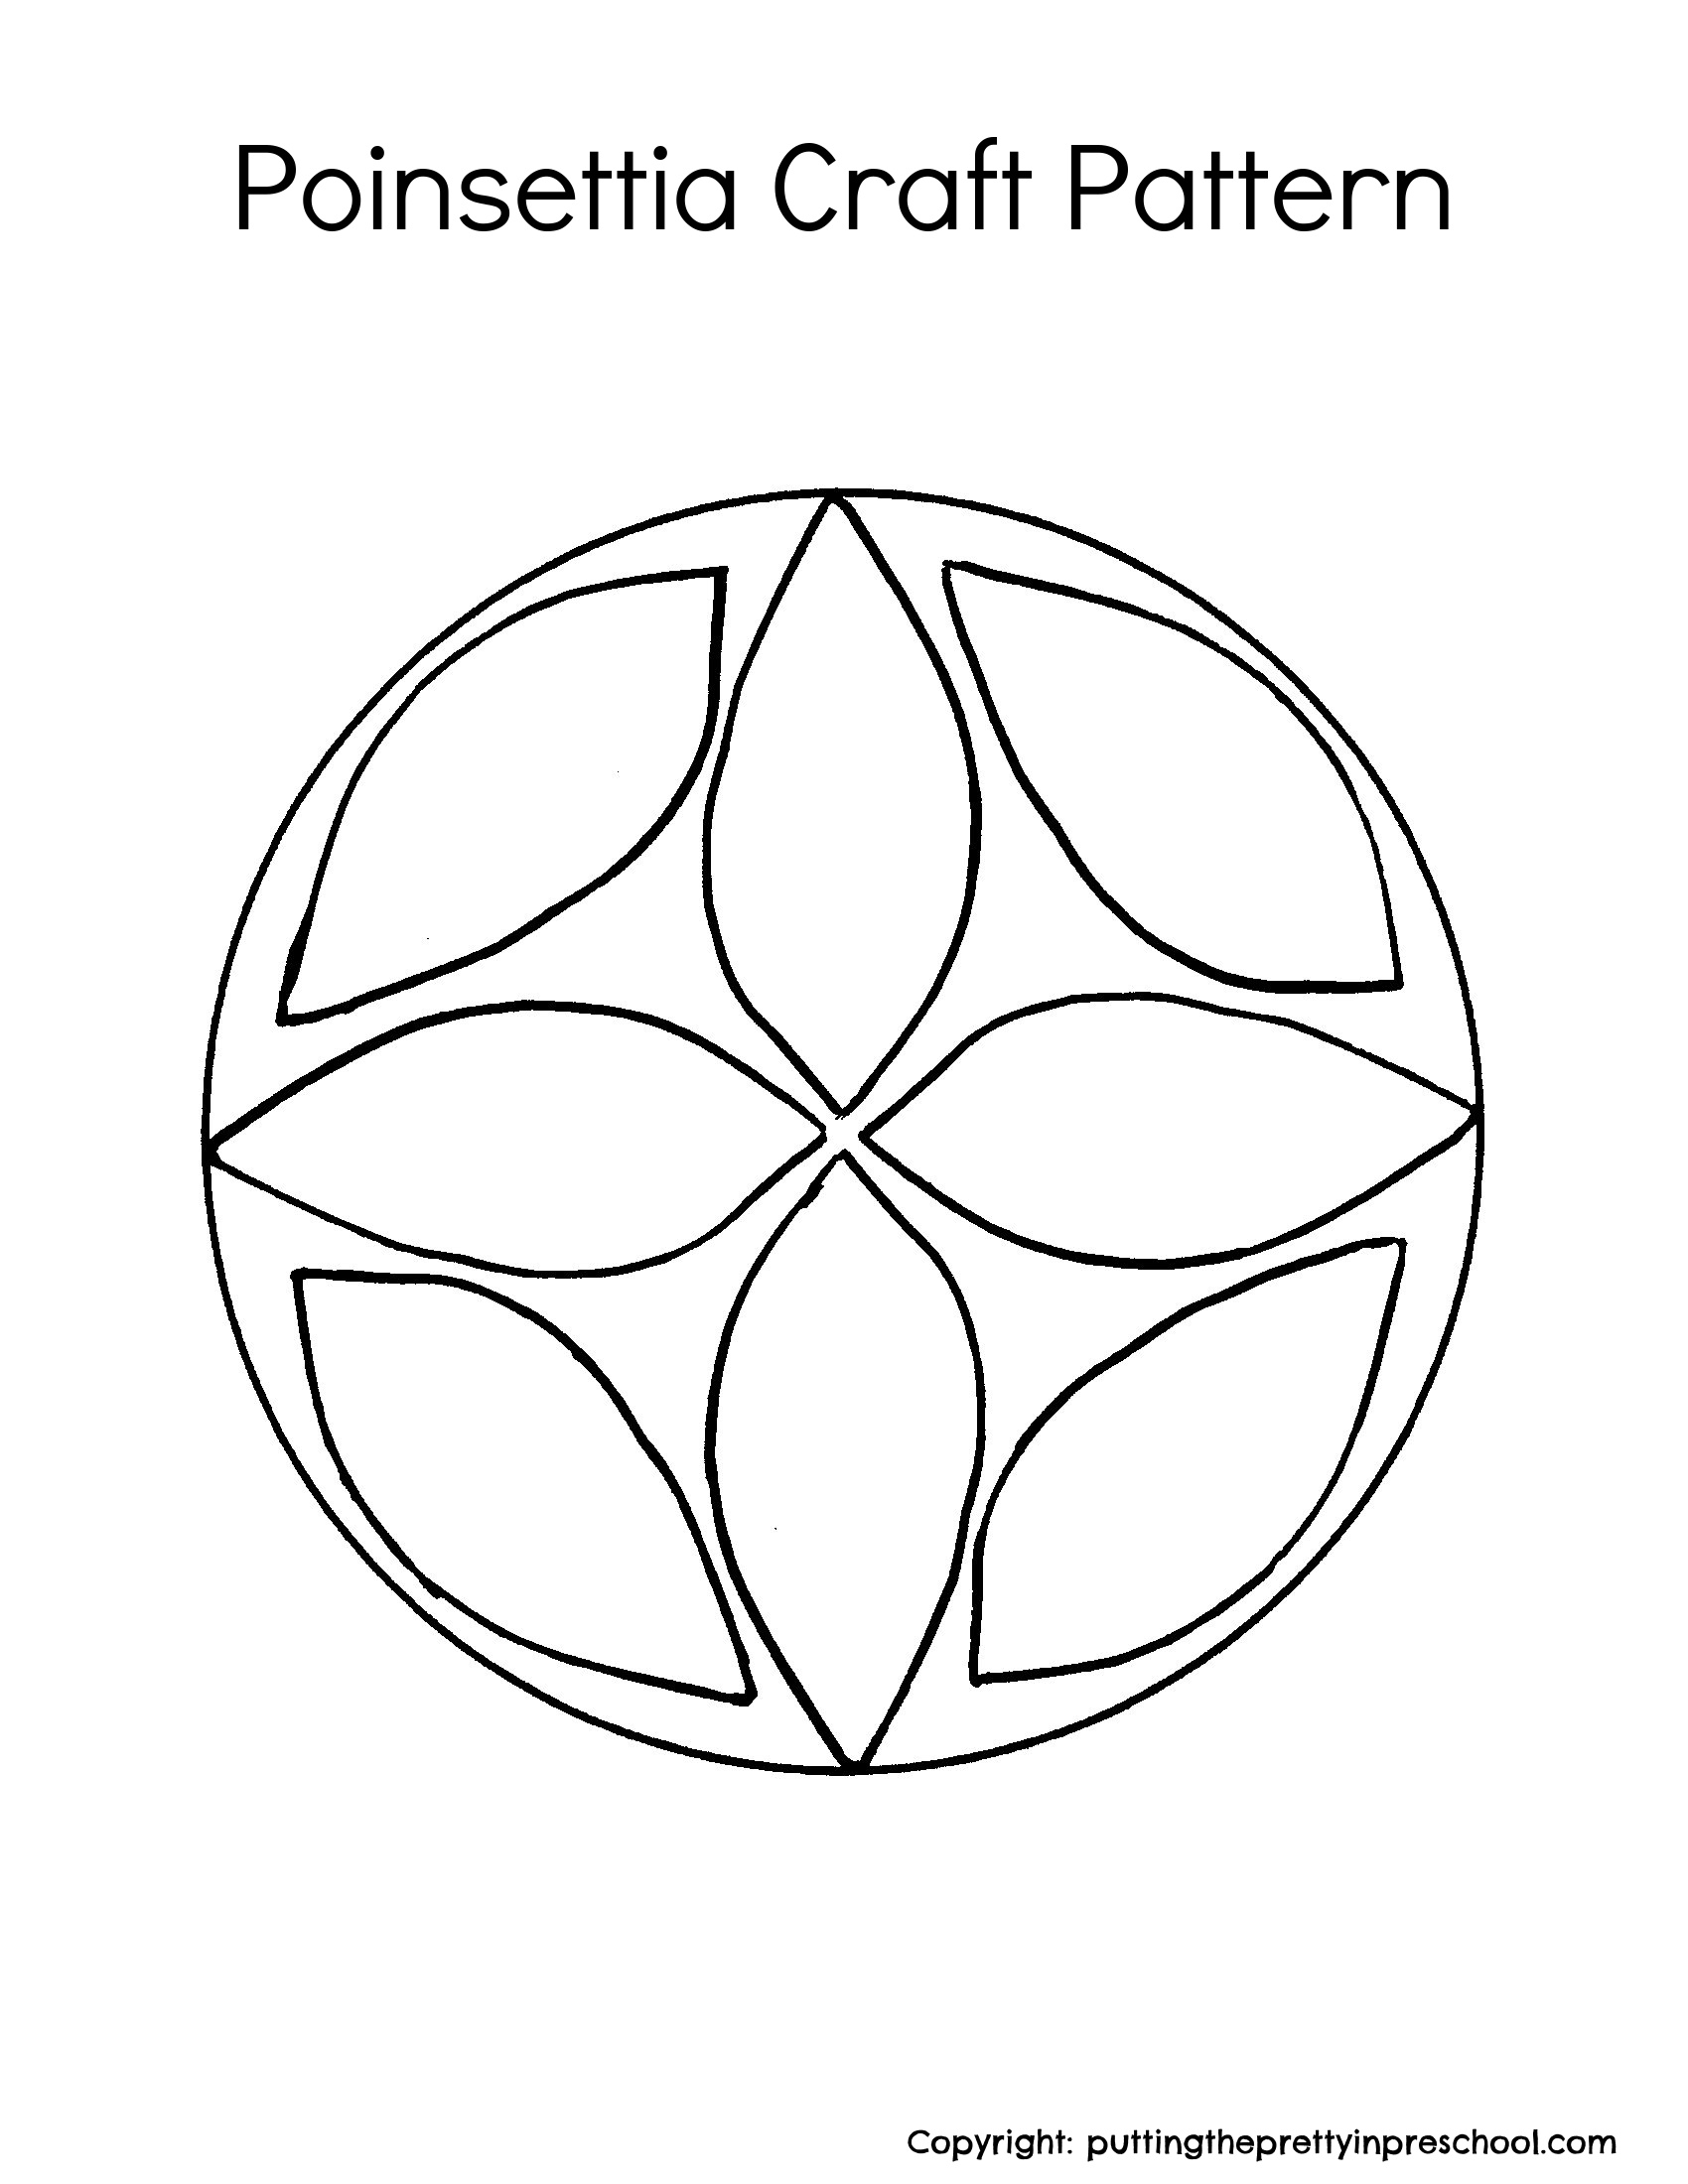
Carefully cut poinsettia leaves from the decorated circle. Feel free to download this poinsettia pattern to make your crafting easier.

_______

Poinsettia Craft Pattern PrintableDownload

This printable is for individual or one classroom use only.

_______

Note: A little paint may chip off during the cutting. But you’ll have plenty left to give your poinsettia leaves a spotted look.

_______

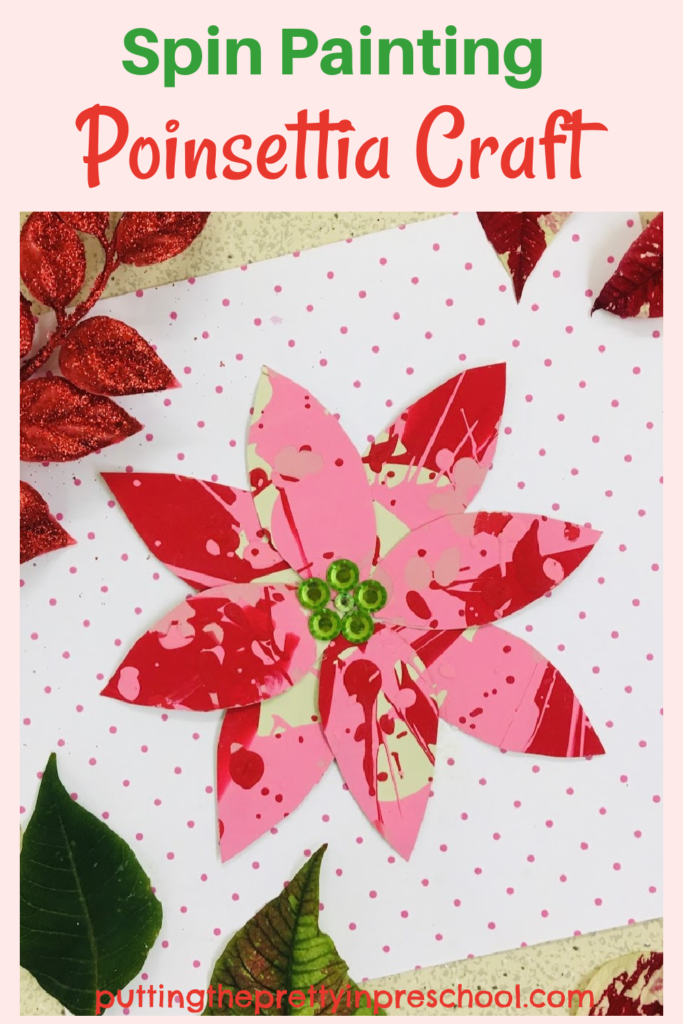
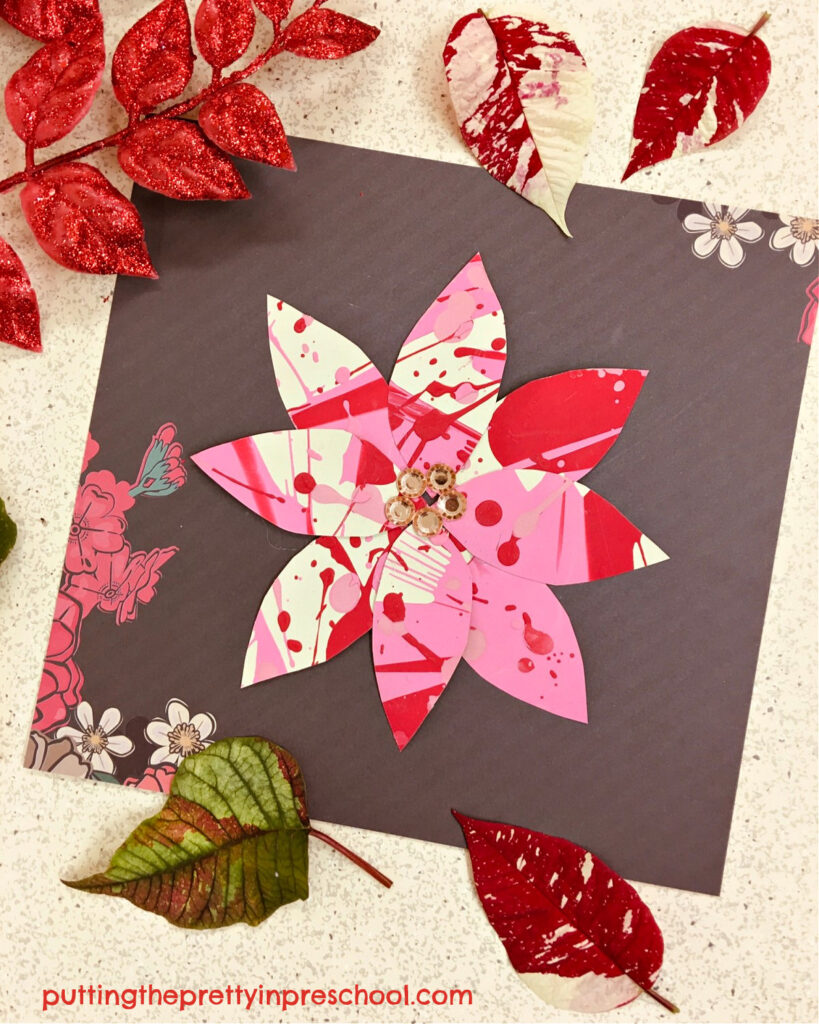
Assembling The Poinsettia

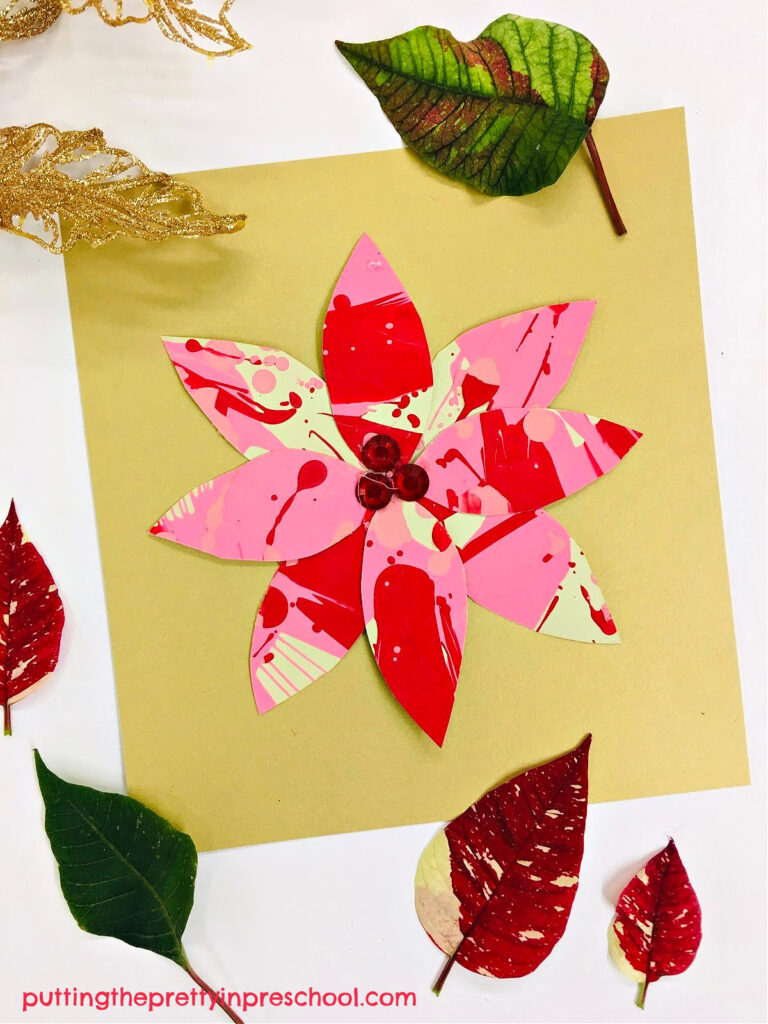
To assemble the poinsettia, choose a decorative piece of cardstock paper to use as a background.

Then choose four painted and cut leaves and glue them on. Affix them in the shape of an X, leaving a little space in the center.

Afterward, glue the other four leaves in between.

Finally, add three to five medium-sized adhesive gems to the center.

_______

Variations of the Spin Painting Poinsettia Craft

In addition to making a great wall art project, this poinsettia craft would look superb on a holiday greeting card.

_______

_______

Novelty poinsettias come in a wide range of colors, and the carstock leaves could be brush-painted in hues such as vibrant red or orange, salmon pink, or peach. The color possibilities for this poinsettia holiday craft project are endless.

_______

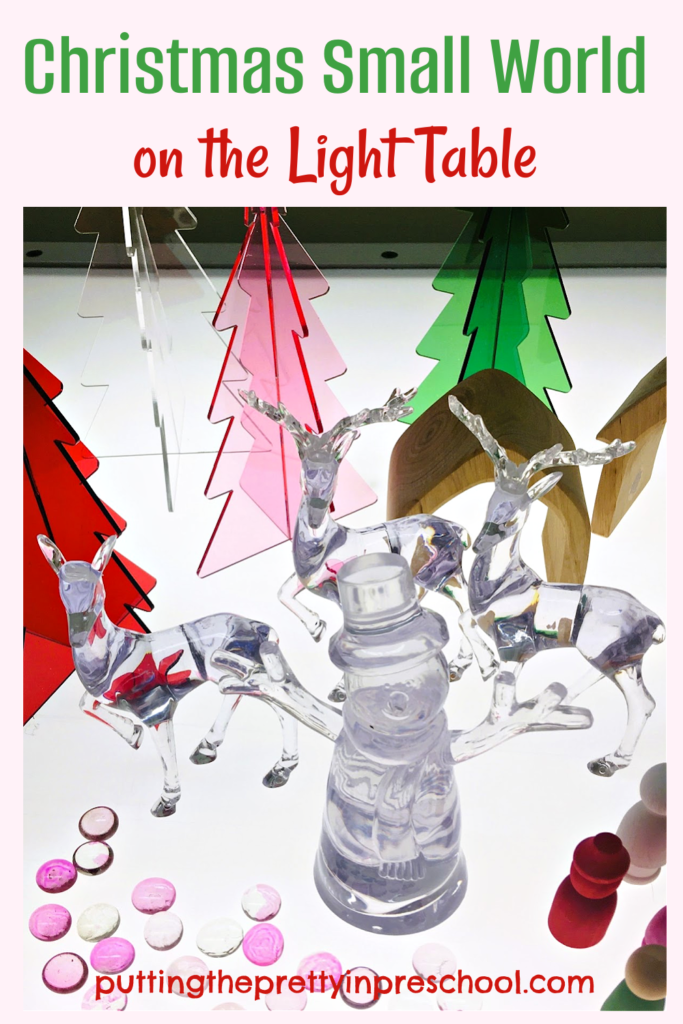
More Christmas Crafts

Paper Bag Christmas Ornaments

Monochromatic Christmas Tree Art

CD Case Christmas Craft

Christmas Sheep Craft

Washi Tape Christmas Pots

Handprint Angel Craft

Turtle Christmas Craft

Christmas Tree Art

Christmas Dove Art

Handprint Angel Christmas Keepsake

Woodland Fox Treat Holder

_______

[Read more…] about Spin Painting Poinsettia Craft

Filed Under: art, Christmas, crafts, flowers, preschool Tagged With: painting, poinsettias, spin art

Woodland Fox Treat Holder

December 16, 2023 by Annette Kaminsky Leave a Comment

_______

This woodland fox treat holder is inspired by gingerbread man stories, which I often read to my preschoolers in December.

The interaction between the fox and the gingerbread cookie is always a highlight of each story. One of the first years we read a series of gingerbread stories, we happened to start by reading tales wherein the gingerbread cookie outsmarted the fox. When we finally read a version in which the spicy cookie did get eaten by a sly fox, one little preschooler couldn’t believe it. After a round of gingerbread man stories this year, a little learner asked “Do you think the gingerbread cookie will ever really get away?”

_______

At the end of our current gingerbread storybook theme, I thought it would be fun to craft a fox treat holder for each preschooler. And to have a little gingerbread cookie in it. Below are instructions to make the treat holder, and a template to download for the craft.

_______

Follow me on Pinterest for more early learning ideas.

_______

Woodland Fox Treat Holder Supplies

Gather the following supplies to make the whimsical fox treat holder:

  • rust-colored cardstock paper
  • cream-colored cardstock paper
  • light brown pipe cleaner
  • black pom pom
  • wiggly eyes
  • black felt pen
  • glue stick
  • glue gun
  • crafted gingerbread person or a gingerbread cookie
  • candy cane

_______

Making The Woodland Fox Treat Holder

_______

To make the woodland animal treat holder, start by cutting two fox faces from rust-colored cardstock paper. Feel free to download this fox template for the craft.

_______

Fox Treat Holder PrintableDownload

This printable is for individual or one classroom use only.

_______

Then bend the cream-colored pipe cleaner into a half circle and use a glue gun to affix it to the ears of one fox head to create a handle.

Next, glue the edges of the fox together starting just below the ears.

Afterward, cut a heart shape from the cream-colored cardstock and glue it to the second rust-colored fox head. Then draw a mouth with a black marker.

Finally, glue on a black pom pom nose just above the mouth, and add two wiggly eyes.

_______

Gingerbread Person and Candy Cane Favors

When the woodland fox treat holder is finished, have your little learner craft a gingerbread person to put inside. Then add a candy cane. The treat holder holds a small crafted gingerbread person and a large candy cane nicely.

_______

Or you could add an edible gingerbread cookie and candy cane to the treat holder.

This crafted duo also makes a cute decoration to add to a Christmas tree.

_______

More Gingerbread Man Activities

Melted Candy Gingerbread Ornaments

Gingerbread Sensory Bin

Gingerbread Playdough

Scissor Skill Gingerbread Man

_______

[Read more…] about Woodland Fox Treat Holder

Filed Under: art, book theme, Christmas, crafts, preschool Tagged With: forest, gingerbread cookies, gingerbread man, paper crafts

Christmas Small World on the Light Table

December 14, 2023 by Annette Kaminsky Leave a Comment

_______

Transparent Christmas trees are the inspiration for this whimsical Christmas small world on the light table. They illuminate beautifully and pair with a variety of loose parts for creative and imaginative seasonal play.

_______

Follow me on Pinterest for more early learning activities.

_______

Light Table Small World Supplies

The following supplies are included in the Christmas small world setup:

  • transparent Christmas trees in green, red, pink, and clear colors
  • clear acrylic deer figurines
  • clear acrylic snowman figurine
  • acrylic clear nativity decoration
  • pink transparent pebbles
  • small wooden shelters
  • wooden peg dolls painted red, green, pink, and white

_______

The Christmas Small World

In this Christmas small world, transparent trees in red, green, pink, and clear hues set the color scheme.

_______

Wooden peg dolls painted with acrylic paints in red, pink, green, and white colors complement the trees.

_______

Clear acrylic deer and a snowman are beautiful ornaments to explore.

_______

Transparent pink pebbles are a soft touch.

A simple nativity decoration enhances the Christmas small world theme.

_______

Making Your Own Transparent Trees

An alternative to purchasing transparent trees is to create your own.

_______

The trees above are made from transparent page dividers and paper rolls. To make them, cut paper rolls into two-inch cylinders. Next, cut a one-inch slit into opposite sides of each paper roll section. Then cut triangular trees from transparent page dividers.

Feel free to download this template to create the trees.

_______

Paper Roll Tree PatternDownload

_______

Slide the bottom of the trees into the paper roll trunks and set them on your light table or another tabletop. These DIY trees also illuminate nicely.

_______

More Christmas Activities

Christmas Peppermint Sensory Bin

Paper Bag Christmas Ornaments

CD Case Christmas Craft

Plaid-themed Christmas Rice Bin

Christmas Sheep Craft

Christmas Treasure Blocks

_______

[Read more…] about Christmas Small World on the Light Table

Filed Under: Christmas, light table, preschool, pretend play, sensory, trees, winter Tagged With: light table, loose parts, snowmen, trees

Melted Candy Gingerbread Ornaments

December 12, 2023 by Annette Kaminsky Leave a Comment

_______

Making melted candy gingerbread ornaments was something I’ve wanted to try ever since viewing a beautiful four-sided, sweet-tasting red and white gingerbread house on Twitter a few years ago. It’s an eye-pleasing baking activity and a festive science experiment so I highly recommend giving the activity a go.

_______

Follow me on Pinterest for more early learning activities.

_______

Melted Candy Ornament Supplies

_______

Gather the following supplies for this simple candy science activity:

  • red and/or green striped round peppermint candies
  • metal gingerbread cookie cutters
  • no-stick cooking spray
  • parchment or wax paper
  • cookie pans
  • cutting board
  • knife
  • vegetable oil
  • wooden skewer

_______

Melted Candy Gingerbread Ornament Tips

Before trying this minty STEAM activity, I read a few blog posts about making melted peppermint candy designs. This detailed Melted Peppermint Candy Ornaments post by onelittleproject.com was particularly helpful and had great tips.

_______

Making The Melted Candy Christmas Ornaments

_______

To make the melted gingerbread candy ornaments, start by picking out metal cookie cutters for the task. Generously sized gingerbread people and a house were my cookie cutters of choice.

Spray the cookie cutters with no-stick cooking spray.

Next, add parchment paper to one or more cookie pans and set the greased cookie cutters on the pans.

Then insert unwrapped red or green striped peppermint candies inside the cookie cutter shapes. For larger spaces, cut candies into halves or quarters on a cutting board and use the smaller pieces to fill in the gaps.

_______

Baking The Melted Candy Gingerbread Ornaments

To bake the candy gingerbread ornaments, set the oven temperature to 350 degrees.

Next, put the peppermint candy-filled cookie cutters in the oven and heat them for around six minutes.

Stay by the oven and make sure to turn the oven light on to view the candies melting. It’s okay to take a peek…the sweet creations won’t jump out of the oven. But they will melt down if they are in the oven too long.

When the candies are joined together and a little of the melted candy starts seeping around the cookie cutter edges, take the baking pans out of the oven.

_______

After around two minutes, dip a wooden skewer in vegetable oil and carefully make a little hole near the top of each decoration so a string can be drawn through.  Then let the eye-catching creations cool for around fifteen minutes.

Before the ornaments cool completely, carefully pull away the sides of the cookie cutters from the candy shapes and gently push them out. Oh-so-carefully break off melted bits around the peppermint ornaments if there are any.

Let the beautiful striped ornaments cool completely.

_______

How The Melted Gingerbread Ornaments Turned Out

This is where I need to come clean. My candy gingerbread ornaments didn’t turn out perfectly. Each one had one broken bit. The red and white gingerbread person had two broken bits.

_______

But as a first try at making melted candy ornaments, I considered it a success. I determined afterward that I had left the candied shapes in the oven just a little too long (probably eight minutes) and needed to be even more careful in removing them from the cookie cutters after baking. So a second attempt would likely be more successful.

The activity did turn out well enough that I would confidently be able to introduce it to family members or a group of preschool students. The patterned ornaments were fun to put back together as mini puzzles, and they would be tasty treats broken down into small bits and shared. Broken ornaments could be crushed and infused with playdough or baked in a peppermint cookie recipe when the science experiment was over. And there could be a conversation about stripes, patterns, halves, quarters, and the smell and taste of peppermint.

Striped peppermint candies are economical to buy, and I’ll surely give this stunning melted candy gingerbread ornaments STEAM activity another go. How about you? Will you give it a try?

_______

More Peppermint Candy Activities

Christmas Peppermint Sensory Bin

Candy Cane Tree Experiment

_______

[Read more…] about Melted Candy Gingerbread Ornaments

Filed Under: Christmas, Food Art, preschool, science, sensory Tagged With: decorations, gingerbread, science experiment

Christmas Peppermint Sensory Bin

December 10, 2023 by Annette Kaminsky Leave a Comment

_______

This Christmas peppermint sensory bin was inspired by a gorgeous miniature red, pink, and white-striped peppermint tree. The eye-catching tree was one of these “gotta have it” Christmas decorations for me, as it is festive and unique. A quick search in stores around my neighborhood led to finding complementary accessories for the tree. Loose parts round out the supplies in the inviting sensory bin your little learners will absolutely LOVE.

_______

Follow me on Pinterest for more early learning ideas.

_______

Christmas Peppermint Sensory Bin Supplies

_______

The following supplies were gathered for this sweet candy-themed bin:

  • peppermint candy Christmas tree
  • candy cane ornaments
  • candy ornaments
  • peppermint candy erasers
  • toy peppermint candies
  • peppermint candy-themed metal buckets
  • red, pink, and white buttons
  • pink, red, and white pom poms
  • wooden peg people
  • red spoons
  • red, pink, and white acrylic paints
  • small paintbrushes
  • spoons

_______

The Christmas Peppermint Candy Sensory Bin

The unexpected bin of choice for this peppermint candy sensory bin is a red saucer sled. It is an economical purchase and accommodates three or four children nicely at a time.

_______

The base is white glutinous rice, often my go-to for sensory bins. It is low on the mess, and the white color lets the festive supplies in the bin shine.

Wooden peg dolls painted with red, pink, or white acrylic paint match the color theme.

_______

Peppermint candy-themed metal buckets hold candy cane ornaments and the other sensory supplies nicely.

_______

Spoons are always a requested item for my sensory bins, and red ones fit the bill.

Red, pink, and white pom poms and buttons round out the sensory supplies.

_______

The Christmas peppermint theme for the bin is a way for little learners to play with Christmas peppermint candy without the sugar fix.

_______

Benefits Of The Christmas Peppermint Sensory Bin

_______

Aside from adding joy to the holiday season, this Christmas peppermint candy sensory bin allows children to:

  • count candy canes, candies, and other supplies
  • notice red and white, and pink, red, and white striped patterns
  • discuss the words hard (candies and buttons) and soft (pom poms)
  • label pink, red, and white colors
  • develop eye-hand coordination while using the sensory supplies
  • share whether they like the taste of candy canes and other Christmas candy

_______

More Christmas Sensory Bins

Plaid-themed Christmas Rice Bin

Ugly Christmas Sweater Rice Bin

Christmas Sensory Play

Llama Christmas Sensory Bin

Santa Claus Sensory Bin

_______

[Read more…] about Christmas Peppermint Sensory Bin

Filed Under: Christmas, preschool, sensory Tagged With: candy canes, rice bin, sensory bin

  • « Go to Previous Page
  • Page 1
  • Interim pages omitted …
  • Page 13
  • Page 14
  • Page 15
  • Page 16
  • Page 17
  • Interim pages omitted …
  • Page 65
  • Go to Next Page »

Primary Sidebar

Hi, I'm Annette Kaminsky, a preschool teacher who loves sharing learning through play activities for young children. Thanks for visiting my site. Feel free to stay awhile!

Subscribe Via Email

Recent Posts

  • Salt Painting Sensory Bin June 15, 2025
  • Dandelion Sensory Tray June 3, 2025
  • Bergenia Flower Sensory Bin May 31, 2025
  • Salt and Ice Science Experiment May 20, 2025
  • Airplane Rice Sensory Bin May 16, 2025
  • Salt Painting Planet Art May 3, 2025
  • Spring Bunny Sensory Bin April 19, 2025
  • Tin Foil Egg Printing April 17, 2025
  • Lentil Easter Bunny Sensory Bin April 15, 2025
  • Unicorn Store Dramatic Play Center March 25, 2025

Categories

Topics

block play bunnies butterflies Chinese New Year Christmas Christmas craft color colors dramatic play Easter flowers hearts holiday jewelry leaves leprechauns light table loose parts painting paper crafts playdough pretend play printables printmaking process art pumpkins rice bin scented playdough science experiment scissor skills sensory bin sensory play sensory tray shamrocks skeletons snakes snowflakes spiders spring St. Patrick's Day sunflowers tablescapes trees Valentine's Day water play

Copyright © 2025 · Lifestyle Pro on Genesis Framework · WordPress · Log in