• Skip to secondary menu
  • Skip to main content
  • Skip to primary sidebar

Putting The Pretty In Preschool

Finding Beauty In Everyday Early Childhood Experiences

  • Home
  • About Me
  • Winter
  • Chinese New Year
  • Blog
  • Valentine’s Day
  • Contact Me
  • Easter Activities

art

Black History Month Mixed Media Art

February 26, 2025 by Annette Kaminsky Leave a Comment

_______

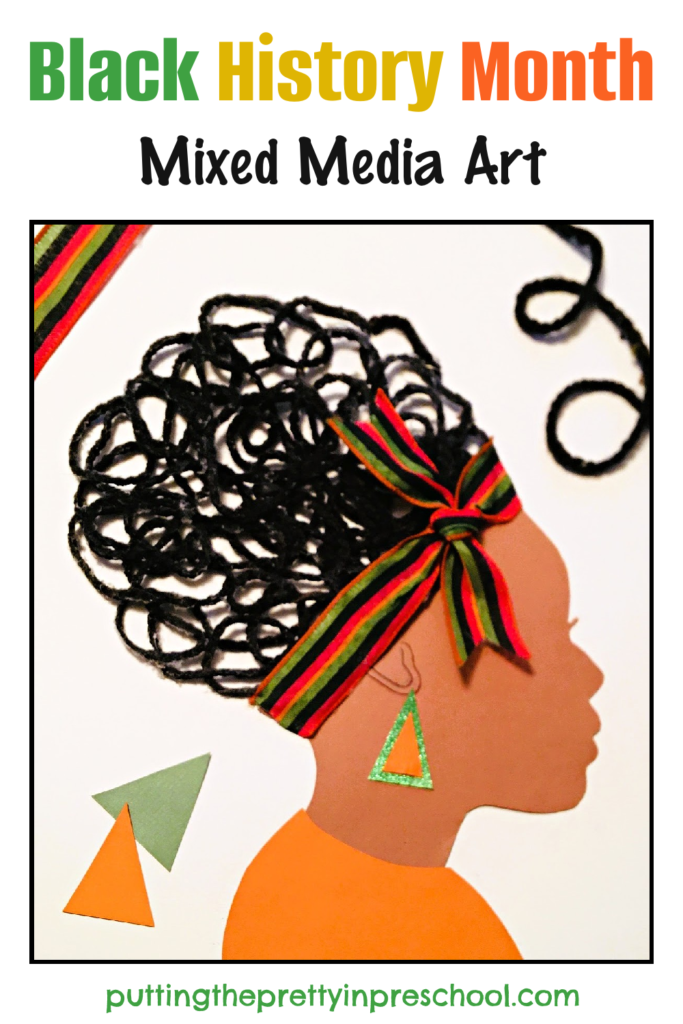
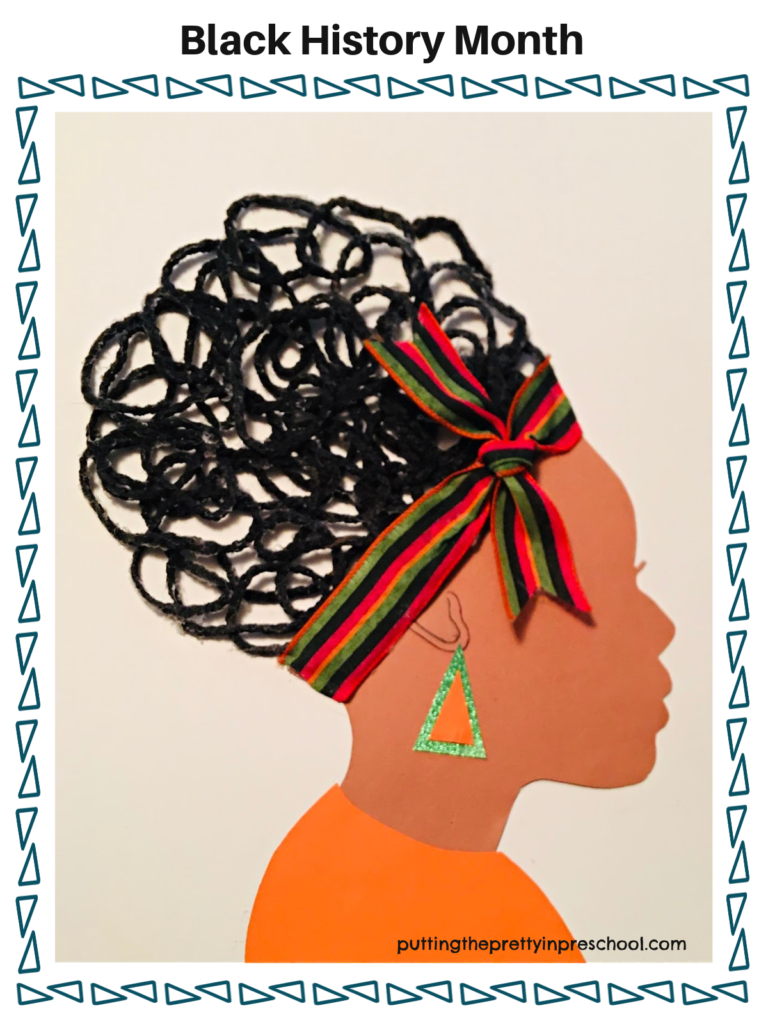
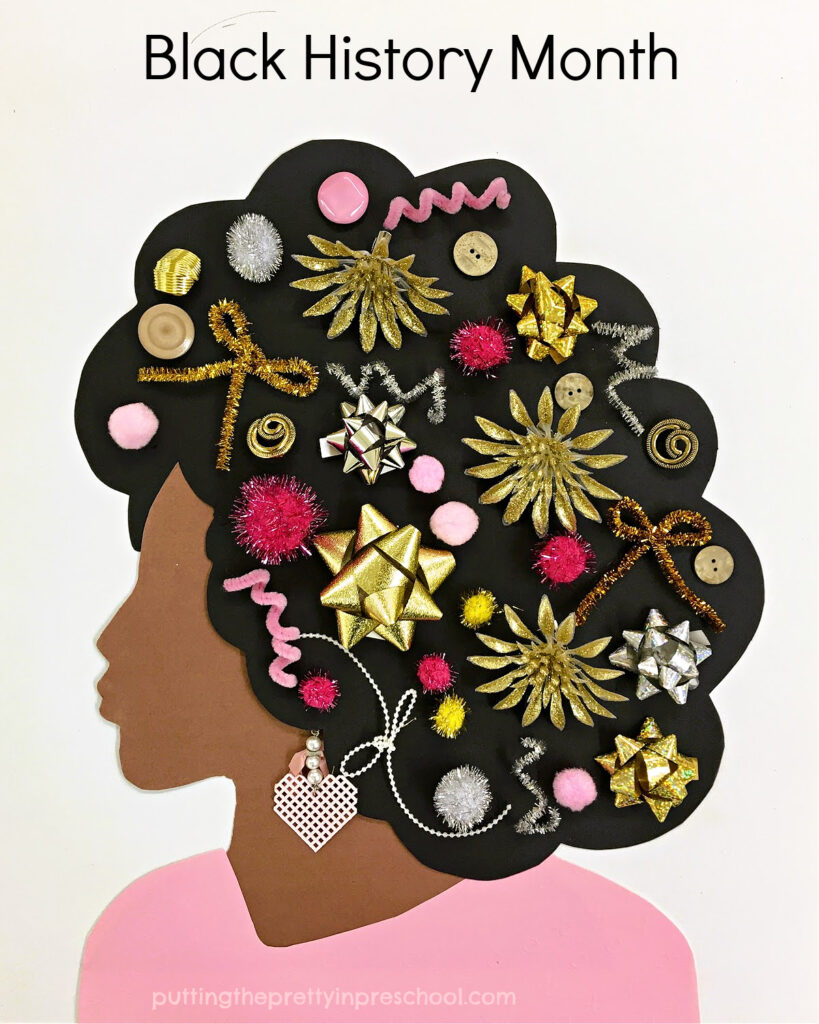
Black History Month is observed in February in the United States and Canada. It is a time to celebrate the creativity and achievements of Black people and their communities by participating in activities and discussions. This Black History Month mixed media art project draws attention to the beauty of black women’s hair. The craft features a unique technique for creating curly hair.

_______

Supplies To Collect

For this mixed media art project that pays homage to Black History Month, gather the following:

  • black yarn
  • brown, orange, and green construction paper
  • 14-inch x 16-inch sheet of white construction paper
  • 1 ½ inch wide wired craft ribbon
  • white glue
  • black fine point marker
  • parchment paper
  • scissors and pencil
  • glue stick and glue gun
  • disposable plate
  • measuring cup
  • spoon
  • tray

_______

Starting the Mixed Media Art Project

_______

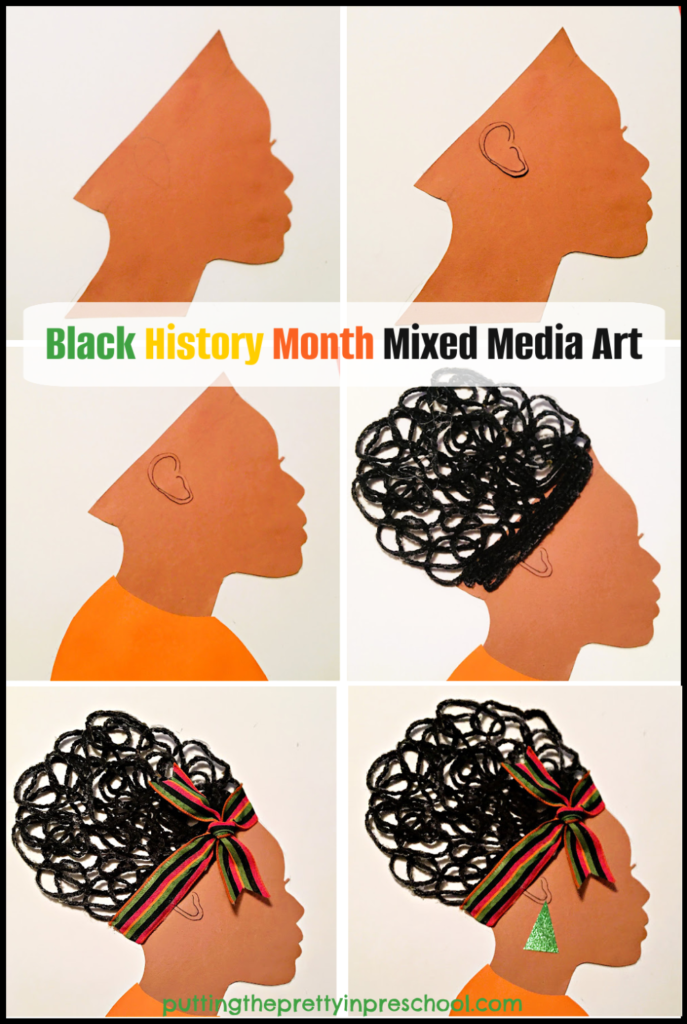
To begin this art project, draw a side view of a woman’s head on brown construction paper and cut it out.

Next, draw and cut out one ear from the same sheet of paper, and the top of a t-shirt from orange construction paper.

Then draw a few lines on the ear with a black fine-point marker to add detail.

After this step, cut two small triangles from green and orange sturdy paper to fit together as an earring.

Then cut two strips of wired craft ribbon, one measuring 12 inches long, and the other measuring 9 inches long.

Next comes the part that may be the most fun: creating the curly yarn hair. To fashion the hair, complete the following steps:

1) Draw a silhouette outline of the hair in the middle of a large sheet of parchment paper. Then place the parchment paper on a tray.

2) Mix one-half cup of white glue with one-half cup of water on a disposable plate.

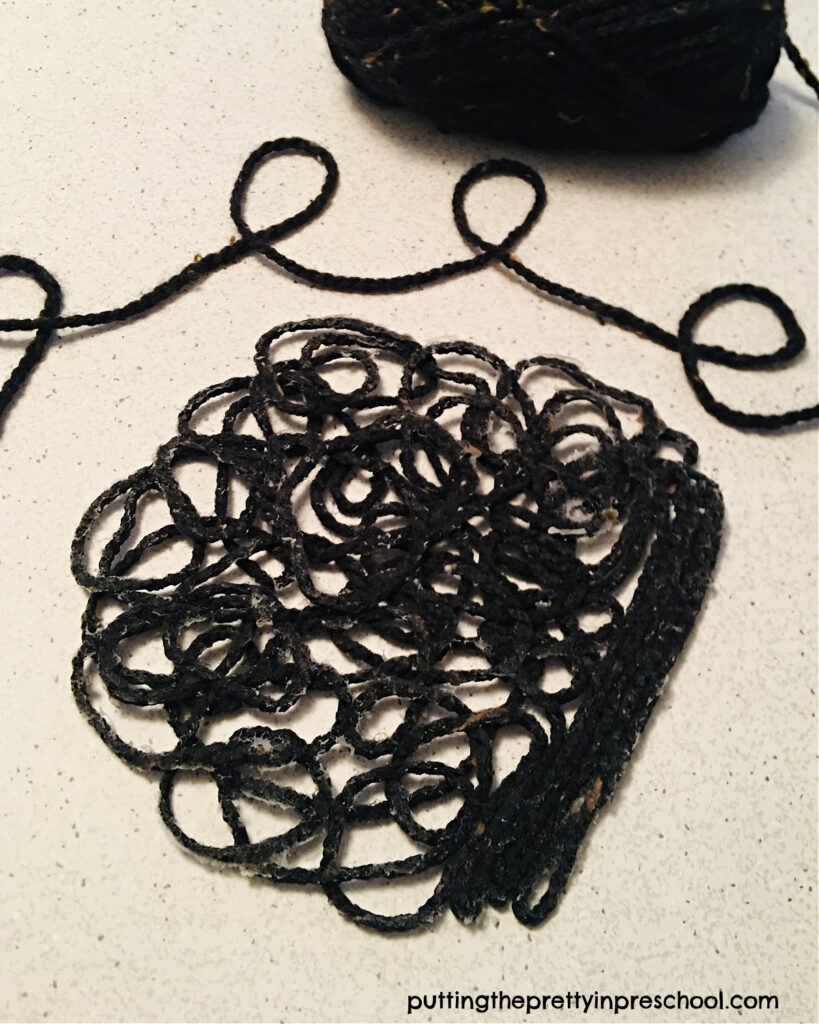
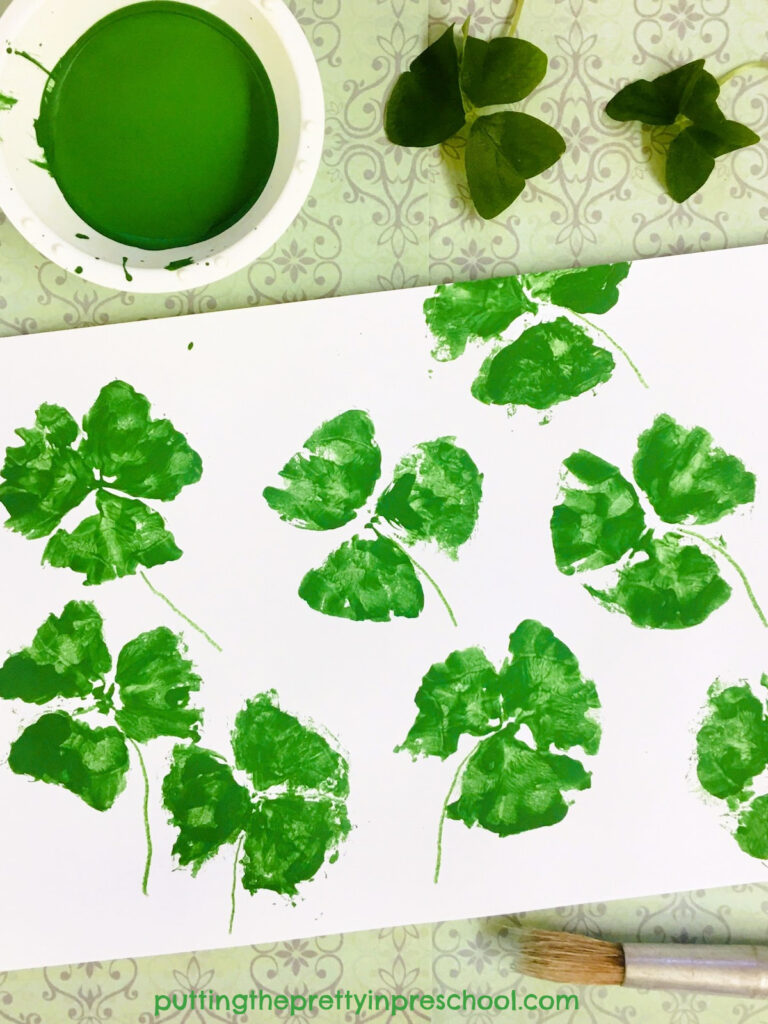
3) Using a spoon, press down a long piece of black yarn in the gooey white mixture to completely cover it in glue.

_______

4) Slowly lift the yarn out of the thinned glue and spread it around the hair outline in swirls. Add a second layer of swirled yarn and gently press it down on the first layer so the yarn sticks to itself when dry. Add a few straight lines at the hairline.

5) Let the sculptured yarn hair dry for one or two days. When dry it lifts off the parchment paper easily.
Note: The glue-soaked yarn hair may look grey at first, but will appear black again as it dries.

This swirled yarn art process was a must-try for me after viewing an informative September 4. 2024 Instagram post by mykidsartbox.

_______

Follow me on Pinterest for more early learning ideas.

_______

Assembling the Black History Month Art

Now it is time to assemble the gorgeous art activity. Complete the following steps:

1) Select a large piece of sturdy paper to glue all the arty shapes onto. I feature paper cut to a 14-inch x 16-inch size.

2) Position the crafted pieces on the background paper and note where they look best. Drawing light pencil lines to mark the perfect spot for each shape makes this easier and the lines can be erased at the end.

_______

3) Use a glue stick to adhere the head, ear, triangular earring, and shirt portion to the paper.

4) Carefully affix the curly hair over and above the face with a glue gun.

_______

5) Fashion two strips of wired craft ribbon into a knotted headband. Cut the ribbon ends to the correct size and fold in the outer edges to fit around the yarn hair above the hairline.

6) Use the glue gun to adhere the headband over and above the bottom edge of the curly hair.

7) Add a caption for Black History Month if desired.

_______

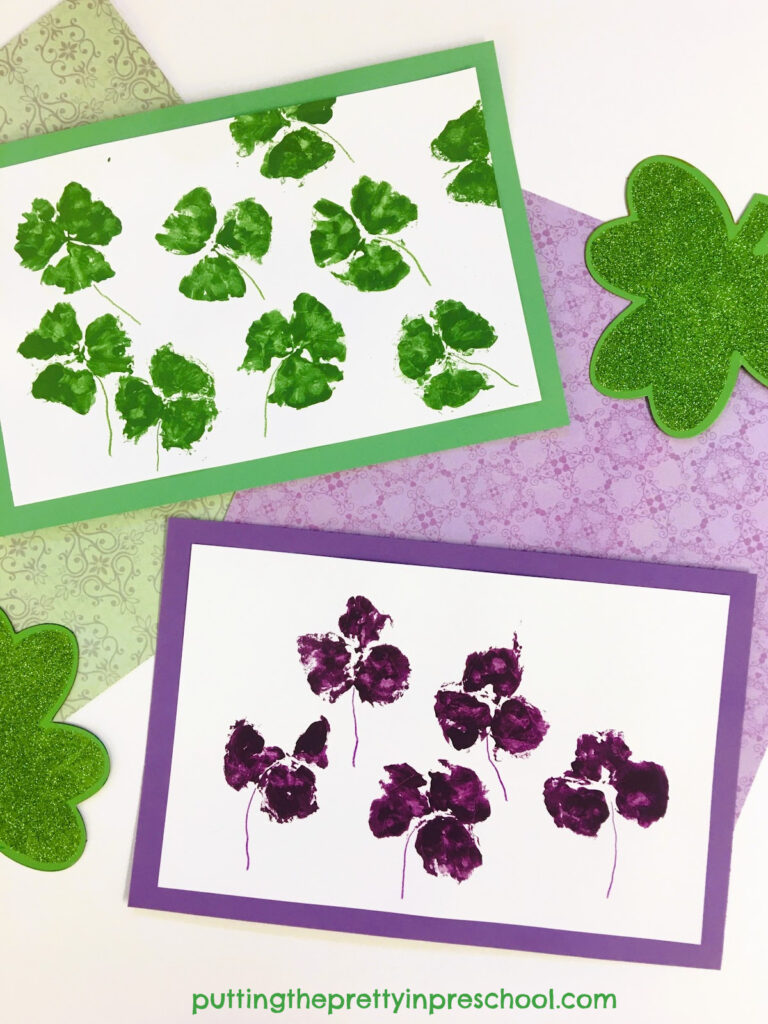
When making the Black History Month mixed media art project, feel free to work with a color scheme of your choice. What do you think of this activity?

_______

Related: Black History Month Hair Decorating Art

_______

[Read more…] about Black History Month Mixed Media Art

Filed Under: art, Black History Month, crafts, preschool, sensory Tagged With: art, Black History Month

Shamrock Leaf Print Art

March 12, 2023 by Annette Kaminsky Leave a Comment

How to make beautiful shamrock leaf print art with sprigs from an Oxalis Regnelli plant. An easy-to-do all-ages art project.

_______

Shamrock leaf print art is an activity I’ve wanted to try for a few years now, and this spring I carved out time for it. The art project is easy and enjoyable to do, and I am sure you will like it too.

A good time to try this leaf print art activity is around St. Patrick’s Day, as shamrock plants are plentiful in stores then. The compound leaves on the plant look like the shamrock symbol that the country of Ireland is known for. Irish people think shamrocks represent good luck, and they are prominent in clothing, decorations, and tableware during St. Patrick’s Day celebrations.

An Oxalis Regnelli shamrock plant with compound leaves composed of three triangular leaflets.

_______

The shamrock plant I found is called Oxalis Regnellii, which comes from Africa and some parts of the Americas. It has delicate leaves with three triangle-shaped leaflets. The leaves fold up neatly on overcast days and anytime it is dark, and open up when they are exposed to sunlight. The tiny, white, long-stemmed flowers have five petals.

A tiny white flower on an Oxalis Regnellii plant.

_______

Follow me on Pinterest for more early learning ideas.

_______

Supplies To Collect

Gather the following supplies for this nature-based art project:

  • shamrock plant
  • green and purple acrylic or tempera paint
  • paint pots
  • paintbrushes
  • purple and green pencil crayons
  • all-purpose art paper
  • green and purple construction paper
  • newspaper or manila paper
  • magnifying glasses

_______

Making The Shamrock Leaf Print Art

Before using the shamrock leaves for printmaking, give participants a chance to study the plant. Offer magnifying glasses to view the leaves and dainty flowers with yellow stamens. Set the plant out in a sunny place and then put it in a dark area to see how its leaves fold down and spread out depending on how much sunlight the plant is getting.

To prepare the art activity, snip a few leaves off the plant to use for making paint prints.

Steps to make beautiful shamrock leaf print art. This is an easy-to-do all-ages nature art project

_______

Next, lay down newspaper sheets or a large piece of manilla paper for participants to work on.

Then add an art station with a sheet of all-purpose art paper, leaf sprig, paintbrush, and green acrylic paint for each participant. My paper size is an 11-inch x 14-inch inch sheet cut in half, creating a 7-inch x 11-inch piece to work on.

Note: Non-toxic tempera paint is a good choice for young children taking part in the activity.

Afterward, invite participants to brush the tops of the leaflets on their sprig thoroughly with green paint, flip the leaf over, and carefully press the painted sides down on the paper.  Have them gently rub their fingers over the leaflets and pat the edges down to transfer as much paint to the paper as possible.

Beautiful shamrock leaf print art with leaves from the Oxalis Regnelli plant. This is a nature art project that is perfect for St. Patrick's Day.

_______

Then ask everyone to slowly lift their leaf off the paper canvas and repaint it to make more leaf prints. The shamrock leaves are delicate, but when handled gently they can be used a few times. If someone’s leaf tears, offer a new sprig to use.

When the paint prints are dry, ask participants to use a pencil crayon to add stems to the leaves.

As a finishing touch, mount each shamrock leaf print art project on a similar-colored construction paper background.

_______

Making Purple Shamrock Leaf Print Art

A purple shamrock, called Oxalis Triangularis, has similarly shaped leaves and flowers as the Oxalis Regnallii. This purple shamrock showcases deep purple, dark-edged leaves that respond to darkness and light in the same way.

A purple shamrock plant with compound leaves composed of three triangular leaflets.

_______

With purple acrylic or tempera paint, let participants create shamrock prints just as they were made in green.

Beautiful shamrock leaf print art with leaves from the Oxalis Regnelli plant. This is a nature art project that is perfect for St. Patrick's Day.

_______

If there are any leaves left on the plant after the printmaking activity is done, add them to a playdough activity. Or have someone without pets take the plant home to care for.

Note: All Oxalis plants are toxic to dogs, cats, and grazing animals such as horses and must be kept out of their reach. These plants are slightly toxic to humans. Make sure to supervise all shamrock leaf activities closely so that no one ingests the leaves.

How to make beautiful shamrock leaf print art with sprigs from an Oxalis Regnelli plant. An easy-to-do all-ages art project.

_______

More Shamrock-themed Activities:

Shamrock Paper Plate Lion

Shamrock Dissolving Candy Experiment

St. Patrick’s Day Painted Shamrock

Shamrock Rolling Pin Art

Scissor Skill Shamrock Collage

[Read more…] about Shamrock Leaf Print Art

Filed Under: art, playdough, preschool, science, sensory, spring, St. Patrick's Day Tagged With: art, leaf prints, leaves, printmaking, shamrocks, St. Patrick's Day

Glow Art Words Of Affirmation

September 20, 2022 by Annette Kaminsky Leave a Comment

This black light "words of affirmation" glow art activity is a must-try. It is a science, art, and language self-esteem-building project.
This black light "Words Of Affirmation" Glow Art activity is a must-try. It is a science, art, and language self-esteem-building project.

_______

Words are powerful, and they can be super uplifting to early learners. At the beginning of the school year, supportive, self-esteem-building words help students get off to a good start. A creative and oh-so-easy way to introduce them is by inviting little learners to use highlighters to color around positive ones printed in heart shapes. Afterward, the fancied-up words can be viewed and discussed in a “Glow Art Words Of Affirmation” language and science activity.

_______

Follow me on Pinterest for more early learning ideas.

_______

Supplies To Collect

For this confidence-boosting glow art activity, gather the following supplies:

  • chisel-tipped highlighters in a variety of colors
  • white cardstock paper
  • black felt marker
  • scissors
  • tape
  • portable black light fluorescent tube and holder
  • small coffee table

_______

Glow Word Art

First, draw heart shapes on white cardstock paper with a black felt marker, and add a word of affirmation to each one. Or design the project digitally. The words chosen for my art project are:

  • creative
  • friendly
  • kind
  • brave
  • helpful
  • teachable
  • awesome
  • unique
  • cherished
Steps to perform a black light "words of affirmation" glow art activity. The art project is perfect for the beginning of the year, the end of the year, or anytime in between.

_______

Next, invite little learners to decorate a word heart with highlighter markers, and then cut their hearts out. Leaving some parts of the designs uncolored is fine, as white will glow too.

Note: Highlighter ink is a tiny bit toxic, but using it is not considered a health risk. If your little charges are prone to sticking things in their mouths and/or coloring on themselves, it is advisable to choose another art medium for this activity.

When decorated, tape the embellished hearts to a wall in a room that can be made totally dark.

Afterward, place a fluorescent tube black light on a small table next to the art wall, and turn it on.

Then invite everyone to the room to view the art with all lights on. Discuss how the words apply to your little learners.

This "positive words" glow art activity incorporates language and science. It is a confidence-boosting art project perfect for any time of the year.

_______

Lastly, make the room dark and leave just the black light on. Students will be wowed by the glowing, worded hearts.

This "positive words" glow art activity incorporates language and science. It is a confidence-boosting art project perfect for any time of the year.

_______

Safety Tip: Tell children that they should only be near a black light for a short period of time. Prolonged exposure may lead to eye and skin damage.

_______

Discussing The Glow Art Words Of Affirmation

Here are some ideas for discussing decorated word hearts with the children:

  • Assure early learners that they are brave in coming to school and meeting new friends.
  • Affirm the specialness of each child by saying they are “unique, awesome, and cherished.”
  • Compliment students for being creative and teachable.
  • Highlight that being “friendly, helpful, and kind” are ways to work as a team and get along with each other.
This black light "Words Of Affirmation" Glow Art activity is a must-try. It is a science, art, and language self-esteem-building project.

_______

The Science Behind Black Light

Black lights are designed to block out visible light and emit invisible, ultraviolet (UV-A) light. They illuminate natural and man-made materials that contain phosphors. Phosphors convert the energy in UV radiation to visible light by re-emitting it at a different wavelength, one that our eyes can see.

The dyes from highlighter pens contain phosphors. When highlighter art is positioned in a dark room near a black light, it glows.

This black light character trait art activity incorporates language and science. It is a confidence-boosting art project perfect for any time of the year.

_______

Glowing Names

Instead of focussing on words of affirmation, invite your little learners to color around their names with highlighters. This is also a terrific beginning of the year activity. And it works well at the end of the school term to remind children that they have been valued members of the class.

_______

Related: Scented Moon Playdough

_______

[Read more…] about Glow Art Words Of Affirmation

Filed Under: art, display, fall, friends, literacy, preschool, science Tagged With: art, black light, light, science experiment, self-esteem

Skull And Crossbones Art

September 15, 2022 by Annette Kaminsky Leave a Comment

Oh, so easy skull and crossbones art project your little learners will love. Two free printables are included for the scissor skill activity.

Most years a pirate theme finds its way into our curriculum offerings. The theme involves action figures, boats, and lots of treasure, so what’s not to love? This year we included skull and crossbones art, which led to interesting discussions!

_______

Oh, so easy skull and crossbones art project your little learners will love. Two free printables are included for the scissor skill activity.

_______

Follow me on Pinterest for more ideas.

_______

What I like most of all about a pirate theme is the way it enhances children’s language. Near the beginning of the school year, dramatic pirate language (demonstrated in storybooks) helps draw children out of their shells as they practice it in pretend play. Later on, it presents opportunities to work on sounds children may still be having difficulty with (think letter R / “arrr”.)

_______

International Talk Like A Pirate Day

An International Talk Like A Pirate Day is held every year on September 19. Celebrating it in the classroom fits in well with the benefits of imitating pirate talk at the beginning of the school term (which is in September where I live.}

_______

The Skull And Crossbones Art Project

Near the end of my latest pirate theme, I offered a little skull and crossbones art activity. (A skull and crossbones symbol was one of the designs used on pirate ships.)  Although the main goals were to discuss symmetry and practice scissor skills, the activity also inspired lively group conversation.

Oh, so easy skull and crossbones "creepy art" activity your little learners will love. Two free printables are included for the scissor skill ainvitation.

_______

Children cut out a skull and crossbones from a printable and then used felt markers to decorate it.

Invitation to create "creepy art" with two free skull and crossbones printables. Scissor skill practice is also a goal.

_______

My preschoolers loved the decorating phase. And they called their designs “creepy art.”  That term (which rolled off their tongues numerous times) was the inspiration for drawing spiders and dripping blood. (There were a few hearts to soften the look.)

This led me to tell them that there is such a thing as creepy art and that it is perfectly legitimate. Skull and crossbones art fits the label, and some of it is even described as “gorgeous” and “pretty” online.

_______

Skull And Crossbones Printables

The simple pirate-themed art activity was so well-received that I thought it was worth sharing in a blog post. It’s easy to pull out on International Talk Like A Pirate Day, or any time of the year.

Here are two free printables to download so your little learners can make creepy art too.

This first printable can be cut out and decorated. Or you can skip the cutting phase.

Skull and crossbones template to download for scissor skill practice and art.

_______

Skull And Crossbones PrintableDownload

This printable is for individual or one classroom use only.

_______

The second printable is designed to be folded in half lengthwise and then cut. It’s a good activity to discuss symmetry.

Skull and crossbones template to download for scissor skill practice and art. Learning about symmetry is also a possibility.

_______

Skull And Crossbones Scissor Skill PrintableDownload

This printable is for individual or one classroom use only.

_______

The work of Salvador Dali is an example of exquisite creepy art. An artist theme on Dali would be a great follow-up to this skull and crossbones art activity.

_______

And for more pirate-themed fun, try this “Exploding Treasure Chests” science experiment by FUN-A-DAY.

_______

Related: Pirate Treasure Bin

_______

[Read more…] about Skull And Crossbones Art

Filed Under: art, literacy, Math, pirates, preschool Tagged With: art, pirates, scissor skills

Jelly Bean Theme

April 16, 2022 by Annette Kaminsky Leave a Comment

_______

A few weeks ago, I set out to make an Easter display that would work for a wall art tree. I thought of incorporating the “Jelly Bean Prayer,” and wondered if there was such a thing as a jelly bean tree. To my delight, an online search revealed a variety of references to “jelly bean tree,” and provided inspiration for other activities. So in addition to changing up the display, I came up with this fun and tasty Jelly Bean Theme. The post includes free printables and a few facts about the colorful candy.

_____

10 Jelly Bean Facts

  • Jelly beans are bite-sized candies with hard, crunchy shells and soft, chewy centers.
  • These sweet candies are associated with Easter in Canada and the United States.
  • Part of the appeal is their egg shape and tiny size. This makes them terrific Easter egg fillers.
  • There are eight basic colors and flavors, which often have a fruity taste.
  • Over time, jelly beans were created in many different color schemes, often matching seasonal celebrations.
  • Jelly beans became popular in the 1960s.
  • The most common order for eating the candies is: red, purple, green, yellow, and black.
  • Jelly beans are used as an art medium, and there are mosaic art pieces made with them.
  • President Ronald Reagan liked them a lot, so artist Peter Rocha made a jelly bean portrait of the president.
  • There is a National Jelly Bean Day (in the US) on April 22.

_______

Follow me on Pinterest for more early learning ideas.

_______

Jelly Bean Theme Activities

There are a number of easy, educational jellybean activities to do at home or school.

Tasting Jelly Beans

Give participants jelly beans in the colors red, purple, green, yellow, and black. Chart the order each child eats the jellybeans.

What order would you eat these jelly beans in? Try this candy tasting activity and record the results.

_______

Incorporate language and math sequencing by describing color and taste, and using words such as first, next, and last.

_______

Jelly Bean Sorting

Invite children to sort jelly beans by color. This flower-shaped paint palette is perfect for individual color sorting.

A flower-shaped paint palette makes the perfect tray to sort jelly beans by color.

_______

Candies On Display

Jelly beans look attractive stored in mason jars. The filled jars could be part of a tablescape display or food table.

Store jelly beans in jars for a tablescape or food table display. Have a "Guess The Number Of Jelly Beans In The Jar" contest.

_______

How Many Jelly Beans Are In The Jar?

Fill a jar with jelly beans, and have participants guess the number of candies in the jar. Then count the jellybeans together. For early learners, a baby food jar or small bottle would be a good size to use.

_______

Cupcake Liner Easter Party Favors

Add pipe cleaner handles to sturdy Easter-themed cupcake liners. Fill the liners with Easter-colored jelly beans and hand them out as Easter basket party favors. Or fill plastic Easter eggs with jelly beans.

_______

Jelly Bean Prayer Wall Display

Over-sized paper jelly beans for a "Jelly Bean Prayer" tree display. Download the free printable for art, book-making, and display opportunities.

_______

Download this free template for a Jelly Bean Prayer tree display. I used it to cut out large jelly beans from different colors of cardstock paper. Then I wrote a line of the prayer on each one and added them to a tree theme wall display.

Download this oversized jelly bean template for art, book-making, and display use.

_______

Jelly Bean PrintableDownload

This printable is for individual or one classroom use only.

_______

Jelly Bean Art

Use this same printable for children to paint or color and cut out gigantic paper jelly beans.

Or have children dictate or write a page for a jelly bean storybook, and then decorate the background.

_______

J Is For Jelly Bean Craft

Invite children to glue jelly beans onto a paper letter J. How fun!

"J Is For Jelly Beans" in this tasty craft. Reinforce the letter J sound with this fun and easy activity.

_______

Jelly Bean Tree Craft

Print copies of this tree template on white cardstock paper. Set them on an art table along with white glue and jelly beans. Invite children to glue jelly beans on the tree.

This could also be a transient art activity offered in a tray.

How fun! Decorate a tree template with jelly beans. Glue the tasty candies on for a finished project. Free tree printable available.

_______

Jelly Bean Artists

There are artists who work with jelly beans as a medium, or as a subject in their art. Who knew?

Peter Rocha and Kristen Cummings are two notable jelly bean artists. Their creations can be viewed on the Jelly Belly Company’s “The Jelly Belly Bean Art Gallery” web page. Their candy art can also be viewed on my Pinterest Board Jelly Bean Kids Activities/Jelly Bean Artists.

_______

Storybooks Incorporating Jelly Beans

The flavorful candies make an entertaining subject for storybooks. Here are a few books incorporating jelly beans:

Arthur’s Jelly Beans by Marc Brown 

Arthur and his friends participate in a “Spring Fling” party, which includes a jelly bean hunt of course!

Jellybean Mouse by Philip Roy

Happy the mouse isn’t excited to go on a laundromat errand but discovers a jellybean machine once there. The day’s adventure becomes just the excitement the spunky mouse is seeking.

The Jellybeans And The Big Dance by Laura Numeroff and Nate Evans

A group of girls with different interests meet at a dance studio, and slowly become friends. They eventually discover that just as jellybeans come in different flavors but go well together, they get along great. They decide to call themselves “The Jellybeans.”

There are three more books in this friendship and team-building series:

  • The Jellybeans and the Big Book Bonanza
  • The Jellybeans and the Big Camp Kickoff
  • The Jellybeans and the Big Art Adventure

Jelly Bean Tree by Toni Yuli

This story isn’t about jelly beans, but the main character, a giraffe, is called Jelly Bean. It’s reason enough to include the colorfully illustrated, endearing story in the theme.

_______

[Read more…] about Jelly Bean Theme

Filed Under: art, crafts, display, Easter, literacy, Math, party, preschool, sensory, spring, themes, trees Tagged With: art, crafts, jelly beans, sensory tray

Primary Sidebar

Hi, I'm Annette Kaminsky. I am a preschool teacher who loves to share easy and fun early learning activities. Thanks for visiting my blog. Feel free to stay awhile!

Subscribe Via Email

Recent Posts

  • Salt and Ice Science Experiment May 20, 2025
  • Airplane Rice Sensory Bin May 16, 2025
  • Salt Painting Planet Art May 3, 2025
  • Spring Bunny Sensory Bin April 19, 2025
  • Tin Foil Egg Printing April 17, 2025
  • Lentil Easter Bunny Sensory Bin April 15, 2025
  • Unicorn Store Dramatic Play Center March 25, 2025
  • Easter Store Dramatic Play Center March 23, 2025
  • Origami Heart Wreath February 28, 2025
  • Black History Month Mixed Media Art February 26, 2025

Categories

Topics

block play bunnies butterflies Chinese New Year Christmas Christmas craft color colors dramatic play Easter flowers hearts holiday jewelry leaves leprechauns light table loose parts painting paper crafts playdough pretend play printables printmaking process art pumpkins rice bin scented playdough science experiment scissor skills sensory bin sensory play sensory tray shamrocks skeletons snakes snowflakes spiders spring St. Patrick's Day sunflowers tablescapes trees Valentine's Day water play

Copyright © 2025 · Lifestyle Pro on Genesis Framework · WordPress · Log in