• Skip to secondary menu
  • Skip to main content
  • Skip to primary sidebar

Putting The Pretty In Preschool

Finding Beauty In Everyday Early Childhood Experiences

  • Home
  • About Me
  • Winter
  • Chinese New Year
  • Blog
  • Contact Me
  • Black History Month
  • SHOP
  • Valentine’s Day

gardening

Cauliflower Theme Activities

September 17, 2023 by Annette Kaminsky Leave a Comment

Tweet
Share
Share
Pin
Easy and fun cauliflower theme activities. Art, craft, science and snack ideas are included in this hands-on vegetable theme.

_______

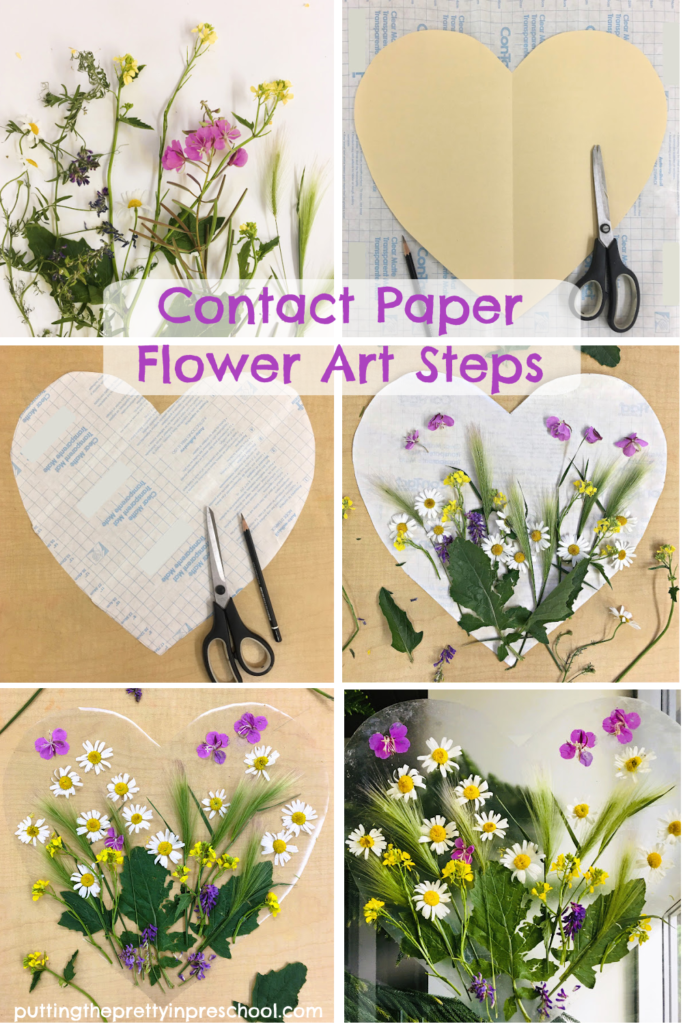
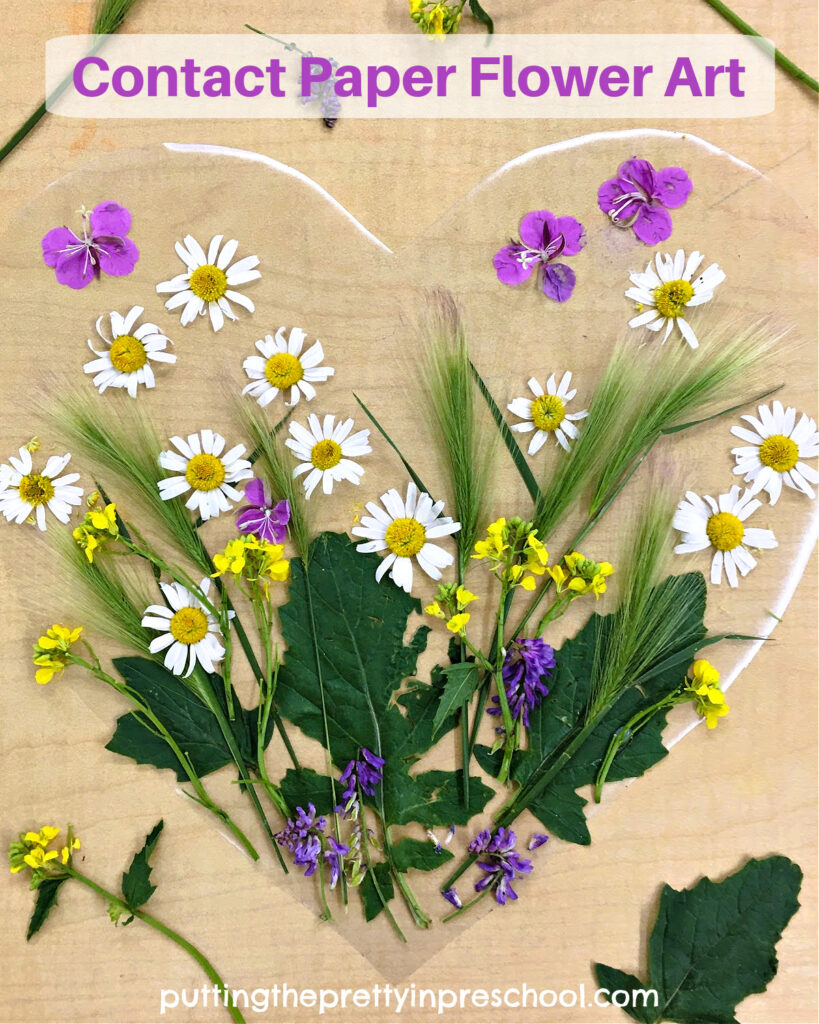
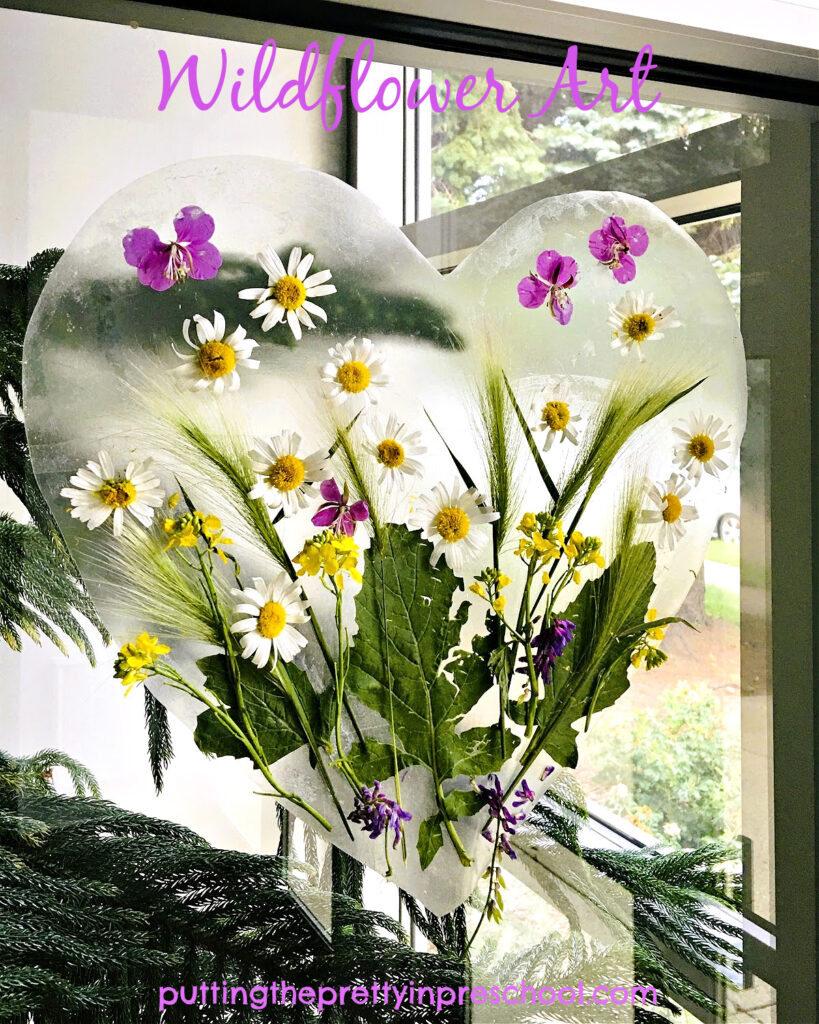
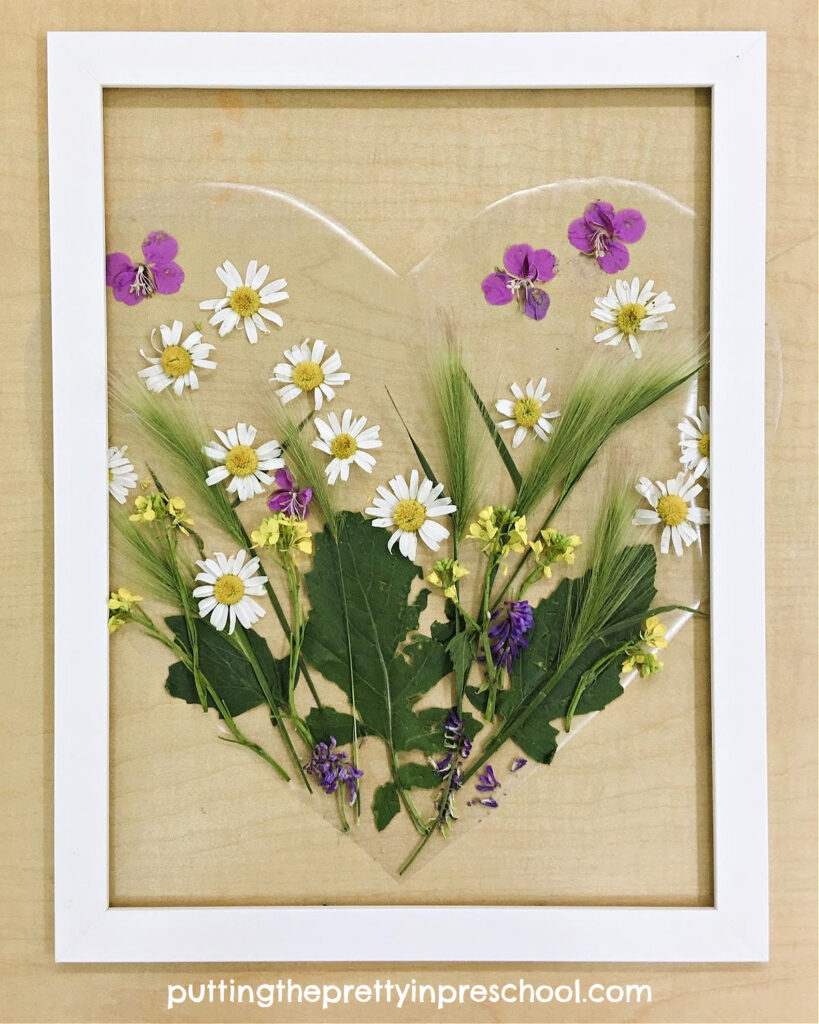
Beans in a variety of colors weren’t the only thing I discovered on a recent street market stroll. I also stumbled upon a delightful vegetable stall with three different colors of cauliflower. The uniquely hued vegetables are the inspiration for cauliflower theme activities to try, including super easy raw and cooked cauliflower snacks, cauliflower science, and arts and crafts activities.

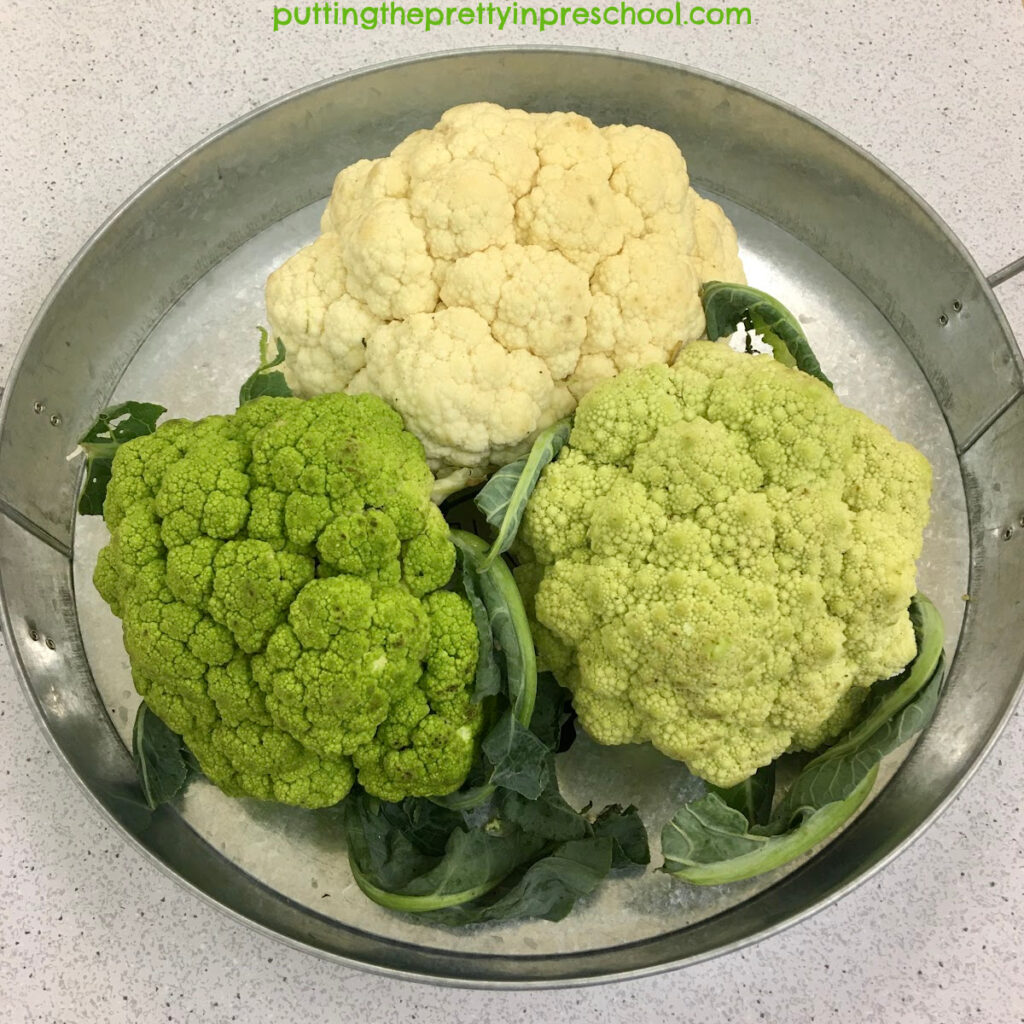
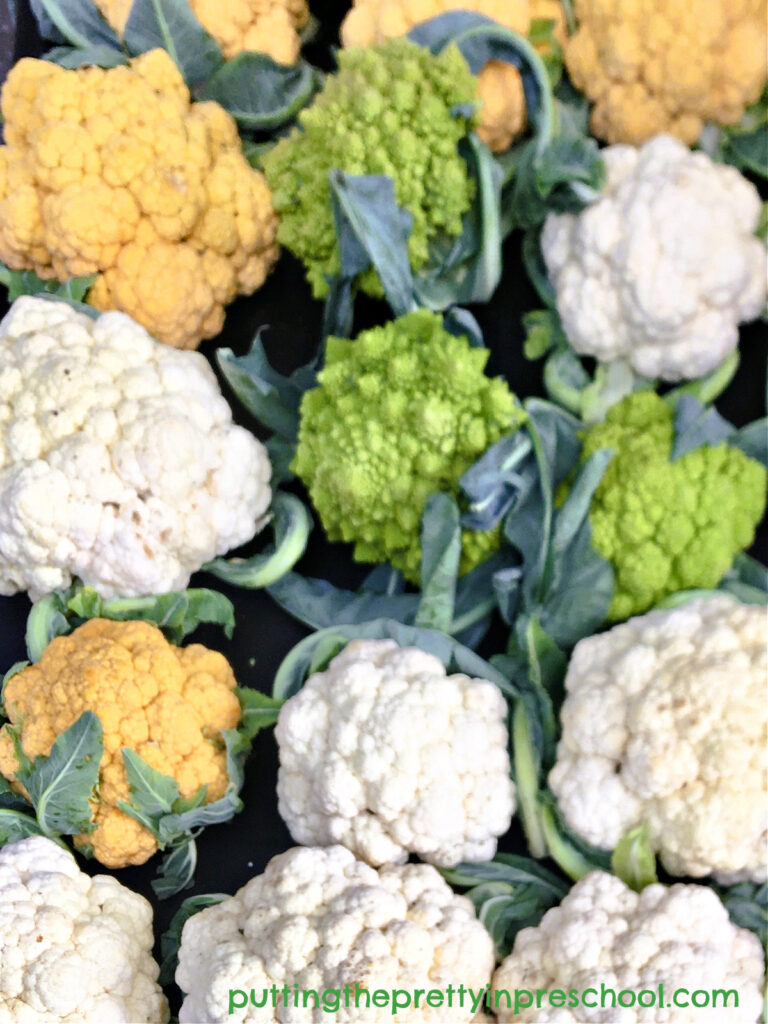
The easiest cauliflower to find is white, but did you know that this popular vegetable also comes in green, orange, and purple colors? These additional hues have recently popped up at vegetable stands. They add variety to food offerings and would certainly be a conversation piece at any gathering.

Three cauliflower colors spotted at a farmer's market to use in a vegetable tray or a roasted dish.

_______

Follow me on Pinterest for more early learning ideas.

_______

The cauliflower colors I feature in the snacks below are cream, light green, and medium green.

Note: On another street market stroll I came across an orange variety, shown in a photo below. I am still on the hunt for purple and look forward to being able to find it.

_______

Cauliflower Snacks

Cauliflower is a versatile vegetable and can be used in many different dishes. Two easy ways to introduce cauliflower are in a vegetable tray or as a roasted dish.

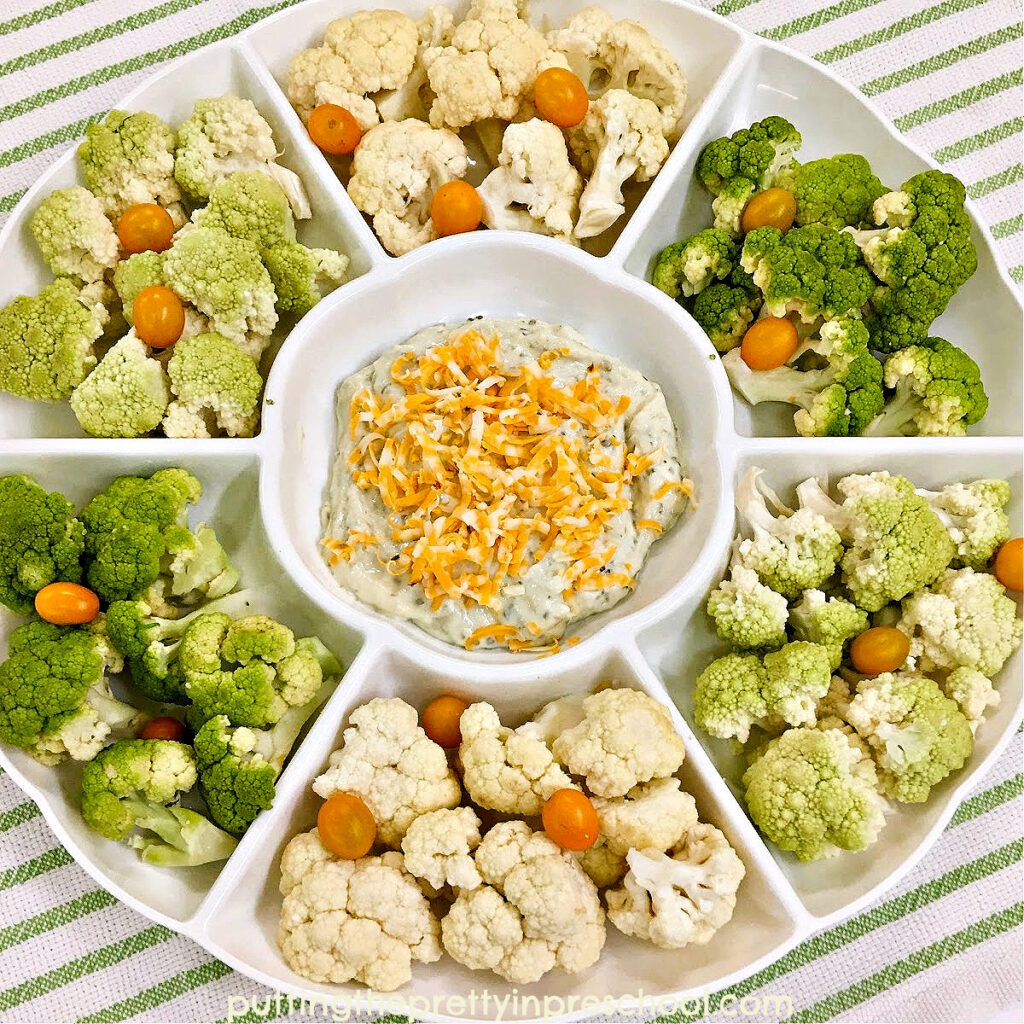
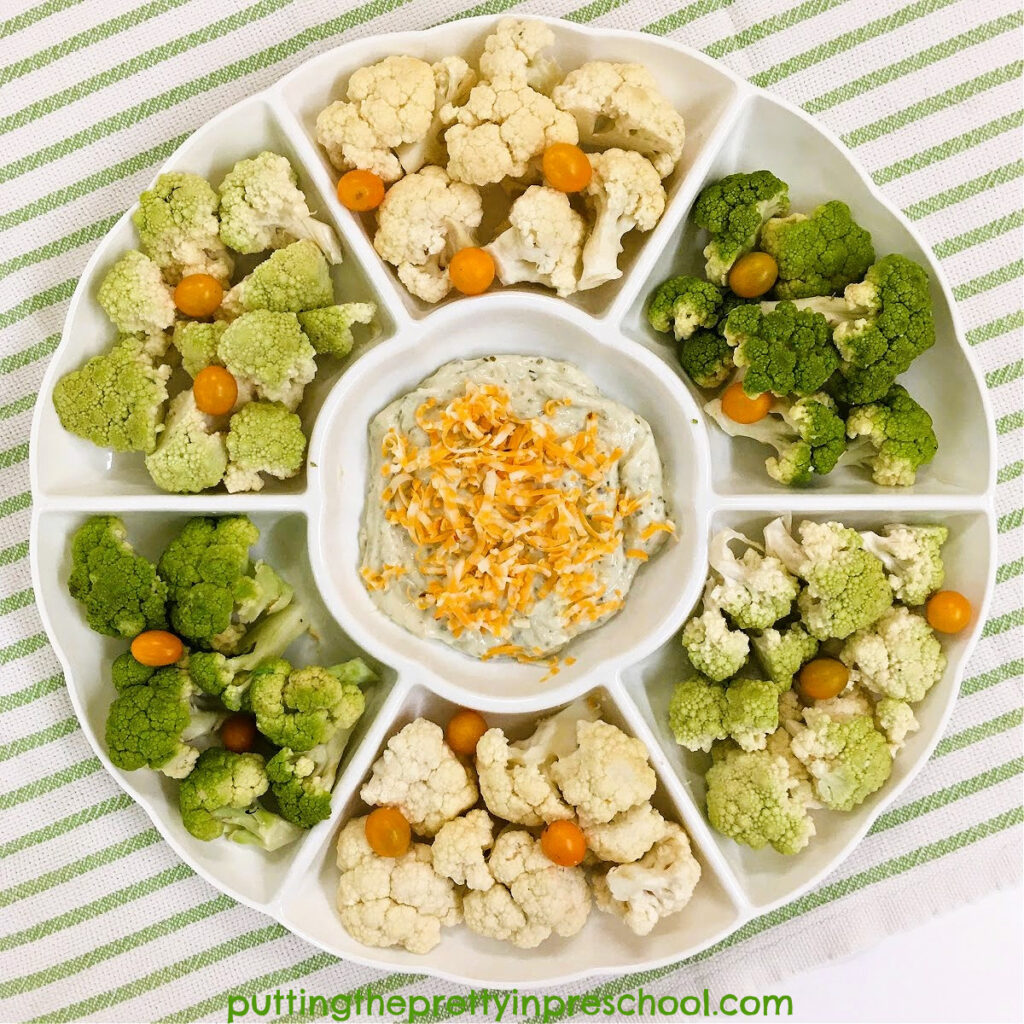
Cauliflower Vegetable Tray

An eye-appealing vegetable tray with cream and green cauliflower and orange cherry tomatoes.

_______

To give them a moment to shine, include different-hued cauliflower florets in a vegetable tray. Add a favorite dip in the middle of the eye-appealing snack. A little shredded cheese sprinkled on top of the dip and a few cherry tomatoes placed around the cauliflower add pops of color to the tray.
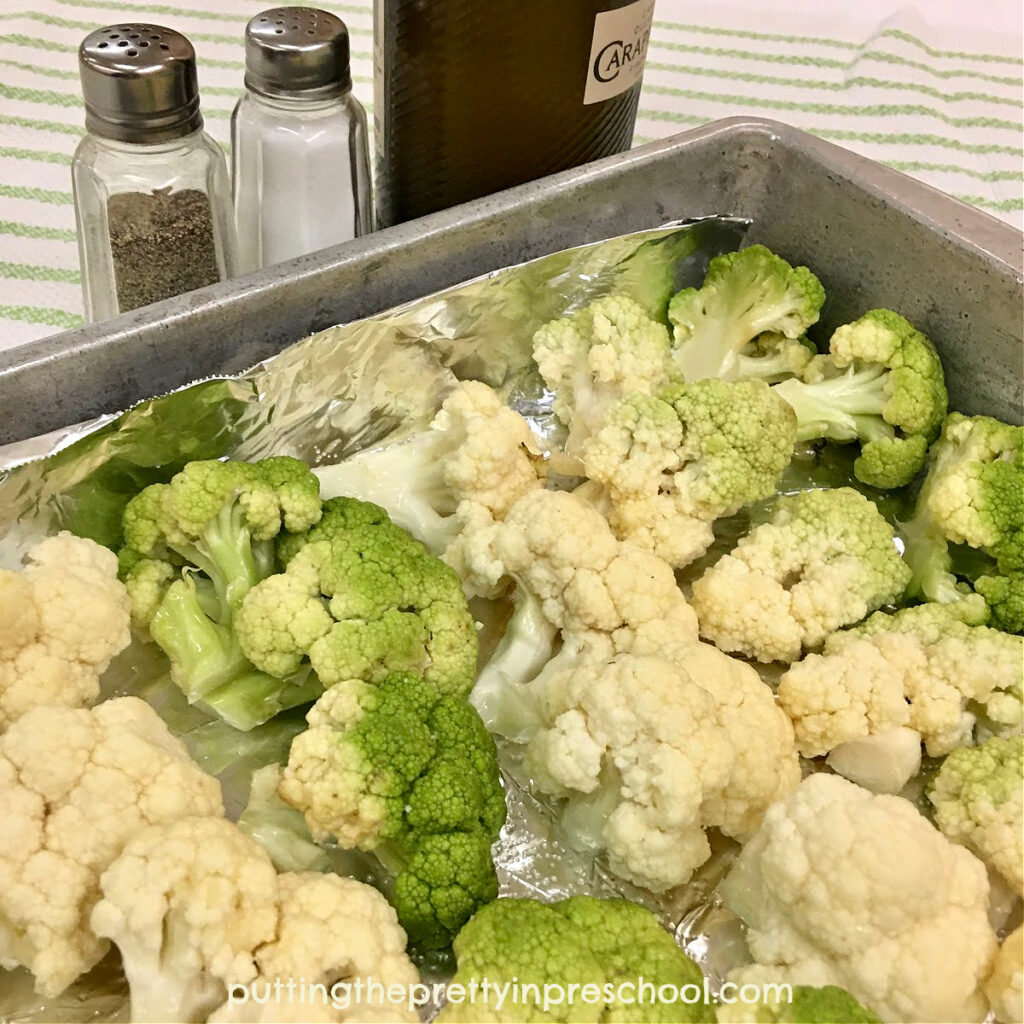
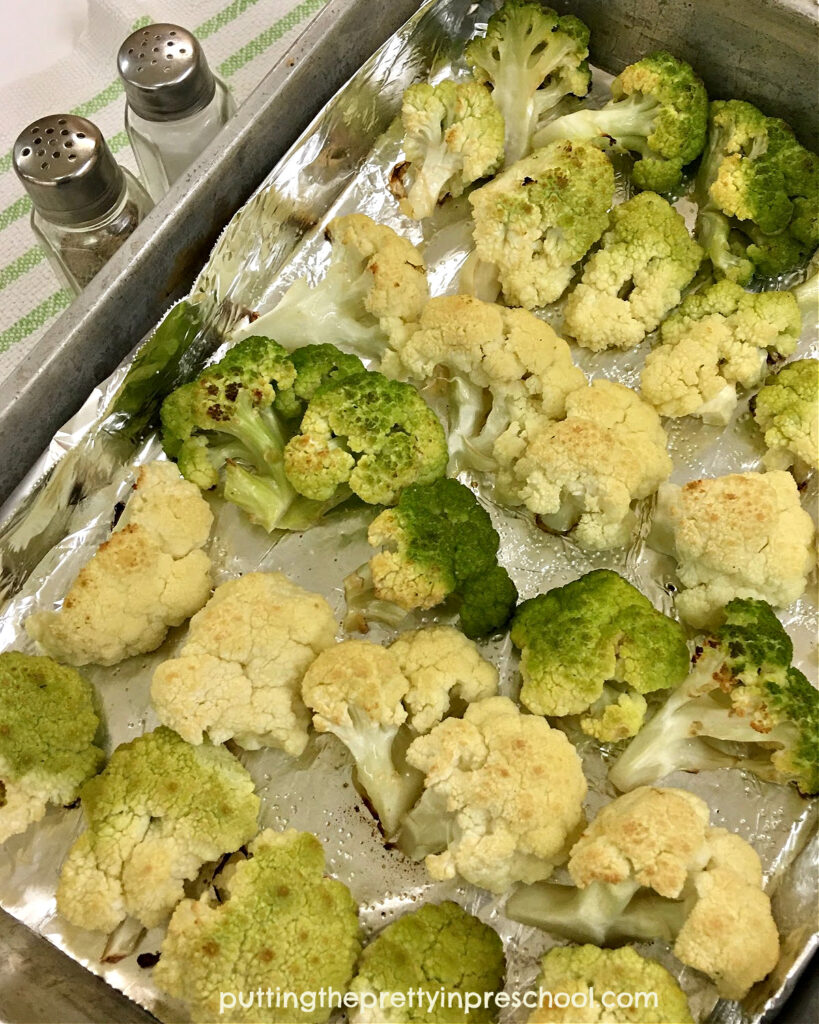
An eye-appealing vegetable tray with cream and green cauliflower and orange cherry tomatoes.

_______

Roasted Cauliflower

How to make a roasted cauliflower vegetable dish. Three different hues of cauliflower are featured in this easy-to-make recipe.

_______

Offer different colored cauliflower varieties in an easy-to-make roasted dish. First, pour a little olive oil in a bowl. Then cut the heads of cauliflower into florets and toss them in the oil. Spread the cut pieces in a baking pan lined with parchment paper or aluminum foil. Finally, sprinkle a little salt and pepper on the florets and bake them in an oven heated to 400 degrees for about 25 minutes.
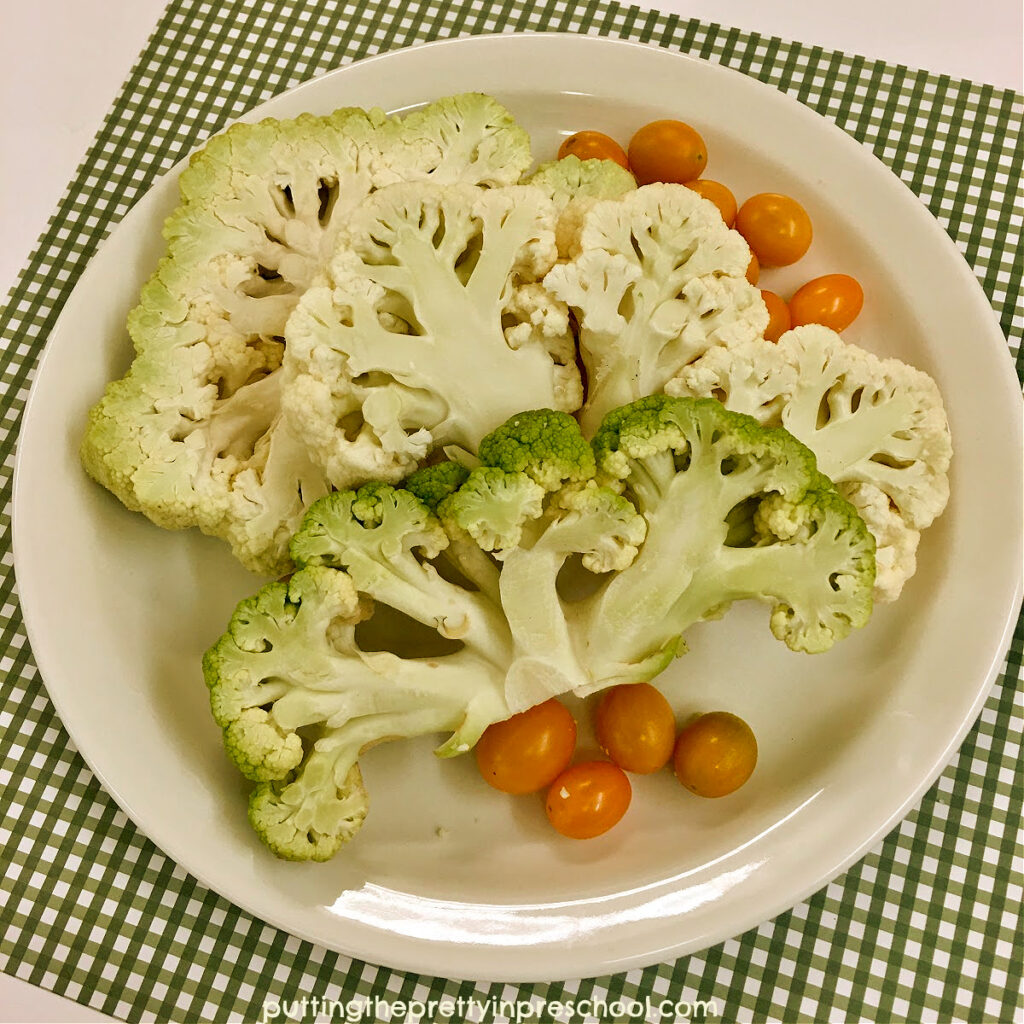
How to make a roasted cauliflower vegetable dish. Three different hues of cauliflower are featured in this easy-to-make recipe.

_______

Cauliflower Science

Before cutting a few different colors of cauliflower into florets, set them on a table for participants to view. Discuss cauliflower parts such as the head and stem leaves.

Green and cream cauliflower cut lengthwise into slabs to compare inside and outside colors.

_______

Next, slice a cauliflower into wedges to see cross sections of the cruciferous vegetable. View the stem and florets. If the cauliflower is green, orange, or purple, note if the insides of the cauliflower slabs are the same color as the outsides.

Discuss that this nutrient-rich vegetable has lots of vitamins and minerals, and is very healthy to eat.

_______

Cauliflower Arts And Crafts

You may not be able to find purple and orange cauliflower at your local grocery store, but their hues can certainly be included in cauliflower art and craft projects. In addition to green and cream, they are eye-catching colors to introduce in arty activities.

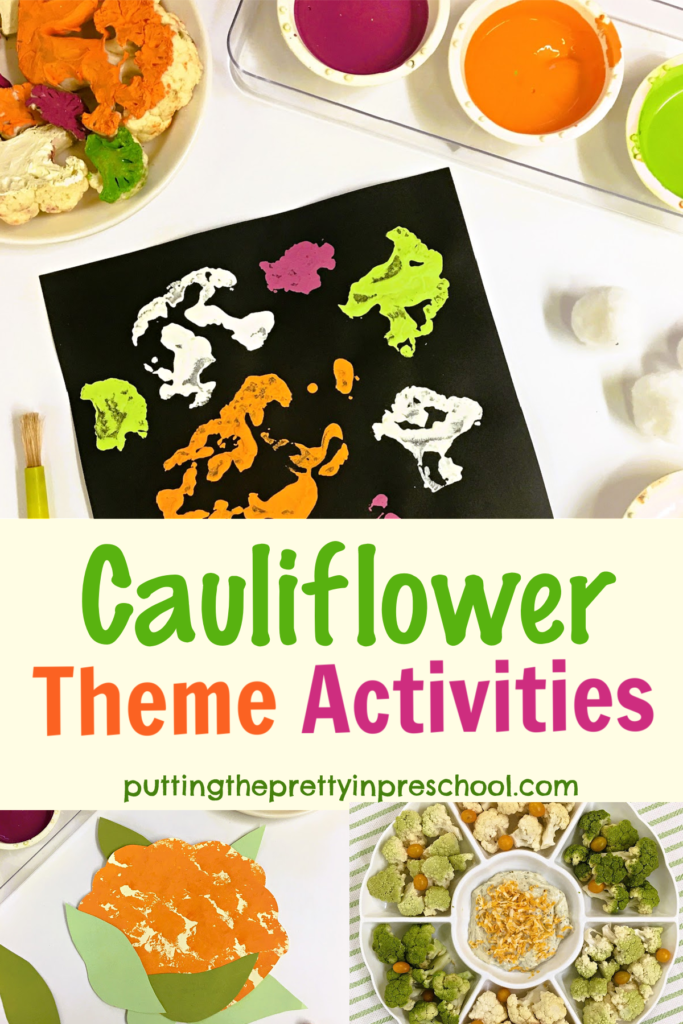
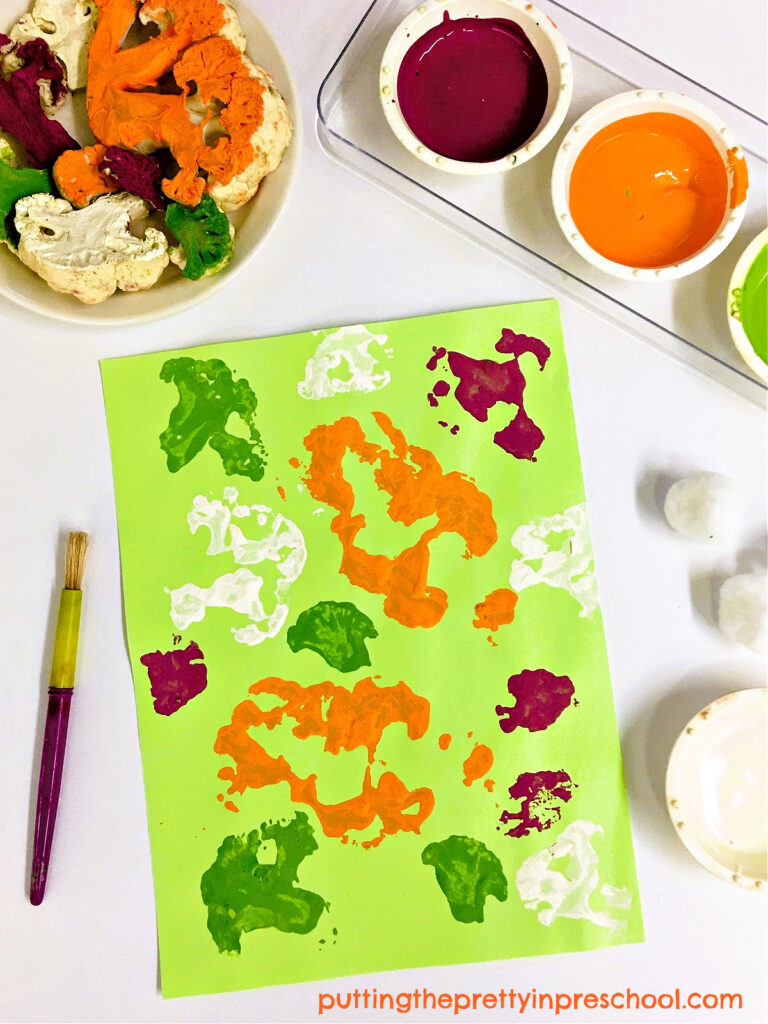
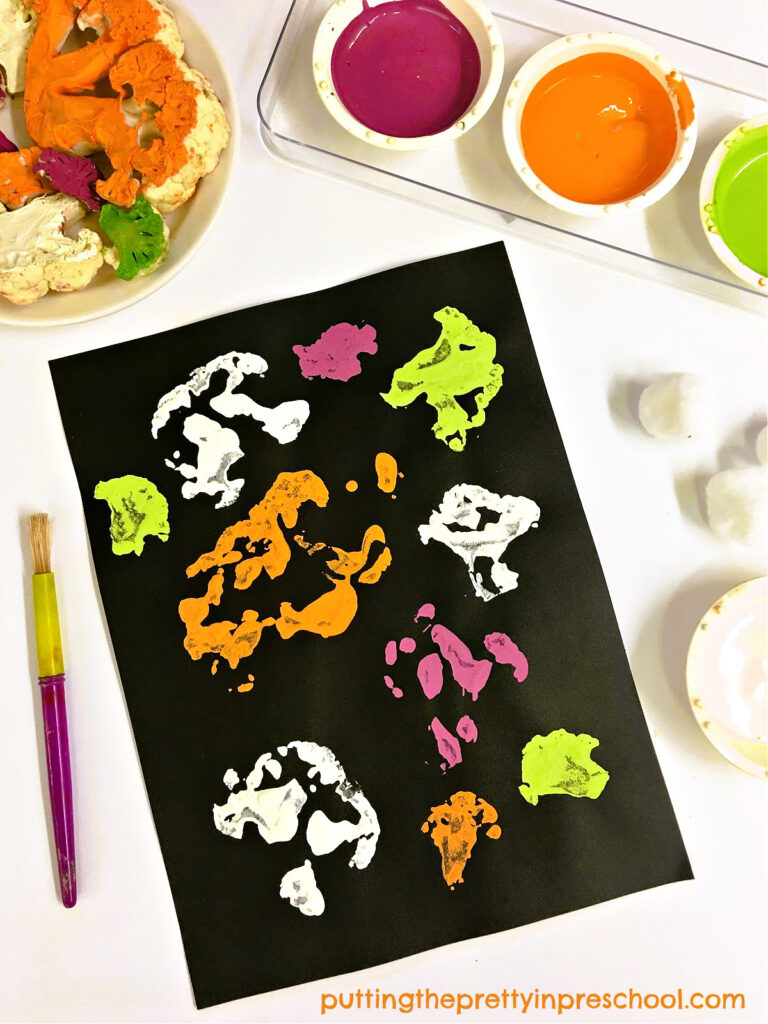
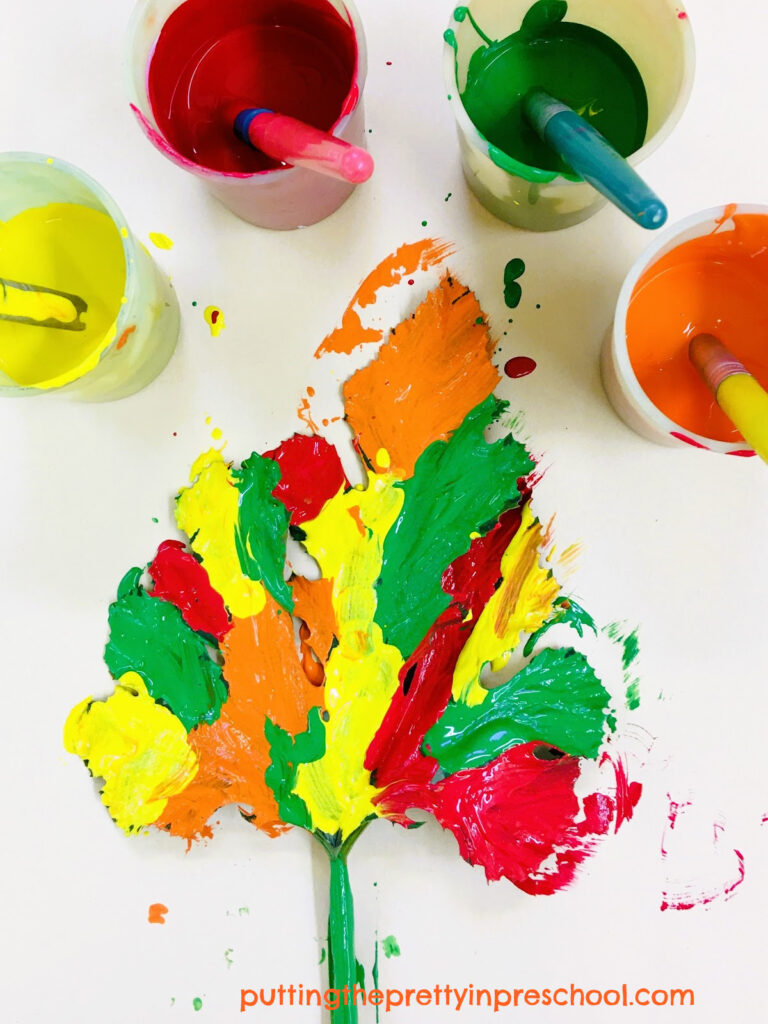
Vegetable Printing With Cauliflower

Create interesting, unexpected designs by using cauliflower florets as printmaking tools.

First, cut cauliflower into different-sized florets.

An invitation to make vegetable prints with cauliflower florets and orange, purple, green, and cream tempera paints.

_______

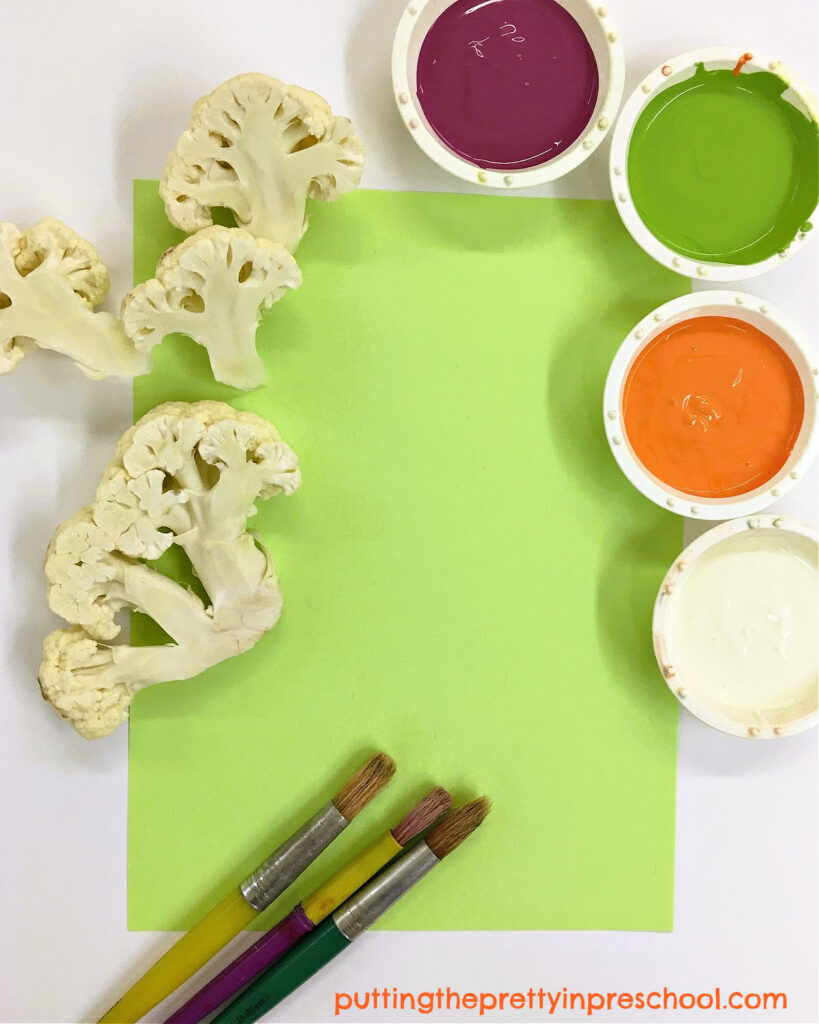
Next, paint the flatter sides of the florets with tempera paint. Cauliflower hues are a standout in this painting activity.

Then press down the florets onto a piece of sturdy art paper to make vegetable prints. Black and green fade-resistant construction paper work nicely for this cauliflower printmaking project.

How to make vegetable prints with cauliflower florets and orange, purple, green, and cream tempera paints.

_______

Paint Mixing Tips:

  • Add a drop of yellow tempera paint in the white to make a lovely cream color.
  • Mix a little yellow paint into green to make a lighter and brighter hue.
  • Drop in a teaspoon or two of white paint into purple and orange to make softer hues.

_______

How to make vegetable prints with cauliflower florets and orange, purple, green, and cream tempera paints.

_______

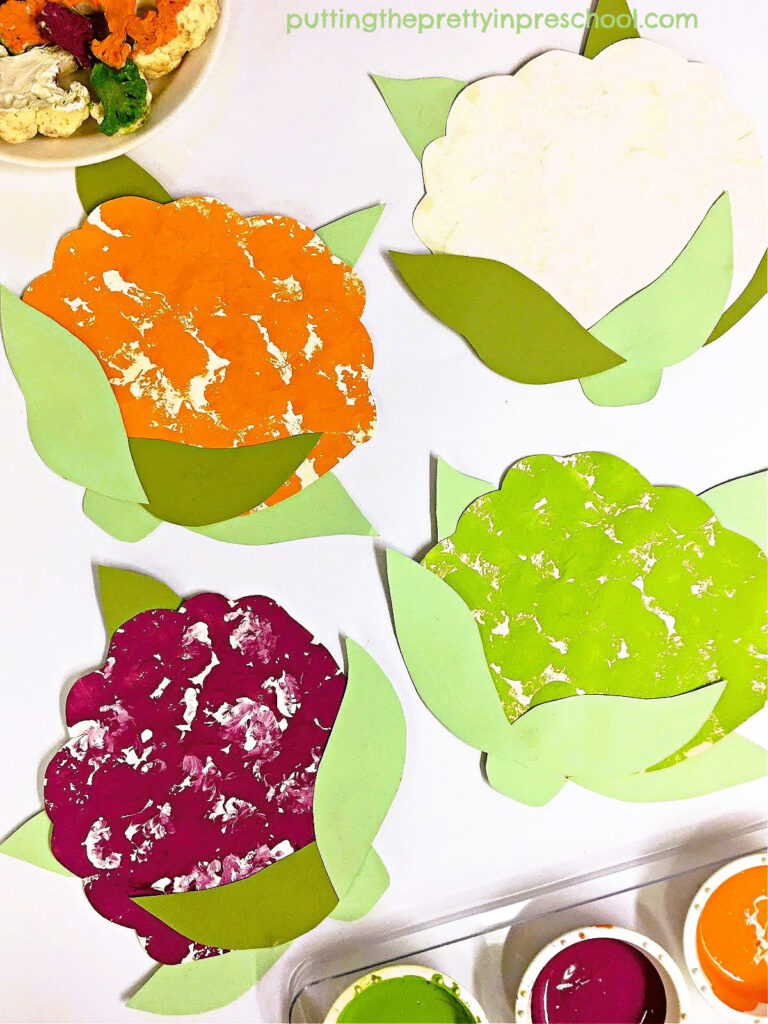
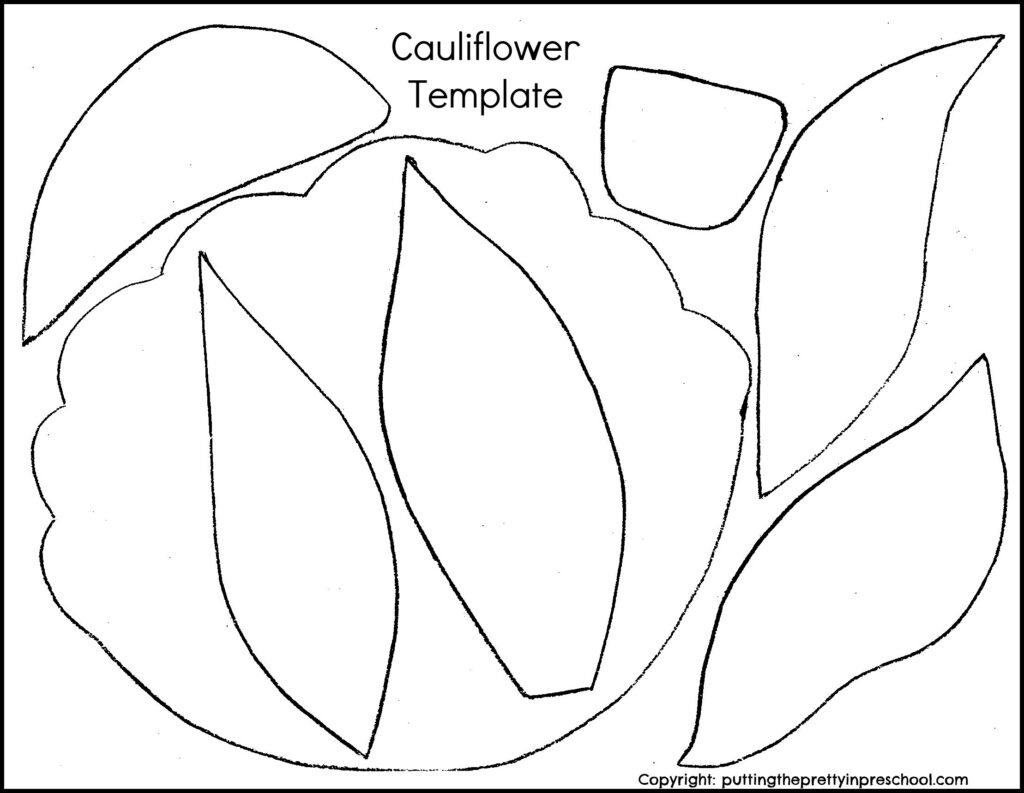
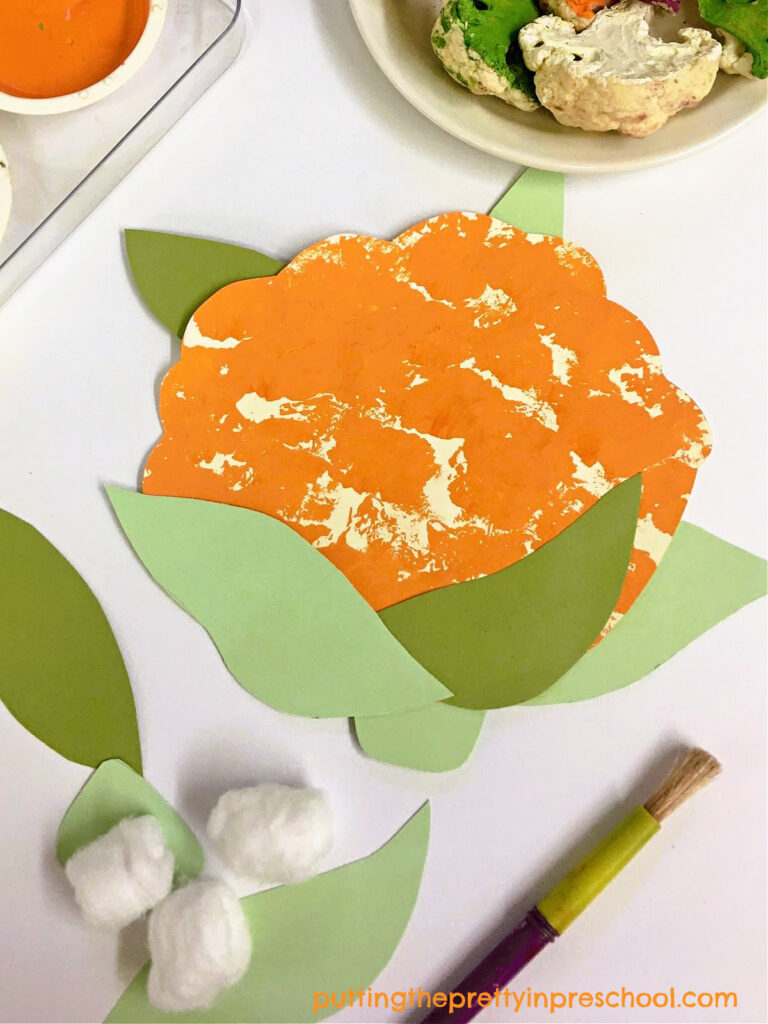
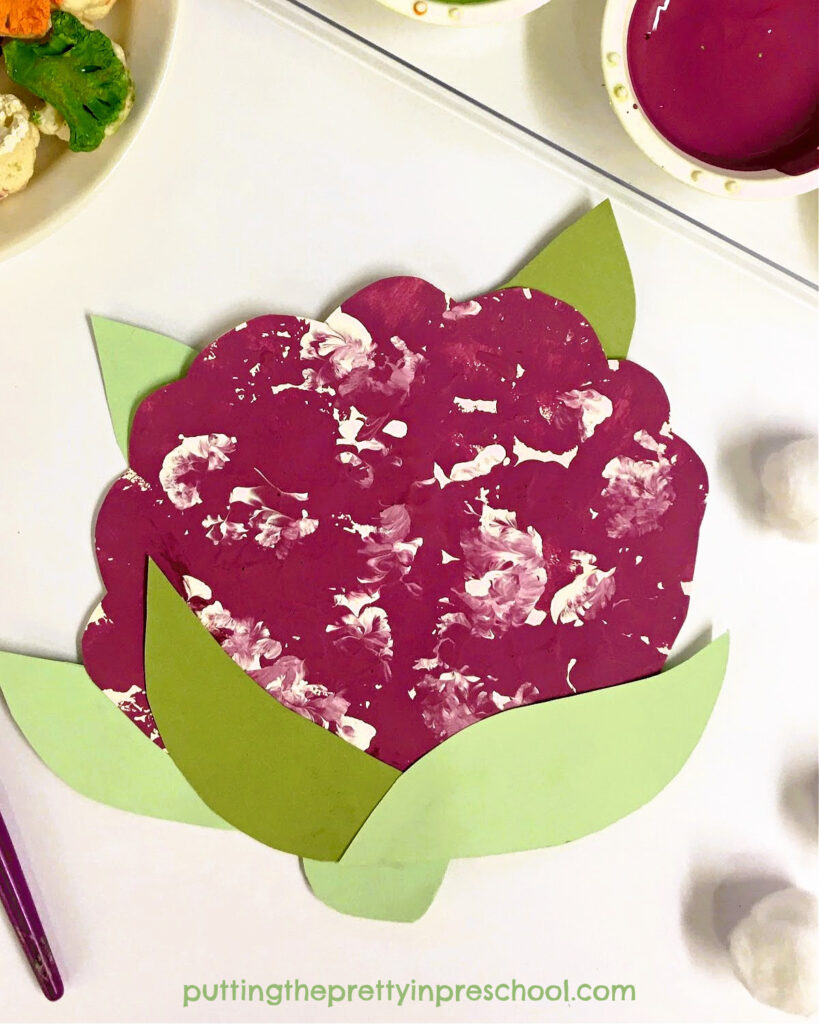
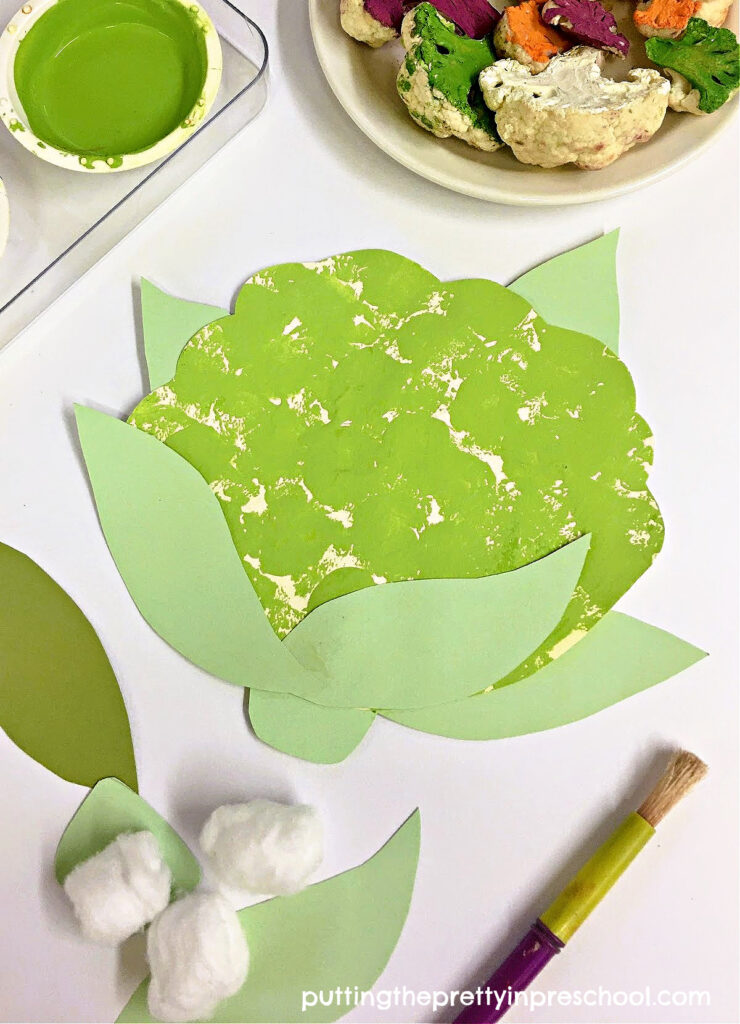
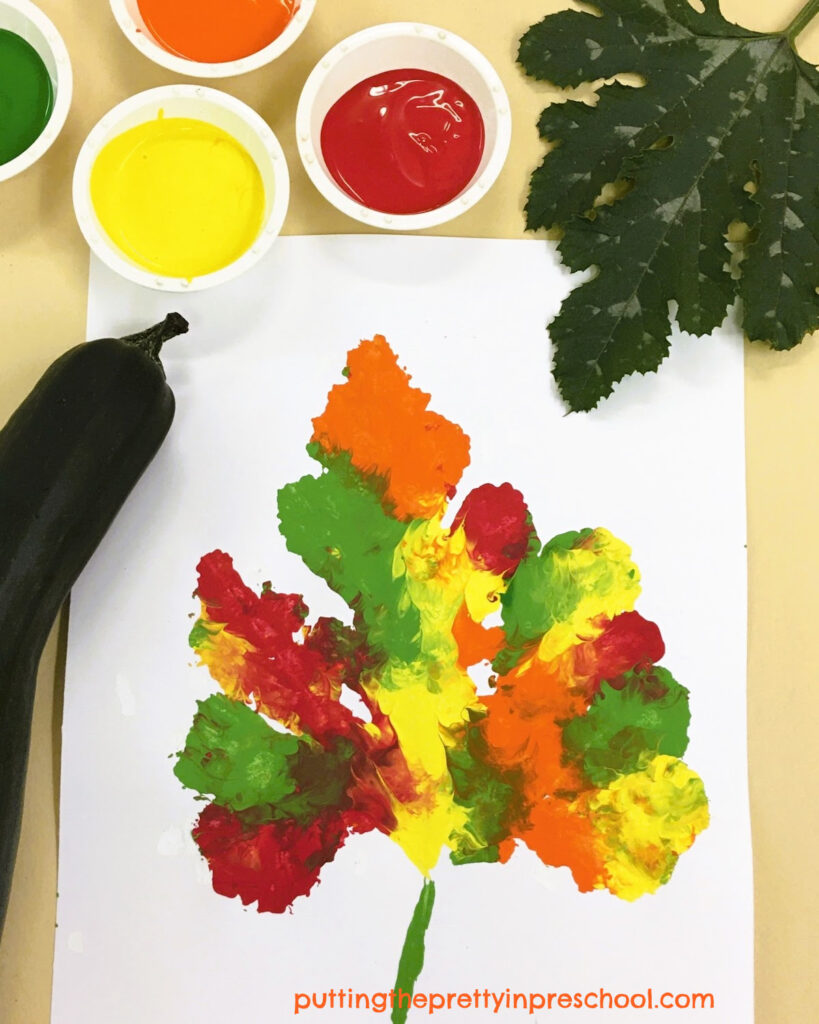
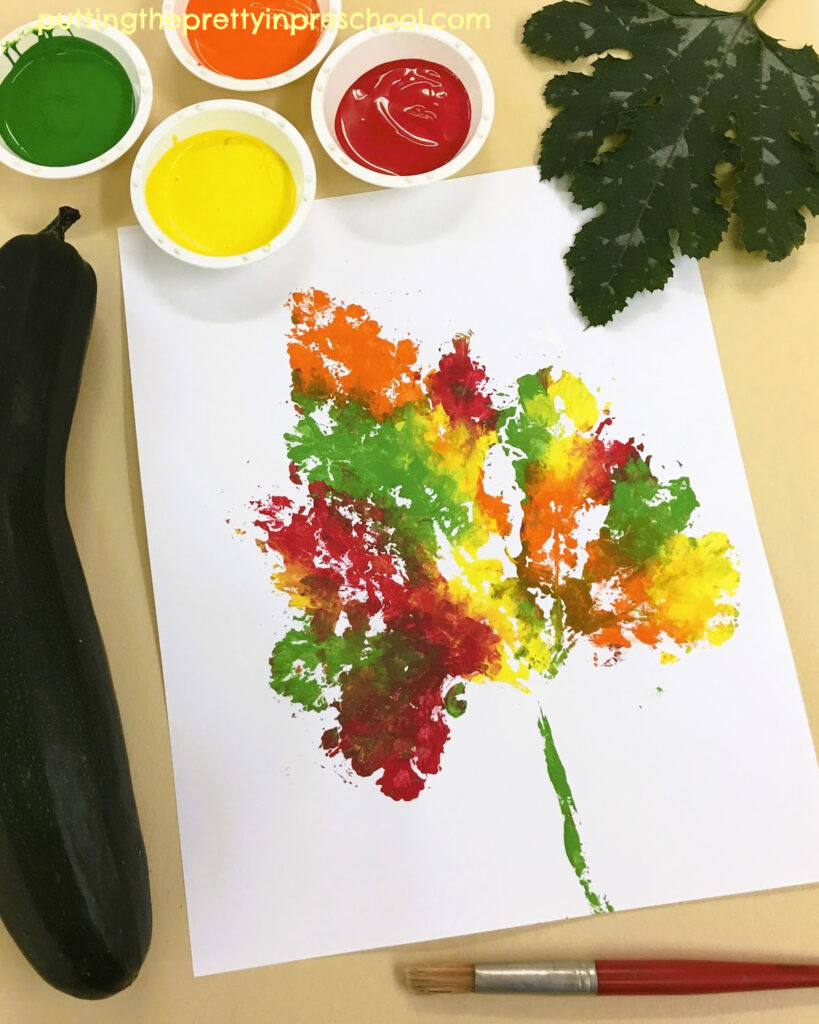
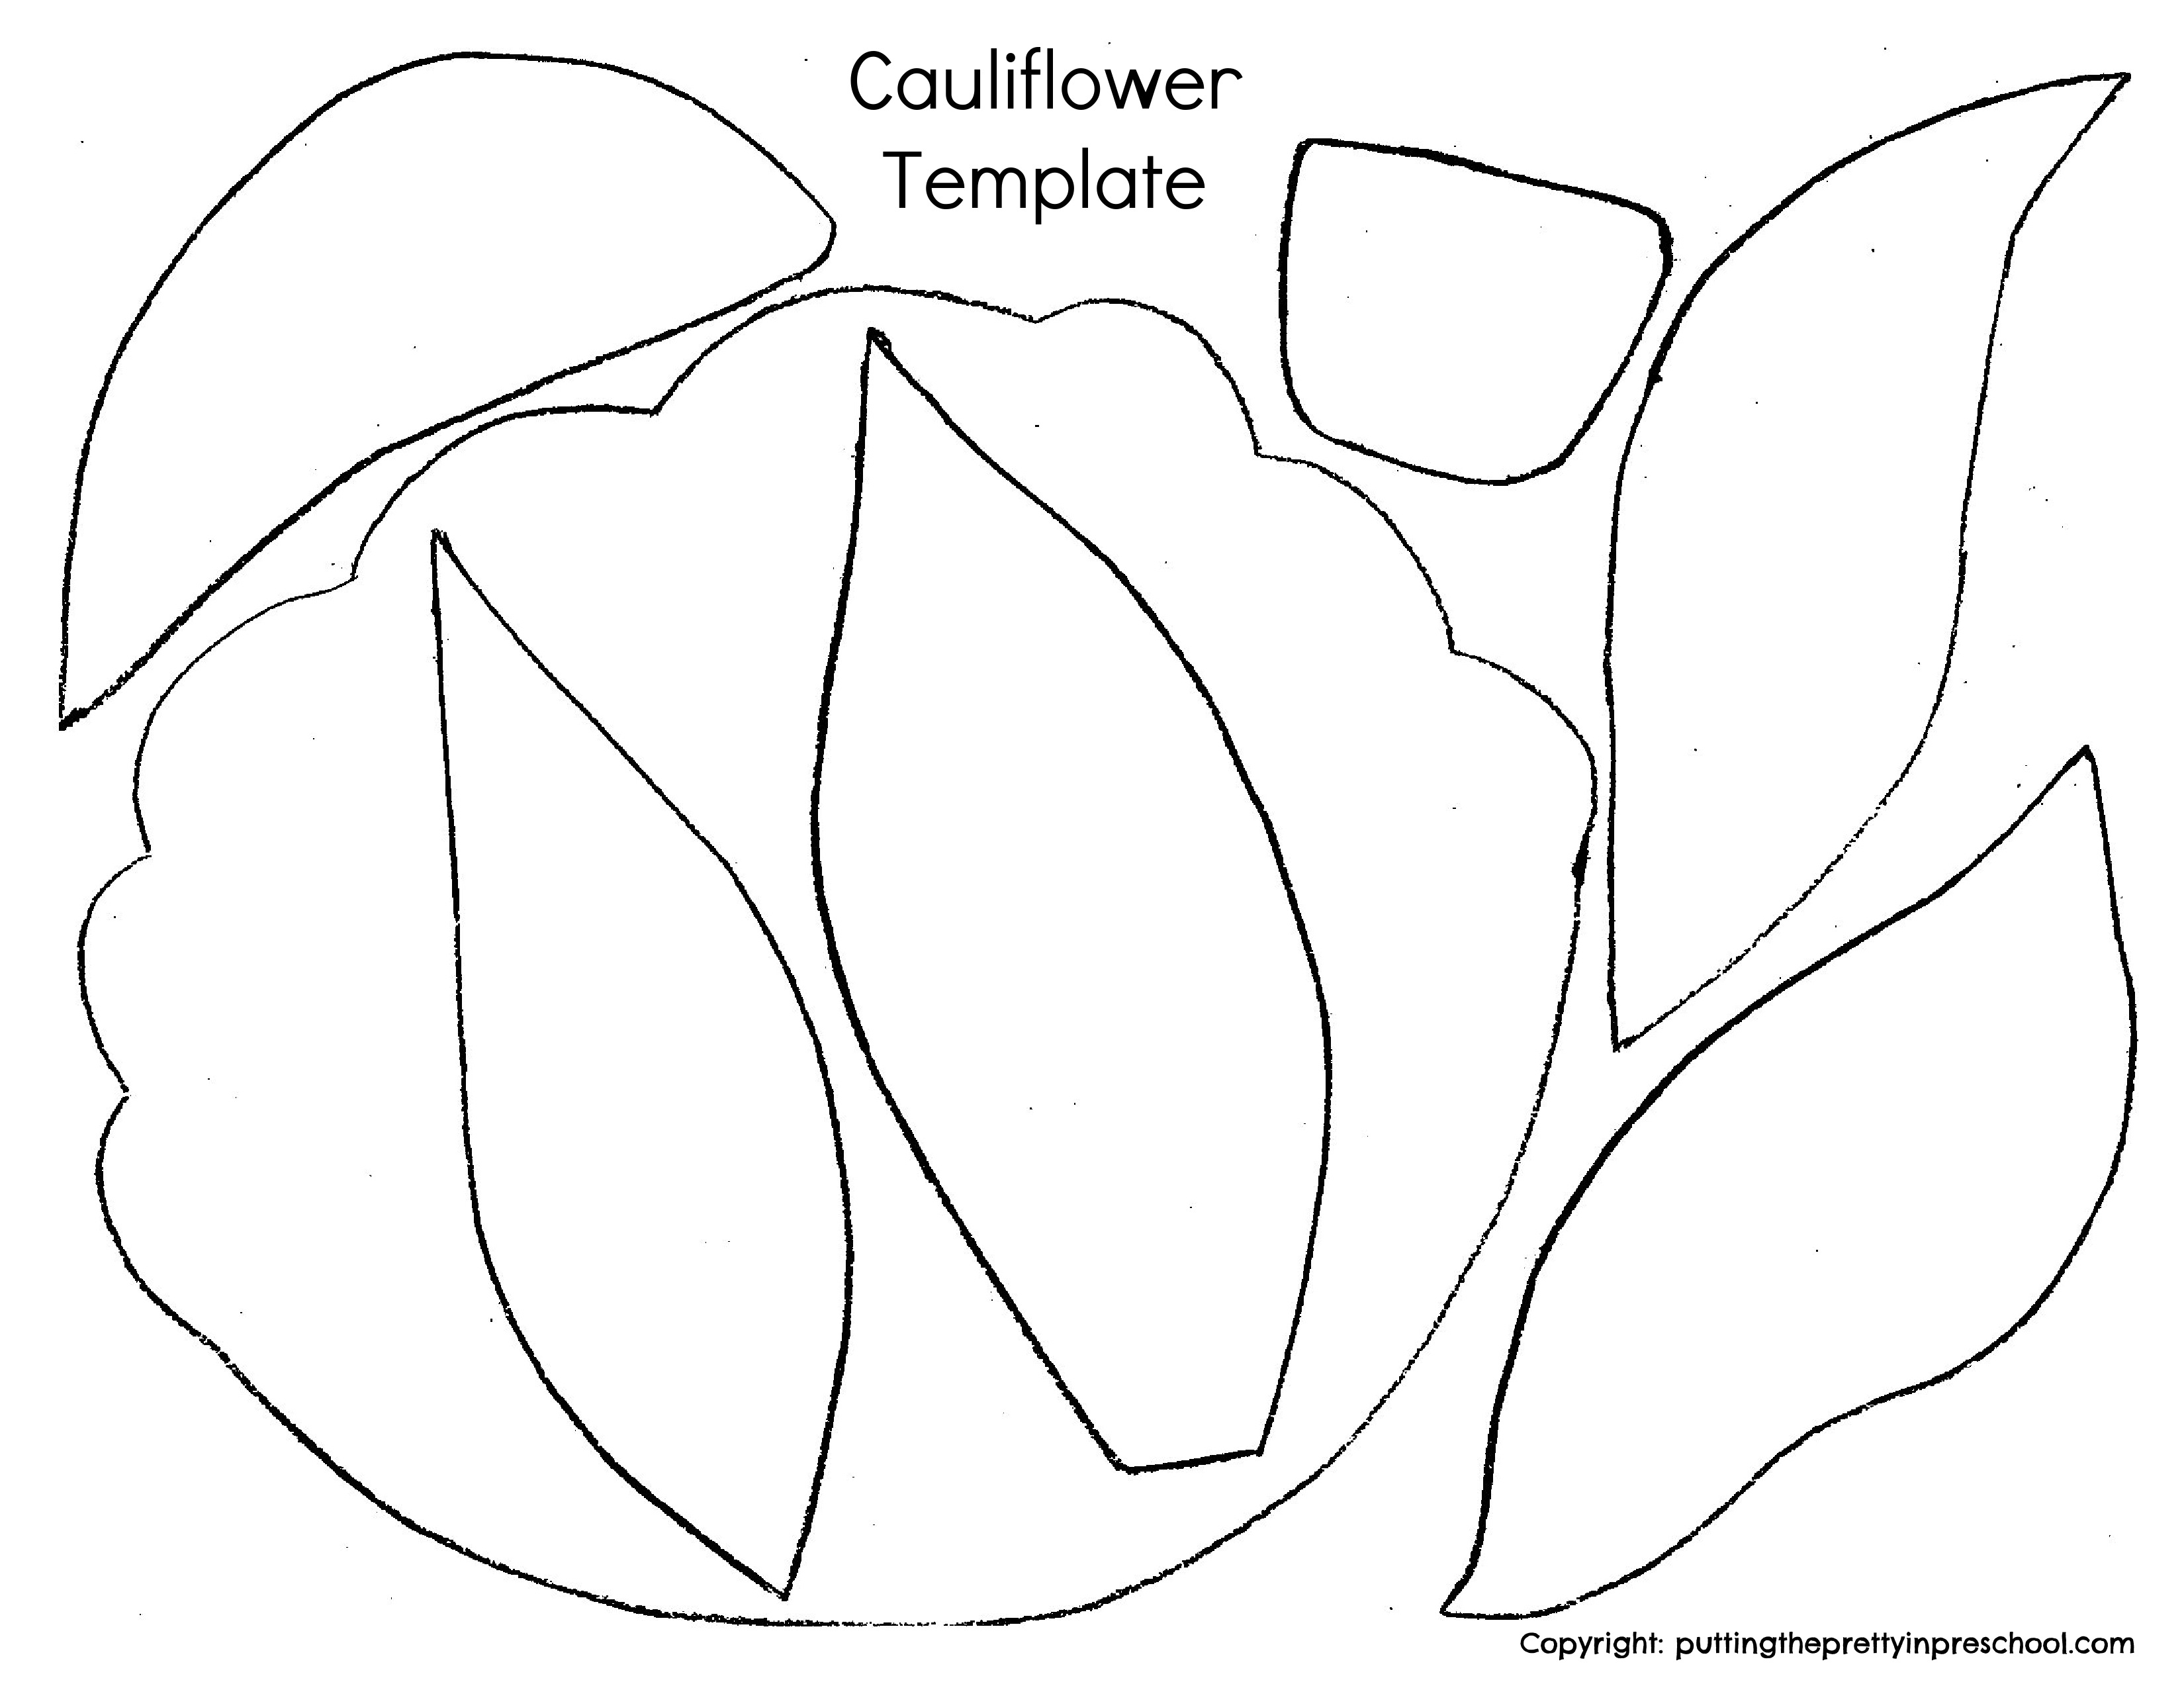
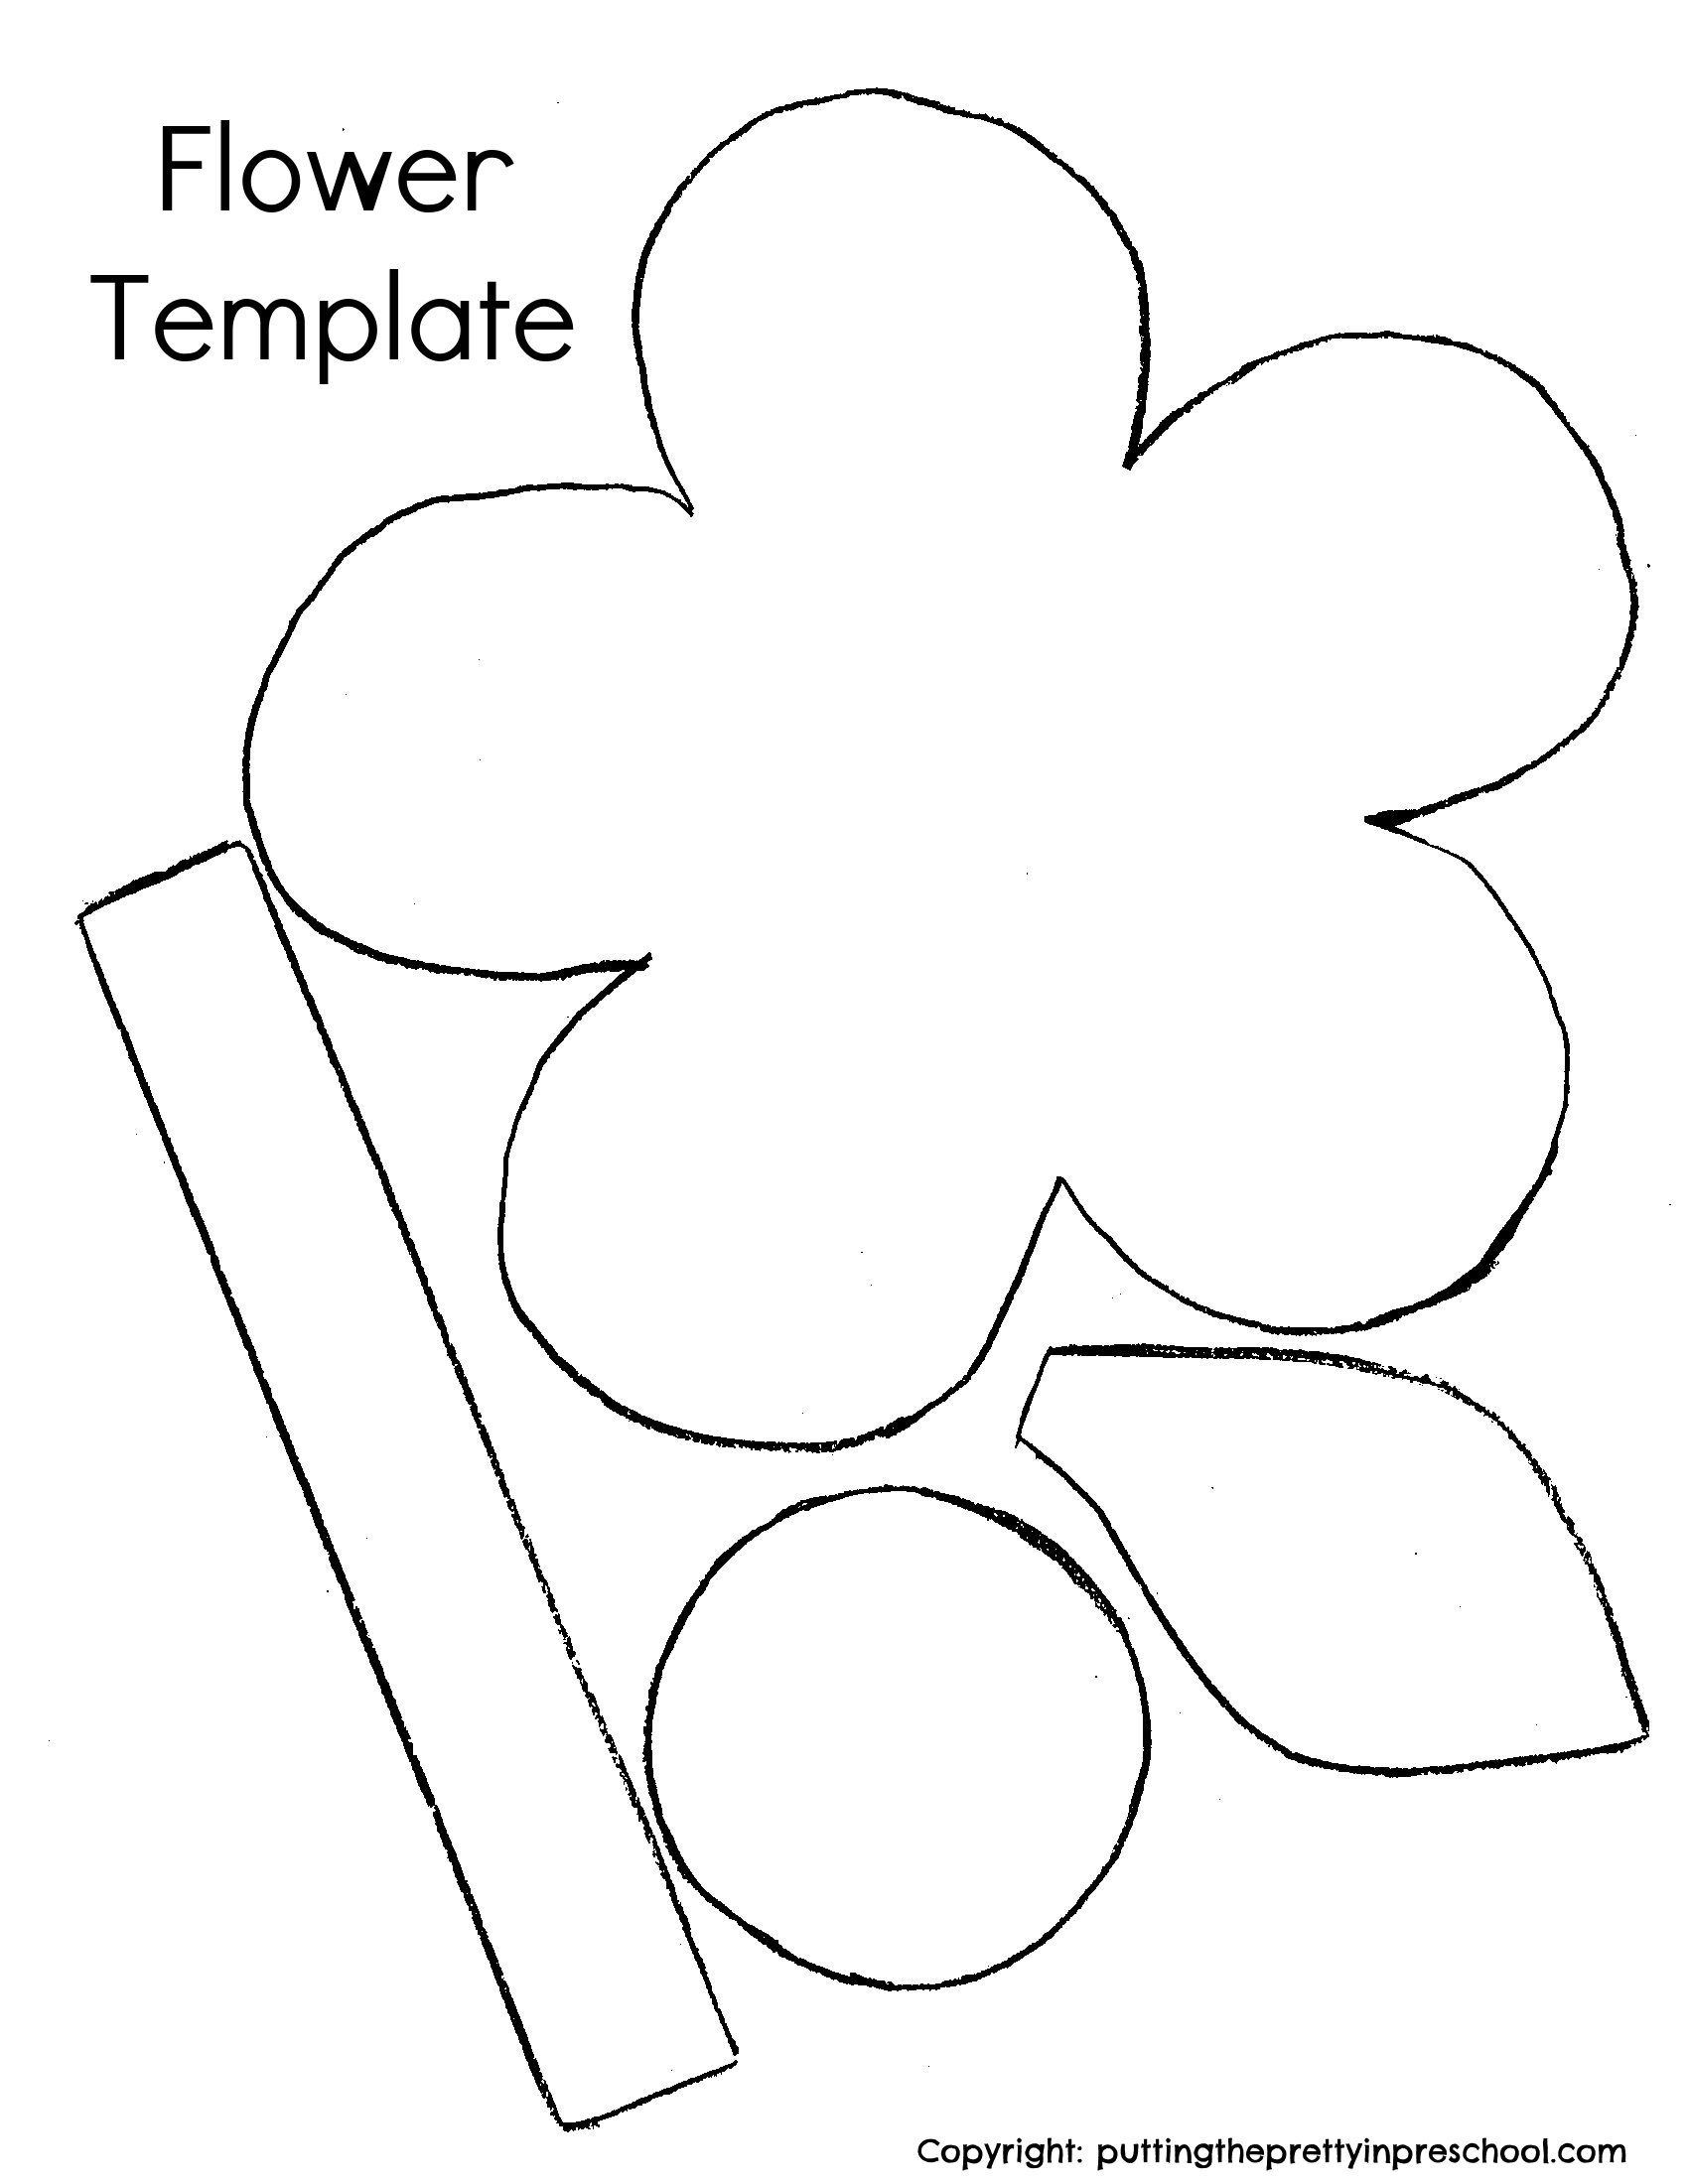
Cauliflower Paper Craft

How to make cauliflower paper crafts in green, orange, purple, and cream hues. These crafts incorporate a cotton ball painting technique.

_______

This cute cauliflower paper craft also includes printmaking.

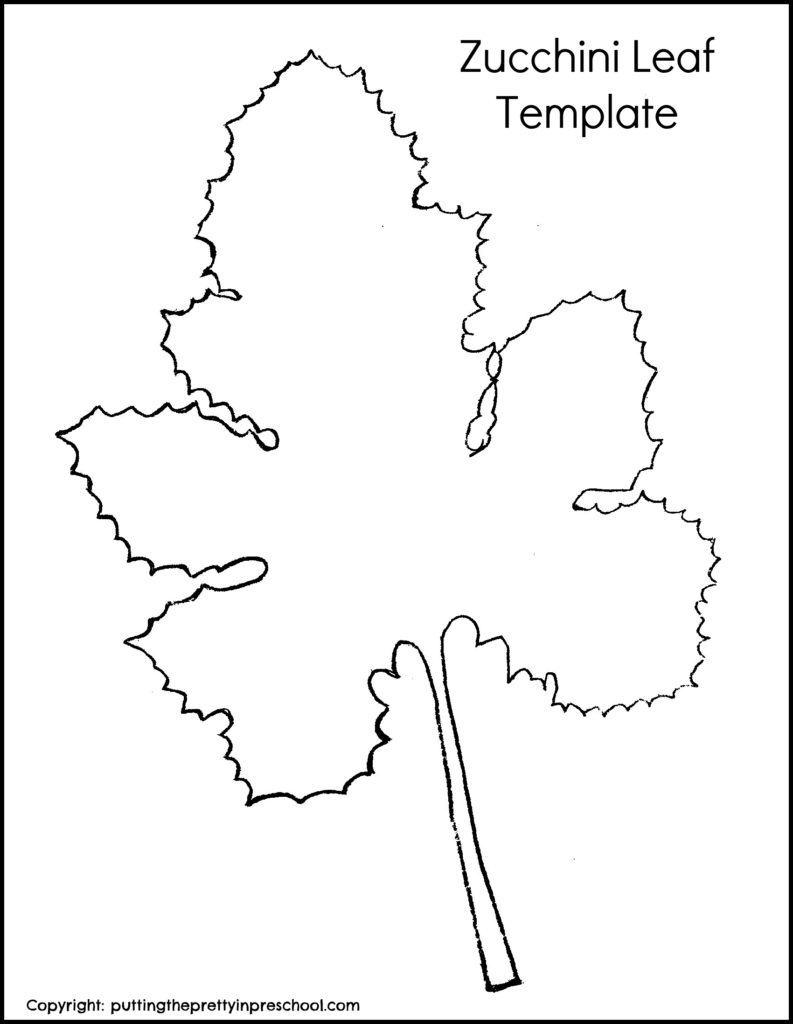
To do the craft, first cut cauliflower heads from manilla tag or cream construction paper, and humps and stem leaves from one or two shades of green cardstock or construction paper. Choosing fadeless paper for the project is recommended.

Feel free to download this template for the vegetable craft project.

Download this free cauliflower vegetable template to use for arts and crafts activities. Make purple, orange, green, and cream cauliflower paper crafts.

_______

Cauliflower PrintableDownload

This printable is for individual or one classroom use only.

_______

Next, print color onto the paper cauliflower heads in hues of cream, green, orange, and purple using painted florets. Or simply use cotton balls dipped in tempera paint for the printmaking process.

How to make an orange cauliflower paper craft. This craft incorporate a cotton ball painting technique.

_______

After the painted cauliflower heads are dry, use a glue stick to affix a hump to the back of each one.

Finally, glue two or three paper stem leaves onto each side of the cauliflower heads.   

How to make an orange cauliflower paper craft. This craft incorporates a cotton ball painting technique.

_______

How to make a purple cauliflower paper craft. This craft incorporates a cotton ball painting technique.

_______

How to make a green cauliflower paper craft. This craft incorporates a cotton ball painting technique.

_______

How to make a cauliflower vegetable paper craft. This craft incorporates a cotton ball painting technique.

_______

These cauliflower theme activities celebrate the vegetable’s vibrant colors and are perfect for a fall or garden theme.

_______

Related:

Corn Theme Activities

Beet Science And Sensory Activities

Carrot Theme Activities

Pumpkin Color Activities

_______

[Read more…] about Cauliflower Theme Activities
Tweet
Share
Share
Pin

Filed Under: art, crafts, gardening, preschool, science, summer Tagged With: cauliflower, gardening, painting, paper crafts, snacks

Zucchini Leaf Paint Prints

September 2, 2023 by Annette Kaminsky Leave a Comment

Tweet
Share
Share
Pin
How to make large zucchini leaf paint prints in fall colors. This is an all-ages garden art activity everyone will enjoy giving a try.

_______

Fall is a popular time to do art activities with leaves. Aside from picking tree leaves to work with, don’t overlook garden plants as interesting subjects for leaf art projects. For instance, the zucchini plant is one with large, curvy leaves that beg to be used in painting or drawing projects. In this post, the garden plant is featured in a stunning zucchini leaf paint prints art activity.

Zucchini ready to be harvested in mid summer.

_______

Zucchini is a green summer squash with large yellow star-shaped flowers and silver-speckled leaves. All parts of the zucchini plant can be eaten, and it is a common food in many cultures.

A gorgeous star-shaped flower on a zucchini plant.

_______

Follow me on Pinterest for more early learning ideas.

_______

Supplies To Collect

Gather the following supplies for zucchini leaf print art:

  • zucchini leaves
  • tempera paint in fall colors
  • paintbrush
  • paper towel sheets
  • garden or disposable gloves
  • 11 x 14-inch sturdy art paper
  • waterproof tablecloth or large sheet of manilla paper

_______

Making The Zucchini Leaf Paint Prints

As this is a painting activity, first lay down a waterproof tablecloth. A large sheet of manilla paper also works fine.

Next, fill paint pots with red, green, yellow, and orange tempera paint.

A large, silver-speckled zucchini leaf ready to paint for a leaf printmaking activity.

_______

Then set up a station with a zucchini leaf, a paintbrush, and a paper towel sheet. Add pots filled with red, yellow, green, and orange paint.

Put on gloves and paint the leaf, dabbing excess paint onto a paper towel sheet between colors.

A zucchini leaf is a good subject for a printmaking activity. The painted leaf makes a beautiful paint print.

_______

When the leaf is covered in paint, carefully flip it over on a large sheet of all-purpose art paper, gently pressing all parts of the leaf down.  

A leaf print in fall colors made with a large zucchini leaf and tempera paint. An all-ages art activity everyone will enjoy.

_______

If the leaf is covered with a lot of paint, a second print can be made with it. The print has a little less paint but looks equally beautiful.

How to make a leaf print in fall colors with a large zucchini leaf and tempera paint. An all-ages art activity everyone will enjoy.

_______

Note: The stem and back of the zucchini leaf are a little prickly, so wearing a pair of garden or disposable gloves is advisable.

_______

Zucchini Leaf Tracing

Zucchini leaves have interesting curves and edges and also make good subjects for tracing. Before painting the zucchini leaf, trace around it and then color it in with crayons or pencil crayons. Or use the zucchini leaf template below to paint or color.

A free zucchini leaf template for art and craft activities.

_______

Zucchini Leaf PrintableDownload

This printable is for individual or one classroom use only.

_______

Zucchini Leaf Transient Art

Once the printmaking activity is done, the painted leaf can be displayed for a few days or even a couple of weeks. Although the leaf isn’t flat at the start, it becomes very flat afterward, making it easy to work with in a wall display.

Or you can just paint the leaf as a transient art project without using it for printmaking

A painted zucchini leaf used in printmaking can be displayed for a few days or weeks as transient art.

_______

Pumpkin Leaf Transient Art

A pumpkin leaf also makes a great canvas, as it is large and uniquely shaped. As a transient art activity, set out a pumpkin leaf for a painting activity. You may want to tape the back of the leaf down to make it a little flatter before using it as a canvas.

A large pumpkin leaf on a vine can be picked and used in a transient art painting activity.

_______

Paint a large pumpkin leaf canvas with fall-colored tempera paints for a beautiful transient art project.

_______

_______

More Leaf Activities

Fall Leaf Crown Paper Crafts

Make a gorgeous leaf crown craft with one of these leaf crown printables.

_______

Maple Leaf Activities

Spin Painting Maple Leaf Art

Horse Chestnut Leaf Art Activities

_______

[Read more…] about Zucchini Leaf Paint Prints
Tweet
Share
Share
Pin

Filed Under: art, autumn, display, gardening, preschool, science Tagged With: gardening, leaves, painting, printmaking, pumpkin, zucchini

Gorgeous Eye Dropper Art

August 27, 2023 by Annette Kaminsky Leave a Comment

Tweet
Share
Share
Pin
Baeutiful paper towel eye dropper art . Do the process art activity on its own or turn the art into dragonfly, butterfly, and flower designs.

_______

What do dragonflies, butterflies, and flowers have in common? Aside from appearing during the summer season, they all look spectacular in eye dropper art. This easy-to-do, oh-so-satisfying process art technique is one of children’s favorite ways to paint.

_______

Follow me on Pinterest for more early learning ideas.

_______

Supplies To Collect

For this stunning art activity, gather the following:

  • liquid watercolors or food coloring
  • roll of absorbent paper towels
  • pipette eye droppers
  • paint containers
  • waterproof tablecloth

_______

The Eye Dropper Art Process

Create gorgeous eye dropper art with liquid watercolors on paper towle sheets. An all-ages process art activity.

_______

Things might get very wet with this art technique, so the first thing to do is cover the working surface with a waterproof tablecloth.

Next, tear off sheets from a paper towel roll. If you have a choice, pick a thicker brand, as it will be more absorbent. But any kind of paper towel will work fine.

Then pour water into paint pots, and mix a few drops of liquid watercolors or food coloring in each one.

Set up an art station with a paper towel sheet and paint pots with eyedropper pipettes for each participant.

Invite children to squeeze paint on their paper towel canvas with the droppers.

Create gorgeous eye dropper art with liquid watercolors on paper towle sheets. An all-ages process art activity.

_______

When the arty paper towel sheets are thoroughly covered in paint, set them aside to dry.

_______

Eye Dropper Paint Crafts

Eye dropper painting is a well-loved process art activity, and participating artists will likely want to decorate a few paper towels. In this case, send some of the paper towel art home, and save a few sheets for crafts or other activities. The paper towel art looks beautiful in the following three crafts.

Paper Towel Dragonflies

Create a gorgeous dragonfly with a super fun eye dropper painting technique. A paper craft that looks stunning displayed.

_______

The large wings of mosquito-munching dragonflies have a moment with the eye dropper art technique. To craft the dragonflies, cut two pairs of long wings out of painted paper towel sheets, and a one-piece head, thorax, and abdomen from complementary-toned regular or glitter cardstock. Use a glue stick to affix the dragonfly wings to the back of the cardstock shapes. Finally, use a glue gun to add folded pipe cleaner antennae and wiggly eyes to the heads.

Tip: Paper towel rolls are often two-ply. If the layers in your cutouts separate while you are working, dab a little glue in a few spots between them so they stay in place.

Create gorgeous dragonflies with a super fun eye dropper painting technique. A paper craft that looks stunning displayed.

_______

Download this free dragonfly template to make the craft.

Download this free dragonfly template for art or craft activities.

_______

Dragonfly PrintableDownload

_______

This printable is for individual or one classroom use only.

_______

Paper Towel Butterflies

Create a gorgeous, dainty butterfly with a super fun eye dropper painting technique. A paper craft that looks stunning displayed.

_______

Butterflies look fantastical in any kind of art technique, and the wings look especially dainty when crafted from painted paper towels. To create the butterflies, snip two pairs of butterfly wings from a colored paper towel. Then cut a one-piece head, thorax, and abdomen from cardstock. As with the dragonflies, affix the wings to the back of the cardstock bodies. With a glue gun, attach a folded pipe cleaner antennae and two small wiggly eyes to the heads.

Create gorgeous, dainty butterflies with a super fun eye dropper painting technique. A paper craft that looks stunning displayed.

_______

Download this free butterfly template to make the craft.

Download this free butterfly template for art or craft activities.

_______

Butterfly TemplateDownload

_______

This printable is for individual or one-classroom use only.

_______

Paper Towel Flowers

Create a beautiful flower with a super fun eye dropper painting technique. A paper craft that looks stunning displayed.

_______

A third art project is to create paper towel flowers. Cut the flowers and circular centers from painted paper towel sheets, and add cardstock or construction paper stems and leaves.

Create beautiful flowers with a super fun eye dropper painting technique. A paper craft that looks stunning displayed.

_______

Download this free flower template to make the craft.

Download this free flower template for art or craft activities.

_______

Flower PrintableDownload

This printable is for individual or one-classroom use only.

_______

Light Table Play

The eye dropper paper towel dragonflies, butterflies, and flowers look especially beautiful displayed on a light table.

Eyedropper art dragonfly, butterfly, and flowers display beautifully on a light table.

_______

As an alternative, eye dropper-painted geometric shapes cut from paper towel sheets also illuminate wonderfully and offer opportunities to create original designs.

Eye dropper art on geomtric shapes look beautiful on a light table and provide an invitation to create interesting new designs.

_______

Related:

Earth Day Heart Art

Eye Dropper Leaf Art

Spider Theme Activities

Ladybug Wand Craft

_______

Eye dropper art on geomtric shapes look beautiful on a light table and provide an invitation to create interesting new designs.

_______

[Read more…] about Gorgeous Eye Dropper Art
Tweet
Share
Share
Pin

Filed Under: art, crafts, gardening, insects, light table, preschool, summer Tagged With: butterflies, dragonflies, flowers, light table, painting, paper crafts, process art

Contact Paper Flower Art

August 4, 2023 by Annette Kaminsky Leave a Comment

Tweet
Share
Share
Pin
How to create oh-so-pretty contact paper flower art using flowers and foliage found in the wild. A beautiful, transient nature art project.

_______

For at least two years I have been wanting to try a floral window art project with contact paper. And I was hoping to use flowers and foliage growing in the wild in my first attempt, just to give them a moment. Although this summer I purchased more flowering annuals than usual and the blooms are taking over my yard, this contact paper flower art project is made with wildflowers and greenery found in our city. It is surprisingly effortless to do, and little learners can easily join in.

Use flowers and foliage found in the wild to create beautiful transient window art on contact paper. An all-ages nature art activity.

_______

Follow me on Pinterest for more early learning ideas.

_______

Creating Contact Paper Flower Art

To create this transient nature art project, start by gathering flowers and greenery to use. A natural wildflower patch at a local dog park provided all I needed for this design.

Create oh-so-pretty contact paper flower art using flowers and foliage found in the wild. A beautiful, transient nature art project.

_______

Note: It is a good idea to check if the plants you find are toxic to humans before you decide to include them. If so, do not offer them to little learners to use in the project.

Next, cut a shape from contact paper. You can simply snip off a rectangular strip, or create a special shape such as a heart or star.

Then slowly and carefully peel off the backing so it comes off smoothly without wrinkling the sticky contact paper.

Steps to create oh-so-pretty contact paper flower art using flowers and foliage found in the wild. A beautiful, transient nature art project.

_______

If you have a specific design in mind, use the peeled-off paper as a dummy to plan the arrangement of the flowers.

Afterward, transfer the flowers and foliage to the contact paper, and gently press them down. It works well to start with greenery and then add flowers.

In my design, the daisies are plump in the middle but tolerate a good finger press and adhere well. And the four-petalled purple flowers work perfectly as butterflies.

Create oh-so-pretty contact paper flower art using flowers and foliage found in the wild. A beautiful, transient nature art project.

_______

This contact paper art project with wildflowers looks beautiful displayed in a window. Just use a glue stick to add adhesive to the window of choice, and gently press the flower art over it. The glue washes off easily without leaving any marks after the project is taken down.

How to create oh-so-pretty contact paper flower art using flowers and foliage found in the wild. A beautiful, transient nature art project.

_______

More Contact Paper Flower Art Ideas

Here are more ways to create or display contact paper flower art:

Instead of setting this art project on a table, tack the contact paper to a window first and offer the art activity there. Besides providing a novel way to create art, it improves little learners’ core body strength and eye-hand coordination.

How to create oh-so-pretty contact paper flower art using flowers and foliage found in the wild. A beautiful, transient nature art project.

_______

To provide a unique invitation to create, set the contact paper on a table and place a frame around it. Add a tray of flowers and foliage for little learners to use to decorate the sticky surface.

An Invitation to create oh-so-pretty contact paper flower art using flowers and foliage found in the wild. A beautiful, transient nature art project.

_______

To make this tacky art project more durable, add a cardboard frame.

Another way to display the art is to use a glue gun to adhere a strip of yarn to the top of the completed project and hang it on a tree.

_______

[Read more…] about Contact Paper Flower Art
Tweet
Share
Share
Pin

Filed Under: art, crafts, display, gardening, preschool, summer Tagged With: flowers, nature art, transient art

Dyed Peony Science Experiment

July 2, 2023 by Annette Kaminsky Leave a Comment

Tweet
Share
Share
Pin
This simple dyed peony science experiment shows how water travels through plants. An all-ages activity everyone will enjoy.

_______

Peony plants have large, bold flowers that grow profusely during the blossoming season. It’s always sad to see them go so I try to snap a few pictures before they drop off.

Don’t get scared off by the ants in this picture I took! Ants eat peony nectar and help keep peonies safe by attacking bud-eating insects.

Pretty light pink peony flowers and buds. Peony blooms are showstoppers during the summer season.

_______

After taking a peony and thrifted vintage teacup photo, I realized that a saved flower in a jar of water would provide the perfect opportunity for a dyed peony science experiment. Peony flowers have a dense cluster of petals, similar to carnations, so I wondered if the experiment would turn out as well. It worked wonderfully, so I highly recommend giving it a try.

A pretty in pink peony bloom complements a thrifted vintage teacup.

_______

Follow me on Pinterest for more learning ideas.

_______

Supplies To Collect

All you need is a few supplies to perform this oh-so-easy, nature science experiment. Gather the following:

  • peony flower stem with leaves
  • clear jar or vase with water
  • neon blue food coloring
  • spoon

_______

Warning: All parts of the peony plant contain a toxin and should not be ingested. Please supervise this activity closely. If your participants tend to put things other than food in their mouths, you may wish to choose another flower for this science experiment. This activity is commonly done with carnation flowers.

_______

The Dyed Peony Science Experiment

To perform this simple science experiment, fill a small, clear jar at least half full of water.

Add 10 or more drops of neon blue food coloring and stir it in. I use a blue hue, but any color of food coloring would work nicely.

Try this easy-to-do dyed peony science experiment today. This activity shows how water travels up peony stems and flows through leaves and petals.

_______

Set the sprig in the colored water overnight and observe it the next day. You’ll notice that the edges of the peony flower petals have turned blue.

Check the plant once a day after that to spot more color changes.

This simple dyed peony science experiment shows how water travels through plants. An all-ages activity everyone will enjoy.

_______

Try this easy-to-do dyed peony science experiment today. This activity shows how water travels up peony stems and flows through leaves and petals.

_______

Tell your little charges that coloring the water blue helps us see how water travels up the stem of a plant into the flower leaves and petals.

Note: The leaves and stems of my peony plant are dark, so it is difficult to see water travel up them. Choosing a plant with lighter leaves would show water travel through these plant parts better.

Large, light pink peony blooms are showstoppers during the summer season.

_______

The Importance of Water For Plants

Along with light, air, and good soil, water is super important to a plant’s growth and survival:

  • Plants are made of mostly water, and it helps them stay firm.
  • Plants cool down by releasing water from their stems and leaves. This helps them regulate their temperature.
  • Water carries important nutrients that help plants grow.
  • Sunlight, carbon dioxide from the air, and water are necessary for photosynthesis, which is how the leaves of plants create energy to survive.

_______

This simple dyed peony science experiment shows how water travels through plants. An all-ages activity everyone will enjoy.

_______

If you have an abundance of peonies, why not try this dyed peony science experiment with a variety of food coloring hues? Or you could perform it with carnations, which are easy to find and economical to buy.

Related:

Celery Science Experiment

_______

[Read more…] about Dyed Peony Science Experiment
Tweet
Share
Share
Pin

Filed Under: gardening, preschool, science, sensory, summer Tagged With: color experiment, flowers, science experiment

  • « Go to Previous Page
  • Page 1
  • Page 2
  • Page 3
  • Page 4
  • Page 5
  • Interim pages omitted …
  • Page 7
  • Go to Next Page »

Primary Sidebar

Hi, I'm Annette Kaminsky, a preschool teacher who loves sharing learning through play activities for young children. Thanks for visiting my site. Feel free to stay awhile!

Subscribe Via Email

Recent Posts

  • Celebrate Diversity Coloring Pages March 1, 2026
  • Lunar New Year Lantern Craft February 11, 2026
  • Black History Month Positive Affirmations Art January 29, 2026
  • Snowflake Cafe Dramatic Play Set January 19, 2026
  • Pastel Christmas Letterhead and Envelope December 20, 2025
  • December Kindness Activities November 30, 2025
  • Fall Forest Sensory Bin November 30, 2025
  • DIY Turkey Bowling Game November 25, 2025
  • Fall Leaf Crown Paper Crafts November 23, 2025
  • Colors of Fall Sensory Bin October 13, 2025

Categories

Topics

apples block play bunnies Chinese New Year Christmas Christmas craft color colors dramatic play Easter fall flowers hearts holiday jewelry leaves leprechauns light table loose parts painting paper crafts playdough pretend play printables printmaking process art pumpkins rice bin scented playdough science experiment scissor skills sensory bin sensory play sensory tray shamrocks skeletons snakes snowflakes spiders spring St. Patrick's Day sunflowers tablescapes Valentine's Day water play

Copyright © 2026 · Lifestyle Pro on Genesis Framework · WordPress · Log in