• Skip to secondary menu
  • Skip to main content
  • Skip to primary sidebar

Putting The Pretty In Preschool

Finding Beauty In Everyday Early Childhood Experiences

  • Home
  • About Me
  • Winter
  • Chinese New Year
  • Blog
  • Contact Me
  • Black History Month
  • SHOP
  • Valentine’s Day

art

Five Black History Month Crafts

January 28, 2023 by Annette Kaminsky 2 Comments

Tweet
Share
Share
Pin
Five gorgeous Black History Month crafts that celebrate diversity. Easy-to-make crafts the whole family can do.

_______

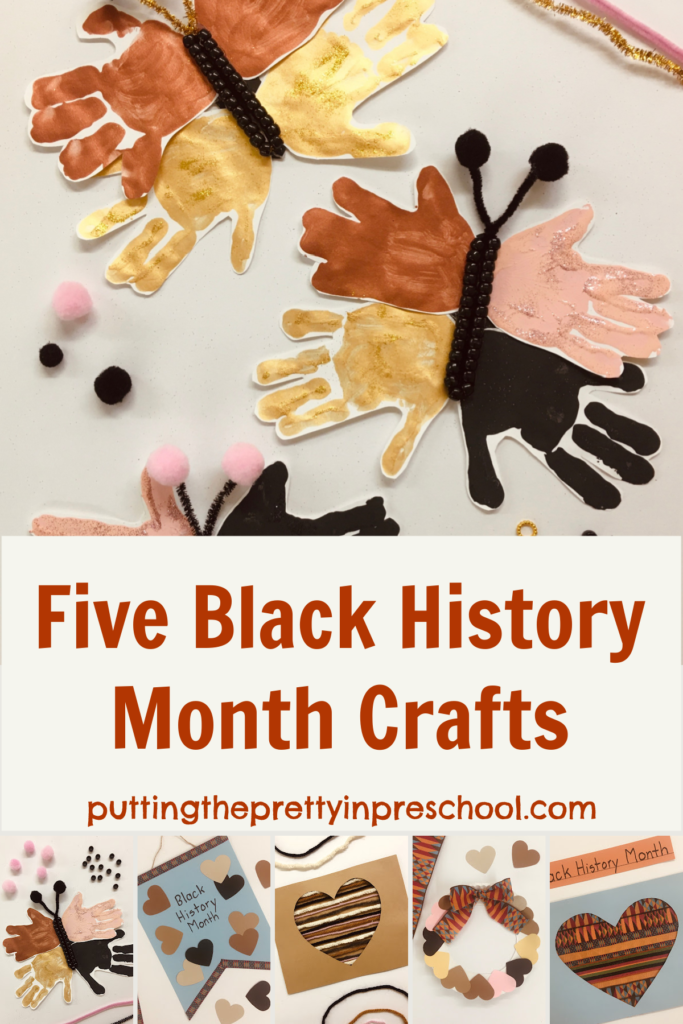
Black History Month, a time set aside to remember notable black people and their achievements, is just around the corner. It is celebrated in the United States and Canada during the month of February. Here are five Black History Month crafts to help children engage in the celebration.

_______

Follow me on Pinterest for more early learning ideas.

_______

Celebrate Diversity Butterflies

To make these striking butterflies that represent celebrating diversity, gather the following supplies:

  • metallic gold and bronze tempera paint
  • pink, black, and white paint
  • light pink, black, bronze, and gold glitter
  • black pipe cleaners and pony beads
  • white cardstock paper
  • black cardstock paper
  • pie tins or disposable plates
  • white glue
  • glue gun

_______

Steps to make a handprint butterfly craft to recognize and celebrate Black History Month.

_______

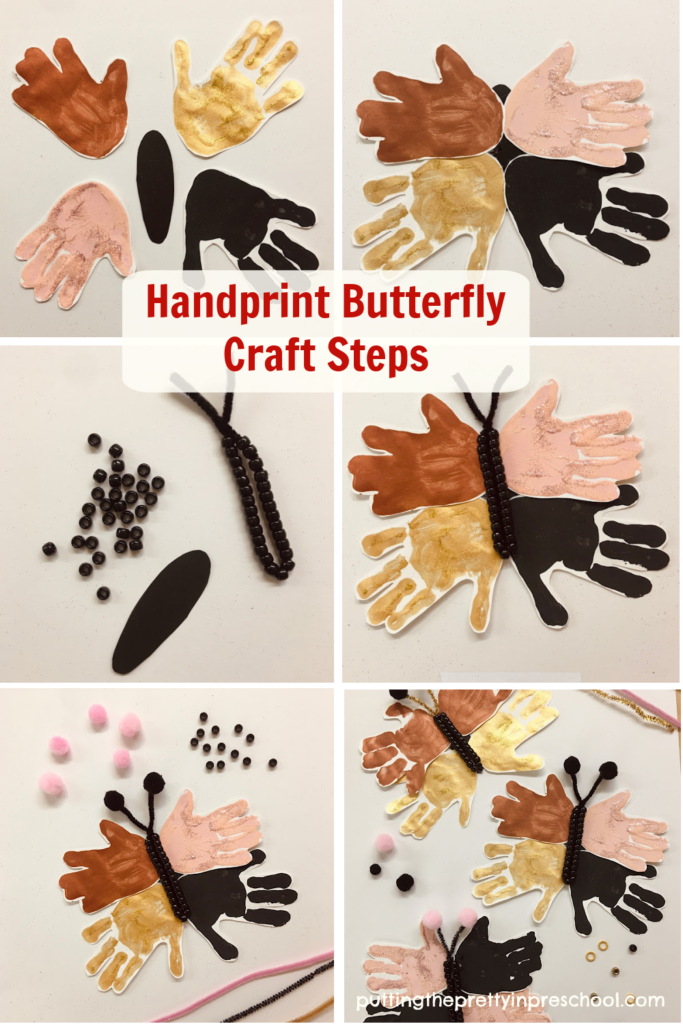
Making The Handprint Butterflies

To start off, pour skin-toned tempera paints into pie tins or disposable plates. You may want to add a little white to the black paint to soften its hue.

Have participants dip a hand in a paint color and press it onto white cardstock paper. I use metallic gold and bronze for two of the skin tone shades. Regular tempera paints in these hues would work fine too.

If you have the shades available, sprinkle a similar color glitter onto each handprint.

After the handprints dry and extra glitter is shaken off, cut around the edges.

Next, cut long narrow ovals from black cardstock paper to represent butterfly abdomens.

Bend black pipe cleaners in half and have participants string black beads onto them, leaving a little section open for the butterfly antennae. Twist the pipe cleaners just above the beads to make sure they stay on.

Assembling The Butterflies

Make this gorgeous handprint butterfly craft to recognize Black History Month and celebrate diversity.

_______

Using white glue or a hot glue gun, add black or pink pompoms to the antennae.

Then use white glue or a hot glue gun to affix four handprint “wings” onto each abdomen. The butterflies can be designed in different kinds of color combinations.

Next, glue the beaded pipe cleaners to the butterfly abdomens. Now the “celebrate diversity” butterflies are ready to be displayed!

Make these gorgeous handprint butterfly crafts to recognize Black History Month and celebrate diversity.

_______

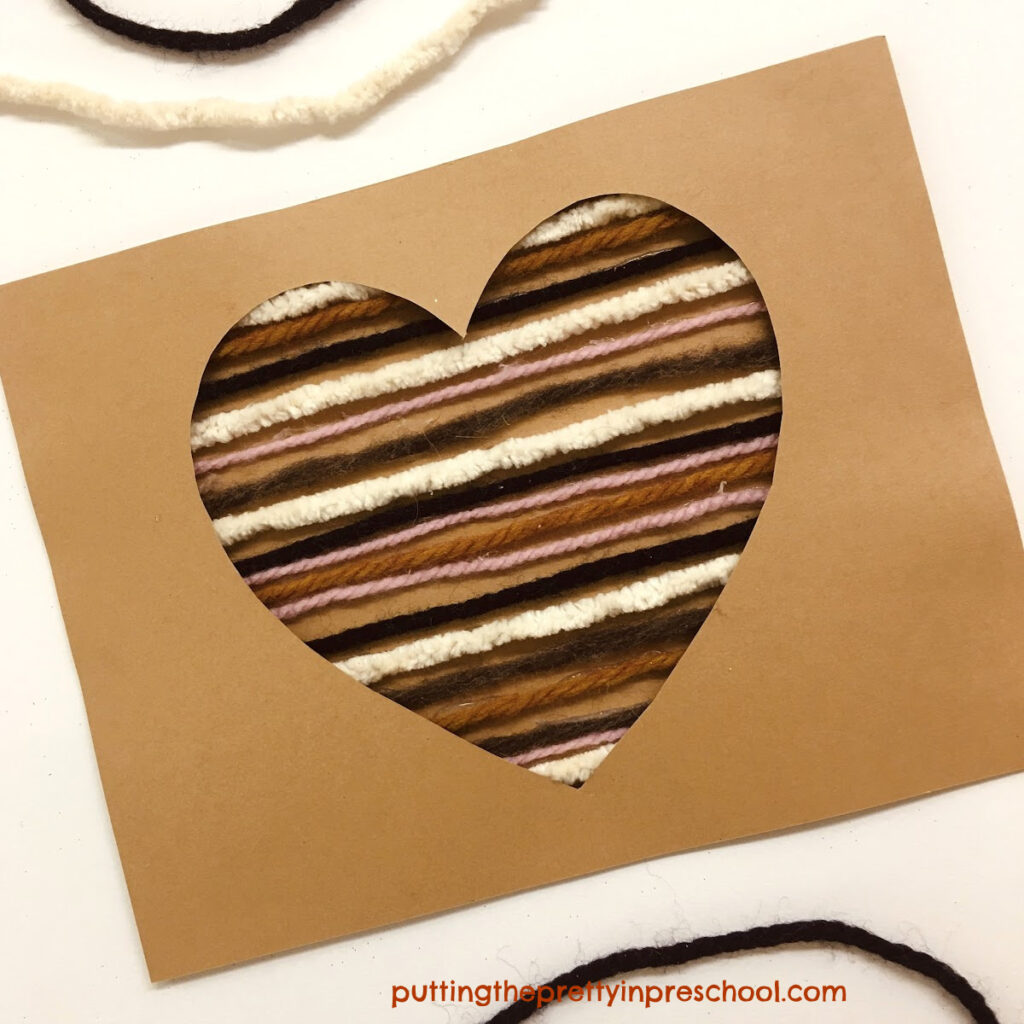
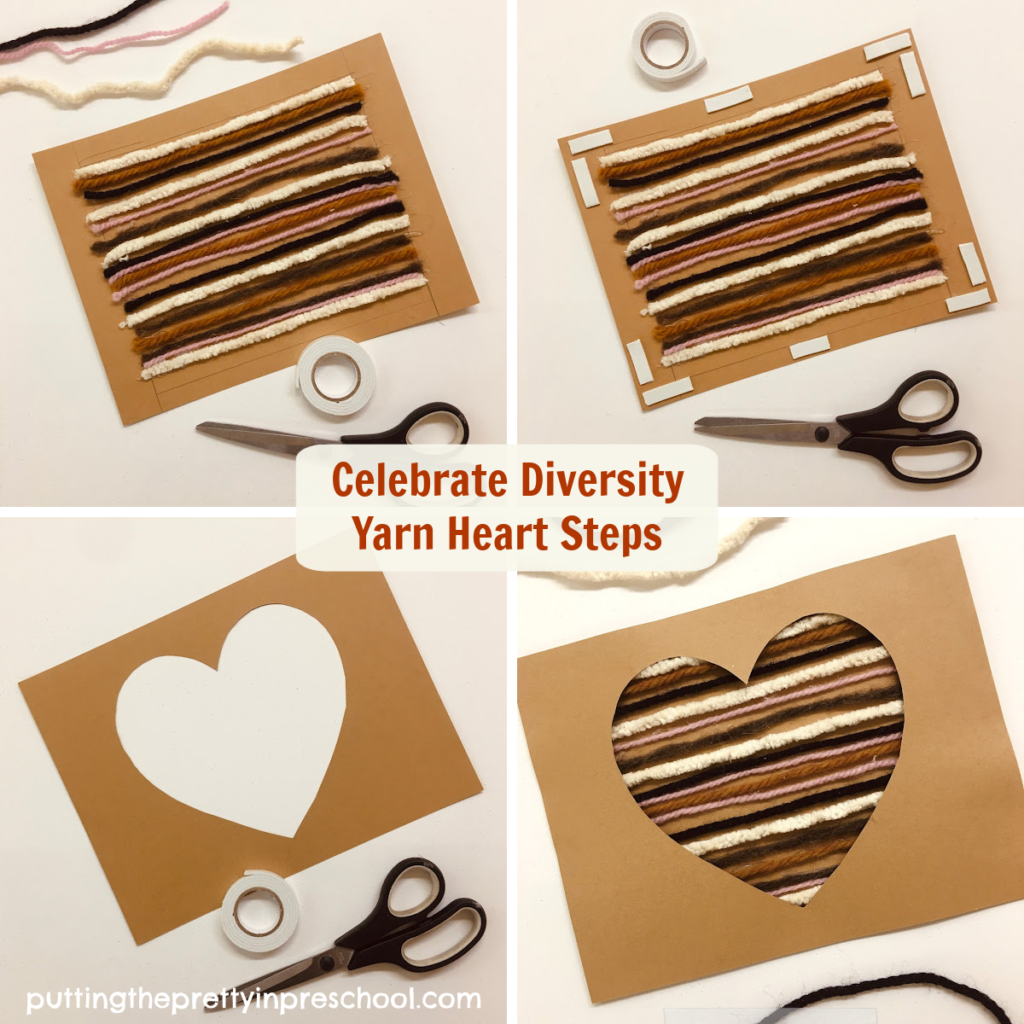
Celebrate Diversity Yarn Heart

Different shades of skin-toned yarn represent diversity in this textured yarn heart craft.

Make this gorgeous skin-toned yarn heart craft to recognize Black History Month and celebrate diversity.

_______

Supplies to Collect

  • yarn in a variety of thicknesses and skin tones
  • 8 ½ x 11-inch golden-brown cardstock paper
  • white glue or hot glue gun
  • double-sided tape
  • ruler
  • scissors
  • heart template

_______

Steps to make a gorgeous skin-toned yarn heart craft to recognize Black History Month and celebrate diversity.

_______

To make this gorgeous yarn heart craft, start by cutting skin-toned yarn into 7 ½ inch strips. Using different thicknesses of yarn adds variety to the craft.

Next, glue the strips of yarn in rows onto a sheet of 8 ½ x 11-inch cardstock using white glue or a glue gun. Leave a small border around the edge of the paper.

Then add pieces of double-sided tape around the edges of the paper.

Afterward, cut a large heart in the center of a second piece of cardstock.

Finally, gently position the cardstock paper with the heart cut out on top of the yarn-covered piece, making sure the double-sided tape adheres to it.

_______

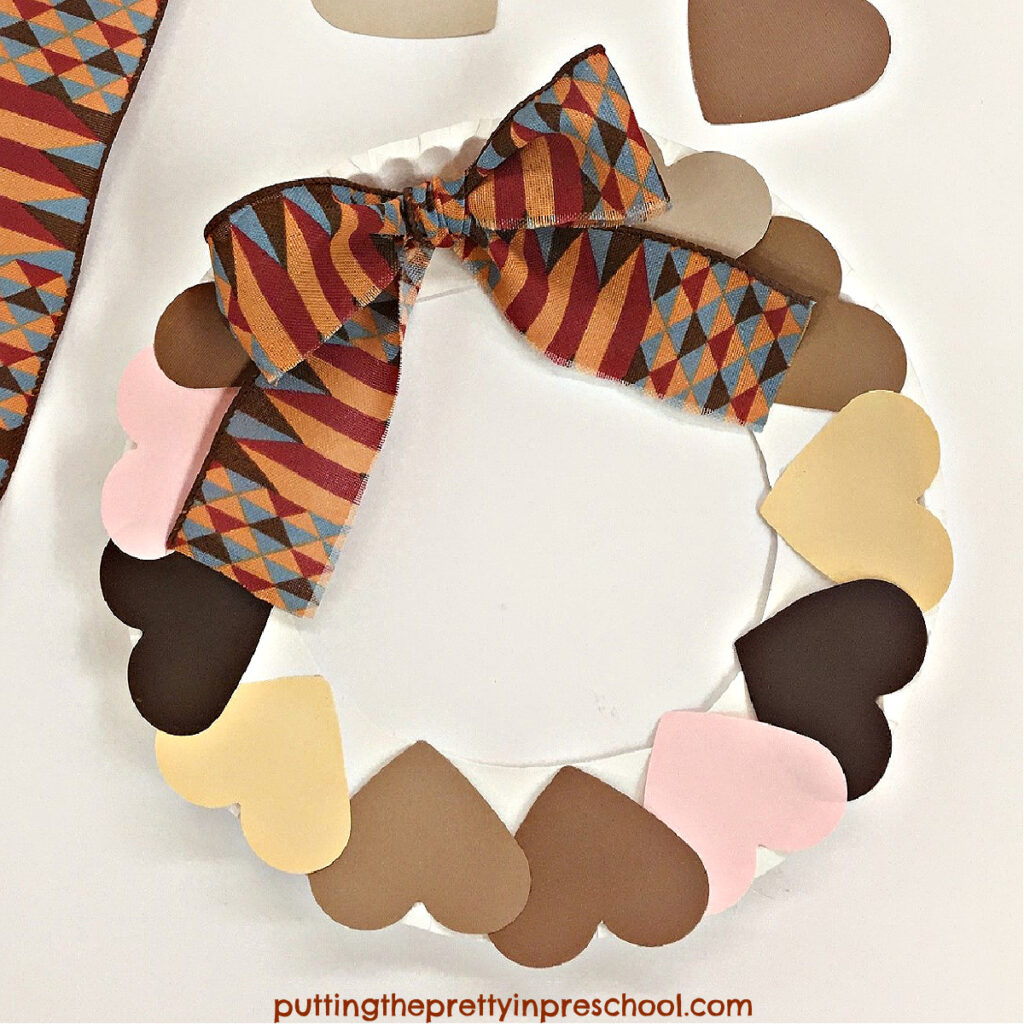
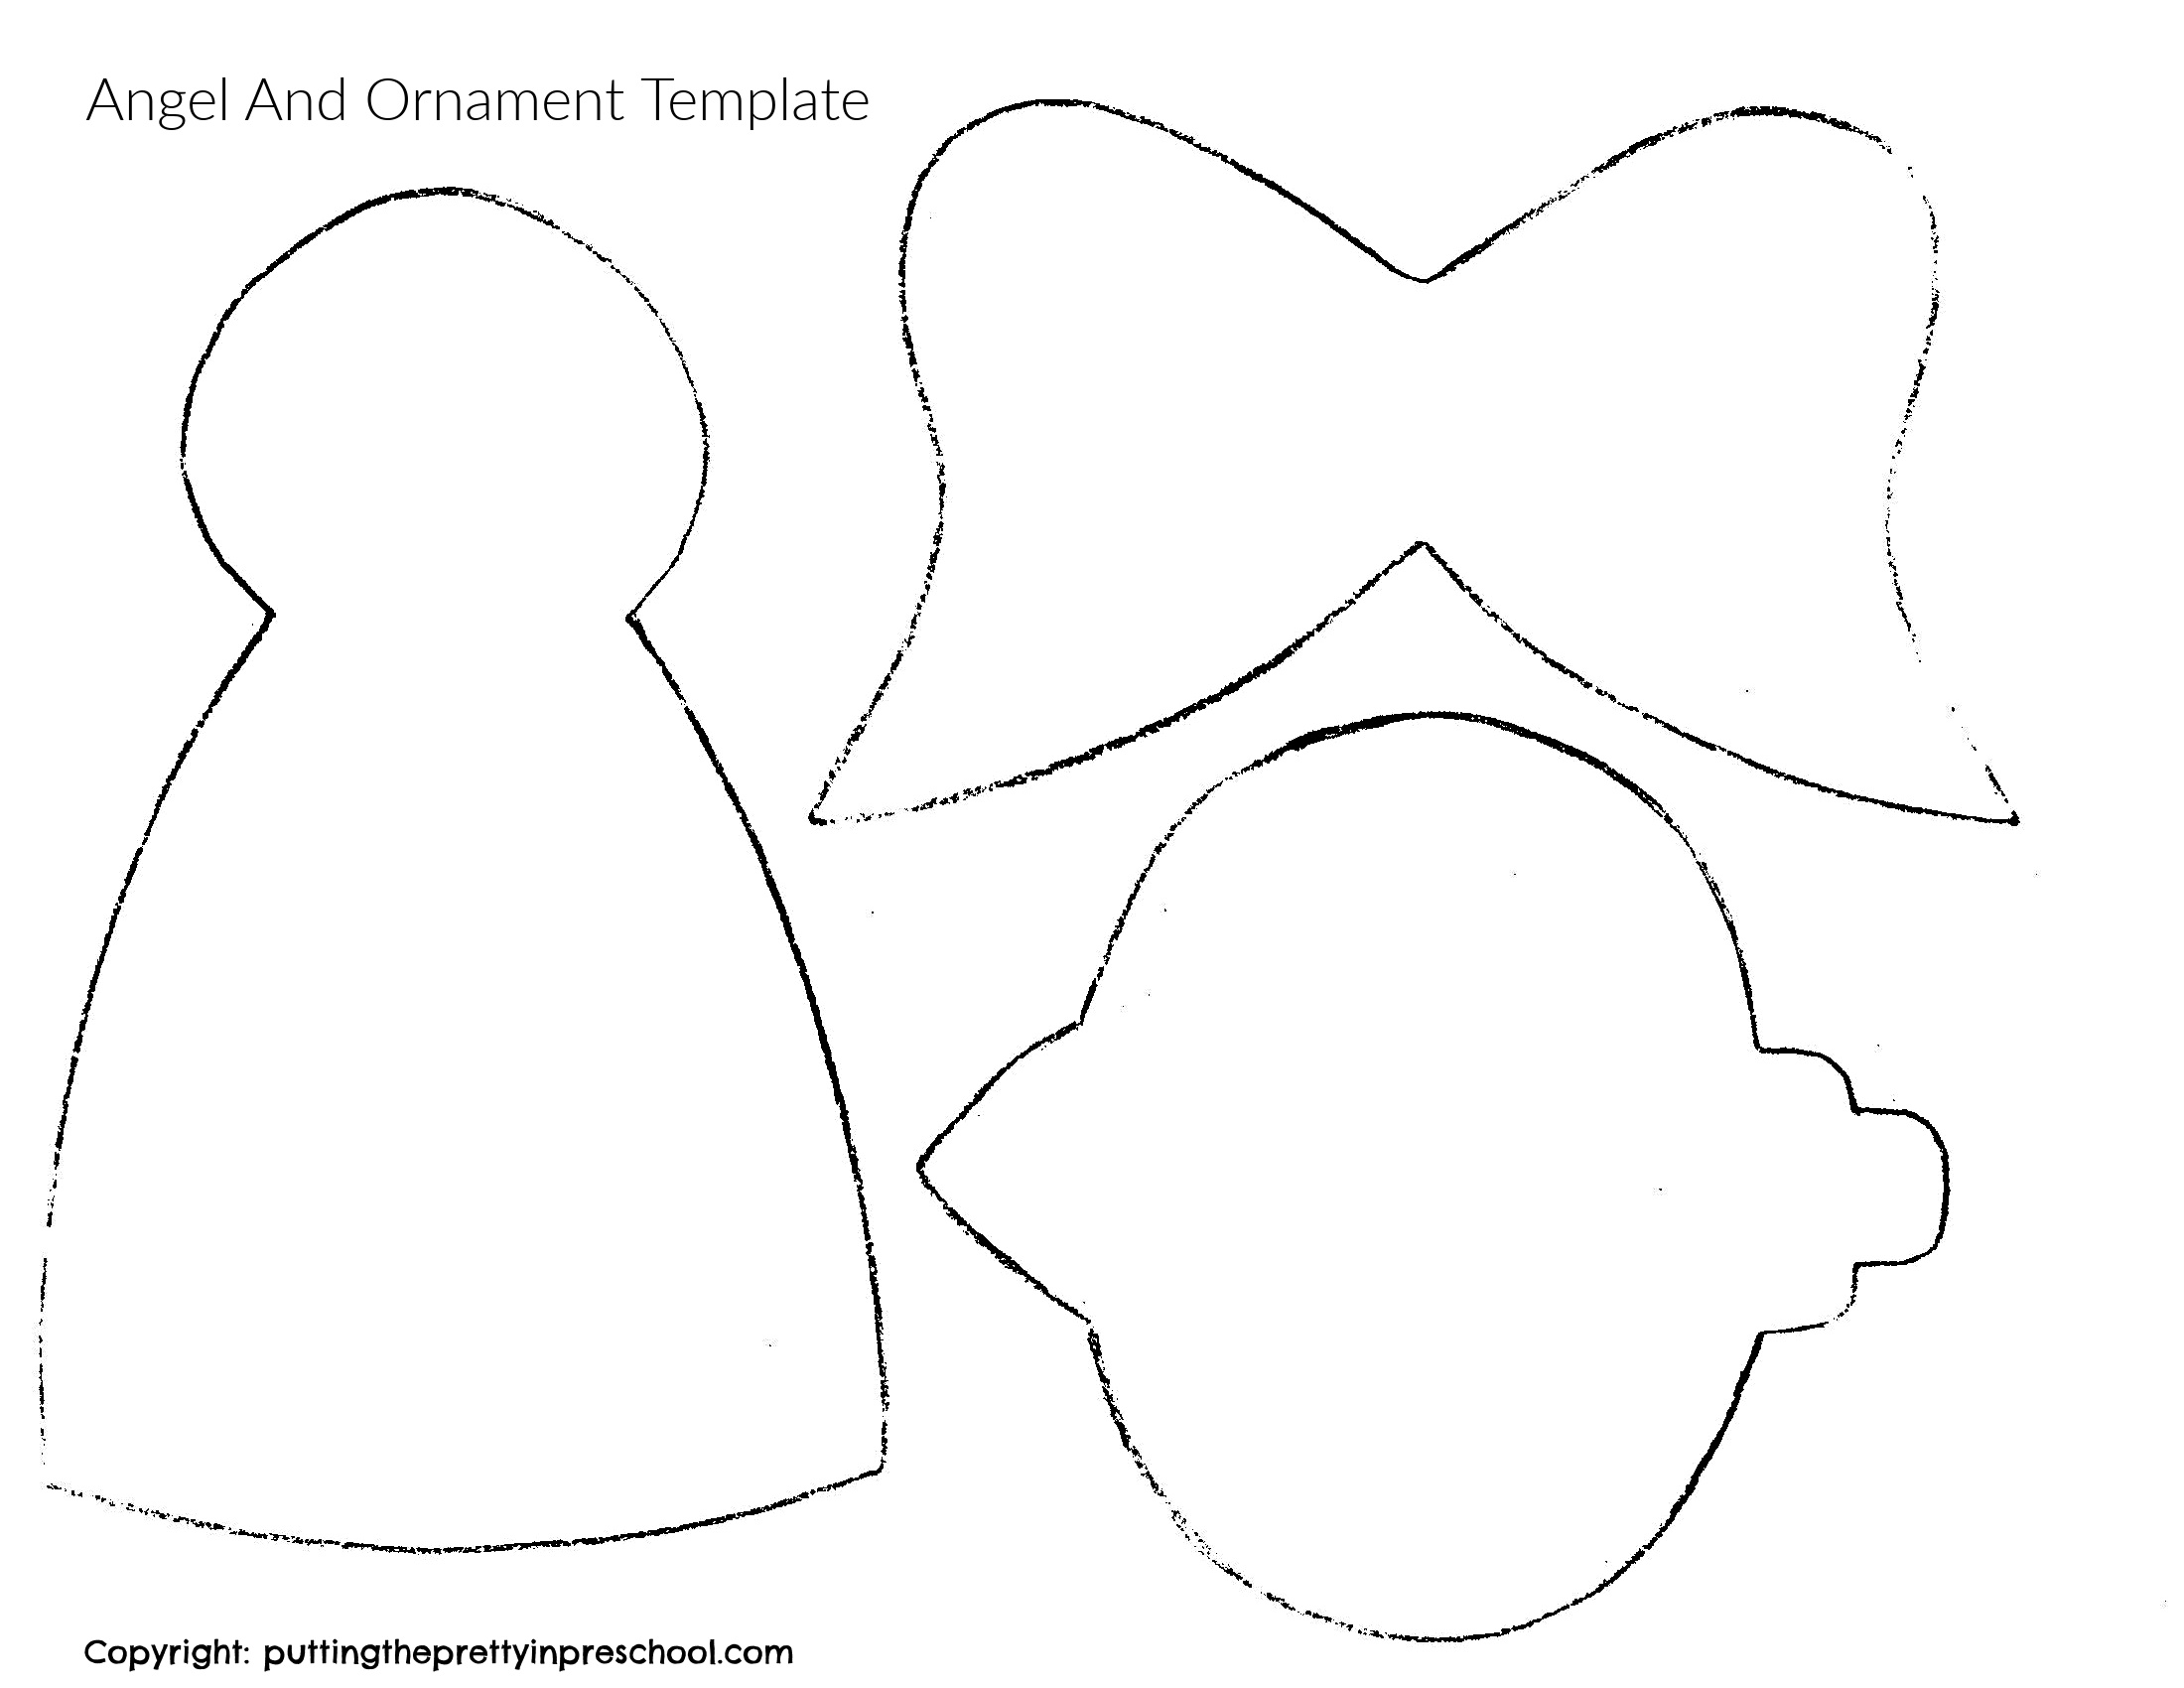
Kindness Heart Wreath

This kindness heart wreath with cardstock skin-toned hearts and a geometric bow communicates that all lives matter and that everyone should be treated with kindness.

Black History Month ribbon and skin-toned hearts are the highlights of this easy-to-make "kindness" wreath craft.

_______

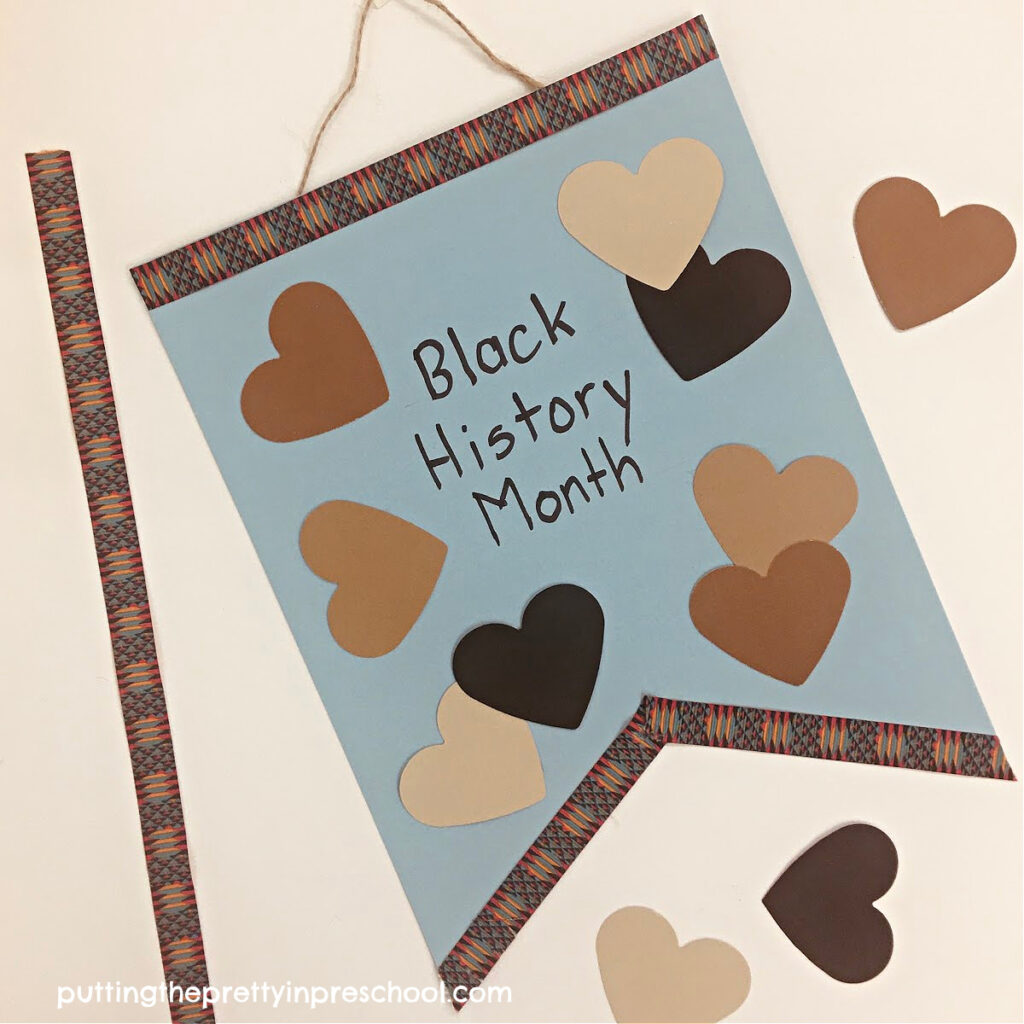
Black History Month Heart Banner

In this craft, skin-toned hearts are used to decorate an attractive, geometric ribbon-edged banner honoring Black History Month.

Black History Month ribbon and skin-toned paper hearts are the highlights of this easy-to-make banner craft.

_______

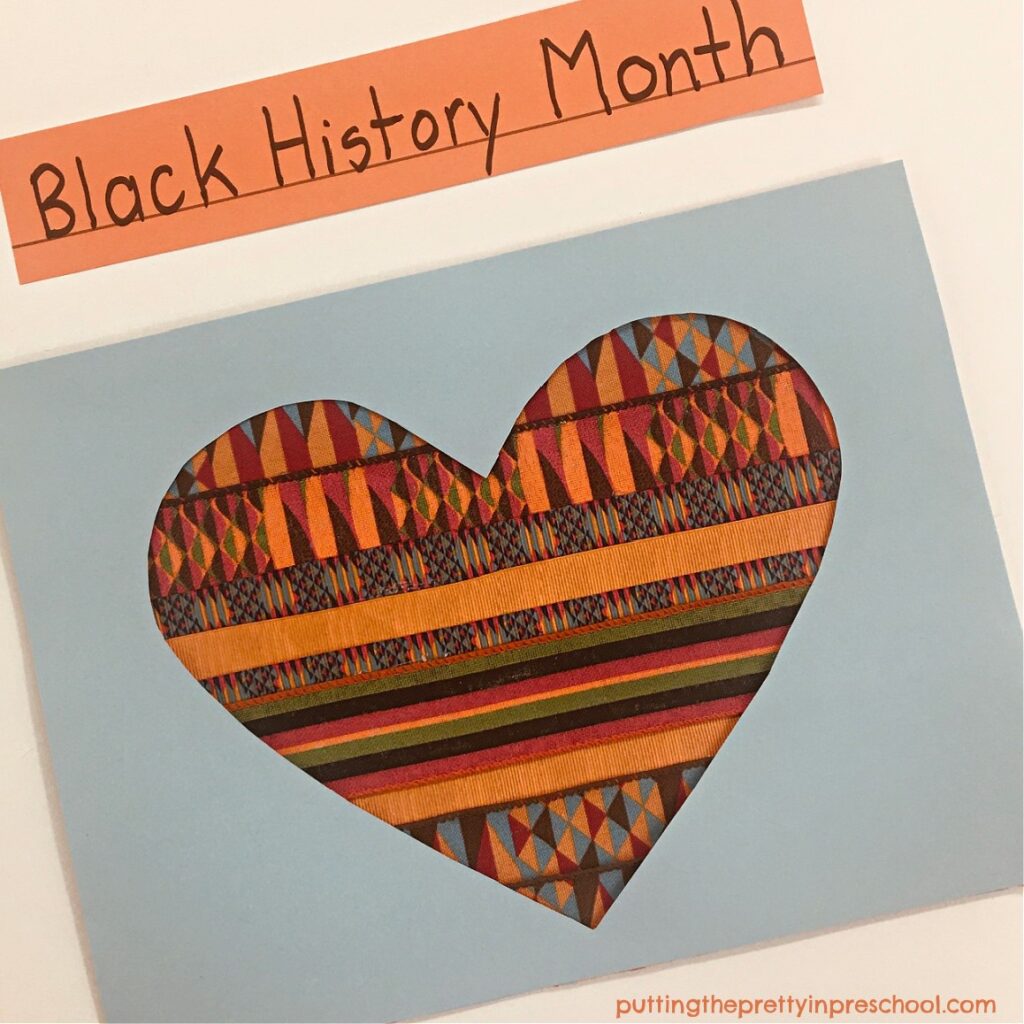
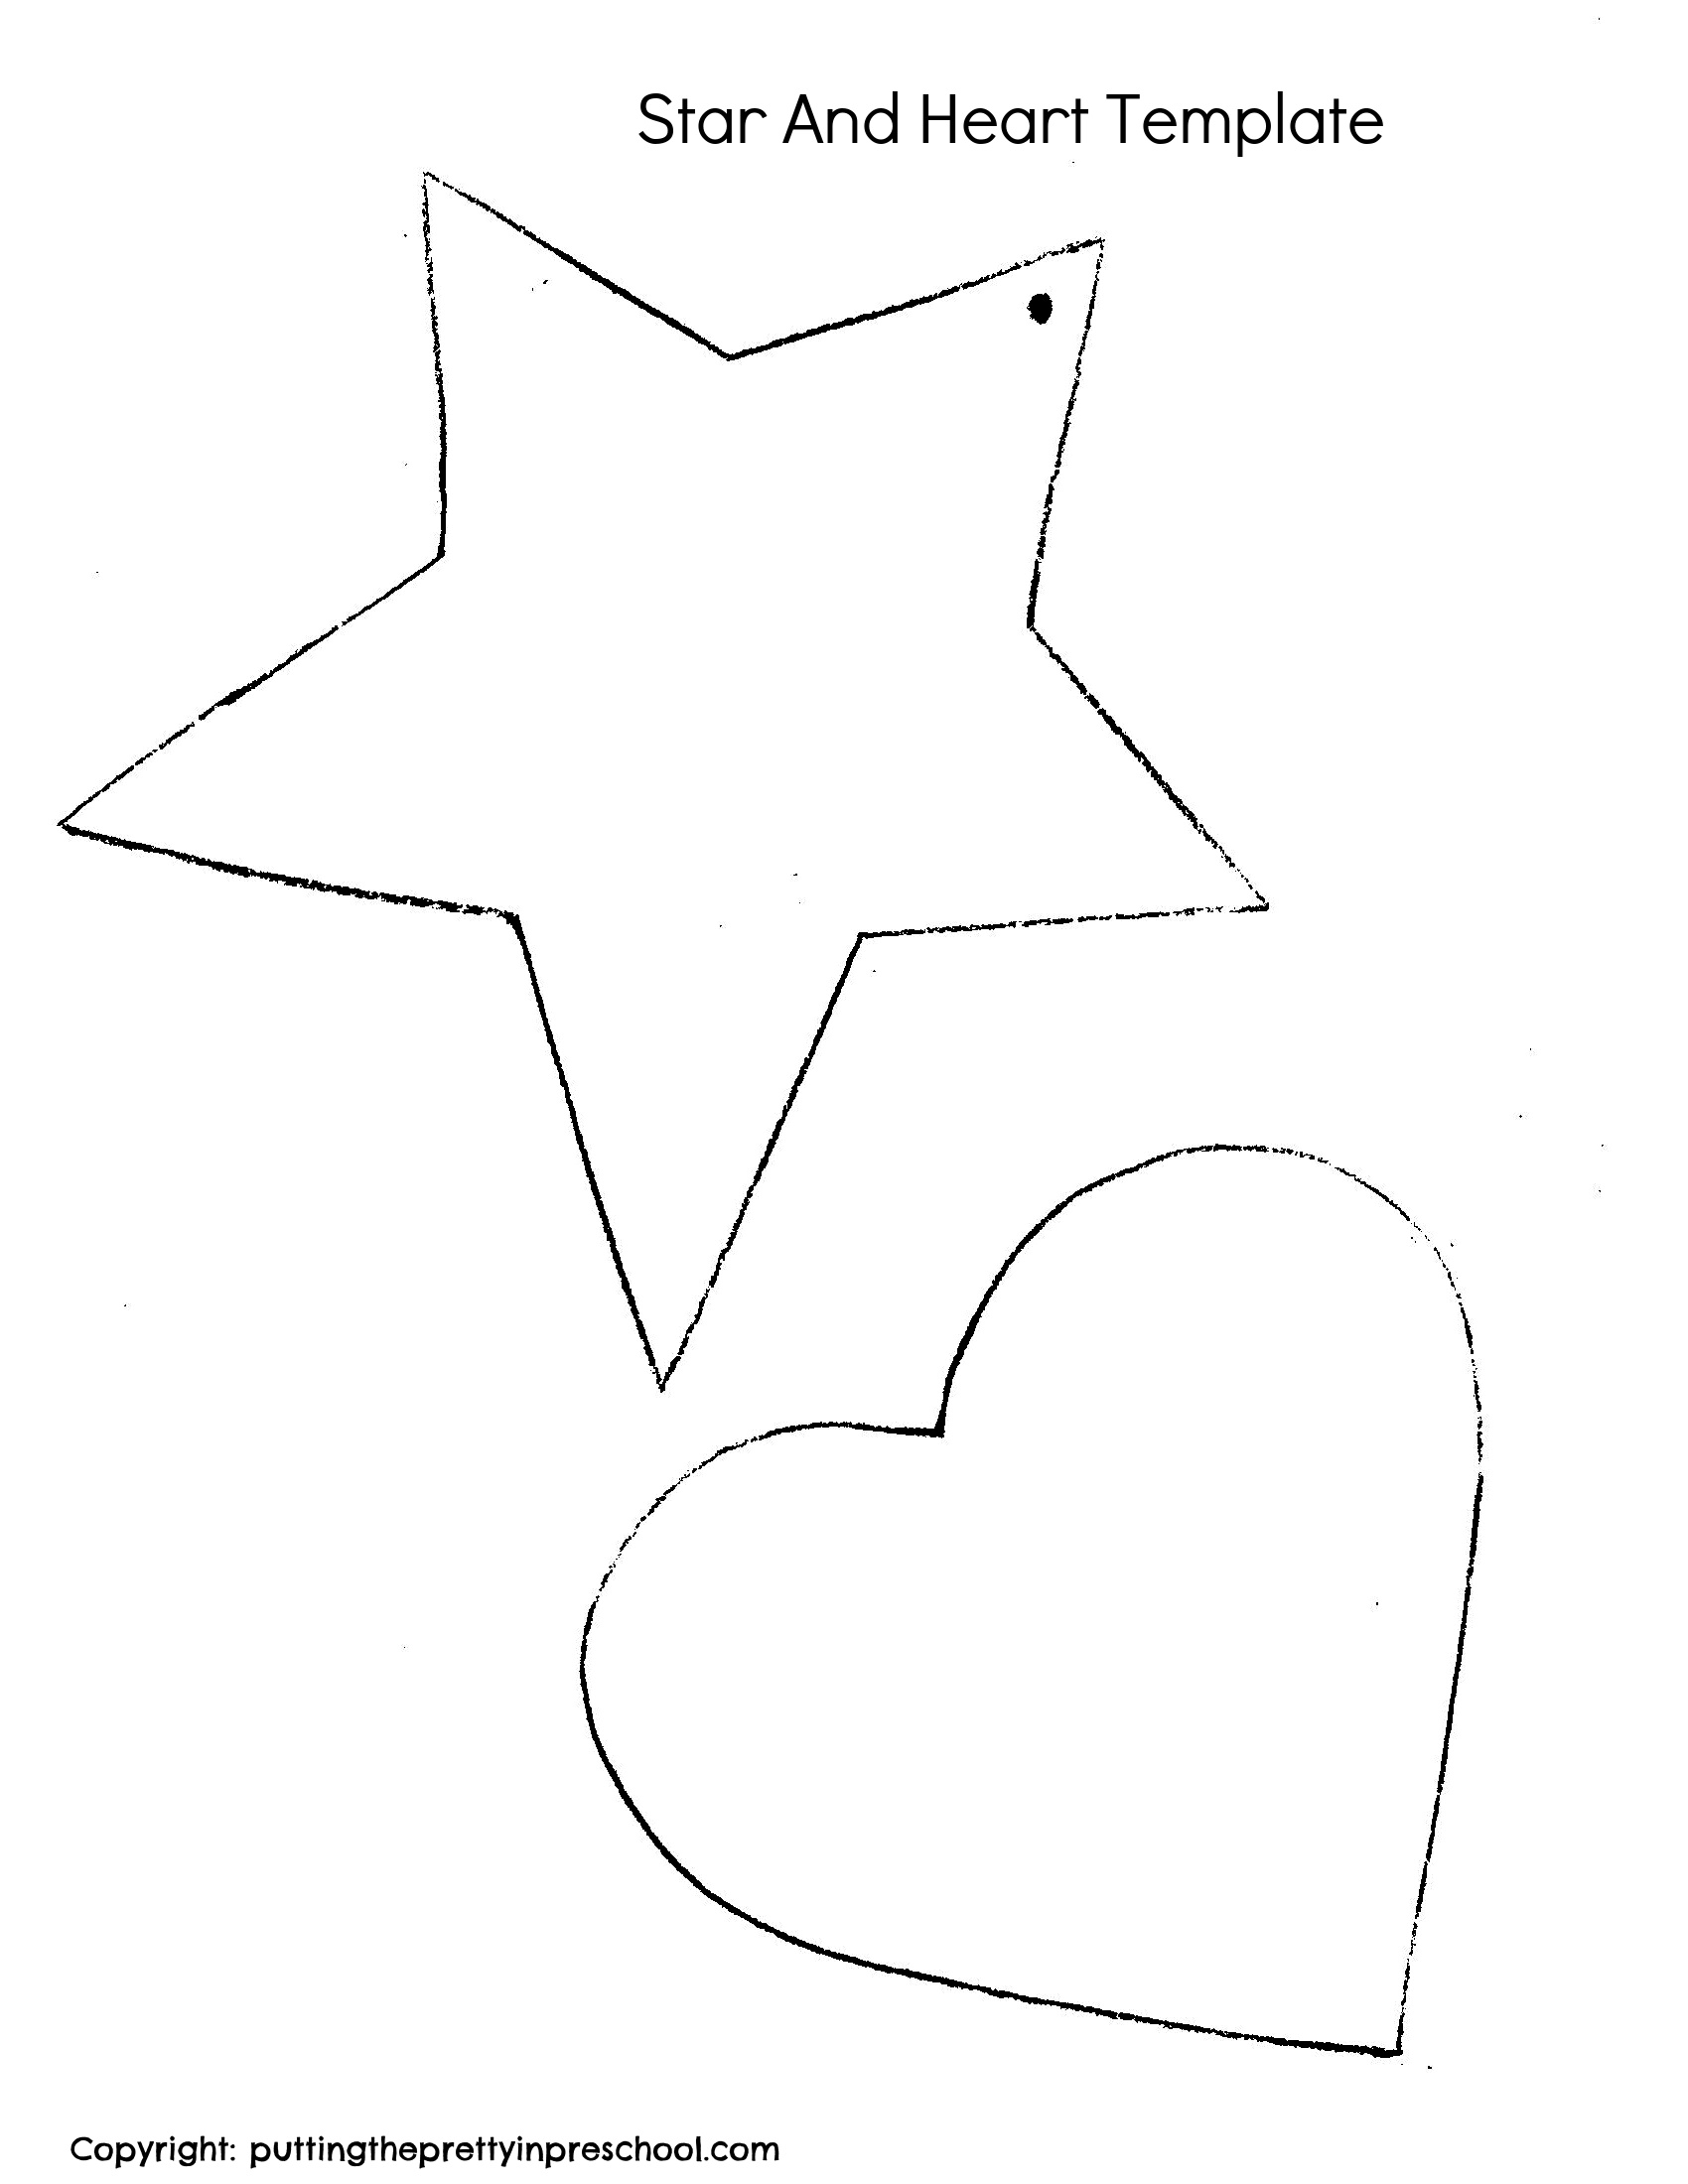
Black History Month Ribbon Heart

This heart craft takes full advantage of vibrant, geometrically patterned ribbon, and looks striking on display.

Make this stunning Black History Month heart craft to honor this important annual celebration.

_______

Which one of these five Black History Month crafts will you try? Let me know in a comment below.

_______

_______

Black History Month Positive Affirmations

This Black History Month printable set has coloring pages with 18 positive affirmations and 4 editable pages. Many creative patterns inspired by African art are possible, all with basic art supplies. Two bulletin board headers make displaying the stunning finished artwork super easy. Download this easy-to-use printable set at my Etsy Skills N Smiles shop for an everyday low price.

_______

See the blog post Black History Month Positive Affirmations Art for more infomation.

_______

_______

More Celebrate Diversity Crafts

Celebrate Diversity Heart Art

Celebrate Diversity Paper Craft

Black History Month Hair Decorating Art

_______

[Read more…] about Five Black History Month Crafts
Tweet
Share
Share
Pin

Filed Under: art, Black History Month, crafts, preschool Tagged With: Black History Month, butterflies, hearts, papercrafts, wreaths

Paper Bag Christmas Ornaments

December 22, 2022 by Annette Kaminsky Leave a Comment

Tweet
Share
Share
Pin
How to make six different brown paper bag Christmas ornaments. An all-ages, beautiful recycled craft. Free templates are included.

_______

For so long I have admired art projects that involve brown paper bags or doilies. This Christmas I was determined to use both of these supplies to make paper bag Christmas ornaments. The resulting ornaments are simple but beautiful… a perfect combination.

_______

Follow me on Pinterest for more early learning ideas.

_______

Supplies To Collect

Supplies to make vintage-inspired paper bag Christmas ornaments. Download the free templates for these six different designs.

_______

To craft these vintage-themed ornaments, gather the following easy-to-find supplies:

  • large brown paper grocery bag
  • white paper doilies
  • thin white ribbon
  • white pearl bead garland
  • adhesive white pearl beads
  • white pencil crayon
  • pencil
  • scissors
  • glue stick
  • glue gun

_______

Make these beautiful vintage-inspired paper bag Christmas ornaments with lace paper doily accents. Free templates are available to use.

_______

Making The Paper Bag Christmas Ornaments

First, cut out a star, gingerbread girl, angel, heart, and each tree ornament from a large brown paper bag. Feel free to download the templates below to help with the designs.

Note: The three printables in this post are for individual and one-classroom use only.

Download this gingerbread girl and ornament template to make beautiful vintage-inspired brown paper bag Christmas ornaments.

_______

Gingerbread Girl And Ornament PrintableDownload

_______

Download this angel and ornament template to make beautiful vintage-inspired brown paper bag Christmas ornaments.

_______

Angel And Ornament PrintableDownload

_______

Download this star and heart template to make beautiful vintage-inspired paper bag Christmas ornaments.

_______

Star And Heart PrintableDownload

_______

With a white pencil crayon, outline the border of each paper bag shape.

Make these vintage-inspired brown paper bag Christmas ornaments. Download the free templates to make six different designs.

_______

Next, cut out shapes from white paper doilies to accent the paper ornaments. Snipping around the designs in the doilies will give you pretty lace pieces to work with.

Afterward, use a glue stick to affix them to the brown paper backgrounds.

Then cut thin white ribbon into 15 cm strips. Tie them in bows, and trim the ends to your desired length. Glue one bow to each ornament.

Next, cut white pearl bead garland into 8 cm strips. Use a glue gun to affix one strip to the back of each ornament in a loop shape.

Make these beautiful vintage-inspired paper bag Christmas ornaments with lace paper doily accents. Free templates are available to use.

_______

As a finishing touch, accent the ornaments with a few adhesive white pearl beads.

Make these six different brown paper bag Christmas ornaments with lace paper doily accents. Free templates are included.

_______

Now the ornaments are ready to be displayed on a Christmas tree. Aren’t they gorgeous?

How to make six different paper bag Christmas ornaments. An all-ages, beautiful recycled craft. Free templates are included.

_______

Paper Bag Gift Wrap

Another easy, festive craft activity with paper bags is to make decorated gift wrap. A blog post by “A Pretty Fix” titled “Four Simple Brown Paper Bag Gift Wrap Ideas” will give you lots of ideas to try.

_______

Related: Handprint Christmas Crafts

_______

_______

December Kindness Activities Printable Set

A December Kindness Calendar and Kindness Jar are two activities to teach empathy and kindness at home or in the classroom. Download this gorgeous pastel holiday printable set of kindness activities in my Skills N Smiles Etsy Shop for a low-low price. You’ll have the December kindness activities ready in minutes!

_______

[Read more…] about Paper Bag Christmas Ornaments
Tweet
Share
Share
Pin

Filed Under: art, Christmas, crafts, preschool Tagged With: Christmas craft, ornaments, paper bag crafts

Monochromatic Christmas Tree Art

December 17, 2022 by Annette Kaminsky Leave a Comment

Tweet
Share
Share
Pin
Include this simple monochromatic Christmas tree art project in your holiday activities. The pastel-themed trees look beautiful on display.

_______

This simple monochromatic Christmas tree art is completed in four different color themes. The art activity is easy to implement at home or in a Christmas art program. Finished projects display beautifully on a bulletin board or feature wall.

The color theme chosen for this gorgeous art activity is inspired by the exquisite pastel-colored miniature Christmas tree ornaments spotted on shopping trips around town this holiday season.

_______

Follow me on Pinterest for more early learning activities.

_______

Supplies To Collect

Just a few supplies are needed for this pretty craft:

  • 12 x 18-inch sturdy paper
  • magenta, yellow, teal, green, and white tempera paints
  • glitter in magenta, teal, gold, and green colors
  • large magenta, gold, teal, and light green gift bows
  • paint palettes
  • paint pots
  • paintbrushes
  • spoons
  • ruler
  • pencil
  • scissors
  • hot glue gun or white glue
  • plastic tablecloth

_______

Preparing The Tree Art Project

This monochromatic Christmas tree art project is done in pastel shades of green, yellow, teal, and magenta. The trees look beautiful on display.

_______

First, select 12 x 18-inch sturdy paper for the art project. I used manila and manila tag and both kinds worked well.

With a ruler and pencil, draw a long, narrow triangle on each sheet of paper. The triangles should fill the whole page.

Next, cut the paper triangles out.

Then mix a variety of shades of magenta, yellow, teal, and green tempera paint in small pots by adding various amounts of white to each color. For each hue, the shades should range from light to dark.

Tips:

  • To warm up the yellow just a little, add a drop of red to the hues.
  • To make teal paint, mix a little yellow into blue paint. Or use teal tempera paint straight out of the bottle.

Afterward, spoon different shades of each color into paint palettes. Each palette should have shades of one hue only. Include a little white tempera.

_______

The Monochromatic Christmas Tree Art Process

This monochromatic Christmas tree art project is done in pastel shades of green, yellow, teal, and magenta. The trees look beautiful on display.

_______

To offer this tree painting project, cover an art table with a plastic tablecloth.

Choose one monochromatic color scheme to work with.

Then set out a triangular-shaped paper tree, filled paint palette, and brush for each child participating.

Invite participants to paint their tree, using as many shades of the chosen color as they can.

When the trees are fully covered and the paint is still wet, let little artists sprinkle similarly toned glitter on their projects. They will love this part of the process.

After the paint has dried, use white glue or a hot glue gun to affix a matching gift bow to the top of each tree. As an alternative, glue silver or gold bows on the trees.

On another day, pick a different paint color and offer the Christmas tree painting project again.

If there is time, complete the tree art in all four colors.

Include this simple monochromatic Christmas tree art project in your holiday activities. The pastel-themed trees look beautiful on display.

_______

When finished, display the painted trees together on a wall. They are sure to be admired!

Note: The paint colors used for this art project also make awesome ombre Christmas trees.

_______

Related: Christmas Tree Art

_______

_______

December Kindness Activities Printable Set

A December Kindness Calendar and Kindness Jar are two activities to teach empathy and kindness at home or in the classroom. Download this gorgeous pastel holiday printable set of kindness activities in my Skills N Smiles Etsy Shop for a low-low price. You’ll have the December kindness activities ready in minutes!

_______

[Read more…] about Monochromatic Christmas Tree Art
Tweet
Share
Share
Pin

Filed Under: art, Christmas, preschool, trees, winter Tagged With: Christmas tree, painting, paper crafts, trees

Corn Syrup Paint Sunflowers

November 18, 2022 by Annette Kaminsky Leave a Comment

Tweet
Share
Share
Pin
Make these glorious, corn syrup paint sunflowers using a taste-safe, homemade, two-ingredient recipe. Download and use the free template.

_______

If you’ve followed my blog for a while, you can probably tell that I like both sunflowers and corn syrup paint a lot. I regularly post sunflower activity ideas and frequently feature corn syrup paint art. These corn syrup paint sunflowers perfectly showcase the beauty and appeal of this shiny, glossy paint. Prepare to be wowed!

_______

Follow me on Pinterest for more early learning ideas.

_______

This shiny, corn syrup paint sunflower art project is easy-to-do and looks gorgeous displayed. A free sunflower template is available to download.

_______

Supplies To Collect

For this easy-to-do, pretty painting activity, gather the following supplies:

  • white corn syrup
  • blue, red, and yellow food coloring
  • sunflower seeds
  • baby food jars
  • paintbrushes
  • teaspoons
  • 8 ½ x 11-inch white cardstock paper
  • green construction paper
  • scissors
  • glue stick
  • glue gun
  • pencil
  • sunflower template
  • plastic tablecloth

_______

Making The Corn Syrup Paint Sunflowers

There is always white corn syrup in my art supply collection, as I love using it in painting activities. But you can substitute light corn syrup instead.

Steps to make glorious, corn syrup paint sunflowers using a taste-safe, homemade, two-ingredient recipe. Download and use the free template for this art project.

_______

First, pour the corn syrup into three baby food jars, or paint containers you have handy. Add a few drops of red, yellow, and blue food coloring to one jar and mix it with a teaspoon to make a shade of brown. Add a few drops of yellow to another and stir. Mix red and yellow colors into a third container to make orange.

Note: The more food coloring drops you add, the darker each hue will be.

Next, trace and cut leaves and stems from green construction paper.

Afterward, cut cardstock sunflowers from a template. Feel free to download and use the sunflower template included in this post.

Download this sunflower template to make gorgeous corn syrup art.

_______

Sunflower PrintableDownload

This printable is for individual or one classroom use only.

_______

Then set out the paper sunflowers, brown paint, and seeds on a table covered with a plastic tablecloth. Invite participants to paint the circular middle of their sunflower brown, and press in seeds.

Next, set out the yellow and orange paints and brushes. Ask everyone to paint the petals of their sunflower. They’ll love using this bright, slick, translucent paint.

Gorgeous, glossy sunflower art made with a taste-safe, two-ingredient homemade paint recipe. This art project looks stunning when displayed.

_______

As soon as the artists are finished, move each decorated sunflower onto an 8 ½ x 11-inch white cardstock background, or a cardstock color of choice.  Adhere it with a glue gun. Then with a gluestick or glue gun, add a green paper stem and leaf.

The corn syrup paint is thick and sticky, and completed sunflower art projects should be left to dry for a few days.

Gorgeous, glossy sunflower art made with a taste-safe, two-ingredient homemade paint recipe. This art project looks stunning when displayed.

_______

Displaying The Corn Syrup Sunflower Art

These syrupy sunflowers have a shiny, firm finish when dry, and look beautiful displayed. The art is somewhat transient, as the paint will melt and drip in hot, humid conditions. But I have had a piece on display for over a year and it is still looking fabulous.

This shiny, corn syrup paint art project is easy to do and looks gorgeous displayed. It's an all-ages art activity everyone will love to try.

_______

More Corn Syrup Paint Art

As mentioned earlier, I feature lots of corn syrup paint activities on this blog. You may be interested in:

Textured Octopus Craft

Sea Star Art

Sea Turtle Hatchling Art

Painted Turtle And Lizard

Spooky Hands Craft

Sunflower Heart Craft

All these art projects yield gorgeous results.

_______

[Read more…] about Corn Syrup Paint Sunflowers
Tweet
Share
Share
Pin

Filed Under: art, autumn, fall, gardening, preschool, summer Tagged With: corn syrup painting, painting, sunflowers

Gadget Printmaking Poppy Art

November 10, 2022 by Annette Kaminsky Leave a Comment

Tweet
Share
Share
Pin
Try this beautiful gadget printmaking poppy art project today! It introduces participants to a new and unusual way to paint.

_______

It started with a large dot print made with a pie pan, tempera paint, and a paintbrush. The intent was to make a simple red poppy print with a black round center. But afterward, I decided to add paint markings with gadgets to add more color and definition. The result is super striking gadget printmaking poppy art that’s easy and fun to do.

This poppy art is perfect for a Remembrance Day project. Red poppies are a symbol of lives lost to war since World War I. They especially serve as reminders of this each year on November 11, the Remembrance Day holiday in our country.

How to make stunning gadget printmaking poppy art.

_______

Follow me on Pinterest for more early learning ideas.

_______

Poppy Art Supplies

Gadgets used as painting tools make interesting prints, and you can find them all over your home. Here are the gadgets I use for this large-scale art activity:

  • 9-inch round cake or pie pan
  • Jumbo circular bubble wand and tray
  • ground meat chopper
  • spools
  • bottle sponge brush
  • round sponge brush

A few simple supplies complete the list of items needed to make poppy art:

  • tempera paint colors in bright red, yellow, green, pink, and orange
  • 12-inch x 16-inch sturdy white paper
  • green construction paper
  • green marker
  • ruler
  • scissors
  • glue stick
  • flat plate or tray

_______

Gadget Printmaking Poppy Art Steps

Simple steps to create beautiful poppy art with a gadget printmaking technique. The art project introduces participants to a new and unusual way to paint.

_______

First, lay out a large sheet of sturdy paper on a table.

Next, pour red paint on a tray or flat plate. Dip the bottom of a round cake or pie pan in the paint, and press it down on the paper background to make the flower head.

Then dip a bubble wand into orange paint and press it in the middle of the dot. The bubble wand tray holds the paint perfectly for this step.

Afterward, press a sponge bottle brush into the green paint, and make a print in the center.

Then dip a spool into black paint, and press it into the very center of the flower.

Bubble wand, sponge bottle brush, and spool paint prints add color and definition to this gadget printmaking poppy art project.

_______

Next, draw on a stem with a green marker. If desired, use a ruler to keep the stem line straight.

Finally, cut a simple leaf from green fadeless construction paper, and glue it onto the stem.

_______

Poppy Art Color Variations

The gadgets and paint colors used for enhancing the red poppies can be varied. In this art project, a bubble wand, bottle brush, and two spools are the gadgets used.

Try this beautiful gadget printmaking poppy art project today! It introduces participants to a new and unusual way to paint.

_______

A ground meat chopper paint print adds detail to the flower center below.

A bubble wand and ground meat chopper paint print add color and definition to this gadget printmaking poppy art project.

_______

Remembrance Day Poppy Art

Simple steps to create beautiful Remembrance Day poppy art with a gadget printmaking technique. The art project introduces participants to a new and unusual way to paint.

_______

This next project employs the bubble wand tray for the large dot print. The tray is not as big as the cake or pie pan, so can be used with a smaller-sized paper base. And it has a scalloped edge, adding character to the poppy dot. This design is my pick for the official Remembrance Day art project for this year.

For the flower center, dip a round sponge brush or small round sponge into black paint, and press it in the middle of the red dot print. Then press a sponge bottle brush into yellow paint, and make a print on top of the black circle. Finish off with a black spool print in the center of the flower.

Tip: Letting the red and black paint dry for a few hours helps the yellow sponge bottle print stand out and remain bright.

Create this beautiful Remembrance Day poppy art with a gadget printmaking technique. The art project introduces participants to a new and unusual way to paint.

_______

_______

More Gadget Printmaking Poppy Art Ideas

Instead of using only red for the large flower petal dot, introduce a few more color choices, such as yellow and orange. The colors will blend in nicely to make red-orange hues, adding shading and texture.

And since poppies come in a variety of colors, you could choose an entirely new color scheme for this project.

Bubble wand, sponge, meat chopper, bottle brush, and spool prints add highlights and detail to the poppy flower art. And the gadget painting technique introduces participants to a new and unusual way to do painting and printmaking.

_______

How to make stunning gadget printmaking poppy art.

_______

Bubble wand, sponge bottle brush, and spool paint prints add color and definition to this gadget printmaking poppy art project.

_______

More Remembrance Day Art Projects

Remembrance Day Butterfly Craft

Remembrance Day Poppy Art

_______

[Read more…] about Gadget Printmaking Poppy Art
Tweet
Share
Share
Pin

Filed Under: art, autumn, fall, gardening, preschool, Remembrance Day Tagged With: flowers, poppies, printmaking, Remembrance Day

  • « Go to Previous Page
  • Page 1
  • Interim pages omitted …
  • Page 13
  • Page 14
  • Page 15
  • Page 16
  • Page 17
  • Interim pages omitted …
  • Page 35
  • Go to Next Page »

Primary Sidebar

Hi, I'm Annette Kaminsky, a preschool teacher who loves sharing learning through play activities for young children. Thanks for visiting my site. Feel free to stay awhile!

Subscribe Via Email

Recent Posts

  • Celebrate Diversity Coloring Pages March 1, 2026
  • Lunar New Year Lantern Craft February 11, 2026
  • Black History Month Positive Affirmations Art January 29, 2026
  • Snowflake Cafe Dramatic Play Set January 19, 2026
  • Pastel Christmas Letterhead and Envelope December 20, 2025
  • December Kindness Activities November 30, 2025
  • Fall Forest Sensory Bin November 30, 2025
  • DIY Turkey Bowling Game November 25, 2025
  • Fall Leaf Crown Paper Crafts November 23, 2025
  • Colors of Fall Sensory Bin October 13, 2025

Categories

Topics

apples block play bunnies Chinese New Year Christmas Christmas craft color colors dramatic play Easter fall flowers hearts holiday jewelry leaves leprechauns light table loose parts painting paper crafts playdough pretend play printables printmaking process art pumpkins rice bin scented playdough science experiment scissor skills sensory bin sensory play sensory tray shamrocks skeletons snakes snowflakes spiders spring St. Patrick's Day sunflowers tablescapes Valentine's Day water play

Copyright © 2026 · Lifestyle Pro on Genesis Framework · WordPress · Log in