• Skip to secondary menu
  • Skip to main content
  • Skip to primary sidebar

Putting The Pretty In Preschool

Finding Beauty In Everyday Early Childhood Experiences

  • Home
  • About Me
  • Winter
  • Chinese New Year
  • Blog
  • Valentine’s Day
  • Contact Me
  • Easter Activities

painting

Painting With Corn

October 21, 2023 by Annette Kaminsky Leave a Comment

_______

This painting with corn process art activity is quick and easy to do and offers young children an unexpected way to paint. It can be completed in a few different ways, adding variety and sensory options to the art experience.

_______

Follow me on Pinterest for more early learning ideas.

_______

Supplies To Collect

Gather the following supplies for painting with corn:

  • corn ear and husk
  • box or serving tray
  • large sheets of sturdy art paper
  • 8 ½ x 11-inch cardstock paper
  • tempera paint
  • paint pots
  • paint tray
  • teaspoons
  • sharp knife

_______

Painting With Corn Techniques

Corn Painting In a Tray

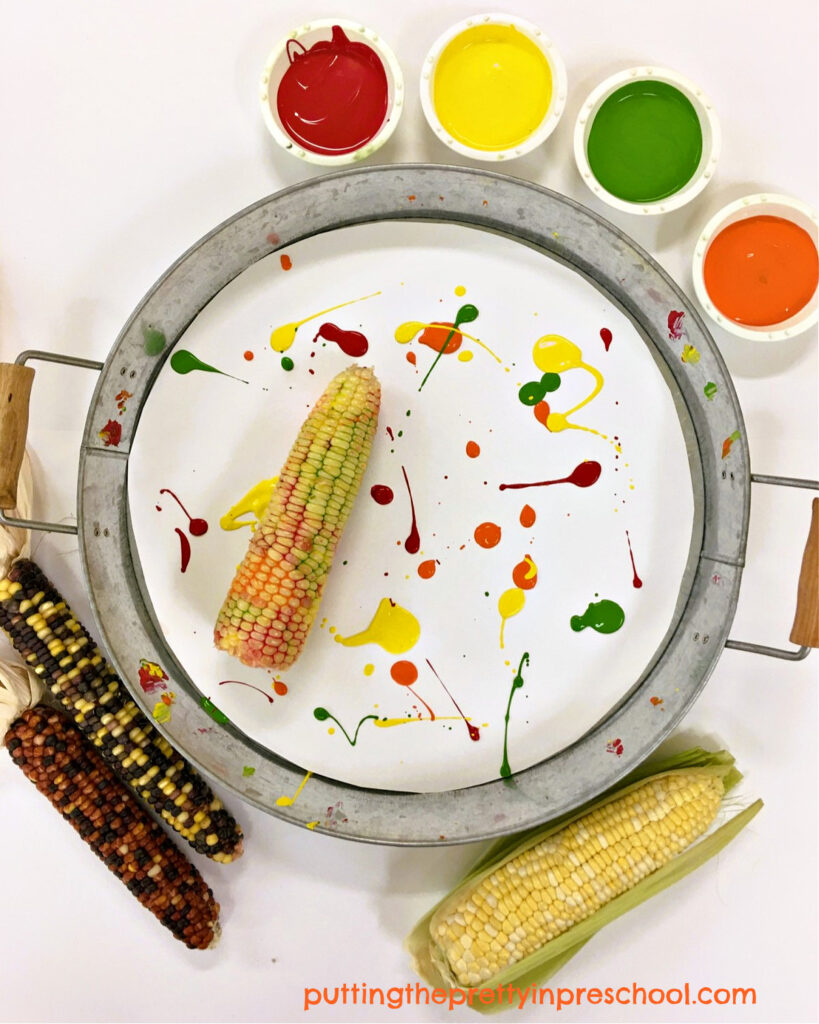
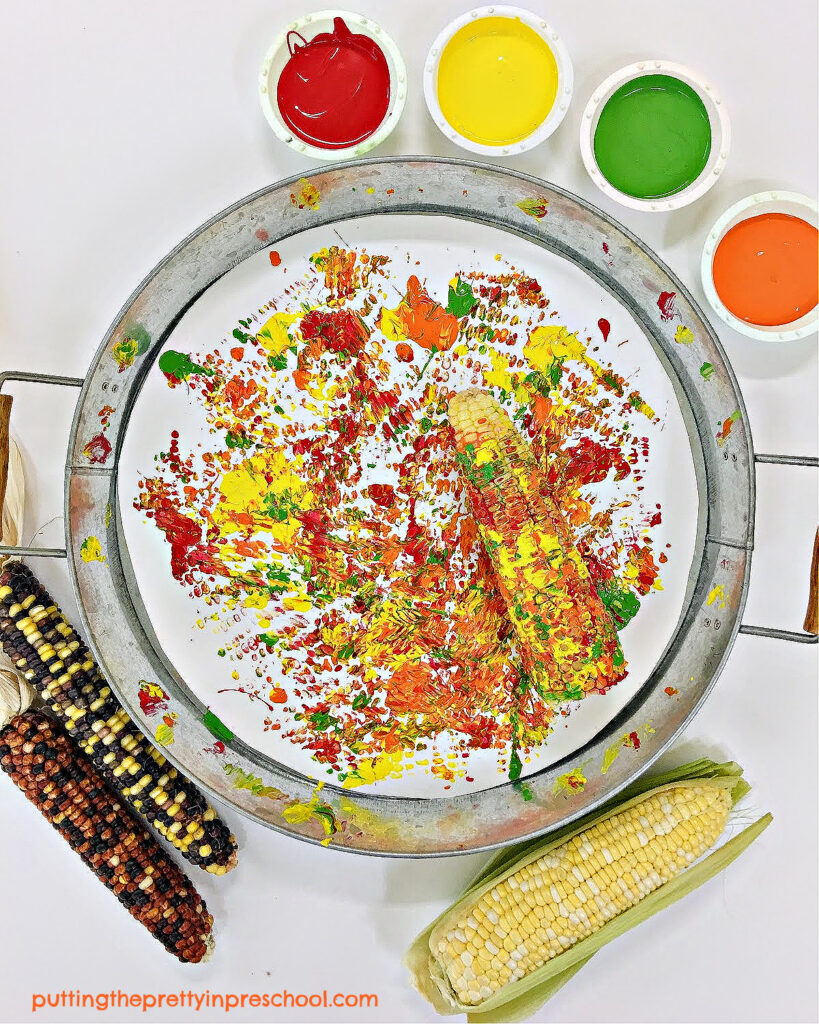
The first way to paint with corn is to set a piece of sturdy paper into a low-edged box or serving tray.

Next, spoon globs of paint in the colors of your choice onto the paper.

_______

Then shuck an ear of corn and drop it in the box or tray. Or use an ear of corn that is already shucked for the art activity.

Tip the box or tray carefully from side to side to move the corn ear around, and you’ll soon have a completed piece of art.

_______

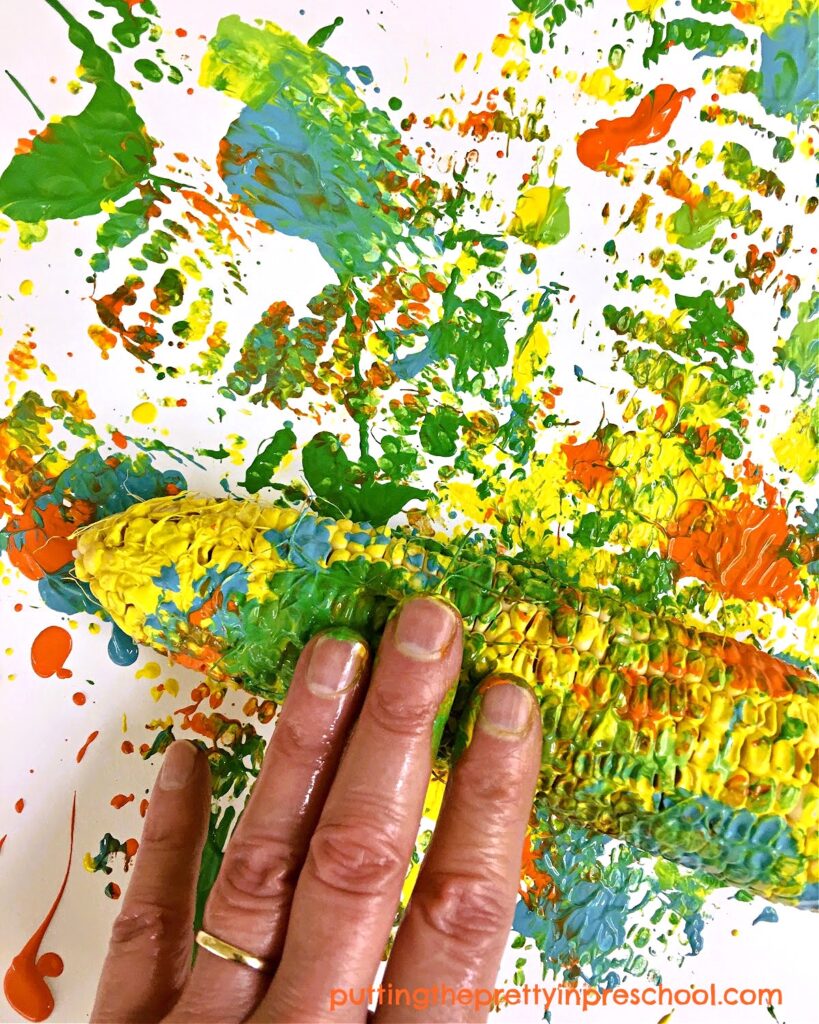
For a little more control, paint the ear of corn instead of spooning paint onto the art paper. When the corn cob is covered in paint, drop it into the box or tray. Then tip the box from side to side as in the process above.

_______

Painting By Hand Rolling Corn

A second way to paint with corn is to forgo using a box or tray for the art process. Simply set a large piece of sturdy paper on a table covered with newsprint or a washable tablecloth.

_______

Then drop globs of paint onto the paper and roll the corn over them with your hands as if you were using a rolling pin.

_______

Or paint the corn ear first and then roll it in different directions over the paper.

This rolling corn technique just might go over best with little learners, as they love to mingle with the paint.

_______

Corn Half Paint Prints

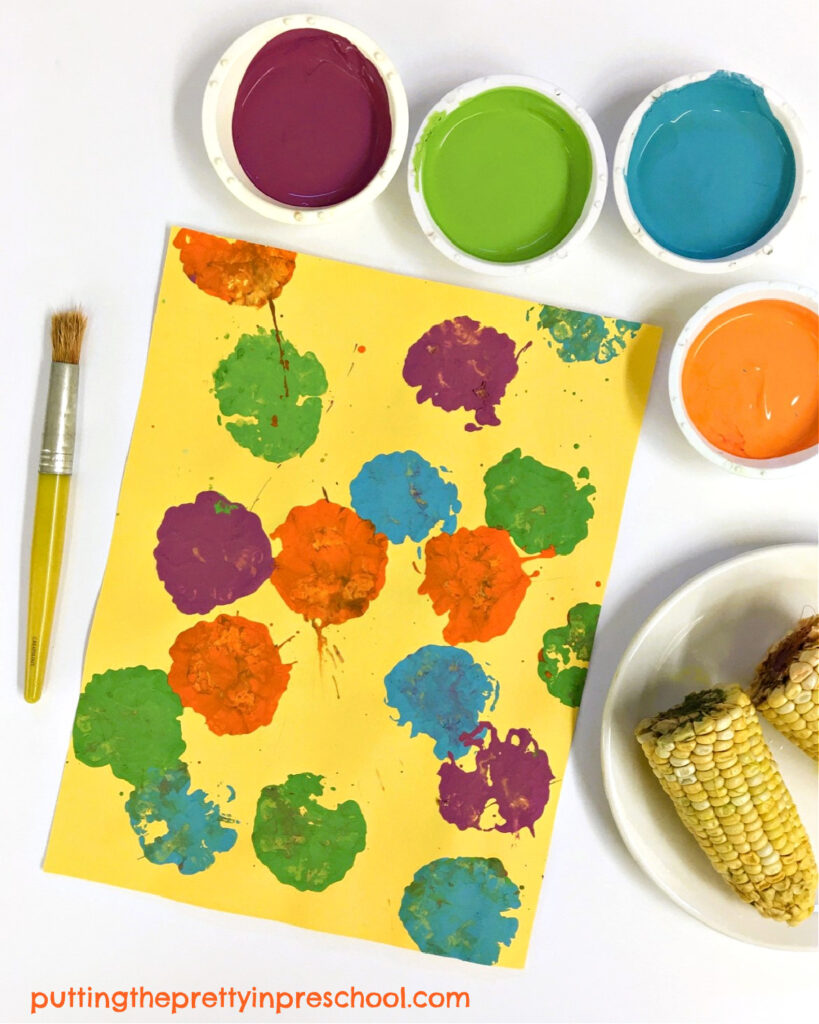
The third method of painting is to start by cutting an ear of corn in half with a sharp knife, aiming to get a smooth sliced end on each half.  

Next, spoon tempera paint colors into pie tins, disposable plates, or paint trays.

Dip the sliced end of one corn ear half into a paint color and press it onto the paper.

_______

When switching colors, wipe the paint-filled edge of the corn with a paper towel sheet before dipping it in a new hue.

_______

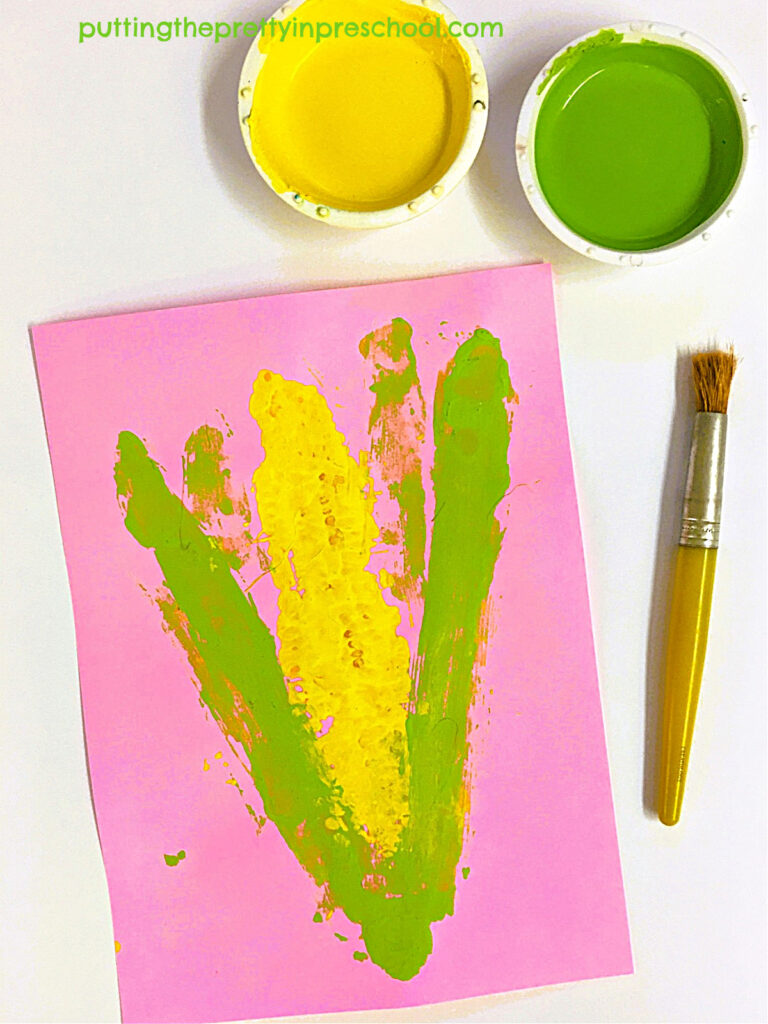
Corn Cob Paint Print

In the last method of painting with corn, the goal is to make a realistic corn cob by using a printmaking technique. In this art activity, a corn cob and a husk are used to make paint prints.

_______

For the art project, set out an ear of shucked corn. Save one of the green husks to use.

With a paintbrush, first thoroughly paint a corn ear with yellow tempera paint.

Next, press the corn cob on a piece of 8 ½ x 11-inch cardstock paper, slightly rolling it back and forth with your fingers.

Remove the corn cob from the paper.

Then paint one side of a husk and press it down on the paper next to the corn print. Make a second husk print on the other side of the cob. Afterward, add a couple more husk prints around the corn.

_______

You may wish to try all of the above painting with corn methods as each adds an interesting twist to the art activity. Which corn process art painting technique is your favorite? Share in a comment below.

_______

Related: Corn Theme Activities

_______

[Read more…] about Painting With Corn

Filed Under: art, autumn, fall, gardening, preschool Tagged With: corn, painting, process art

Cauliflower Theme Activities

September 17, 2023 by Annette Kaminsky Leave a Comment

Easy and fun cauliflower theme activities. Art, craft, science and snack ideas are included in this hands-on vegetable theme.

_______

Beans in a variety of colors weren’t the only thing I discovered on a recent street market stroll. I also stumbled upon a delightful vegetable stall with three different colors of cauliflower. The uniquely hued vegetables are the inspiration for cauliflower theme activities to try, including super easy raw and cooked cauliflower snacks, cauliflower science, and arts and crafts activities.

The easiest cauliflower to find is white, but did you know that this popular vegetable also comes in green, orange, and purple colors? These additional hues have recently popped up at vegetable stands. They add variety to food offerings and would certainly be a conversation piece at any gathering.

Three cauliflower colors spotted at a farmer's market to use in a vegetable tray or a roasted dish.

_______

Follow me on Pinterest for more early learning ideas.

_______

The cauliflower colors I feature in the snacks below are cream, light green, and medium green.

Note: On another street market stroll I came across an orange variety, shown in a photo below. I am still on the hunt for purple and look forward to being able to find it.

_______

Cauliflower Snacks

Cauliflower is a versatile vegetable and can be used in many different dishes. Two easy ways to introduce cauliflower are in a vegetable tray or as a roasted dish.

Cauliflower Vegetable Tray

An eye-appealing vegetable tray with cream and green cauliflower and orange cherry tomatoes.

_______

To give them a moment to shine, include different-hued cauliflower florets in a vegetable tray. Add a favorite dip in the middle of the eye-appealing snack. A little shredded cheese sprinkled on top of the dip and a few cherry tomatoes placed around the cauliflower add pops of color to the tray.

An eye-appealing vegetable tray with cream and green cauliflower and orange cherry tomatoes.

_______

Roasted Cauliflower

How to make a roasted cauliflower vegetable dish. Three different hues of cauliflower are featured in this easy-to-make recipe.

_______

Offer different colored cauliflower varieties in an easy-to-make roasted dish. First, pour a little olive oil in a bowl. Then cut the heads of cauliflower into florets and toss them in the oil. Spread the cut pieces in a baking pan lined with parchment paper or aluminum foil. Finally, sprinkle a little salt and pepper on the florets and bake them in an oven heated to 400 degrees for about 25 minutes.

How to make a roasted cauliflower vegetable dish. Three different hues of cauliflower are featured in this easy-to-make recipe.

_______

Cauliflower Science

Before cutting a few different colors of cauliflower into florets, set them on a table for participants to view. Discuss cauliflower parts such as the head and stem leaves.

Green and cream cauliflower cut lengthwise into slabs to compare inside and outside colors.

_______

Next, slice a cauliflower into wedges to see cross sections of the cruciferous vegetable. View the stem and florets. If the cauliflower is green, orange, or purple, note if the insides of the cauliflower slabs are the same color as the outsides.

Discuss that this nutrient-rich vegetable has lots of vitamins and minerals, and is very healthy to eat.

_______

Cauliflower Arts And Crafts

You may not be able to find purple and orange cauliflower at your local grocery store, but their hues can certainly be included in cauliflower art and craft projects. In addition to green and cream, they are eye-catching colors to introduce in arty activities.

Vegetable Printing With Cauliflower

Create interesting, unexpected designs by using cauliflower florets as printmaking tools.

First, cut cauliflower into different-sized florets.

An invitation to make vegetable prints with cauliflower florets and orange, purple, green, and cream tempera paints.

_______

Next, paint the flatter sides of the florets with tempera paint. Cauliflower hues are a standout in this painting activity.

Then press down the florets onto a piece of sturdy art paper to make vegetable prints. Black and green fade-resistant construction paper work nicely for this cauliflower printmaking project.

How to make vegetable prints with cauliflower florets and orange, purple, green, and cream tempera paints.

_______

Paint Mixing Tips:

  • Add a drop of yellow tempera paint in the white to make a lovely cream color.
  • Mix a little yellow paint into green to make a lighter and brighter hue.
  • Drop in a teaspoon or two of white paint into purple and orange to make softer hues.

_______

How to make vegetable prints with cauliflower florets and orange, purple, green, and cream tempera paints.

_______

Cauliflower Paper Craft

How to make cauliflower paper crafts in green, orange, purple, and cream hues. These crafts incorporate a cotton ball painting technique.

_______

This cute cauliflower paper craft also includes printmaking.

To do the craft, first cut cauliflower heads from manilla tag or cream construction paper, and humps and stem leaves from one or two shades of green cardstock or construction paper. Choosing fadeless paper for the project is recommended.

Feel free to download this template for the vegetable craft project.

Download this free cauliflower vegetable template to use for arts and crafts activities. Make purple, orange, green, and cream cauliflower paper crafts.

_______

Cauliflower PrintableDownload

This printable is for individual or one classroom use only.

_______

Next, print color onto the paper cauliflower heads in hues of cream, green, orange, and purple using painted florets. Or simply use cotton balls dipped in tempera paint for the printmaking process.

How to make an orange cauliflower paper craft. This craft incorporate a cotton ball painting technique.

_______

After the painted cauliflower heads are dry, use a glue stick to affix a hump to the back of each one.

Finally, glue two or three paper stem leaves onto each side of the cauliflower heads.   

How to make an orange cauliflower paper craft. This craft incorporates a cotton ball painting technique.

_______

How to make a purple cauliflower paper craft. This craft incorporates a cotton ball painting technique.

_______

How to make a green cauliflower paper craft. This craft incorporates a cotton ball painting technique.

_______

How to make a cauliflower vegetable paper craft. This craft incorporates a cotton ball painting technique.

_______

These cauliflower theme activities celebrate the vegetable’s vibrant colors and are perfect for a fall or garden theme.

_______

Related:

Corn Theme Activities

Beet Science And Sensory Activities

Carrot Theme Activities

Pumpkin Color Activities

_______

[Read more…] about Cauliflower Theme Activities

Filed Under: art, crafts, gardening, preschool, science, summer Tagged With: cauliflower, gardening, painting, paper crafts, snacks

Zucchini Leaf Paint Prints

September 2, 2023 by Annette Kaminsky Leave a Comment

How to make large zucchini leaf paint prints in fall colors. This is an all-ages garden art activity everyone will enjoy giving a try.

_______

Fall is a popular time to do art activities with leaves. Aside from picking tree leaves to work with, don’t overlook garden plants as interesting subjects for leaf art projects. For instance, the zucchini plant is one with large, curvy leaves that beg to be used in painting or drawing projects. In this post, the garden plant is featured in a stunning zucchini leaf paint prints art activity.

Zucchini ready to be harvested in mid summer.

_______

Zucchini is a green summer squash with large yellow star-shaped flowers and silver-speckled leaves. All parts of the zucchini plant can be eaten, and it is a common food in many cultures.

A gorgeous star-shaped flower on a zucchini plant.

_______

Follow me on Pinterest for more early learning ideas.

_______

Supplies To Collect

Gather the following supplies for zucchini leaf print art:

  • zucchini leaves
  • tempera paint in fall colors
  • paintbrush
  • paper towel sheets
  • garden or disposable gloves
  • 11 x 14-inch sturdy art paper
  • waterproof tablecloth or large sheet of manilla paper

_______

Making The Zucchini Leaf Paint Prints

As this is a painting activity, first lay down a waterproof tablecloth. A large sheet of manilla paper also works fine.

Next, fill paint pots with red, green, yellow, and orange tempera paint.

A large, silver-speckled zucchini leaf ready to paint for a leaf printmaking activity.

_______

Then set up a station with a zucchini leaf, a paintbrush, and a paper towel sheet. Add pots filled with red, yellow, green, and orange paint.

Put on gloves and paint the leaf, dabbing excess paint onto a paper towel sheet between colors.

A zucchini leaf is a good subject for a printmaking activity. The painted leaf makes a beautiful paint print.

_______

When the leaf is covered in paint, carefully flip it over on a large sheet of all-purpose art paper, gently pressing all parts of the leaf down.  

A leaf print in fall colors made with a large zucchini leaf and tempera paint. An all-ages art activity everyone will enjoy.

_______

If the leaf is covered with a lot of paint, a second print can be made with it. The print has a little less paint but looks equally beautiful.

How to make a leaf print in fall colors with a large zucchini leaf and tempera paint. An all-ages art activity everyone will enjoy.

_______

Note: The stem and back of the zucchini leaf are a little prickly, so wearing a pair of garden or disposable gloves is advisable.

_______

Zucchini Leaf Tracing

Zucchini leaves have interesting curves and edges and also make good subjects for tracing. Before painting the zucchini leaf, trace around it and then color it in with crayons or pencil crayons. Or use the zucchini leaf template below to paint or color.

A free zucchini leaf template for art and craft activities.

_______

Zucchini Leaf PrintableDownload

This printable is for individual or one classroom use only.

_______

Zucchini Leaf Transient Art

Once the printmaking activity is done, the painted leaf can be displayed for a few days or even a couple of weeks. Although the leaf isn’t flat at the start, it becomes very flat afterward, making it easy to work with in a wall display.

Or you can just paint the leaf as a transient art project without using it for printmaking

A painted zucchini leaf used in printmaking can be displayed for a few days or weeks as transient art.

_______

Pumpkin Leaf Transient Art

A pumpkin leaf also makes a great canvas, as it is large and uniquely shaped. As a transient art activity, set out a pumpkin leaf for a painting activity. You may want to tape the back of the leaf down to make it a little flatter before using it as a canvas.

A large pumpkin leaf on a vine can be picked and used in a transient art painting activity.

_______

Paint a large pumpkin leaf canvas with fall-colored tempera paints for a beautiful transient art project.

_______

Related:

Maple Leaf Activities

Spin Painting Maple Leaf Art

Horse Chestnut Leaf Art Activities

_______

[Read more…] about Zucchini Leaf Paint Prints

Filed Under: art, autumn, display, gardening, preschool, science Tagged With: gardening, leaves, painting, printmaking, pumpkin, zucchini

Gorgeous Eye Dropper Art

August 27, 2023 by Annette Kaminsky Leave a Comment

Baeutiful paper towel eye dropper art . Do the process art activity on its own or turn the art into dragonfly, butterfly, and flower designs.

_______

What do dragonflies, butterflies, and flowers have in common? Aside from appearing during the summer season, they all look spectacular in eye dropper art. This easy-to-do, oh-so-satisfying process art technique is one of children’s favorite ways to paint.

_______

Follow me on Pinterest for more early learning ideas.

_______

Supplies To Collect

For this stunning art activity, gather the following:

  • liquid watercolors or food coloring
  • roll of absorbent paper towels
  • pipette eye droppers
  • paint containers
  • waterproof tablecloth

_______

The Eye Dropper Art Process

Create gorgeous eye dropper art with liquid watercolors on paper towle sheets. An all-ages process art activity.

_______

Things might get very wet with this art technique, so the first thing to do is cover the working surface with a waterproof tablecloth.

Next, tear off sheets from a paper towel roll. If you have a choice, pick a thicker brand, as it will be more absorbent. But any kind of paper towel will work fine.

Then pour water into paint pots, and mix a few drops of liquid watercolors or food coloring in each one.

Set up an art station with a paper towel sheet and paint pots with eyedropper pipettes for each participant.

Invite children to squeeze paint on their paper towel canvas with the droppers.

Create gorgeous eye dropper art with liquid watercolors on paper towle sheets. An all-ages process art activity.

_______

When the arty paper towel sheets are thoroughly covered in paint, set them aside to dry.

_______

Eye Dropper Paint Crafts

Eye dropper painting is a well-loved process art activity, and participating artists will likely want to decorate a few paper towels. In this case, send some of the paper towel art home, and save a few sheets for crafts or other activities. The paper towel art looks beautiful in the following three crafts.

Paper Towel Dragonflies

Create a gorgeous dragonfly with a super fun eye dropper painting technique. A paper craft that looks stunning displayed.

_______

The large wings of mosquito-munching dragonflies have a moment with the eye dropper art technique. To craft the dragonflies, cut two pairs of long wings out of painted paper towel sheets, and a one-piece head, thorax, and abdomen from complementary-toned regular or glitter cardstock. Use a glue stick to affix the dragonfly wings to the back of the cardstock shapes. Finally, use a glue gun to add folded pipe cleaner antennae and wiggly eyes to the heads.

Tip: Paper towel rolls are often two-ply. If the layers in your cutouts separate while you are working, dab a little glue in a few spots between them so they stay in place.

Create gorgeous dragonflies with a super fun eye dropper painting technique. A paper craft that looks stunning displayed.

_______

Download this free dragonfly template to make the craft.

Download this free dragonfly template for art or craft activities.

_______

Dragonfly PrintableDownload

_______

This printable is for individual or one classroom use only.

_______

Paper Towel Butterflies

Create a gorgeous, dainty butterfly with a super fun eye dropper painting technique. A paper craft that looks stunning displayed.

_______

Butterflies look fantastical in any kind of art technique, and the wings look especially dainty when crafted from painted paper towels. To create the butterflies, snip two pairs of butterfly wings from a colored paper towel. Then cut a one-piece head, thorax, and abdomen from cardstock. As with the dragonflies, affix the wings to the back of the cardstock bodies. With a glue gun, attach a folded pipe cleaner antennae and two small wiggly eyes to the heads.

Create gorgeous, dainty butterflies with a super fun eye dropper painting technique. A paper craft that looks stunning displayed.

_______

Download this free butterfly template to make the craft.

Download this free butterfly template for art or craft activities.

_______

Butterfly TemplateDownload

_______

This printable is for individual or one-classroom use only.

_______

Paper Towel Flowers

Create a beautiful flower with a super fun eye dropper painting technique. A paper craft that looks stunning displayed.

_______

A third art project is to create paper towel flowers. Cut the flowers and circular centers from painted paper towel sheets, and add cardstock or construction paper stems and leaves.

Create beautiful flowers with a super fun eye dropper painting technique. A paper craft that looks stunning displayed.

_______

Download this free flower template to make the craft.

Download this free flower template for art or craft activities.

_______

Flower PrintableDownload

This printable is for individual or one-classroom use only.

_______

Light Table Play

The eye dropper paper towel dragonflies, butterflies, and flowers look especially beautiful displayed on a light table.

Eyedropper art dragonfly, butterfly, and flowers display beautifully on a light table.

_______

As an alternative, eye dropper-painted geometric shapes cut from paper towel sheets also illuminate wonderfully and offer opportunities to create original designs.

Eye dropper art on geomtric shapes look beautiful on a light table and provide an invitation to create interesting new designs.

_______

Related:

Earth Day Heart Art

Eye Dropper Leaf Art

Spider Theme Activities

Ladybug Wand Craft

_______

Eye dropper art on geomtric shapes look beautiful on a light table and provide an invitation to create interesting new designs.

_______

[Read more…] about Gorgeous Eye Dropper Art

Filed Under: art, crafts, gardening, insects, light table, preschool, summer Tagged With: butterflies, dragonflies, flowers, light table, painting, paper crafts, process art

Shiny Paint Cactus Art

August 3, 2023 by Annette Kaminsky Leave a Comment

Four easy to make shiny cactus art projects that look beautifully displayed. Kitchen supplies gleam in this all-ages art activity.

_______

This all-ages shiny paint cactus art can be made in a few different ways. Try one of the versions or try them all, and share a few cactus facts along the way. Saguaro and prickly pear cactus trees are featured in the activities, and two free cactus templates are available to download to make your art activity preparation easier.

_______

Follow me on Pinterest for more early learning ideas.

_______

Supplies To Collect

Make this shiny saguaro cactus tree art project using only a few supplies. An all-ages easy-to-do desert art activity.

_______

Gather the following basic supplies for the cactus art projects in this post:

  • white corn syrup
  • neon purple and green food coloring
  • green food coloring
  • paint pots
  • paintbrushes
  • glue paddle
  • small bowls
  • spoons
  • white glue
  • scissors
  • large circle punch
  • 8 ½ inch x 11-inch white cardstock paper
  • 12 x 12-inch colored cardstock
  • flower confetti
  • cactus templates
  • newsprint or tablecloth

_______

Cactus Art Paint

Three of the four projects featured employ a shiny paint made by adding a food coloring hue to white corn syrup. Little learners find this paint soooo satisfying to use. It is super sticky and can work as an adhesive. It dries with a glossy, smooth finish.

_______

Coconut Embellished Saguaro Cactus

Saguaro cactus trees grow naturally in southern Arizona and in the Mexican state of Sonora. The desert dwellers are covered in prickly spines.

Saguaros often bloom in late May to late June, but the blooms can be spotted earlier or later in the year. The stunning white flowers with yellow centers mature into edible ruby red fruits.

Steps to make a shiny saguaro cactus art project using only a few supplies. An all-ages easy-to-do art project.

_______

For this first saguaro cactus art project, start by squeezing a little white corn syrup into a paint pot. A baby food jar works well as a paint holder.

Next, add a few drops of neon green food coloring into the corn syrup and stir it in.

Then cut a saguaro cactus tree from white cardstock paper. Feel free to download this template for the project.

A free saguaro cactus template to use for art and craft projects. Paint, glue, and create with using unique cactus design.

_______

Saguaro Cactus PrintableDownload

_______

Afterward, set the cactus cutout on an art table along with the sticky green paint, a paintbrush, a small bowl with shredded coconut, and a spoon.

Cover the cactus with shiny paint, and then sprinkle on coconut bits to represent pokey spines. Press in confetti flowers to depict a cactus in the blooming season.

To complete the cactus art project, add a strip of golden or yellow ochre sturdy paper to the bottom of a 12-inch x 12-inch piece of cardstock that is a pastel shade. Using white glue or a glue gun, carefully adhere the painted cactus to the cardstock background. Punch or cut out a large cardstock circle and glue it on to represent a sun in the picture.

Make this shiny saguaro cactus tree art project using only a few supplies. An all-ages easy-to-do desert art activity.

_______

Note: This paint takes a generous amount of time to dry. After at least a few days of drying time, the art is ready to be displayed.

_______

Chive Embellished Saguaro Cactus

This easy to create saguarro cactus tree art uses chives as one of the supplies. An all-ages art project that is rewarding to do.

_______

This second cactus tree art project uses green glue instead of corn syrup paint. For this art activity:

  • Mix a little neon green food coloring into white glue to make a light green hue. Use a glue paddle to apply the glue all over a cactus template. A light coat of glue works best, as it helps prevent the paper cactus from curling as it dries.
  • Sprinkle on freeze-dried chives to look like cactus spines, and add pink confetti blooms.
  • Finish the project the same way the first one was done.

Note: Corn syrup paint works beautifully for this cactus art design just as well.

This easy to create saguarro cactus tree art uses chives as one of the supplies. An all-ages art project that is rewarding to do.

_______

Purple Prickly Pear Cactus Art

Make this shiny purple prickly pear cactus art project using only a few supplies. An all-ages easy-to-do desert art activity.

_______

As I am always drawn to unique colors in nature, I was excited to find out that there is such a thing as purple cacti. Some prickly pear cacti are purple, so this next project celebrates this pretty, vibrant hue and highlights the unique prickly pear cactus shape. Feel free to download the template below for the art activity.

A free prickly pear cactus template to use for art and craft projects. Paint, glue, and create using this unique cactus design.

_______

Prickly Pear Cactus PrintableDownload

_______

To complete this art project:

  • Mix a little neon purple food coloring in a pot of white corn syrup.
  • Paint the prickly pear cactus with the purple sticky paint.  
  • Sprinkle on uncooked rice grains to represent spines.
  • Press in purple confetti flowers. Or use yellow confetti flowers…the natural color of purple prickly pear blooms.
  • Finish the project the same way the first two cactus versions were done.
This prickly pear cactus art project requires simple supplies you can find in your kitchen. It's an easy-to-do all-ages art activity.

_______

Cactus Christmas Tree Art

This last cactus project is elevated by using cake sprinkles for the spines. The balls in the sprinkle mix inspired me to turn the cactus into a decorated Christmas tree.

Use supplies you have in your kitchen to decorate a saguaro cactus as a Christmas tree. An all-ages art activity everyone will love.

_______

To make this art project:

  • Mix a hue of green corn syrup paint and brush it onto a saguaro cactus.
  • Drop on cake sprinkles with your fingers or a spoon, and press them in gently. Space out the sprinkle balls to look like ornaments on the tree.
  • Glue a cut or punched metallic paper star at the top for a tree topper.
  • Complete the art project the same way as all the others.

Note: The corn syrup paint and glue paint have adhesive qualities. If any of the embellishments do not adhere, use white glue or a glue gun to affix the shapes.

Use supplies you have in your kitchen to decorate a saguaro cactus as a Christmas tree. An all-ages art activity everyone will love.

_______

These shiny paint cactus art activities are suitable for people of every age. Each project can be a cooperative one for little learners, with an older child or adult helping a little one with the cactus art.

_______

Related:

Octopus Art

Sea Turtle Art

Sea Star Art

Lizard And Turtle Art

Corn Syrup Paint Sunflowers

_______

[Read more…] about Shiny Paint Cactus Art

Filed Under: art, Christmas, crafts, preschool, sensory, trees Tagged With: corn syrup painting, desert, painting

  • « Go to Previous Page
  • Page 1
  • Page 2
  • Page 3
  • Page 4
  • Page 5
  • Interim pages omitted …
  • Page 11
  • Go to Next Page »

Primary Sidebar

Subscribe Via Email

Recent Posts

  • Dandelion Sensory Tray June 3, 2025
  • Bergenia Flower Sensory Bin May 31, 2025
  • Salt and Ice Science Experiment May 20, 2025
  • Airplane Rice Sensory Bin May 16, 2025
  • Salt Painting Planet Art May 3, 2025
  • Spring Bunny Sensory Bin April 19, 2025
  • Tin Foil Egg Printing April 17, 2025
  • Lentil Easter Bunny Sensory Bin April 15, 2025
  • Unicorn Store Dramatic Play Center March 25, 2025
  • Easter Store Dramatic Play Center March 23, 2025

Categories

Topics

block play bunnies butterflies Chinese New Year Christmas Christmas craft color colors dramatic play Easter flowers hearts holiday jewelry leaves leprechauns light table loose parts painting paper crafts playdough pretend play printables printmaking process art pumpkins rice bin scented playdough science experiment scissor skills sensory bin sensory play sensory tray shamrocks skeletons snakes snowflakes spiders spring St. Patrick's Day sunflowers tablescapes trees Valentine's Day water play

Copyright © 2025 · Lifestyle Pro on Genesis Framework · WordPress · Log in