• Skip to secondary menu
  • Skip to main content
  • Skip to primary sidebar

Putting The Pretty In Preschool

Finding Beauty In Everyday Early Childhood Experiences

  • Home
  • About Me
  • Winter
  • Chinese New Year
  • Blog
  • Valentine’s Day
  • Contact Me
  • Easter Activities

Food Art

Melted Candy Gingerbread Ornaments

December 12, 2023 by Annette Kaminsky Leave a Comment

_______

Making melted candy gingerbread ornaments was something I’ve wanted to try ever since viewing a beautiful four-sided, sweet-tasting red and white gingerbread house on Twitter a few years ago. It’s an eye-pleasing baking activity and a festive science experiment so I highly recommend giving the activity a go.

_______

Follow me on Pinterest for more early learning activities.

_______

Melted Candy Ornament Supplies

_______

Gather the following supplies for this simple candy science activity:

  • red and/or green striped round peppermint candies
  • metal gingerbread cookie cutters
  • no-stick cooking spray
  • parchment or wax paper
  • cookie pans
  • cutting board
  • knife
  • vegetable oil
  • wooden skewer

_______

Melted Candy Gingerbread Ornament Tips

Before trying this minty STEAM activity, I read a few blog posts about making melted peppermint candy designs. This detailed Melted Peppermint Candy Ornaments post by onelittleproject.com was particularly helpful and had great tips.

_______

Making The Melted Candy Christmas Ornaments

_______

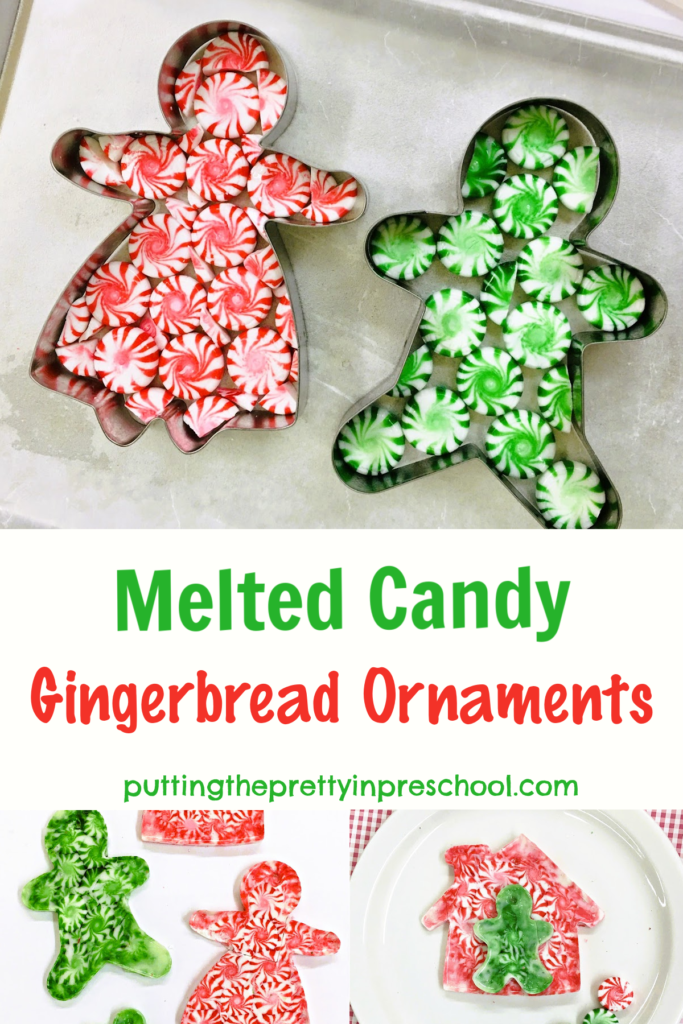
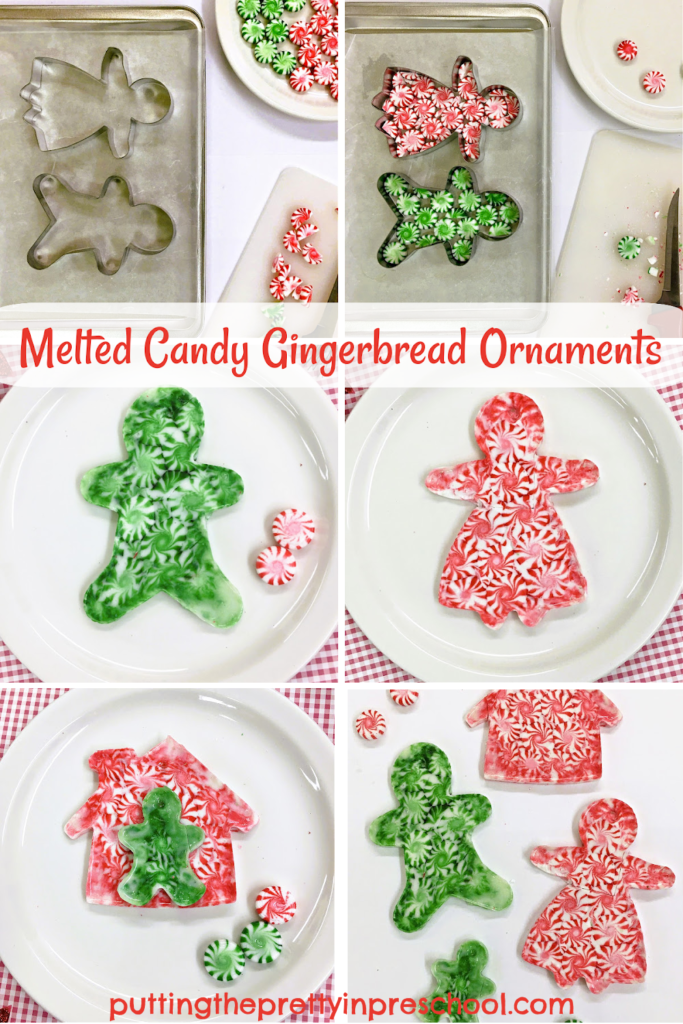
To make the melted gingerbread candy ornaments, start by picking out metal cookie cutters for the task. Generously sized gingerbread people and a house were my cookie cutters of choice.

Spray the cookie cutters with no-stick cooking spray.

Next, add parchment paper to one or more cookie pans and set the greased cookie cutters on the pans.

Then insert unwrapped red or green striped peppermint candies inside the cookie cutter shapes. For larger spaces, cut candies into halves or quarters on a cutting board and use the smaller pieces to fill in the gaps.

_______

Baking The Melted Candy Gingerbread Ornaments

To bake the candy gingerbread ornaments, set the oven temperature to 350 degrees.

Next, put the peppermint candy-filled cookie cutters in the oven and heat them for around six minutes.

Stay by the oven and make sure to turn the oven light on to view the candies melting. It’s okay to take a peek…the sweet creations won’t jump out of the oven. But they will melt down if they are in the oven too long.

When the candies are joined together and a little of the melted candy starts seeping around the cookie cutter edges, take the baking pans out of the oven.

_______

After around two minutes, dip a wooden skewer in vegetable oil and carefully make a little hole near the top of each decoration so a string can be drawn through.  Then let the eye-catching creations cool for around fifteen minutes.

Before the ornaments cool completely, carefully pull away the sides of the cookie cutters from the candy shapes and gently push them out. Oh-so-carefully break off melted bits around the peppermint ornaments if there are any.

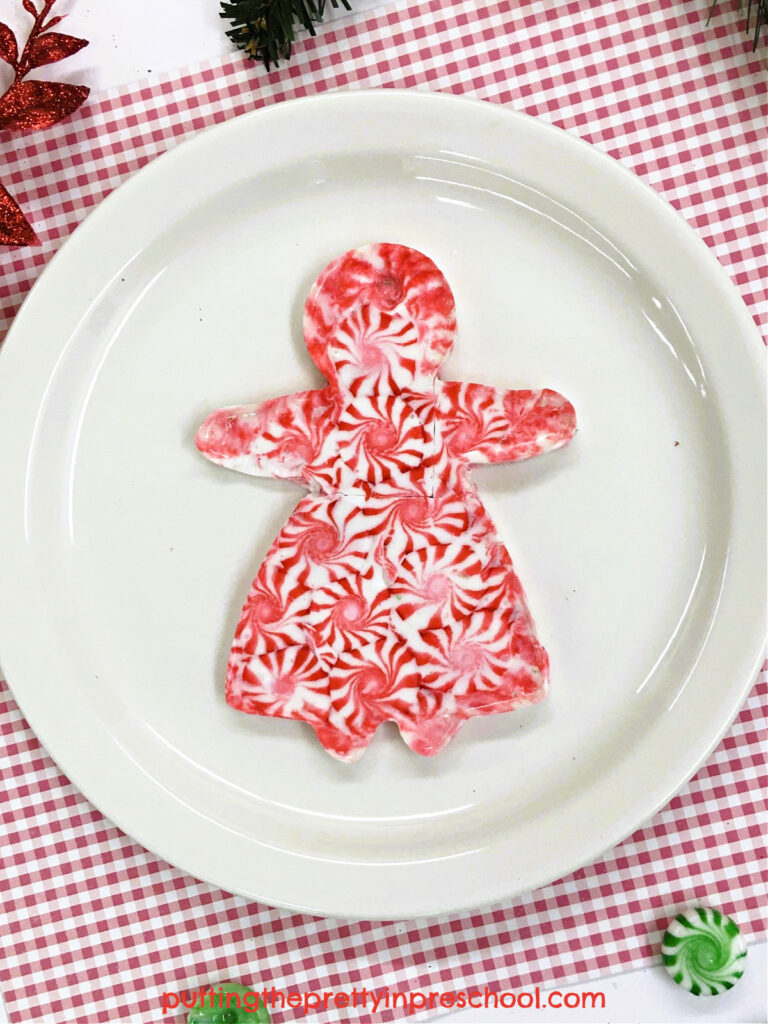
Let the beautiful striped ornaments cool completely.

_______

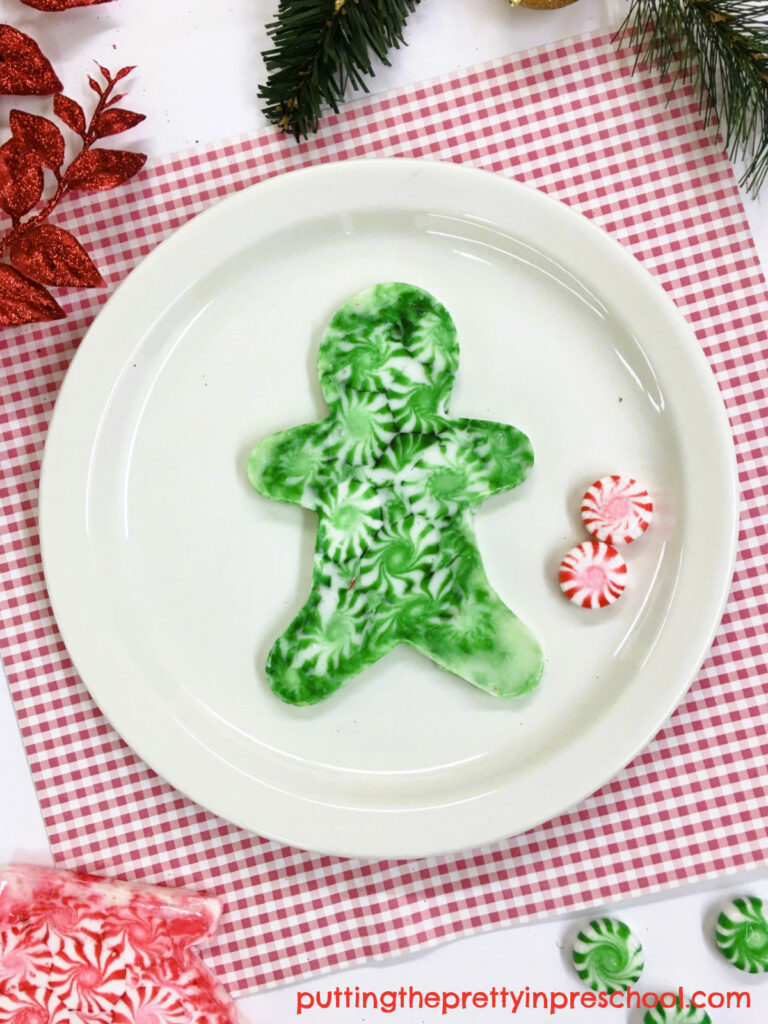
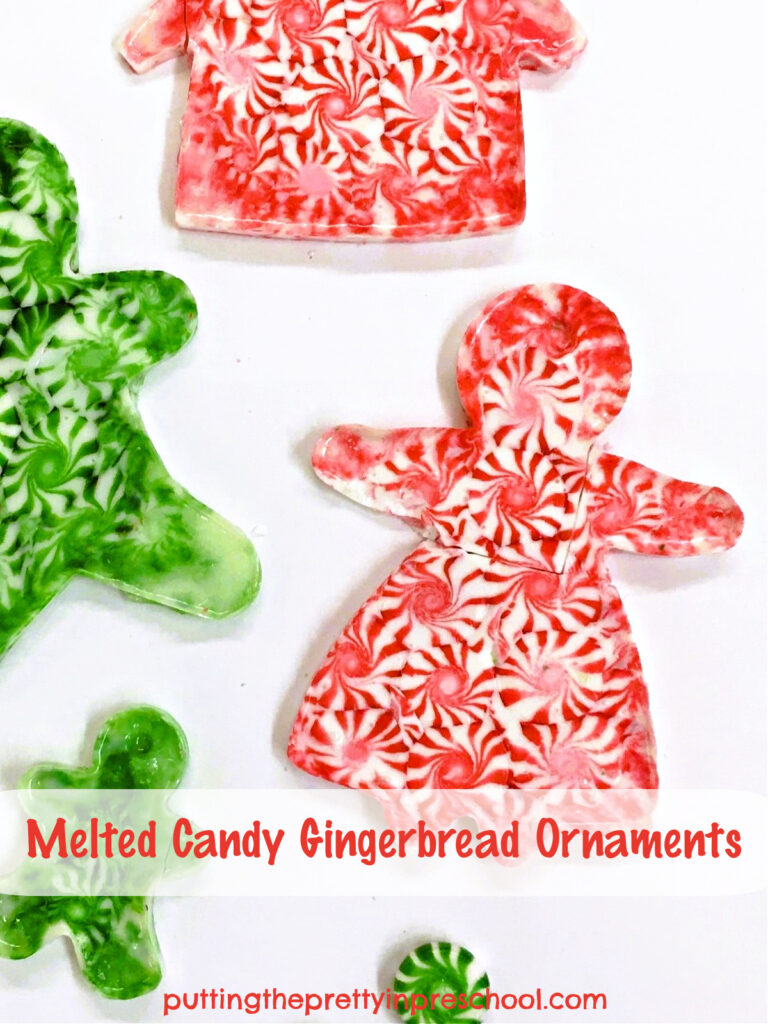
How The Melted Gingerbread Ornaments Turned Out

This is where I need to come clean. My candy gingerbread ornaments didn’t turn out perfectly. Each one had one broken bit. The red and white gingerbread person had two broken bits.

_______

But as a first try at making melted candy ornaments, I considered it a success. I determined afterward that I had left the candied shapes in the oven just a little too long (probably eight minutes) and needed to be even more careful in removing them from the cookie cutters after baking. So a second attempt would likely be more successful.

The activity did turn out well enough that I would confidently be able to introduce it to family members or a group of preschool students. The patterned ornaments were fun to put back together as mini puzzles, and they would be tasty treats broken down into small bits and shared. Broken ornaments could be crushed and infused with playdough or baked in a peppermint cookie recipe when the science experiment was over. And there could be a conversation about stripes, patterns, halves, quarters, and the smell and taste of peppermint.

Striped peppermint candies are economical to buy, and I’ll surely give this stunning melted candy gingerbread ornaments STEAM activity another go. How about you? Will you give it a try?

_______

More Peppermint Candy Activities

Christmas Peppermint Sensory Bin

Candy Cane Tree Experiment

_______

[Read more…] about Melted Candy Gingerbread Ornaments

Filed Under: Christmas, Food Art, preschool, science, sensory Tagged With: decorations, gingerbread, science experiment

Edible Playdough Turkey Craft

November 22, 2023 by Annette Kaminsky Leave a Comment

_______

Here’s a sweet, edible playdough turkey craft just in time for Thanksgiving Day. It is suitable any time of the year for a farm animal theme. It is simple to make and uses five easy-to-find ingredients.

_______

Follow me on Pinterest for more early learning ideas.

_______

Supplies To Collect

Gather the following supplies for this color-infused playdough turkey:

  • chocolate frosting
  • vanilla frosting
  • powdered sugar
  • candy corn
  • white candy eyes
  • small serving plate
  • large mixing bowl
  • large spoon for stirring
  • knife

_____

Making The Edible Playdough

_______

To make this edible playdough, first select a large bowl for the ingredients.

Next, empty half a container of vanilla frosting into the bowl.

Then scoop in an equal amount of powdered sugar.

With a large spoon, stir the powdered sugar and frosting together.

Afterward, knead the ingredients thoroughly, adding more powdered sugar or frosting if necessary, until the dough is a non-sticky playdough consistency.

Make a similar batch of playdough using chocolate frosting, incorporating powdered sugar with the brown icing.

Then form a ball of vanilla playdough and a smaller one of chocolate. Knead the two balls together to get a light brown shade.

Finally, add a little vanilla playdough to a ball of chocolate. Knead them together to get the medium brown shade.

_______

Little learners will love to help make this tasty edible playdough, and will especially enjoy the kneading part. Discussions about color mixing, spheres, and small and large sizes can be introduced during the playdough and turkey-making process.

_______

The Edible Playdough Turkey

Fashioning the playdough turkey is almost as easy as making the two colors of dough.

First, form a ball of medium brown playdough and flatten it into a circle on a dessert plate.

Next, make a light bulb shape from the light brown playdough and press it on top of the circle, designing a turkey head and neck.

Then add two candy eyes and a candy corn beak.

Tip: Slice off the wide end of a piece of candy corn with a knife to make a shorter beak if desired.

Finally, position candy corn pieces all around the edge of the large playdough circle.

_______

You may have noticed that this playdough is super sweet. It’s a good idea to encourage participants to design their turkey first and then snack on some of the extra supplies.

After the turkeys are made and participants have had the chance to do a little snacking, wrap leftover frosting playdough in saran wrap and place it in a jar or plastic bag. Store the playdough and part containers of frosting in the fridge to use another time.

_______

Festive Graham Cracker Turkeys

_______

The leftover frosting and candy eyes will come in handy for desserts, so nothing will go to waste. One idea is to spread a thin layer of chocolate or vanilla frosting on graham crackers. Add two candy eyes to each one, and five candy corn pieces around the upper edges. Slice off the wider end of some of the candy corn pieces and place them under the eyes for beaks. You’ll end up with festive turkey treats that will quickly be gobbled up by your little charges.

_______

Non-Edible Playdough Turkey

The tasty turkey can be made with a basic playdough recipe instead of the sweet, edible dough. You can leave the playdough uncolored to create a white farm turkey or add varying amounts of brown gel icing color to small batches of playdough to get similar turkey colors as with the edible playdough turkey.

_______

More Turkey Activities

Paper Plate Turkey Craft

Turkey Sensory Tubes

Coffee Playdough Turkey

Turkey Playdough Tray

_______

More Playdough Recipes and Activities

Apple Playdough Tray

Scented Playdough Activities

Pumpkin Playdough Activities

Orange-scented Playdough Invitation

Chocolate Mint Playdough

Santa Claus Playdough Tray

Valentine’s Day Playdough Activities

St. Patrick’s Day Playdough Tray

Easter Playdough Tray

_______

[Read more…] about Edible Playdough Turkey Craft

Filed Under: art, autumn, crafts, desserts, farm animals, Food Art, playdough, preschool, Thanksgiving Day Tagged With: playdough, snacks, turkeys

Easter Peeps Houses

April 1, 2023 by Annette Kaminsky 2 Comments

Make two different Easter peeps houses with graham crackers and chick and bunny peeps. Create one with your little learner today!

_______

These cute Easter peeps houses take gingerbread house-making into the Easter season. And the chick peep coop and bunny peep hutch are easy-peasy to make together with little learners.

_______

Follow me on Pinterest for more early learning ideas.

_______

Supplies To Collect

Gather the following supplies to make these sweet graham cracker houses:

  • bunny and chick peeps
  • Easter bunny rabbit jubes
  • graham crackers
  • powdered sugar icing
  • cornstarch
  • water
  • assortment of candies
  • green candy sprinkles
  • green gel icing color
  • mixer or whisk
  • plates, spoons, and disposable knives

_______

Making The Easter Peeps Houses

An oh-so-tasty graham cracker Easter bunny hutch everyone will enjoy making. A sure-to-please Easter activity.

_______

For this activity, I use powdered sugar icing, a little cornstarch, and water to make the icing.  It’s ideal to have powdered gingerbread house icing available, but I couldn’t find any on short notice.

Start by mixing a few scoops of powdered sugar icing, a teaspoon of cornstarch, and a little water in a bowl. Blend ingredients with a mixer or whisk for a couple of minutes. The icing mixture should be thick and tacky. Add a little more icing sugar if the mixture is too thin, or add a tad more water if it is too thick.

Then set aside some of the icing in a bowl and stir in a tiny bit of green gel icing color.

Next, spread plain icing on the edges of graham crackers and gently assemble them together to make five sides of a cube, leaving one side open. Disposable knives are a good size for little learners to work with.

An oh-so-tasty graham cracker Easter chick coop craft everyone will enjoy making. A sure-to-please Easter activity.

_______

Note: Name-brand graham crackers are best to use because they are sturdier, don’t break as easily, and come in bigger pieces. Featured here is a no-name brand.

Afterward, select candies to decorate the Easter peeps house with. I feature miniature M&M’s and jelly bellies.

Easter peeps and an assortment of candy to make graham cracker Easter peeps houses.

_______

Then spread icing on the sides and tops of the graham cracker house and decorate with candies of choice.

If little learners are participating, allow some snacking while working. There will be interesting discussions about candy types, colors, and tastes!

_______

A Peep Bunny Hutch Or Chick Coop

Create this cute Easter bunny hutch with graham crackers, a peeps bunny, and candy treats. It's an all-ages craft sure to be enjoyed.

_______

To make an edible bunny hutch scene, spoon a layer of green icing on a plate. Make sure the plate is disposable if participants are taking their tasty creation home.

Then set in the graham cracker “hutch.” Add a few candy sprinkles around it.

Spread a generous amount of icing on the floor of the house and set in two Easter bunny rabbit jubes. These can be bunny babies.

Finally, drop candy sprinkles on the green icing to look like grass, and add an Easter bunny peep and a few gummy eggs.

Create this cute Easter chick coop with graham crackers, a peeps chick, and candy treats. It's an all-ages craft sure to be enjoyed.

_______

For the chick peep coop scene, set the coop on a plate with green icing, and add candy sprinkles and gummy eggs. Then place the Easter chick peep in the coop.

Create this cute Easter bunny hutch with graham crackers, a peeps bunny, and candy treats. It's an all-ages craft sure to be enjoyed.

_______

These Easter peeps houses are sure to delight little learners and their families. Do you have any suggestions for how to make them? Leave a comment below.

An oh-so-tasty graham cracker Easter chick coop craft everyone will enjoy making. A sure-to-please Easter activity.

_______

Related:

Bunny Candy Art

Valentine’s Day Gingerbread Cookies

Easy S’Mores Bars

_______

[Read more…] about Easter Peeps Houses

Filed Under: crafts, desserts, Easter, Food Art, preschool, sensory, spring Tagged With: Easter, food art, spring

Honeycomb Cereal Necklace Lacing

February 11, 2023 by Annette Kaminsky Leave a Comment

A fun honeycomb cereal necklace lacing activity that is great for fine motor control and eye-hand coordination practice. An all-ages craft.

_______

Honeycomb cereal is tasty to eat, but is also super fun to use in a craft activity. In this post, the craft idea is honeycomb cereal necklace lacing.

_______

Follow me on Pinterest for more early learning ideas.

_______

Honeycomb Cereal “Snowflake” Necklace

With its six sides, each honeycomb makes a nice “snowflake.” And having holes, the cereal is perfect for lacing a “snowflake” necklace.

A thin lacing cord works best for threading honeycomb. In fact, the thinner the cord the better.

Older children may enjoy the challenge of lacing each honeycomb down one side and up the other. And they can make a game of it by seeing who can string the most honeycomb cereal in the shortest amount of time.

For younger children, it’s best to suggest lacing through the center hole.

A fun and tasty lacing honeycomb cereal activity for little learners.

_______

Some honeycomb pieces have holes that are too small to thread lacing cord through, so they are perfect for snacking on.

Stretching the cord while working may break a few, but again, the honeycomb bits are just another excuse for snacking on the tasty morsels!

After some practice, this first string of honeycomb is ready to be tied as a necklace.

A fun honeycomb cereal "snowflake" necklace lacing activity that is great for fine motor control and eye-hand coordination practice.

_______

More Honeycomb Cereal Necklace Lacing

Naturally, it’s hard to stop after lacing just one string of honeycomb cereal. Here’s a pink version for Valentine’s Day.

A fun honeycomb necklace lacing activity that is great for fine motor control and eye-hand coordination practice.

_______

And below is a version for a bumblebee theme, the most natural fit for honeycomb cereal.

A fun honeycomb cereal necklace lacing activity that is great for fine motor control and eye-hand coordination practice. An all-ages craft

_______

Finally, since the lacing cord comes in Easter colors and I have a few jube bunnies hanging around, the chewy treats are included in a necklace craft photo.

A fun honeycomb cereal necklace lacing activity that is great for fine motor control and eye-hand coordination practice. An all-ages craft

_______

Lacing honeycomb cereal is a perfect opportunity to practice eye-hand coordination and fine motor control while casually snacking on the flavorful cereal.

_______

A fun bee theme honeycomb cereal necklace lacing activity that is great for fine motor control and eye-hand coordination practice.

_______

Related:

Bunny Candy Art

Silhouette Easter Bunnies

_______

[Read more…] about Honeycomb Cereal Necklace Lacing

Filed Under: Easter, Food Art, preschool, sensory, Valentine's Day, winter Tagged With: fine motor activity, food art, jewelry

Pumpkin Painting Process Art

October 29, 2022 by Annette Kaminsky Leave a Comment

A super fun pumpkin painting process art activity tailor-made for early learners. Gold glitter glams up the pumpkins big time.

_______

This pumpkin painting process art activity is easy and effortless to do. It looks a little messy but really isn’t at all. Your little learners will be very eager to participate in this unique art project.

_______

Follow me on Pinterest for more early learning ideas.

_______

Supplies To Collect

Gather the following supplies for this creative painting activity:

  • tempera paints
  • paint brushes
  • napkins
  • small pumpkins
  • paint palettes
  • gold glitter
  • spray adhesive
  • large disposable tablecloth

_______

Pumpkin Painting Process Art Set Up

To offer this painting activity, first cover a table with a disposable tablecloth or one that can easily be wiped down afterward.

Then set out a small pumpkin for each child participating.

Next, add tempera paints to paint palettes. Place a paintbrush, filled palette, and napkin next to each pumpkin.

A no-fuss painting invitation with real pumpkins and tempera paint. A process art activity everyone will love.

_______

Invite children to choose a pumpkin and paint it any way they like.

A super fun way to decorate pumpkins with tempera paint. An all-ages art project everyone will love.

_______

Encourage little artists to wipe their brushes on the napkin provided when switching hues.

As a finishing touch, have them generously sprinkle gold glitter on top of their pumpkin. This glams up each one big time.

Gold glitter glams up painted pumpkins big time, and is a welcome addition to this showy process art activity.

_______

After leaving the pumpkins to dry overnight, spray them generously with a craft adhesive to help the glitter stay on.

Now the pumpkins are ready to be displayed or taken home.

_______

Choosing Paint Colors

In this post, I feature primary tempera paint colors. A little yellow and/or white is added to each hue to lighten and brighten it up, as the paint colors are quite intense coming straight out of the jug. There are lots of brown hues on the decorated pumpkins, as little learners never tire of large-scale color mixing. Feel free to choose an entirely different color scheme for your pumpkin art project.

Note: I briefly touch on this pumpkin painting process art activity in a post titled “Pumpkin Color Activities.”

_______

Clean Up

A little handwashing and spot cleaning on the floor take care of cleanup quickly. Most of the glitter and paint are usually contained by the tablecloth. And if there are traces of glitter around the room, I say: “A little glitter never hurt anyone.” The added sparkle is welcome!

An easy and fun pumpkin painting process art activity everyone will be eager to try. Gold glitter adds glamour to the pumpkins.

_______

Collaborative Pumpkin Process Art Project

Another way to do this fabulous art activity is to set out one large pumpkin. Give all children a chance to paint it, working in groups of two or three. Each day the pumpkin can be redecorated, giving it an entirely new look. Just remember to add the glitter at the last painting session.

_______

More Pumpkin Activities

Eye Dropper Pumpkin Art

Glow In The Dark Pumpkin Art

Pumpkin Tablescape Pretend Play

Edible Playdough Pumpkins

Pumpkin Color Activities

Pumpkin Playdough Activities

Pumpkin Collage Art

_______

[Read more…] about Pumpkin Painting Process Art

Filed Under: art, autumn, crafts, Food Art, preschool, sensory Tagged With: painting, process art, pumpkins

Fun Ways To Serve Watermelon

September 29, 2022 by Annette Kaminsky Leave a Comment

Four ways to serve watermelon that make snack time more fun. Orange, yellow, and traditional red watermelon varieties are featured.

_______

Have you ever heard of orange or yellow watermelon, or white? I decided to locate and taste some of these lesser-known varieties this fall. And with a few different colors at my fingertips, I put together four fun ways to serve watermelon.

_______

Ten Watermelon Facts

  • Watermelon is a sweet and juicy fruit.
  • Africa is the country it is believed to have been discovered.
  • Pink or red-fleshed watermelon is commonly found in stores.
  • Some watermelons have orange, yellow, or white flesh.
  • Containing 92% water, this cheery fruit helps people stay hydrated.
  • The large fruit is high in vitamins A, B, and C, and contains antioxidants.
  • The seeds of this thirst-quencher are nutritious too.
  • Watermelon is fat-free and low in calories.
  • A long growing season and lots of sunshine are needed to garden this fruit.
  • Watermelon is a popular snack for hot days and picnics.

_______

Four Fun Ways To Serve Watermelon

Four ways to serve watermelon that make snack time more fun. Orange, yellow, and traditional red watermelon varieties are featured.

_______

Without any fancy recipes, you can serve watermelon in ways that add creativity and fun to snack and meal times. Including a variety of melon flesh hues will add interest and sensory opportunities, and the different colors are bound to be a conversation piece.

Note: Seedless watermelon varieties are used in this post. Orange, yellow, and red kinds are featured.

Below are four ways to serve watermelon that make snack time more fun.

_______

Watermelon Skewers

Fruity watermelon skewers using orange, yellow, and red watermelon add fun and sensory opportunities to snack time.

_______

For an easy way to add novelty to a snack, cut different colors of watermelon into bite-sized pieces and thread them onto wooden skewers. The small chunks don’t have to be perfectly cubed to work. And although the yellow and orange pieces look like pineapple and cantaloupe, they are actually chunks of orange and yellow watermelon.

While snackers eat the fruit, discuss the color and taste of each kind. I found that my purchased yellow and orange watermelon tasted quite similar to red. And my taste-testers were fine with each color.

_______

Watermelon Popsicles

Juicy watermelon popsicles using orange, yellow, and red watermelon add fun and sensory opportunities to snack time.

_______

Watermelon is often served in triangular shapes, which works well for popsicles. After cutting the triangles, use a knife to make a slit in the rind of each piece. Next, push in stick handles.

Then freeze the watermelon triangles overnight in a single layer to turn them into popsicles. Or skip the freezing part and serve them immediately.

_______

Watermelon Suns

Three colors of watermelon are featured in these juicy suns. Blueberries, strawberries, and raspberries fill in the centers.

_______

For this eye-appealing watermelon snack version, berries are added to the mix.

To make the juicy suns, first cut the watermelons into triangle shapes.

Next, lay slices of each watermelon color on a dinner plate in a circular design, leaving room in the middle for berries.

Then add blueberries or raspberries to the center of each plate.

_______

Watermelon Sunflowers

Large square serving trays work well for creating watermelon sunflowers.

To create them, start off with the same design as the watermelon suns.

Then add a different colored watermelon leaf, and a stem made with skin-covered rind pieces.

Make this sunflower-shaped snack with yellow and orange watermelon and raspberries. Add strawberries and blueberries for garnish.

_______

On the tray above, yellow watermelon serves as the sunflower petals. The leaf is a slice of orange watermelon, and raspberries are the “seeds.” Blueberries and strawberries complete the tray.

Make this sunflower-shaped snack with orange and yellow watermelon and raspberries. Add strawberries and blueberries for garnish.

_______

On this second tray, the sunflower has orange petals and a yellow watermelon leaf.

Create a juicy sunflower with red watermelon petals, a yellow watermelon leaf, and a blueberry seed center.

_______

Traditional red watermelon is featured in this third design. The leaf is yellow watermelon. Blueberries are the “seeds.”

_______

Purchasing Watermelon Varieties

Red watermelon is easy to spot in grocery stores. Orange, yellow, and white varieties are harder to locate, and will likely be more expensive. I was able to find the yellow watermelon in a tray of precut slices and purchased the orange one whole. Tasting a white watermelon is on my list to do next summer!

_______

Watermelon Recipes

Ready to add more flavor and variety to your watermelon snacks? Check out the recipes in the blog post “45+ Watermelon Recipes” by Country Living.

And how about some watermelon pizza, featured on Mom On Time Out?

_______

Related: Watermelon Playdough Tray

_______

[Read more…] about Fun Ways To Serve Watermelon

Filed Under: Food Art, gardening, preschool, summer Tagged With: food art, snacks, sunflowers, watermelon

Primary Sidebar

Hi, I'm Annette Kaminsky. I am a preschool teacher who loves to share easy and fun early learning activities. Thanks for visiting my blog. Feel free to stay awhile!

Subscribe Via Email

Recent Posts

  • Salt and Ice Science Experiment May 20, 2025
  • Airplane Rice Sensory Bin May 16, 2025
  • Salt Painting Planet Art May 3, 2025
  • Spring Bunny Sensory Bin April 19, 2025
  • Tin Foil Egg Printing April 17, 2025
  • Lentil Easter Bunny Sensory Bin April 15, 2025
  • Unicorn Store Dramatic Play Center March 25, 2025
  • Easter Store Dramatic Play Center March 23, 2025
  • Origami Heart Wreath February 28, 2025
  • Black History Month Mixed Media Art February 26, 2025

Categories

Topics

block play bunnies butterflies Chinese New Year Christmas Christmas craft color colors dramatic play Easter flowers hearts holiday jewelry leaves leprechauns light table loose parts painting paper crafts playdough pretend play printables printmaking process art pumpkins rice bin scented playdough science experiment scissor skills sensory bin sensory play sensory tray shamrocks skeletons snakes snowflakes spiders spring St. Patrick's Day sunflowers tablescapes trees Valentine's Day water play

Copyright © 2025 · Lifestyle Pro on Genesis Framework · WordPress · Log in