• Skip to secondary menu
  • Skip to main content
  • Skip to primary sidebar

Putting The Pretty In Preschool

Finding Beauty In Everyday Early Childhood Experiences

  • Home
  • About Me
  • Winter
  • Chinese New Year
  • Blog
  • Valentine’s Day
  • Contact Me
  • Easter Activities

color

Paper Chain Snake Craft

January 29, 2025 by Annette Kaminsky Leave a Comment

_______

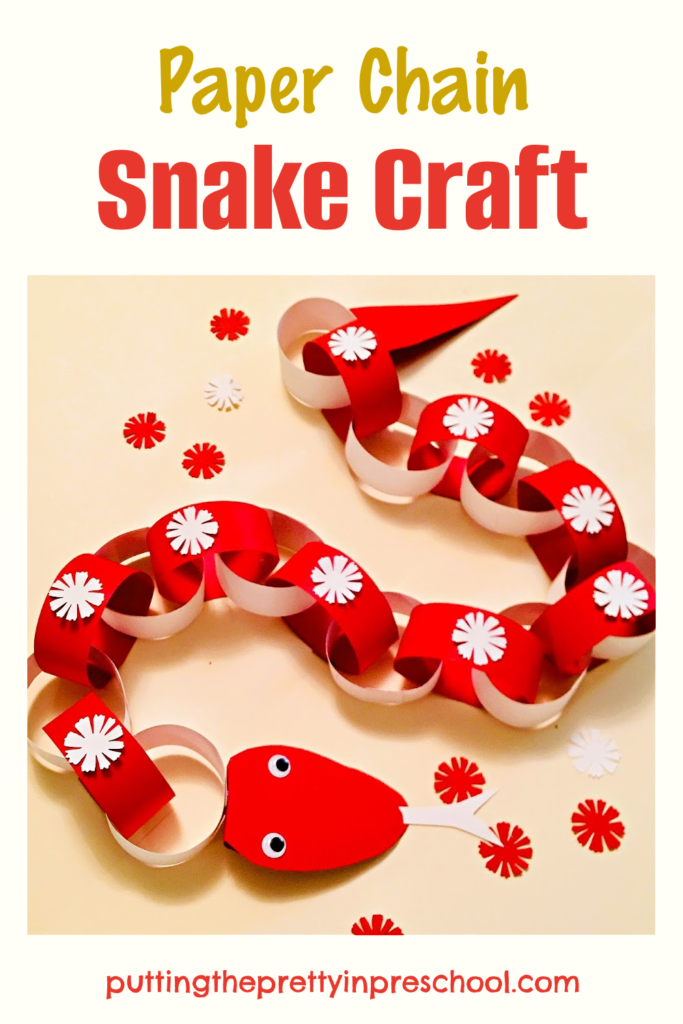
This paper chain snake craft is a perfect hands-on creative activity. It helps young children develop fine motor skills, recognize colors, practice measurement, and make patterns. The activity suits a reptile, jungle, or Chinese New Year “Year of the Snake” theme.

_______

Supplies To Collect

Gather the following basic supplies you probably already have on hand to make this slithery chain-link friend:

  • light cardstock paper
  • ruler and pencil
  • wiggly eyes
  • scissors
  • tape
  • glue stick
  • glue gun

_______

Follow me on Pinterest for more early learning ideas.

_______

Steps to Make a Paper Chain Snake Craft

_______

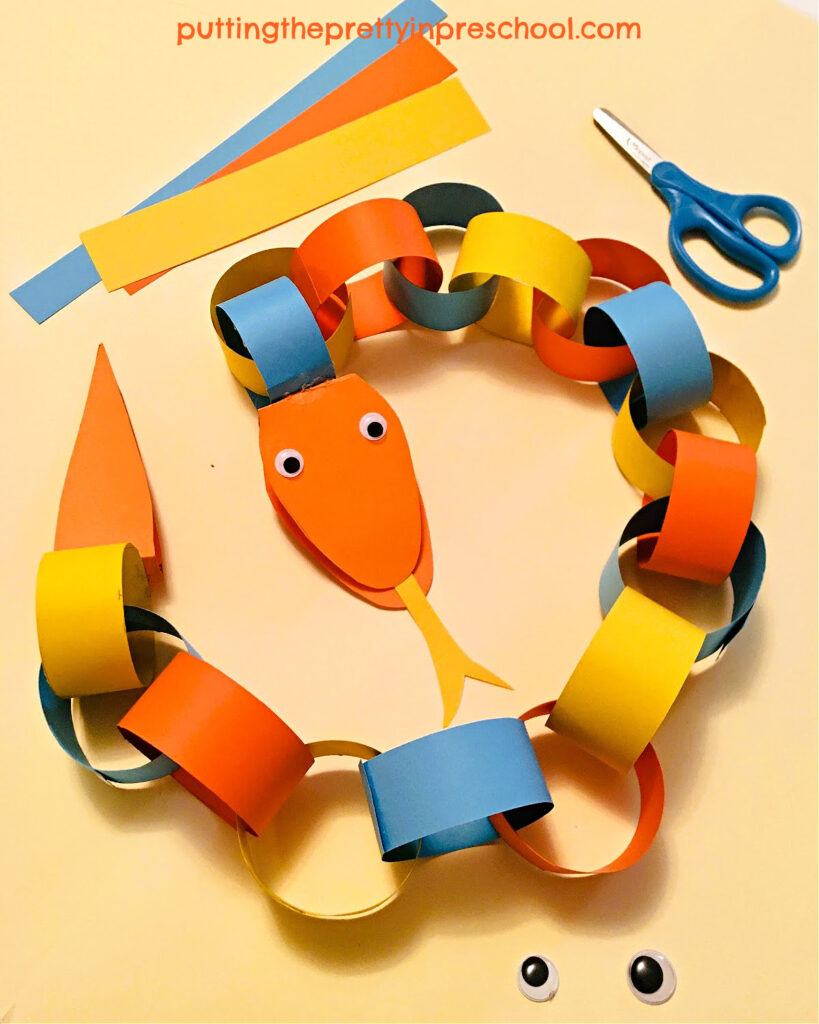
To start making a paper chain snake select a sturdy paper in two or more colors. Construction paper or light cardstock is a good choice because it isn’t too heavy to curve into a loop and holds up well for display.

_______

Next, cut the paper into strips. To make the strips the same-sized width and length, use a pencil and ruler to draw light lines on the paper first. My strips are about 1 ¼ inch wide and 8 ½ inches long. You can make yours shorter and thinner or longer and wider depending on how big you would like the snake to be.

Afterward, form a loop with one paper strip and tape or glue the ends together.

Then add the next link by threading a paper strip through the first loop. Form it into a loop and tape or glue the ends together.

Keep adding paper strips in the same way to make the chain the desired snake body length.

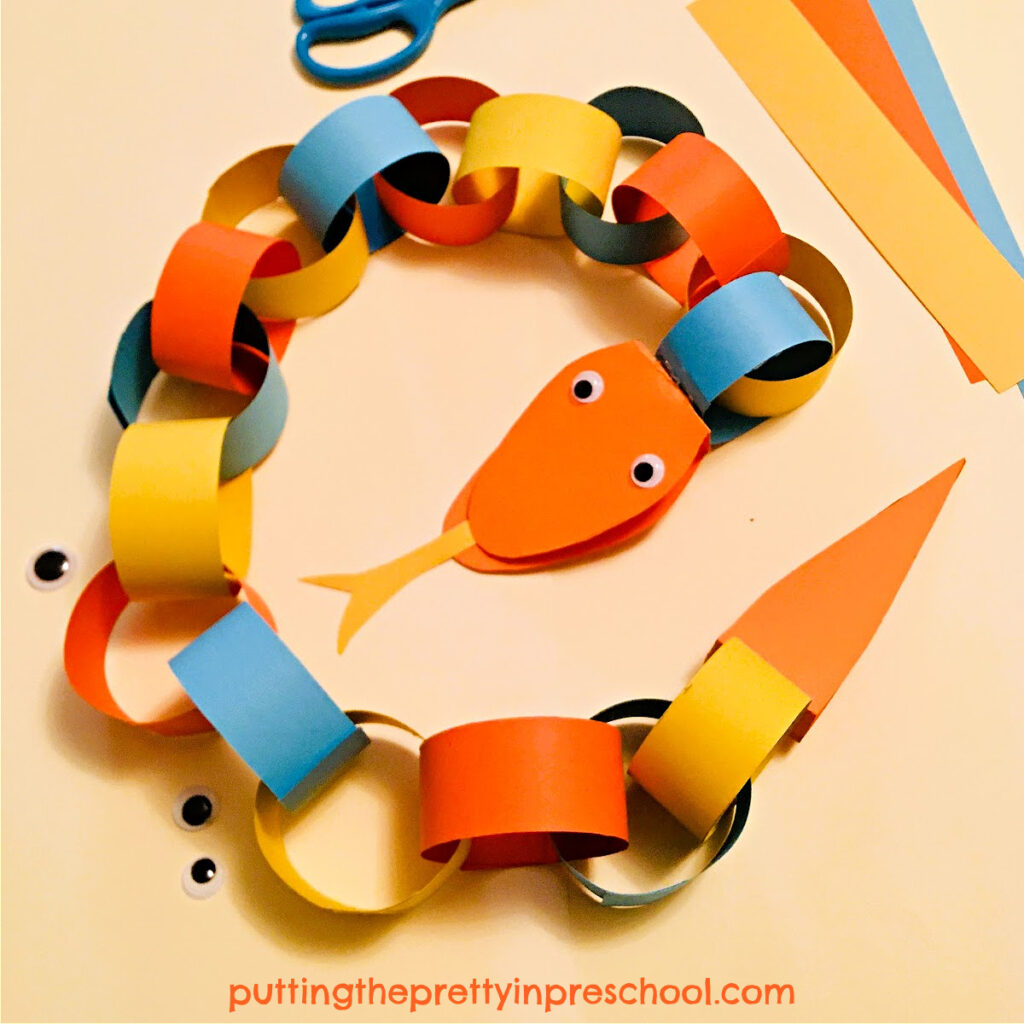
Then draw and cut out a snake head and tail from cardstock. Fold both pieces in half leaving a little section in the middle.

_______

Afterward, draw a forked tongue on a contrasting color of cardstock and glue it to the bottom of the snake head.

Then glue two wiggly eyes to the head.

Finally, use a glue gun to affix the head to one end of the paper chain snake body and tail to the other.

_______

Inspired By Chinese Culture

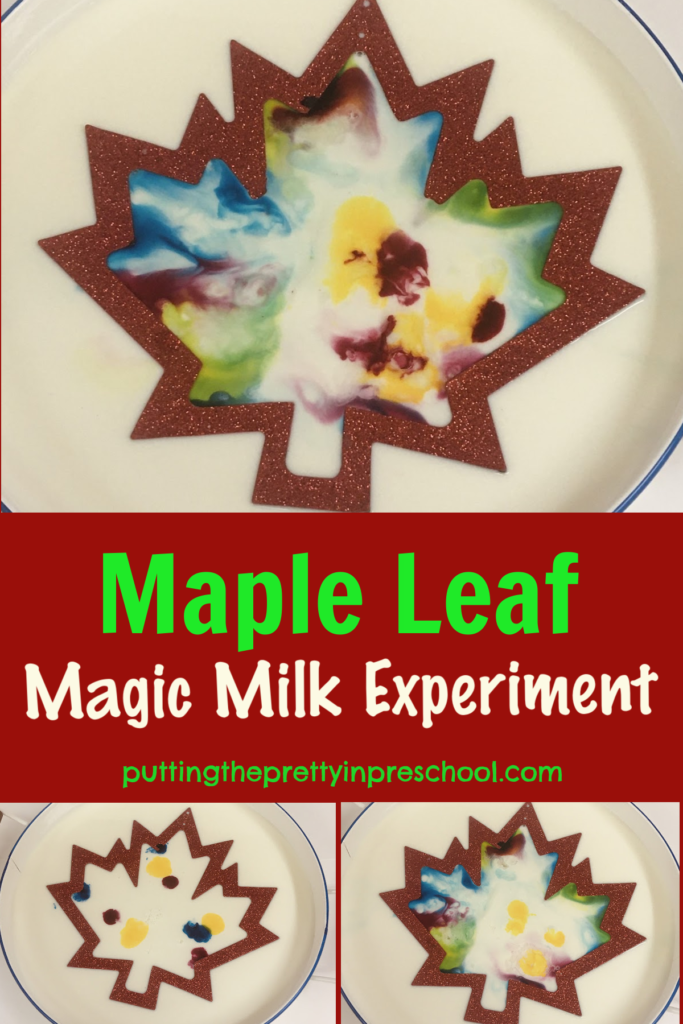
The paper chain snakes in this blog post are inspired by colors spotted in Chinese festivals and artwork. Turquoise, orange, and yellow are hues seen in lion dance performances.

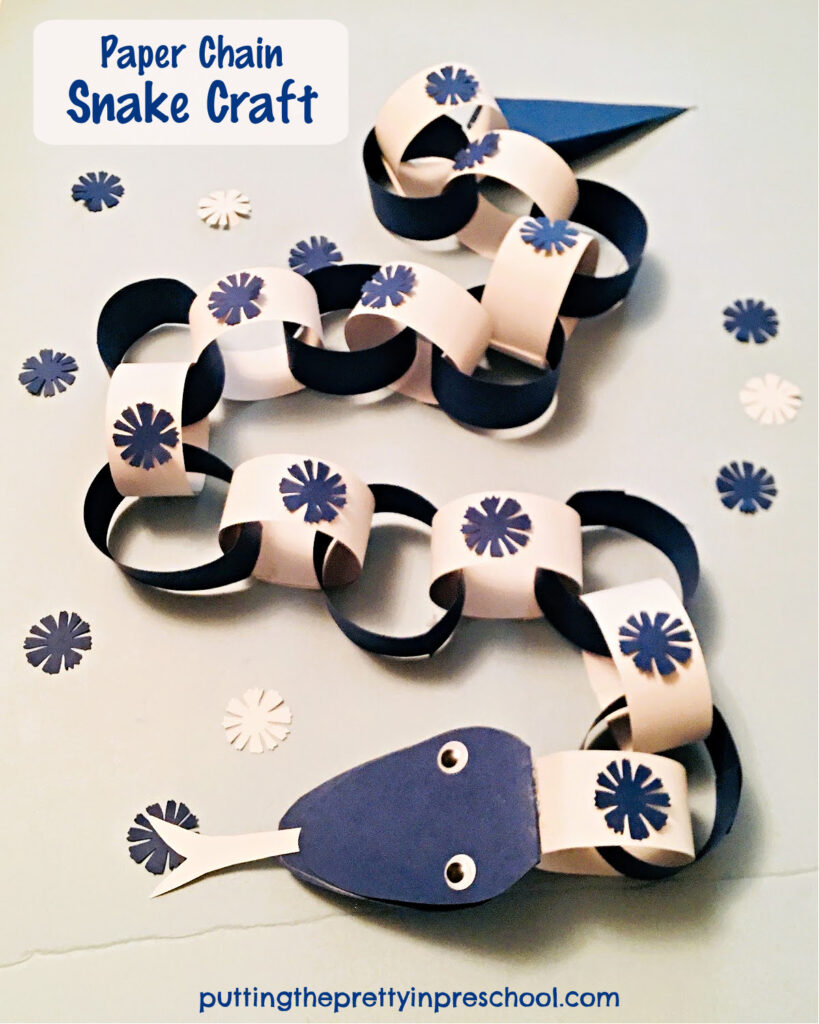
Blue and white color schemes are popular in Chinese ceramics, with flower motifs being common. So as a finishing touch, this next snake is embellished with paper-punched flowers.

________

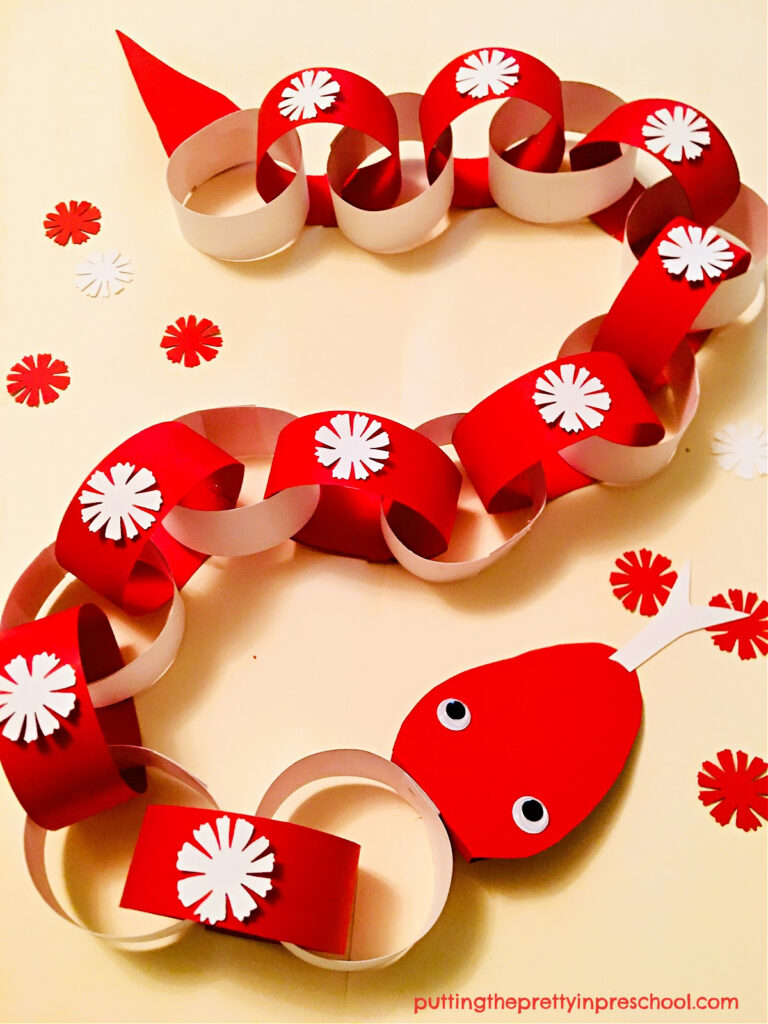
Red and white decorations are feature colors in Chinese New Year celebrations. Red symbolizes celebration and white provides a nice contrast. White paper flowers enhance the snake below too.

_______

This Chinese New Year signifies “The Year of the Snake“, and the snake craft fits in well with the theme.

_______

Benefits of The Paper Chain Snake Craft

This slithery snake craft has many benefits for young children. It helps them

  • develop fine motor control and finger muscle strength as they tape or glue paper strips into loops.
  • recognize colors and make patterns.
  • observe and/or help use a glue gun.

The snakes can be measured with a string or a long ruler. They make great pretend pets for little learners.

_______

_______

More Activities With Snakes

Chinese New Year Chickpea-based Bin

Black Playdough Snakes

Reptile Theme Activities

Reptile Egg Science

String Painting Snake Art

_______

_______

You may also like:

Unicorn Playdough Tray

Set up this magical unicorn playdough tray early learners will love. The best homemade playdough recipes are featured.

_______

Teacup and Peony Sensory Tray

This beautiful teacup and peony sensory tray allows for practice with scissors skills and eye-hand coordination. Peony facts are included.

_______

Don’t forget to share this post on Pinterest or your favorite social media channel. Sharing is caring!

_______

© Annette Kaminsky January 29, 2025

_______

Filed Under: art, Chinese New Year, crafts, Math, preschool, reptiles Tagged With: color, Lunar New Year, paper crafts, snakes

Giant Snowflake Printmaking

January 26, 2024 by Annette Kaminsky Leave a Comment

_______

This giant snowflake printmaking project gives children a chance to paint on a different canvas and practice a printmaking technique in an ombre color scheme. A large, slatted wooden snowflake is the inspiration and unique find for this printmaking activity.

_______

Follow me on Pinterest for more early learning ideas.

_______

Snowflake Printmaking Craft Supplies

For this gigantic snowflake printmaking activity, gather the following supplies:

  • large slatted wooden snowflake
  • turquoise, red, blue, and white tempera paints
  • paint pots and paintbrushes
  • spoons
  • large sheets of paper

_______

The Giant Snowflake Printmaking Process

_______

To do this snowflake printmaking activity, select a large, wooden snowflake for the canvas. This oversized snowflake with four wooden slats works perfectly for an ombre painting activity.

Next, choose tempera paint colors. In this ombre design, the chosen colors are shades of blue, pink, and turquoise.

Then stir white paint into the red, blue, and turquoise temperas to create hues to your liking. Varying amounts of white mixed with blue tempera paint make the light and medium blue hues. White added to red makes a pastel pink shade. And white added to turquoise makes the lighter hue.

_______

Afterward, set out the paints in pots and add a paintbrush to each one.

Paint each slat a different paint color. Apply the colors generously, and make sure to give the outside edges an extra good coat.

_______

Finally, carefully flip the wooden snowflake over onto an 11-inch x 14-inch piece of sturdy art paper, or an 11-inch x 17-inch piece of copy paper. Press firmly on all parts of the unpainted side of the snowflake, and then lift it off carefully.

_______

Tip: You may want to make two prints for your first try with this painting technique. The tempera paint will transfer over better on the second try.

When the paint print snowflake is dry, trim the top and bottom edges of the paper. Or cut the colorful snowflake out.

_______

The wooden snowflake canvas can be used over and over if you are introducing this printmaking activity to a group of children.

Large printed snowflakes positioned at different angles display beautifully together.

_______

Helping Little Learners Experience The Printmaking Process

Little learners will need help when performing this giant snowflake printmaking activity in the following ways:

  • painting each slat the appropriate color
  • applying paint to all areas of the wooden canvas
  • flipping the snowflake over to make a print on paper

In this activity, they can label and match colors, learn about an ombre color scheme, and practice a printmaking art activity.

_______

Variations Of This Giant Snowflake Printmaking Activity

To follow up this art experience, invite participants to paint the snowflake canvas any way they would like to allow for individual creativity.

A second idea is to offer wooden snowflakes in a smaller size. This gives little learners a chance to make snowflake prints independently.

_______

More Winter Activities

Winter Playdough Recipe

Spray Paint Snowflake Silhouette

Blue Candy Cane Science Experiment

Winter-themed Treasure Blocks

Igloo Camping Pretend Play

Polar Bear Small World

Winter Sensory Trays

Painting Ice and Snow

Winter Wreath Paper Plate Craft

Ice Drum Musical Instruments

_______

[Read more…] about Giant Snowflake Printmaking

Filed Under: art, preschool, winter Tagged With: color, loose parts, printmaking, snowflakes

Pump Bottle Watercolor Art

July 15, 2023 by Annette Kaminsky Leave a Comment

_______

A little extra watercolor paint and some repurposed and never been used pump bottles were the inspiration for this pump bottle watercolor art project. It’s a process art activity your early learners will love to do, and everyone in the family could give it a try.

_______

Follow me on Pinterest for more early learning ideas.

_______

Supplies To Collect

Just a few supplies will get your little learners off and painting in this pump bottle process art activity. A fun, watercolor art project.

_______

Gather the following supplies for this super fun art activity:

  • large sheets of copy paper, cardstock, or art paper
  • food coloring or liquid watercolors in a variety of hues
  • pump bottles
  • newsprint or water-resistant tablecloth
Super pretty pump bottle process art project your little learners will absolutely love to try. An all-ages watercolor art activity.

_________

The Pump Bottle Watercolor Art Project

This process art activity is so easy to set up and do. First, cover your work area with newspaper or a water-resistant tablecloth. You can also do the activity in an active world tray.

Next, fill pump bottles at least half full of liquid watercolors or food coloring mixed with water. Two of my pump bottles are repurposed teddy bear tempera paint bottles…so fun to use.

Just a few supplies will get your little learners off and painting in this pump bottle watercolor art activity. A fun, process art project.

_______

Then invite each participant to pump paint colors onto a large piece of copy paper, cardstock, or art paper.

Finally, let the pump bottle painted pictures dry and display.

Note: As this art activity is a little messy, it’s a great one to do outside.

Super pretty pump bottle watercolor art project your little learners will absolutely love to try. An all-ages process art activity.

_______

Super fun pump bottle process art project. An easy-to-do watercolor art activity early learners will love to do inside or outdoors.

_______

Related:

Spin Painting Butterflies

Bubble Wand Painting

Watercolor Planets With Markers

Northern Lights Squish Painting

Apple Print Activities

Monochromatic Christmas Tree Art

Shamrock Rolling Pin Art

_______

[Read more…] about Pump Bottle Watercolor Art

Filed Under: art, preschool Tagged With: color, process art

Snowman Theme Color Experiment

February 17, 2023 by Annette Kaminsky Leave a Comment

Try this magic creamer color experiment using half-and-half coffee cream. An easy-to-do science experiment with stunning results.

_______

It’s been a while back, but I promised to try the always-fun magic milk experiment with homo milk or cream. So here’s a post about a magic creamer snowman theme color experiment.

_______

Follow me on Pinterest for more early learning ideas.

_______

Watch the colors swirl and change in this stunning magic creamer color experiment. This is a crowd-pleasing science experiment.

_______

Supplies Collected

Collected in this winter-themed version is:

  • snowman cake pan
  • half-and-half (10% milk fat) creamer
  • red, yellow, and blue food coloring
  • liquid dish soap

_______

The Snowman Theme Color Experiment

Watch the colors swirl and change in this stunning magic creamer color experiment. This easy-to-do science experiment is sure to be a topic for conversation.

_______

To perform this easy science experiment, pour a layer of half and half (10% milk fat) creamer into a cake pan or small bin. My pick for this experiment is a snowman cake pan. It is medium-sized and fits the amount of liquid I have on hand.

Note: Half and half cream is equal parts whole milk and light cream. It isn’t near as creamy as whipping cream but is creamier than the milk I’ve featured in past experiments. It is commonly used as a coffee creamer.

Next, add drops of red, yellow, and blue food coloring around the pan.

Then add drops of liquid dish soap onto some of the food coloring patches. The colors will immediately swirl around and make new color designs.

Close up, the color changes look super stunning.

A close-up view of the immerging designs created in a magic creamer color experiment. This easy science experiment is a crowd-pleaser.

_______

After the color movement slows down, check back occasionally and you will see new color patterns immerge. The color designs will keep changing for at least half an hour.

Watch the colors swirl and change in this stunning magic creamer color experiment. This easy-to-do science experiment is sure to be a topic for conversation.

_______

At this time, try adding a few more drops of food coloring. I try to make a snowman face and buttons.

Add more dish detergent drops and watch the colors move and change again.

Try this magic creamer color experiment using half-and-half coffee cream. An easy-to-do science experiment with stunning results.

_______

Interpreting This Color-Changing Science Experiment

Although half-and-half (10% milk fat) creamer is made of a significant amount of water, it also contains fat and protein. These are both sensitive to changes in the liquid. When dish soap is added to the pan, it breaks up the surface tension of the half-and-half liquid and is attracted to the fat molecules. The fat molecules try to scurry away but end up bonding with the soap molecules. The movement of the food coloring makes this process visible. As more and more soap and fat molecules bond, the color movement slows down and eventually stops.

Watch the colors swirl and change in this stunning magic creamer color experiment. This is a crowd-pleasing science experiment.

_______

Fat content in the half-and-half creamy liquid is super important in this science experiment.

The colors in the half-and-half coffee creamer experiment move at a slightly slower rate than 2% or 1 % milk, both of which I’ve tried successfully before. All three liquids show stunning color-swirling results.

_______

Related:

Color Explosion Science Experiment

_______

[Read more…] about Snowman Theme Color Experiment

Filed Under: preschool, science, sensory, winter Tagged With: color, color experiment, science experiment, snowmen

Color Magic Milk Experiment

October 8, 2022 by Annette Kaminsky Leave a Comment

Try this mesmerizing color magic milk experiment today! A maple leaf frame adds an artistic twist to the kitchen science experiment.

_______

Have you ever done the color magic milk experiment? It is quick and easy to do, and participants are always in awe of the results. In this version, I add artistic flair by giving the experiment a leafy twist.

_______

Follow me on Pinterest for more early learning ideas.

_______

Supplies To Collect

Just a few supplies are needed for this simple but stunning kitchen science experiment. Gather the following:

  • 2 liters milk  
  • red, yellow, and blue food coloring
  • dish detergent
  • large round serving tray
  • maple leaf frame (optional)

_______

The Color Magic Milk Experiment

Effortlessly perform this color magic milk experiment in four easy steps. A maple leaf frame enhances the kitchen science experiment.

_______

To do this experiment, start by pouring a layer of milk into a food tray. Using homo milk is recommended, but 1% and 2% will also work.

Note: Outdated milk is a great choice for this experiment.

Next, float a maple leaf frame on the milk. (My frame is a cardboard cutout purchased at a dollar store.)

Note: The leaf-themed frame adds interest to the experiment, but is not necessary for it to work.

Then drip yellow, red, and blue food coloring inside the frame.

This next step is where the magic happens… Squirt a drop of dish detergent onto each pool of colors. Watch the colors instantly race to the edge of the frame, swirling around as they go.

After the initial color burst, check back after ten minutes and you will see a variety of hues slowly starting to fill in the maple leaf shape.

Watch the color magically spread around the maple leaf frame in this kitchen science experiment.

_______

At this point, you can add a little more food coloring and a tiny bit of dish detergent for more color play.

The colors slowly fill out the maple leaf frame in this color magic milk experiment with an artistic twist.

_______

View this maple leaf color magic science experiment as a video.

_______

The Science Behind This Color Experiment

Although milk is made of mostly water, it also contains fat and protein. These are both sensitive to changes in the milk. When dish soap is added to the tray, it breaks up the surface tension of the milk and is attracted to the fat molecules. The fat molecules try to scurry away but end up bonded with the soap molecules. The movement of the food coloring makes this process visible. As more and more soap and fat molecules bond, the color movement slows down and eventually stops.

Since the fat content in milk is super important in this experiment, homo milk works the best. But 2% and 1% milk (which I often have handy) also show stunning results.

_______

Try this mesmerizing color magic milk experiment today! A maple leaf frame adds an artistic twist to the kitchen science experiment.

_______

Related: Color Explosion Science Experiment

_______

More Leaf Activities

Five Leaf Art Activities

Fall Leaf Salad Spinner Art

Light Table Leaf Exploration

Eye Dropper Leaf Art

Maple Leaf Activities

_______

[Read more…] about Color Magic Milk Experiment

Filed Under: autumn, fall, preschool, science, sensory, trees Tagged With: color, leaves, science experiment

  • Page 1
  • Page 2
  • Go to Next Page »

Primary Sidebar

Subscribe Via Email

Recent Posts

  • Dandelion Sensory Tray June 3, 2025
  • Bergenia Flower Sensory Bin May 31, 2025
  • Salt and Ice Science Experiment May 20, 2025
  • Airplane Rice Sensory Bin May 16, 2025
  • Salt Painting Planet Art May 3, 2025
  • Spring Bunny Sensory Bin April 19, 2025
  • Tin Foil Egg Printing April 17, 2025
  • Lentil Easter Bunny Sensory Bin April 15, 2025
  • Unicorn Store Dramatic Play Center March 25, 2025
  • Easter Store Dramatic Play Center March 23, 2025

Categories

Topics

block play bunnies butterflies Chinese New Year Christmas Christmas craft color colors dramatic play Easter flowers hearts holiday jewelry leaves leprechauns light table loose parts painting paper crafts playdough pretend play printables printmaking process art pumpkins rice bin scented playdough science experiment scissor skills sensory bin sensory play sensory tray shamrocks skeletons snakes snowflakes spiders spring St. Patrick's Day sunflowers tablescapes trees Valentine's Day water play

Copyright © 2025 · Lifestyle Pro on Genesis Framework · WordPress · Log in