• Skip to secondary menu
  • Skip to main content
  • Skip to primary sidebar

Putting The Pretty In Preschool

Finding Beauty In Everyday Early Childhood Experiences

  • Home
  • About Me
  • Winter
  • Chinese New Year
  • Blog
  • Valentine’s Day
  • Contact Me
  • Easter Activities

Annette Kaminsky

Monochromatic Christmas Tree Art

December 17, 2022 by Annette Kaminsky Leave a Comment

Include this simple monochromatic Christmas tree art project in your holiday activities. The pastel-themed trees look beautiful on display.

_______

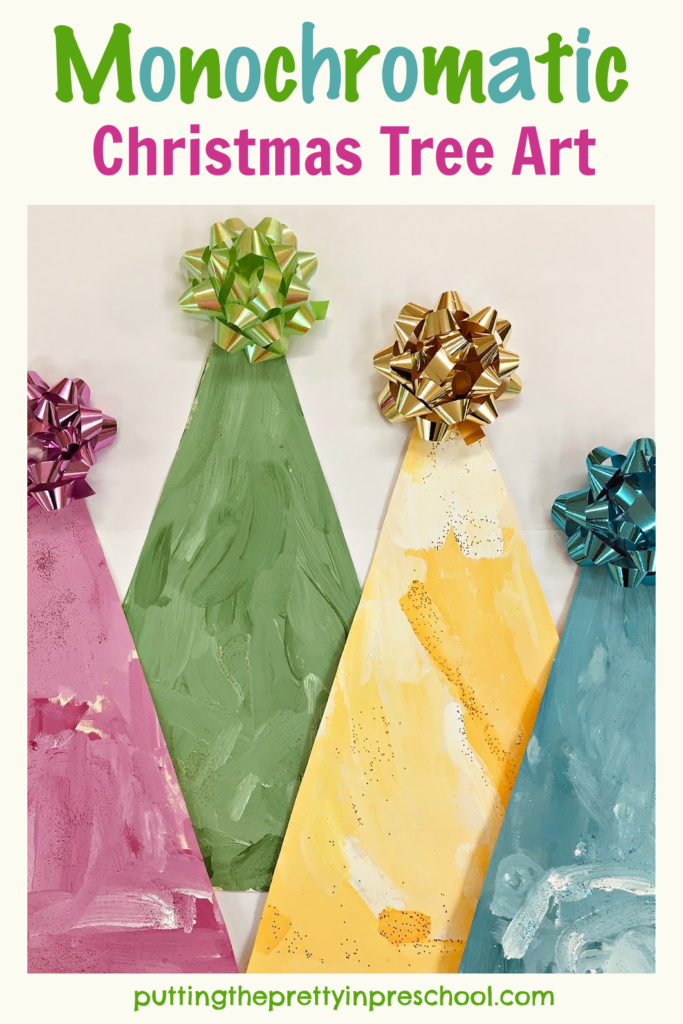
This simple monochromatic Christmas tree art is completed in four different color themes. The art activity is easy to implement at home or in a Christmas art program. Finished projects display beautifully on a bulletin board or feature wall.

The color theme chosen for this gorgeous art activity is inspired by the exquisite pastel-colored miniature Christmas tree ornaments spotted on shopping trips around town this holiday season.

_______

Follow me on Pinterest for more early learning activities.

_______

Supplies To Collect

Just a few supplies are needed for this pretty craft:

  • 12 x 18-inch sturdy paper
  • magenta, yellow, teal, green, and white tempera paints
  • glitter in magenta, teal, gold, and green colors
  • large magenta, gold, teal, and light green gift bows
  • paint palettes
  • paint pots
  • paintbrushes
  • spoons
  • ruler
  • pencil
  • scissors
  • hot glue gun or white glue
  • plastic tablecloth

_______

Preparing The Tree Art Project

This monochromatic Christmas tree art project is done in pastel shades of green, yellow, teal, and magenta. The trees look beautiful on display.

_______

First, select 12 x 18-inch sturdy paper for the art project. I used manila and manila tag and both kinds worked well.

With a ruler and pencil, draw a long, narrow triangle on each sheet of paper. The triangles should fill the whole page.

Next, cut the paper triangles out.

Then mix a variety of shades of magenta, yellow, teal, and green tempera paint in small pots by adding various amounts of white to each color. For each hue, the shades should range from light to dark.

Tips:

  • To warm up the yellow just a little, add a drop of red to the hues.
  • To make teal paint, mix a little yellow into blue paint. Or use teal tempera paint straight out of the bottle.

Afterward, spoon different shades of each color into paint palettes. Each palette should have shades of one hue only. Include a little white tempera.

_______

The Monochromatic Christmas Tree Art Process

This monochromatic Christmas tree art project is done in pastel shades of green, yellow, teal, and magenta. The trees look beautiful on display.

_______

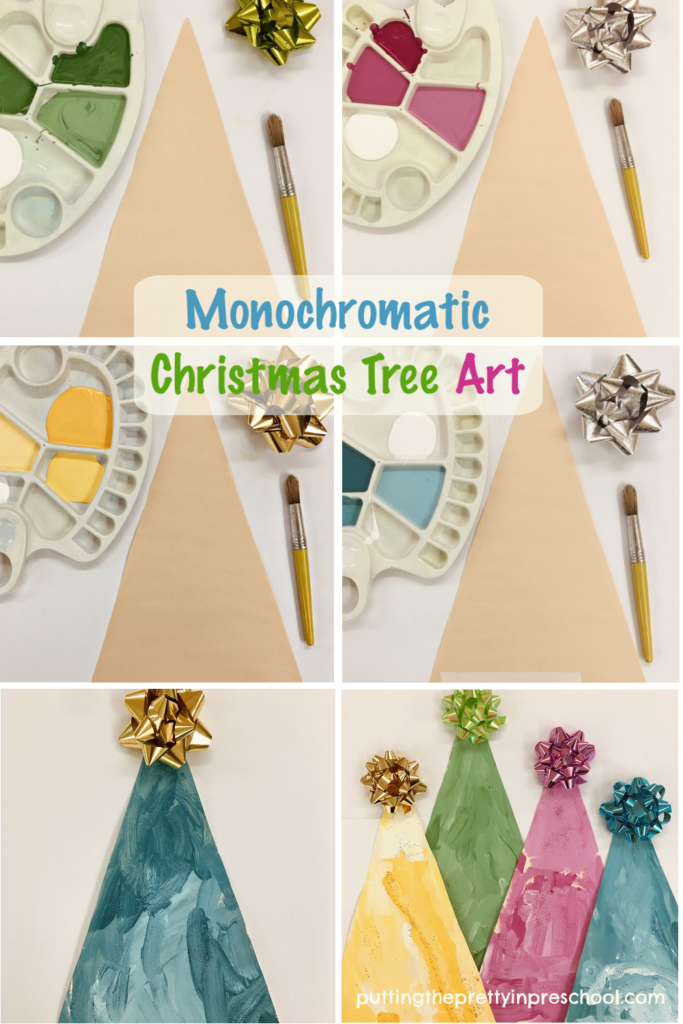
To offer this tree painting project, cover an art table with a plastic tablecloth.

Choose one monochromatic color scheme to work with.

Then set out a triangular-shaped paper tree, filled paint palette, and brush for each child participating.

Invite participants to paint their tree, using as many shades of the chosen color as they can.

When the trees are fully covered and the paint is still wet, let little artists sprinkle similarly toned glitter on their projects. They will love this part of the process.

After the paint has dried, use white glue or a hot glue gun to affix a matching gift bow to the top of each tree. As an alternative, glue silver or gold bows on the trees.

On another day, pick a different paint color and offer the Christmas tree painting project again.

If there is time, complete the tree art in all four colors.

Include this simple monochromatic Christmas tree art project in your holiday activities. The pastel-themed trees look beautiful on display.

_______

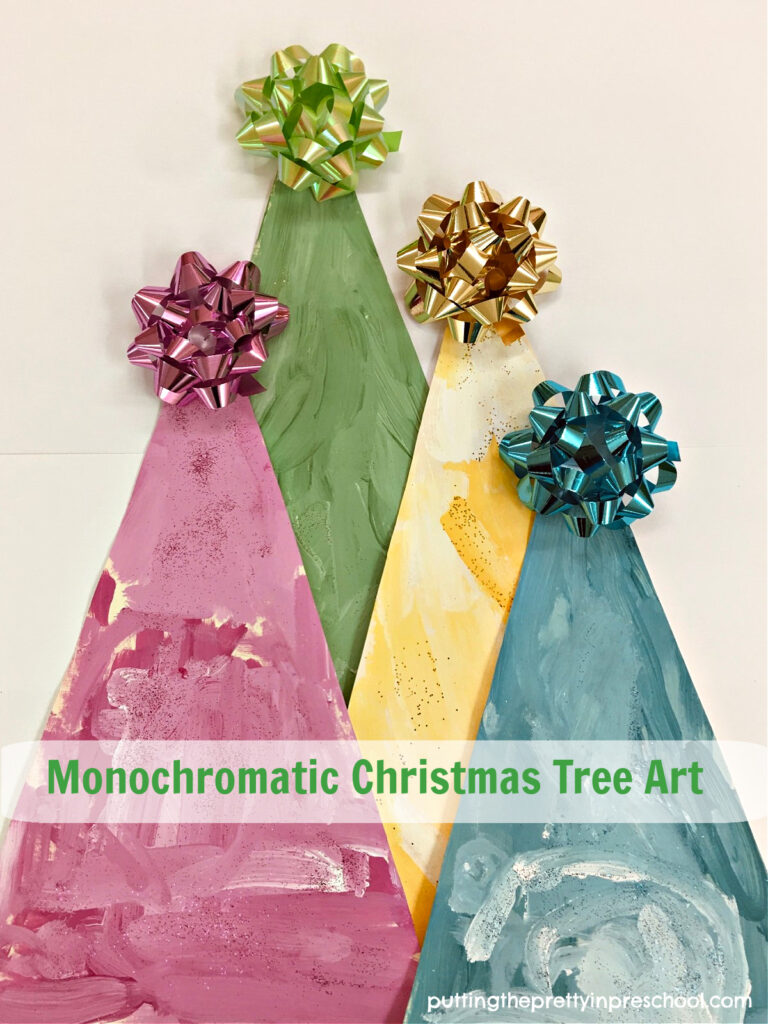
When finished, display the painted trees together on a wall. They are sure to be admired!

Note: The paint colors used for this art project also make awesome ombre Christmas trees.

_______

Related: Christmas Tree Art

_______

[Read more…] about Monochromatic Christmas Tree Art

Filed Under: art, Christmas, preschool, trees, winter Tagged With: Christmas tree, painting, paper crafts, trees

Gingerbread Playdough

December 12, 2022 by Annette Kaminsky Leave a Comment

This gingerbread playdough tray is filled with festive loose parts. The spicy playdough recipe is easy to make and little hands can help.

_______

Christmas playdough recipes are all about the smells, and this gingerbread playdough is no exception. The fragrant recipe is easy to make and doesn’t require cooking or using boiling water. This makes it perfect for early learners to help make, and they can participate from start to finish.

_______

Follow me on Pinterest for more early learning ideas.

_______

The Playdough Ingredients

This scented gingerbread playdough requires no cooking or boiling water. Invite early learners to help make it from start to finish and can experience all the aromatic smells.

_______

Gather the following for this homemade gingerbread-scented dough:

  • 1 cup flour
  • ½ cup salt
  • 1 ½ teaspoon ground ginger
  • 1 ½ teaspoon ground cinnamon
  • 1 teaspoon ground cloves
  • 1/2 teaspoon nutmeg
  • 1 tablespoon vegetable oil
  • ½ cup water

_______

How To Make Gingerbread Playdough

This homemade scented gingerbread playdough and the festive loose parts are ready to be explored by little learners.

_______

Measure all of the above ingredients in a bowl. Invite early learners to help.

Mix the spicy mixture into a dough, and knead it thoroughly. The kneading helps strengthen little helpers’ hand and finger muscles.

Four spices in addition to salt are included in the dough. Allowing your little helpers to smell each one is a rich sensory opportunity.

The spices add color to this all-natural playdough, so no additional color is needed.

Another plus for this homemade playdough is that it can be used in a play invitation as soon as it has been made. It doesn’t need cool down time like a cooked playdough or recipe that uses boiling water would.

This recipe can easily be doubled or tripled to be enough for a group of children.

_______

Gingerbread Playdough Invitation

After helping make the playdough, little learners will love using it to mold and decorate gingerbread houses and people. Offer loose parts in a party tray for a spicy playdough invitation.

There are many opportunities to be creative with the festive loose parts in this spicy gingerbread playdough invitation your children will love.

_______

The loose parts in the tray above are:

  • gingerbread house and people cookie cutters
  • gingerbread ornaments
  • cut sparkly pipe cleaners and pompoms
  • cut rick rack and straws
  • buttons
  • candy cane and gingerbread erasers
  • bows
  • bead garland
  • wiggly eyes

_______

In this next tray, gingerbread house shapes, felt gingerbread people, beads, and rubber peppermint lollipops are included in the mix.

There are many opportunities to be creative with the festive loose parts in this spicy gingerbread playdough invitation your children will love.

_______

Gingerbread Playdough Invitation Benefits

This heavenly-scented playdough invitation offers many benefits:

  • Exercising creativity by decorating pretend cookies.
  • Language development by using playdough cutouts to retell gingerbread stories or develop new ones.
  • Gaining hand and finger strength by rolling, pressing, and kneading dough, and decorating it with loose parts.
  • Role-playing working in a pretend bakery and baking cookies in a play oven.

Tip: A small box with a rack placed inside makes an easy DIY oven for pretend play.

A cardboard box with a rack set inside makes a terrific play oven to bake gingerbread playdough cookies and muffins.

_______

How To Store Gingerbread Playdough

This amazing gingerbread-scented dough is not sticky, rolls out just fine, and works well with cookie cutters.

To store it, wrap it in saran wrap and place it in an airtight container. Doing this will keep it nice and moist. To my delight, the playdough is even easier to work with when you pull it out for additional play.

_______

More Playdough Recipes and Activities:

Apple Playdough Tray

Edible Playdough Turkey

_______

Scented Playdough Activities

Pumpkin Playdough Activities

Gingerbread Playdough

Orange-scented Playdough Invitation

Chocolate Mint Playdough

Christmas Playdough

Offer this lemon cypress scented playdough invitation with cut silk poinsettia leaves and bracts.

_______

Santa Claus Playdough Tray

Valentine’s Day Playdough Activities

St. Patrick’s Day Playdough Tray

Easter Playdough Tray

_______

[Read more…] about Gingerbread Playdough

Filed Under: Christmas, playdough, preschool, sensory Tagged With: gingerbread, playdough, scented playdough, sensory tray

Thanksgiving Tablescape Pretend Play

November 23, 2022 by Annette Kaminsky Leave a Comment

This Thanksgiving tablescape pretend play setup incorporates loose parts in a big way. It's an easy center to include in harvest celebrations.

_______

Here’s an easy Thanksgiving tablescape pretend play setup your little learners will love. It incorporates fall-colored loose parts with a few turkey and pilgrim-themed accessories.

_______

Follow me on Pinterest for more early learning activities.

_______

Supplies In The Thanksgiving Tablescape

Turkey-themed loose parts are the highlight of this Thanksgiving play tablescape setup.

_______

The following supplies make this Thanksgiving tablescape a fun place to play:

  • harvest disposable plates and plaque
  • clear plastic glasses, dessert plates, and jars
  • baking pan
  • orange, yellow, and green cutlery
  • gold flowers in a vase
  • green, yellow, red, and orange felt balls and wooden beads
  • turkey centerpieces
  • miniature artificial pumpkins
  • Thanksgiving cookie cutters
  • Pilgrim sticker “cookies”
  • turkey game pieces and wooden beads
  • “Be Thankful” tea towel
  • white tablecloth

_______

Thanksgiving Tablescape Pretend Play

Arrange supplies for this tablescape in a play kitchen on a shelf, or place them in the play stove, fridge, and cupboards. Your little learners will enjoy incorporating them into festive play.

Loose parts are always a highlight of pretend play setups. Green, yellow, orange, and red-themed felt balls and round wooden beads easily transfer from a fall play tablescape to this Thanksgiving one.

Loose parts are the highlight of this Thanksgiving-themed dramatic play tablescape.

_______

The turkey centerpieces were a delightful find at a party store and add color and style.

Pilgrim-themed stickers make great “cookies” when placed on a baking pan.

Turkey game pieces and wooden beads help make the play set up super special.

Themed cookie cutters are easy-to-find items that add flair.

Turkey-themed loose parts are the highlight of this Thanksgiving tablescape pretend play setup.

_______

Disposable plates befitting the Thanksgiving theme are included in the décor, as are artificial miniature pumpkins showcased in clear plastic glasses.

Early learners will enjoy role-playing Thanksgiving dinner events with this festive pretend play setup.

_______

A “Be Thankful” tea towel and harvest plaque are the finishing touches to this seasonal dramatic play center.

This Thanksgiving tablescape dramatic play setup incorporates loose parts in a big way. It's an easy center to include in harvest celebrations.

_______

Related:

Fall Tablescape Pretend Play

Pumpkin Play Tablescape

_______

[Read more…] about Thanksgiving Tablescape Pretend Play

Filed Under: autumn, dramatic play, preschool, pretend play, Thanksgiving Day Tagged With: dramatic play, pretend play, tablescapes, turkeys

Corn Syrup Paint Sunflowers

November 18, 2022 by Annette Kaminsky Leave a Comment

Make these glorious, corn syrup paint sunflowers using a taste-safe, homemade, two-ingredient recipe. Download and use the free template.

_______

If you’ve followed my blog for a while, you can probably tell that I like both sunflowers and corn syrup paint a lot. I regularly post sunflower activity ideas and frequently feature corn syrup paint art. These corn syrup paint sunflowers perfectly showcase the beauty and appeal of this shiny, glossy paint. Prepare to be wowed!

_______

Follow me on Pinterest for more early learning ideas.

_______

This shiny, corn syrup paint sunflower art project is easy-to-do and looks gorgeous displayed. A free sunflower template is available to download.

_______

Supplies To Collect

For this easy-to-do, pretty painting activity, gather the following supplies:

  • white corn syrup
  • blue, red, and yellow food coloring
  • sunflower seeds
  • baby food jars
  • paintbrushes
  • teaspoons
  • 8 ½ x 11-inch white cardstock paper
  • green construction paper
  • scissors
  • glue stick
  • glue gun
  • pencil
  • sunflower template
  • plastic tablecloth

_______

Making The Corn Syrup Paint Sunflowers

There is always white corn syrup in my art supply collection, as I love using it in painting activities. But you can substitute light corn syrup instead.

Steps to make glorious, corn syrup paint sunflowers using a taste-safe, homemade, two-ingredient recipe. Download and use the free template for this art project.

_______

First, pour the corn syrup into three baby food jars, or paint containers you have handy. Add a few drops of red, yellow, and blue food coloring to one jar and mix it with a teaspoon to make a shade of brown. Add a few drops of yellow to another and stir. Mix red and yellow colors into a third container to make orange.

Note: The more food coloring drops you add, the darker each hue will be.

Next, trace and cut leaves and stems from green construction paper.

Afterward, cut cardstock sunflowers from a template. Feel free to download and use the sunflower template included in this post.

Download this sunflower template to make gorgeous corn syrup art.

_______

Sunflower PrintableDownload

This printable is for individual or one classroom use only.

_______

Then set out the paper sunflowers, brown paint, and seeds on a table covered with a plastic tablecloth. Invite participants to paint the circular middle of their sunflower brown, and press in seeds.

Next, set out the yellow and orange paints and brushes. Ask everyone to paint the petals of their sunflower. They’ll love using this bright, slick, translucent paint.

Gorgeous, glossy sunflower art made with a taste-safe, two-ingredient homemade paint recipe. This art project looks stunning when displayed.

_______

As soon as the artists are finished, move each decorated sunflower onto an 8 ½ x 11-inch white cardstock background, or a cardstock color of choice.  Adhere it with a glue gun. Then with a gluestick or glue gun, add a green paper stem and leaf.

The corn syrup paint is thick and sticky, and completed sunflower art projects should be left to dry for a few days.

Gorgeous, glossy sunflower art made with a taste-safe, two-ingredient homemade paint recipe. This art project looks stunning when displayed.

_______

Displaying The Corn Syrup Sunflower Art

These syrupy sunflowers have a shiny, firm finish when dry, and look beautiful displayed. The art is somewhat transient, as the paint will melt and drip in hot, humid conditions. But I have had a piece on display for over a year and it is still looking fabulous.

This shiny, corn syrup paint art project is easy to do and looks gorgeous displayed. It's an all-ages art activity everyone will love to try.

_______

More Corn Syrup Paint Art

As mentioned earlier, I feature lots of corn syrup paint activities on this blog. You may be interested in:

Textured Octopus Craft

Sea Star Art

Sea Turtle Hatchling Art

Painted Turtle And Lizard

Spooky Hands Craft

Sunflower Heart Craft

All these art projects yield gorgeous results.

_______

[Read more…] about Corn Syrup Paint Sunflowers

Filed Under: art, autumn, fall, gardening, preschool, summer Tagged With: corn syrup painting, painting, sunflowers

Gadget Printmaking Poppy Art

November 10, 2022 by Annette Kaminsky Leave a Comment

Try this beautiful gadget printmaking poppy art project today! It introduces participants to a new and unusual way to paint.

_______

It started with a large dot print made with a pie pan, tempera paint, and a paintbrush. The intent was to make a simple red poppy print with a black round center. But afterward, I decided to add paint markings with gadgets to add more color and definition. The result is super striking gadget printmaking poppy art that’s easy and fun to do.

This poppy art is perfect for a Remembrance Day project. Red poppies are a symbol of lives lost to war since World War I. They especially serve as reminders of this each year on November 11, the Remembrance Day holiday in our country.

How to make stunning gadget printmaking poppy art.

_______

Follow me on Pinterest for more early learning ideas.

_______

Poppy Art Supplies

Gadgets used as painting tools make interesting prints, and you can find them all over your home. Here are the gadgets I use for this large-scale art activity:

  • 9-inch round cake or pie pan
  • Jumbo circular bubble wand and tray
  • ground meat chopper
  • spools
  • bottle sponge brush
  • round sponge brush

A few simple supplies complete the list of items needed to make poppy art:

  • tempera paint colors in bright red, yellow, green, pink, and orange
  • 12-inch x 16-inch sturdy white paper
  • green construction paper
  • green marker
  • ruler
  • scissors
  • glue stick
  • flat plate or tray

_______

Gadget Printmaking Poppy Art Steps

Simple steps to create beautiful poppy art with a gadget printmaking technique. The art project introduces participants to a new and unusual way to paint.

_______

First, lay out a large sheet of sturdy paper on a table.

Next, pour red paint on a tray or flat plate. Dip the bottom of a round cake or pie pan in the paint, and press it down on the paper background to make the flower head.

Then dip a bubble wand into orange paint and press it in the middle of the dot. The bubble wand tray holds the paint perfectly for this step.

Afterward, press a sponge bottle brush into the green paint, and make a print in the center.

Then dip a spool into black paint, and press it into the very center of the flower.

Bubble wand, sponge bottle brush, and spool paint prints add color and definition to this gadget printmaking poppy art project.

_______

Next, draw on a stem with a green marker. If desired, use a ruler to keep the stem line straight.

Finally, cut a simple leaf from green fadeless construction paper, and glue it onto the stem.

_______

Poppy Art Color Variations

The gadgets and paint colors used for enhancing the red poppies can be varied. In this art project, a bubble wand, bottle brush, and two spools are the gadgets used.

Try this beautiful gadget printmaking poppy art project today! It introduces participants to a new and unusual way to paint.

_______

A ground meat chopper paint print adds detail to the flower center below.

A bubble wand and ground meat chopper paint print add color and definition to this gadget printmaking poppy art project.

_______

Remembrance Day Poppy Art

Simple steps to create beautiful Remembrance Day poppy art with a gadget printmaking technique. The art project introduces participants to a new and unusual way to paint.

_______

This next project employs the bubble wand tray for the large dot print. The tray is not as big as the cake or pie pan, so can be used with a smaller-sized paper base. And it has a scalloped edge, adding character to the poppy dot. This design is my pick for the official Remembrance Day art project for this year.

For the flower center, dip a round sponge brush or small round sponge into black paint, and press it in the middle of the red dot print. Then press a sponge bottle brush into yellow paint, and make a print on top of the black circle. Finish off with a black spool print in the center of the flower.

Tip: Letting the red and black paint dry for a few hours helps the yellow sponge bottle print stand out and remain bright.

Create this beautiful Remembrance Day poppy art with a gadget printmaking technique. The art project introduces participants to a new and unusual way to paint.

_______

_______

More Gadget Printmaking Poppy Art Ideas

Instead of using only red for the large flower petal dot, introduce a few more color choices, such as yellow and orange. The colors will blend in nicely to make red-orange hues, adding shading and texture.

And since poppies come in a variety of colors, you could choose an entirely new color scheme for this project.

Bubble wand, sponge, meat chopper, bottle brush, and spool prints add highlights and detail to the poppy flower art. And the gadget painting technique introduces participants to a new and unusual way to do painting and printmaking.

_______

How to make stunning gadget printmaking poppy art.

_______

Bubble wand, sponge bottle brush, and spool paint prints add color and definition to this gadget printmaking poppy art project.

_______

More Remembrance Day Art Projects

Remembrance Day Butterfly Craft

Remembrance Day Poppy Art

_______

[Read more…] about Gadget Printmaking Poppy Art

Filed Under: art, autumn, fall, gardening, preschool, Remembrance Day Tagged With: flowers, poppies, printmaking, Remembrance Day

  • « Go to Previous Page
  • Page 1
  • Interim pages omitted …
  • Page 28
  • Page 29
  • Page 30
  • Page 31
  • Page 32
  • Interim pages omitted …
  • Page 72
  • Go to Next Page »

Primary Sidebar

Subscribe Via Email

Recent Posts

  • Dandelion Sensory Tray June 3, 2025
  • Bergenia Flower Sensory Bin May 31, 2025
  • Salt and Ice Science Experiment May 20, 2025
  • Airplane Rice Sensory Bin May 16, 2025
  • Salt Painting Planet Art May 3, 2025
  • Spring Bunny Sensory Bin April 19, 2025
  • Tin Foil Egg Printing April 17, 2025
  • Lentil Easter Bunny Sensory Bin April 15, 2025
  • Unicorn Store Dramatic Play Center March 25, 2025
  • Easter Store Dramatic Play Center March 23, 2025

Categories

Topics

block play bunnies butterflies Chinese New Year Christmas Christmas craft color colors dramatic play Easter flowers hearts holiday jewelry leaves leprechauns light table loose parts painting paper crafts playdough pretend play printables printmaking process art pumpkins rice bin scented playdough science experiment scissor skills sensory bin sensory play sensory tray shamrocks skeletons snakes snowflakes spiders spring St. Patrick's Day sunflowers tablescapes trees Valentine's Day water play

Copyright © 2025 · Lifestyle Pro on Genesis Framework · WordPress · Log in