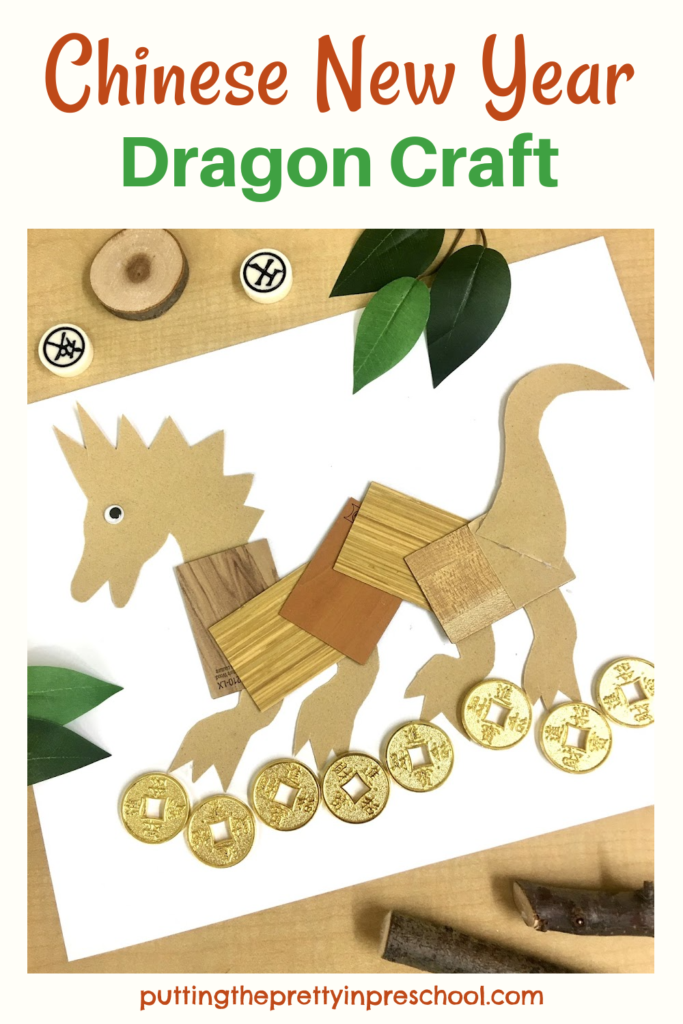
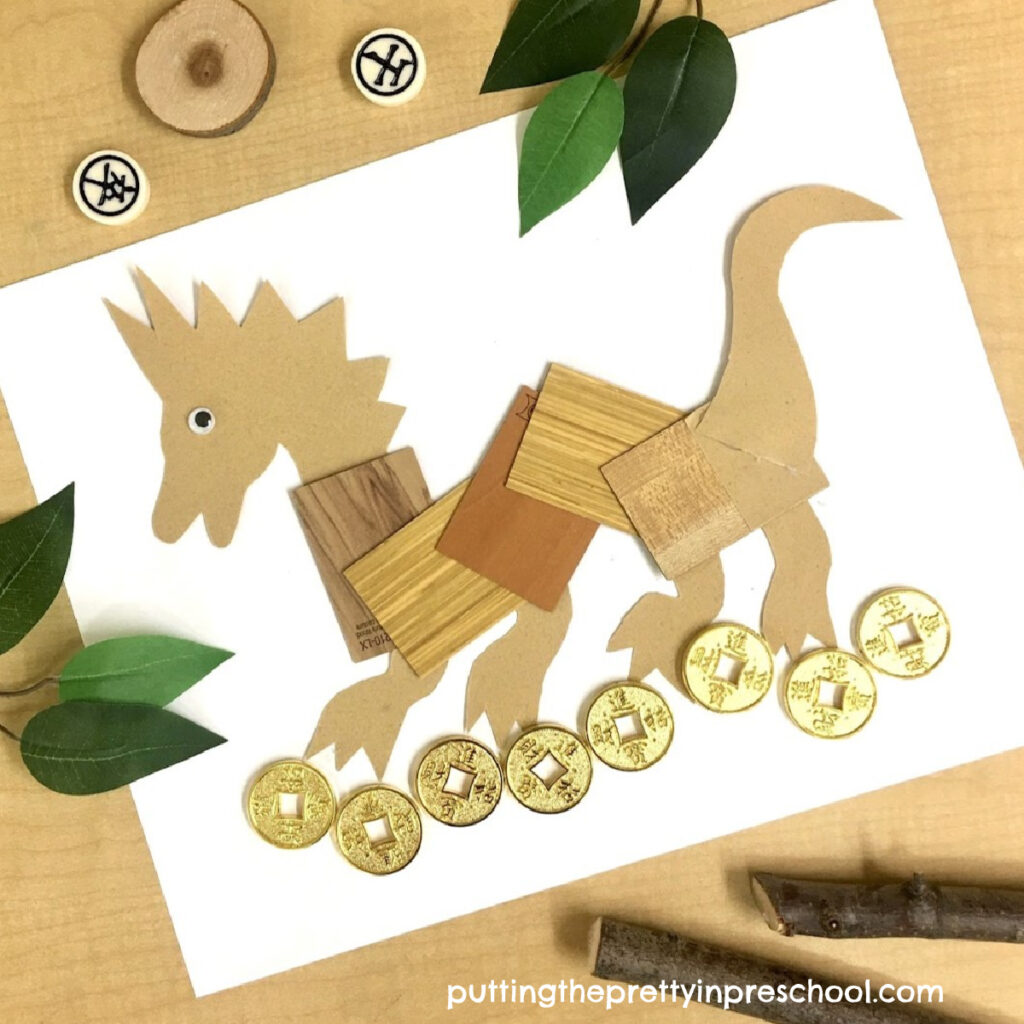
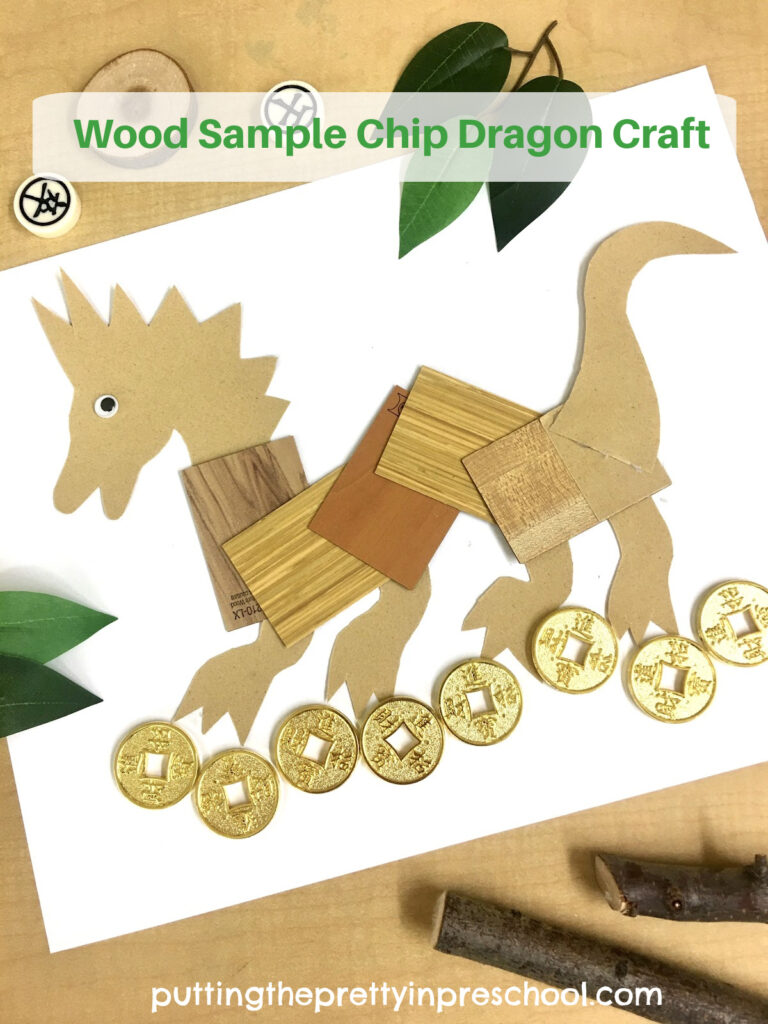
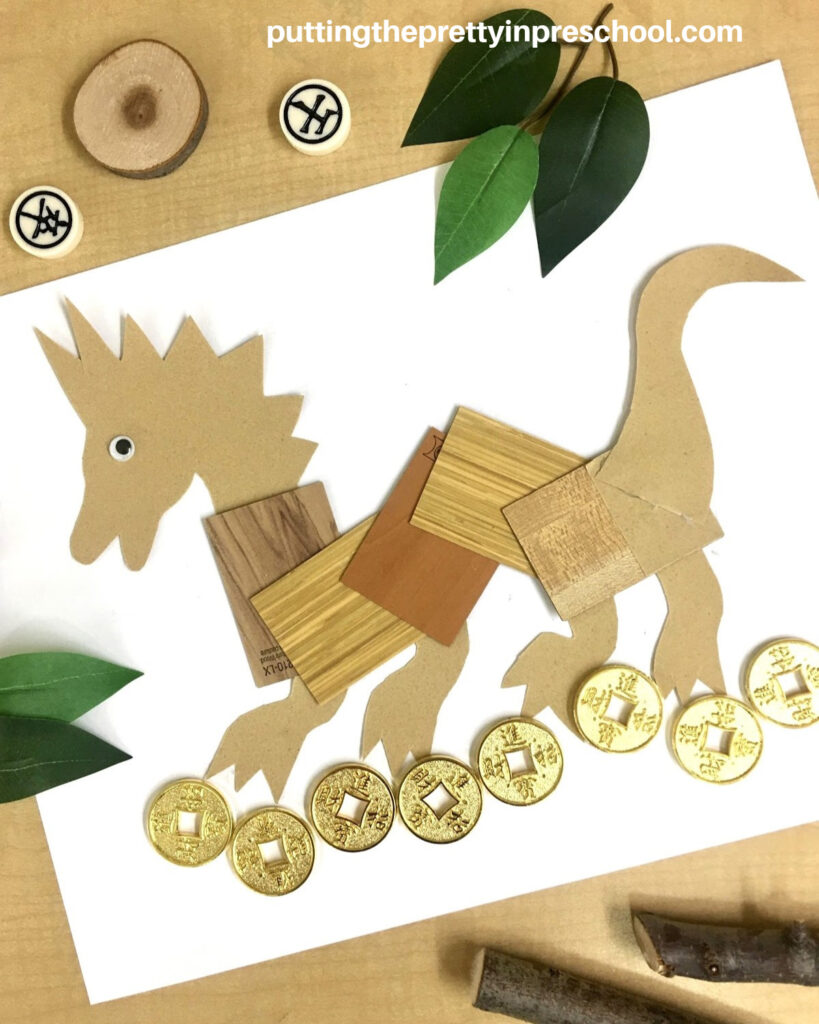
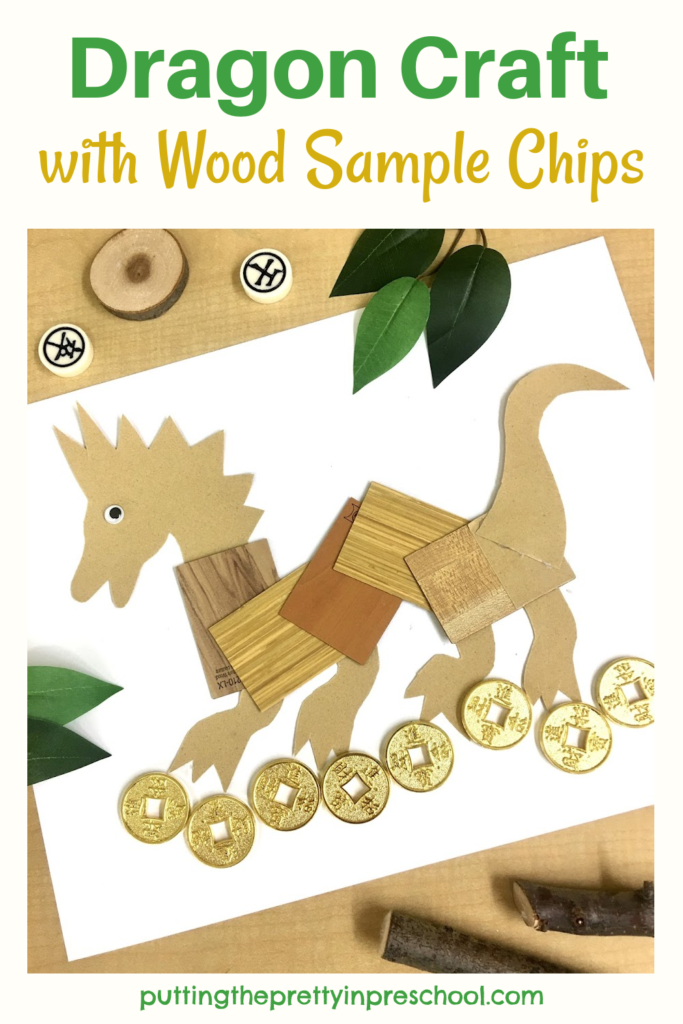
• Skip to secondary menu
  • Skip to main content
  • Skip to primary sidebar

Putting The Pretty In Preschool

Finding Beauty In Everyday Early Childhood Experiences

  • Home
  • About Me
  • Winter
  • Chinese New Year
  • Blog
  • Valentine’s Day
  • Contact Me
  • Easter Activities

art

Loose Part Jewelry Heart

February 19, 2023 by Annette Kaminsky Leave a Comment

An invitation to create a loose-part jewelry heart with costume jewelry pieces. This is a gorgeous all-ages transient art project.

_______

Do you have some costume jewelry you no longer wear? Have you picked up vintage jewelry at a garage sale or second-hand store? It will be perfect for this beautiful loose-part jewelry heart invitation to create.

_______

Follow me on Pinterest for more early learning ideas.

_______

Supplies To Collect

An invitation to create a gorgeous loose-part jewelry heart with costume jewelry pieces. This is an all-ages transient art project everyone will enjoy.

_______

For this easy-to-set-up transient heart art activity, gather the following supplies:

  • large wooden canvas frame
  • wood heart plaque
  • vintage costume jewelry
  • small containers

_______

The Loose Part Jewelry Heart Play Invitation

An invitation to create a loose-part jewelry heart with costume jewelry pieces. This is a gorgeous all-ages transient art project.

_______

To prepare this gorgeous loose part play invitation, first, select a large wooden canvas frame. My frame is approximately 12 inches wide and 16 inches long.

Flip the frame over and use the backside.

Note: A serving tray or an art frame with the back removed also work well for this activity.

Next, put a wood heart plaque inside the frame.

Then cut costume jewelry into pieces suitable for loose part play. Make sure there are no rough edges on the jewelry.

Place the jewelry bits into small containers and set them in the corners of the canvas frame. Add more jewelry pieces around the frame if available.

Finally, set the canvas frame on a table and invite little learners to take turns decorating the heart with jewelry treasures.

A gorgeous loose-part jewelry heart created with costume jewelry pieces. This is an all-ages transient art project everyone will enjoy.

_______

Benefits Of Loose Parts Play

In this loose part jewelry heart play invitation, early learners get to:

  • engage in open-ended play
  • practice sorting, counting, and color matching
  • strengthen finger muscles by moving and arranging jewelry pieces
  • experience beautiful objects with different colors and textures
  • create unique patterns and designs
  • focus on a task and be mindful
  • develop higher thinking skills

_______

A gorgeous loose-part jewelry heart created with costume jewelry pieces. This is an all-ages transient art project everyone will enjoy.

_______

More Loose Part Heart Decorating

On another day, offer this loose part heart invitation to create with polished agate slices and precious rocks and gemstones.

A gorgeous loose-part precious rock heart created with polished agate slices. This is an all-ages transient art project everyone will enjoy.

_______

An invitation to create a loose-part precious rock heart with polished agate slices. This is a gorgeous all-ages transient art project.

_______

A gorgeous loose-part precious rock heart created with polished agate slices. This is an all-ages transient art project everyone will enjoy.

_______

Related:

Jewelry Sensory Tray

St. Patrick’s Jewelry Sensory Bin

_______

[Read more…] about Loose Part Jewelry Heart

Filed Under: art, Mother's Day, preschool, science, sensory, Valentine's Day Tagged With: hearts, jewelry, loose parts, rocks, transient art, Valentine's Day

Spray Paint Snowflake Silhouette

February 18, 2023 by Annette Kaminsky Leave a Comment

A beautiful spray paint snowflake silhouette outdoor transient art activity. Fun facts about snow are included in the post.
A beautiful spray paint snowflake silhouette outdoor transient art activity. Facts about snow are included in the post.

_______

If you are looking for an exciting and easy outdoor winter art activity, this spray paint snowflake silhouette project is a great choice.

_______

Follow me on Pinterest for more early learning ideas.

_______

Supplies to Collect

An invitation to create a spray paint snowflake silhouette outdoors. A quick and easy transient art activity with stunning results.

_______

On a day when there is fresh snow on the ground outdoors, gather the following supplies:

  • spray bottles
  • red, blue, green, and yellow food colors
  • large snowflake decoration
  • small towel
  • tray

_______

The Spray Paint Snowflake Silhouette Activity

A beautiful blue background snowflake silhouette created with a spray paint technique. A quick and easy ourdoor transient art activity.

_______

This painting activity works best when there is a fresh layer of snow on the ground.

To do the art activity, fill spray bottles used only for craft activities at least half full of water. Then add a few drops of food color in each one, and mix it in. I use red, blue, green, and yellow food coloring.

Next, select a large snowflake decoration. I feature an economical 12-inch plastic one purchased at a dollar store.

Afterward, place the colored water-filled spray bottles, the snowflake decoration, and a small towel on a tray.

Then invite participants outside and take the tray of supplies with you.

Gather around a smooth patch of snow that no one has stepped over and gently place the snowflake decoration down.

Have everyone take turns spraying food color paint around the edges of the snowflake.

Afterward, gently lift the decoration off of the snow and admire the beautiful white snowflake silhouette.

A beautiful spray paint snowflake silhouette outdoor transient art activity. Facts about snow are included in the post.

_______

Wipe the decoration down with a towel and lay it down on another spot. Spray-paint the snow around it again. Drying the snowflake template is a tip I learned after trying this red background silhouette. There are a few drops of other colors on the red-framed flake as the decoration was used in the previous snowflake design.

A beautiful red background snowflake silhouette created with a spray paint technique. A quick and easy ourdoor transient art activity.

_______

If you have enough snowflake decorations and spray paint bottles, invite participants to spray paint their own snowflake silhouette.

_______

Spray Paint Snowflake Silhouette Benefits

In this snowflake painting activity, squirting a spray bottle develops finger muscles. And participants get the opportunity to create beautiful transient art outdoors during the winter season working cooperatively or on their own.

_______

Spray Painting Snow Indoors

An invitation to spray paint snow indoors. This is a super fun winter transient art invitation.

_______

Originally, I hoped to offer this spray paint snowflake silhouette activity indoors. I  filled a round tub with snow and got the colored water spray paints ready. But the snow was too sticky and hard, and I couldn’t achieve a smooth snow surface to lay the snowflake decoration down on. But even without a snowflake decoration, the snow is enjoyable to spray paint indoors.

Take snow indoors and invite early learners to spray paint it with food coloring paint. A quick and easy sensory activity.

_______

Fun Facts About Snow

Snow is composed of many snowflakes. Tiny ice crystals clump together to make each snowflake.

The light reflecting off snow makes it appear white.

In cold weather, snow is powdery, while in warm weather it is sticky.

New snow absorbs sound waves, resulting in a quiet atmosphere.

Snow creates a wonderful playground for activities such as making snowballs, snow angels, snow forts, and snowmen.

Snow contains 95 % trapped air, and is a great insulator for animals who burrow under it.

When snow melts, it makes 1/10th the amount of water.

_______

A spray paint snowflake silhouette created outdoors. A quick and easy transient art activity with stunning results.

_______

Related:

Winter Playdough Recipe

Blue Candy Cane Science Experiment

Igloo Camping Pretend Play

Polar Bear Small World

Winter Sensory Trays

Painting Ice and Snow

Winter Wreath Paper Plate Craft

Ice Drum Musical Instruments

Frozen-Inspired Shadow Box

Scissor Skill Snow Cutting Activities

Kid’s Winter Wonderland Play Tablescape

_______

[Read more…] about Spray Paint Snowflake Silhouette

Filed Under: art, preschool, science, winter Tagged With: painting, snow, snowflakes, transient art

Celebrate Diversity Heart Art

February 10, 2023 by Annette Kaminsky Leave a Comment

Three easy-to-do "Celebrate Diversity" heart art projects with chalk, metallic marker, and pencil crayon skin tone art supplies.

_______

With so many skin-tone art supplies available to explore, it is easy to provide art activities that celebrate diversity. In this post, I feature three “Celebrate Diversity” heart art projects: one with chalk, another with pencil crayons, and a third with metallic markers. These are all low-prep, low or no-mess art projects everyone can do. To help out, there is a free heart template to download.

_______

Follow me on Pinterest for more early learning ideas.

_______

Skin Tone Sunburst Heart

A "Celebrate Diversity" sunburst heart art project with skin tone pencil crayons. An all-ages, non-messy, stunning art activity.

_______

Only a few inexpensive supplies are needed for this mini art project:

  • set of skin tone pencil crayons
  • ruler
  • white cardstock paper
  • heart template

_______

Steps to make a "Celebrate Diversity" sunburst heart art project with skin tone pencil crayons. An all-ages, non-messy, stunning art activity

_______

To start off, cut white cardstock paper into 5-inch or 6-inch squares. With this size of paper, the whole project can be done without having to sharpen the pencil crayons.

Next, use a pencil or pencil crayon to trace around a small heart template in the middle of the square. Feel free to download the template further on in the post for the art project.

Then add lines that extend from the heart to the edge of the paper in a sunburst design.

Tips from a blog post by ARTBAR were helpful in making the sunburst lines that protrude invisibly through the heart from one side of the paper to the opposite one. The technique took me a few tries to get right but the effort is worth it.

Afterward, use pencil crayons in skin-tone hues to color inside the lines.

You may want to trace around the small heart template once again at the end to make sure the heart is defined and stands out.

A "Celebrate Diversity" sunburst heart art project with skin tone pencil crayons. An all-ages, non-messy, stunning art activity.

_______

Skin Tone Chalk Heart Art

Make a "Celebrate Diversity" heart art project with skin tone sidewalk chalk. An all-ages, stunning art activity.

_______

For this second art project, gather the following supplies:

  • 8 ½ x 11-inch light blue fadeless construction paper
  • large and small heart template
  • skin tone sidewalk chalk
  • painter’s tape
  • table cover

First, select a heart tracer that is a little smaller than the construction paper.

Lay the heart on the construction paper and tack it down gently with a piece of painter’s tape.

Next, use sidewalk chalk in various skin tones to color in the area around the heart.

Note: An alternative is to trace the heart first and remove the template before using the chalk sticks.

Afterward, gently smudge the chalk lines in an outward fashion.

If desired, trace a smaller heart in the center of the larger one using one of the chalk hues and color it in.

_______

A variation of this art activity is to dip the chalk sticks in water before decorating the paper.

Make a "Celebrate Diversity" heart art project with skin tone sidewalk chalk dipped in water. An all-ages, stunning art activity.

_______

For both chalk activities, it is advisable to lay down newsprint or an old tablecloth first to protect the work surface and make clean-up easier.

_______

Metallic Marker Concentric Hearts

Make a "Celebrate Diversity" heart art project with skin tone metallic markers. An all-ages, non-messy, stunning art activity.

_______

Supplies to gather:

  • 8 ½ inch x 11-inch white cardstock paper
  • metallic markers in skin tones
  • heart template
  • scissors

For this third project, start by tracing the large heart template, and then draw smaller hearts inside it with metallic skin tone markers.

If you do not have metallic markers in all the hues, substitute regular ones. I use a regular marker for the black hue.

Note: For little learners, you can offer non-toxic washable markers in skin tones instead of the permanent metallic markers featured in this art activity.

Downloadable Heart Template

Here is a free heart template to download for the art projects featured in this post:

A free downloadable heart template for making three stunning heart art projects with skin tone pencil crayons, metallic markers, and sidewalk chalk.

_______

Heart Art PrintableDownload

This printable is for individual or one classroom use only.

_______

Three easy-to-do "Celebrate Diversity" heart art projects with chalk, metallic marker, and pencil crayon skin tone art supplies.

_______

These three heart art projects give participants a chance to celebrate diversity by experimenting with different art media. They are a good fit for Black History Month, a Valentine’s Day theme, or a special time set aside to celebrate diversity.

Do you have questions about any of these art projects? Leave a comment below.

_______

Related:

Three Black History Month Crafts

Celebrate Diversity Butterfly

Black History Month Yarn Art

Celebrate Diversity Paper Craft

_______

[Read more…] about Celebrate Diversity Heart Art

Filed Under: art, Black History Month, preschool, Valentine's Day Tagged With: Black History Month, hearts, Valentine's Day

Five Black History Month Crafts

January 28, 2023 by Annette Kaminsky Leave a Comment

Five gorgeous Black History Month crafts that celebrate diversity. Easy-to-make crafts the whole family can do.

_______

Black History Month, a time set aside to remember notable black people and their achievements, is just around the corner. It is celebrated in the United States and Canada during the month of February. Here are five Black History Month crafts to help children engage in the celebration.

_______

Follow me on Pinterest for more early learning ideas.

_______

Celebrate Diversity Butterflies

To make these striking butterflies that represent celebrating diversity, gather the following supplies:

  • metallic gold and bronze tempera paint
  • pink, black, and white paint
  • light pink, black, bronze, and gold glitter
  • black pipe cleaners and pony beads
  • white cardstock paper
  • black cardstock paper
  • pie tins or disposable plates
  • white glue
  • glue gun

_______

Steps to make a handprint butterfly craft to recognize and celebrate Black History Month.

_______

Making The Handprint Butterflies

To start off, pour skin-toned tempera paints into pie tins or disposable plates. You may want to add a little white to the black paint to soften its hue.

Have participants dip a hand in a paint color and press it onto white cardstock paper. I use metallic gold and bronze for two of the skin tone shades. Regular tempera paints in these hues would work fine too.

If you have the shades available, sprinkle a similar color glitter onto each handprint.

After the handprints dry and extra glitter is shaken off, cut around the edges.

Next, cut long narrow ovals from black cardstock paper to represent butterfly abdomens.

Bend black pipe cleaners in half and have participants string black beads onto them, leaving a little section open for the butterfly antennae. Twist the pipe cleaners just above the beads to make sure they stay on.

Assembling The Butterflies

Make this gorgeous handprint butterfly craft to recognize Black History Month and celebrate diversity.

_______

Using white glue or a hot glue gun, add black or pink pompoms to the antennae.

Then use white glue or a hot glue gun to affix four handprint “wings” onto each abdomen. The butterflies can be designed in different kinds of color combinations.

Next, glue the beaded pipe cleaners to the butterfly abdomens. Now the “celebrate diversity” butterflies are ready to be displayed!

Make these gorgeous handprint butterfly crafts to recognize Black History Month and celebrate diversity.

_______

Celebrate Diversity Yarn Heart

Different shades of skin-toned yarn represent diversity in this textured yarn heart craft.

Make this gorgeous skin-toned yarn heart craft to recognize Black History Month and celebrate diversity.

_______

Supplies to Collect

  • yarn in a variety of thicknesses and skin tones
  • 8 ½ x 11-inch golden-brown cardstock paper
  • white glue or hot glue gun
  • double-sided tape
  • ruler
  • scissors
  • heart template

_______

Steps to make a gorgeous skin-toned yarn heart craft to recognize Black History Month and celebrate diversity.

_______

To make this gorgeous yarn heart craft, start by cutting skin-toned yarn into 7 ½ inch strips. Using different thicknesses of yarn adds variety to the craft.

Next, glue the strips of yarn in rows onto a sheet of 8 ½ x 11-inch cardstock using white glue or a glue gun. Leave a small border around the edge of the paper.

Then add pieces of double-sided tape around the edges of the paper.

Afterward, cut a large heart in the center of a second piece of cardstock.

Finally, gently position the cardstock paper with the heart cut out on top of the yarn-covered piece, making sure the double-sided tape adheres to it.

_______

Kindness Heart Wreath

This kindness heart wreath with cardstock skin-toned hearts and a geometric bow communicates that all lives matter and that everyone should be treated with kindness.

Black History Month ribbon and skin-toned hearts are the highlights of this easy-to-make "kindness" wreath craft.

_______

Black History Month Heart Banner

In this craft, skin-toned hearts are used to decorate an attractive, geometric ribbon-edged banner honoring Black History Month.

Black History Month ribbon and skin-toned paper hearts are the highlights of this easy-to-make banner craft.

_______

Black History Month Ribbon Heart

This heart craft takes full advantage of vibrant, geometrically patterned ribbon, and looks striking on display.

Make this stunning Black History Month heart craft to honor this important annual celebration.

_______

Which one of these five Black History Month crafts will you try? Let me know in a comment below.

_______

[Read more…] about Five Black History Month Crafts

Filed Under: art, Black History Month, crafts, preschool Tagged With: Black History Month, butterflies, hearts, papercrafts, wreaths

Paper Bag Christmas Ornaments

December 22, 2022 by Annette Kaminsky Leave a Comment

How to make six different brown paper bag Christmas ornaments. An all-ages, beautiful recycled craft. Free templates are included.

_______

For so long I have admired art projects that involve brown paper bags or doilies. This Christmas I was determined to use both of these supplies to make paper bag Christmas ornaments. The resulting ornaments are simple but beautiful… a perfect combination.

_______

Follow me on Pinterest for more early learning ideas.

_______

Supplies To Collect

Supplies to make vintage-inspired paper bag Christmas ornaments. Download the free templates for these six different designs.

_______

To craft these vintage-themed ornaments, gather the following easy-to-find supplies:

  • large brown paper grocery bag
  • white paper doilies
  • thin white ribbon
  • white pearl bead garland
  • adhesive white pearl beads
  • white pencil crayon
  • pencil
  • scissors
  • glue stick
  • glue gun

_______

Make these beautiful vintage-inspired paper bag Christmas ornaments with lace paper doily accents. Free templates are available to use.

_______

Making The Paper Bag Christmas Ornaments

First, cut out a star, gingerbread girl, angel, heart, and each tree ornament from a large brown paper bag. Feel free to download the templates below to help with the designs.

Note: The three printables in this post are for individual and one-classroom use only.

Download this gingerbread girl and ornament template to make beautiful vintage-inspired brown paper bag Christmas ornaments.

_______

Gingerbread Girl And Ornament PrintableDownload

_______

Download this angel and ornament template to make beautiful vintage-inspired brown paper bag Christmas ornaments.

_______

Angel And Ornament PrintableDownload

_______

Download this star and heart template to make beautiful vintage-inspired paper bag Christmas ornaments.

_______

Star And Heart PrintableDownload

_______

With a white pencil crayon, outline the border of each paper bag shape.

Make these vintage-inspired brown paper bag Christmas ornaments. Download the free templates to make six different designs.

_______

Next, cut out shapes from white paper doilies to accent the paper ornaments. Snipping around the designs in the doilies will give you pretty lace pieces to work with.

Afterward, use a glue stick to affix them to the brown paper backgrounds.

Then cut thin white ribbon into 15 cm strips. Tie them in bows, and trim the ends to your desired length. Glue one bow to each ornament.

Next, cut white pearl bead garland into 8 cm strips. Use a glue gun to affix one strip to the back of each ornament in a loop shape.

Make these beautiful vintage-inspired paper bag Christmas ornaments with lace paper doily accents. Free templates are available to use.

_______

As a finishing touch, accent the ornaments with a few adhesive white pearl beads.

Make these six different brown paper bag Christmas ornaments with lace paper doily accents. Free templates are included.

_______

Now the ornaments are ready to be displayed on a Christmas tree. Aren’t they gorgeous?

How to make six different paper bag Christmas ornaments. An all-ages, beautiful recycled craft. Free templates are included.

_______

Paper Bag Gift Wrap

Another easy, festive craft activity with paper bags is to make decorated gift wrap. A blog post by “A Pretty Fix” titled “Four Simple Brown Paper Bag Gift Wrap Ideas” will give you lots of ideas to try.

_______

Related: Handprint Christmas Crafts

_______

[Read more…] about Paper Bag Christmas Ornaments

Filed Under: art, Christmas, crafts, preschool Tagged With: Christmas craft, ornaments, paper bag crafts

Monochromatic Christmas Tree Art

December 17, 2022 by Annette Kaminsky Leave a Comment

Include this simple monochromatic Christmas tree art project in your holiday activities. The pastel-themed trees look beautiful on display.

_______

This simple monochromatic Christmas tree art is completed in four different color themes. The art activity is easy to implement at home or in a Christmas art program. Finished projects display beautifully on a bulletin board or feature wall.

The color theme chosen for this gorgeous art activity is inspired by the exquisite pastel-colored miniature Christmas tree ornaments spotted on shopping trips around town this holiday season.

_______

Follow me on Pinterest for more early learning activities.

_______

Supplies To Collect

Just a few supplies are needed for this pretty craft:

  • 12 x 18-inch sturdy paper
  • magenta, yellow, teal, green, and white tempera paints
  • glitter in magenta, teal, gold, and green colors
  • large magenta, gold, teal, and light green gift bows
  • paint palettes
  • paint pots
  • paintbrushes
  • spoons
  • ruler
  • pencil
  • scissors
  • hot glue gun or white glue
  • plastic tablecloth

_______

Preparing The Tree Art Project

This monochromatic Christmas tree art project is done in pastel shades of green, yellow, teal, and magenta. The trees look beautiful on display.

_______

First, select 12 x 18-inch sturdy paper for the art project. I used manila and manila tag and both kinds worked well.

With a ruler and pencil, draw a long, narrow triangle on each sheet of paper. The triangles should fill the whole page.

Next, cut the paper triangles out.

Then mix a variety of shades of magenta, yellow, teal, and green tempera paint in small pots by adding various amounts of white to each color. For each hue, the shades should range from light to dark.

Tips:

  • To warm up the yellow just a little, add a drop of red to the hues.
  • To make teal paint, mix a little yellow into blue paint. Or use teal tempera paint straight out of the bottle.

Afterward, spoon different shades of each color into paint palettes. Each palette should have shades of one hue only. Include a little white tempera.

_______

The Monochromatic Christmas Tree Art Process

This monochromatic Christmas tree art project is done in pastel shades of green, yellow, teal, and magenta. The trees look beautiful on display.

_______

To offer this tree painting project, cover an art table with a plastic tablecloth.

Choose one monochromatic color scheme to work with.

Then set out a triangular-shaped paper tree, filled paint palette, and brush for each child participating.

Invite participants to paint their tree, using as many shades of the chosen color as they can.

When the trees are fully covered and the paint is still wet, let little artists sprinkle similarly toned glitter on their projects. They will love this part of the process.

After the paint has dried, use white glue or a hot glue gun to affix a matching gift bow to the top of each tree. As an alternative, glue silver or gold bows on the trees.

On another day, pick a different paint color and offer the Christmas tree painting project again.

If there is time, complete the tree art in all four colors.

Include this simple monochromatic Christmas tree art project in your holiday activities. The pastel-themed trees look beautiful on display.

_______

When finished, display the painted trees together on a wall. They are sure to be admired!

Note: The paint colors used for this art project also make awesome ombre Christmas trees.

_______

Related: Christmas Tree Art

_______

[Read more…] about Monochromatic Christmas Tree Art

Filed Under: art, Christmas, preschool, trees, winter Tagged With: Christmas tree, painting, paper crafts, trees

Corn Syrup Paint Sunflowers

November 18, 2022 by Annette Kaminsky Leave a Comment

Make these glorious, corn syrup paint sunflowers using a taste-safe, homemade, two-ingredient recipe. Download and use the free template.

_______

If you’ve followed my blog for a while, you can probably tell that I like both sunflowers and corn syrup paint a lot. I regularly post sunflower activity ideas and frequently feature corn syrup paint art. These corn syrup paint sunflowers perfectly showcase the beauty and appeal of this shiny, glossy paint. Prepare to be wowed!

_______

Follow me on Pinterest for more early learning ideas.

_______

This shiny, corn syrup paint sunflower art project is easy-to-do and looks gorgeous displayed. A free sunflower template is available to download.

_______

Supplies To Collect

For this easy-to-do, pretty painting activity, gather the following supplies:

  • white corn syrup
  • blue, red, and yellow food coloring
  • sunflower seeds
  • baby food jars
  • paintbrushes
  • teaspoons
  • 8 ½ x 11-inch white cardstock paper
  • green construction paper
  • scissors
  • glue stick
  • glue gun
  • pencil
  • sunflower template
  • plastic tablecloth

_______

Making The Corn Syrup Paint Sunflowers

There is always white corn syrup in my art supply collection, as I love using it in painting activities. But you can substitute light corn syrup instead.

Steps to make glorious, corn syrup paint sunflowers using a taste-safe, homemade, two-ingredient recipe. Download and use the free template for this art project.

_______

First, pour the corn syrup into three baby food jars, or paint containers you have handy. Add a few drops of red, yellow, and blue food coloring to one jar and mix it with a teaspoon to make a shade of brown. Add a few drops of yellow to another and stir. Mix red and yellow colors into a third container to make orange.

Note: The more food coloring drops you add, the darker each hue will be.

Next, trace and cut leaves and stems from green construction paper.

Afterward, cut cardstock sunflowers from a template. Feel free to download and use the sunflower template included in this post.

Download this sunflower template to make gorgeous corn syrup art.

_______

Sunflower PrintableDownload

This printable is for individual or one classroom use only.

_______

Then set out the paper sunflowers, brown paint, and seeds on a table covered with a plastic tablecloth. Invite participants to paint the circular middle of their sunflower brown, and press in seeds.

Next, set out the yellow and orange paints and brushes. Ask everyone to paint the petals of their sunflower. They’ll love using this bright, slick, translucent paint.

Gorgeous, glossy sunflower art made with a taste-safe, two-ingredient homemade paint recipe. This art project looks stunning when displayed.

_______

As soon as the artists are finished, move each decorated sunflower onto an 8 ½ x 11-inch white cardstock background, or a cardstock color of choice.  Adhere it with a glue gun. Then with a gluestick or glue gun, add a green paper stem and leaf.

The corn syrup paint is thick and sticky, and completed sunflower art projects should be left to dry for a few days.

Gorgeous, glossy sunflower art made with a taste-safe, two-ingredient homemade paint recipe. This art project looks stunning when displayed.

_______

Displaying The Corn Syrup Sunflower Art

These syrupy sunflowers have a shiny, firm finish when dry, and look beautiful displayed. The art is somewhat transient, as the paint will melt and drip in hot, humid conditions. But I have had a piece on display for over a year and it is still looking fabulous.

This shiny, corn syrup paint art project is easy to do and looks gorgeous displayed. It's an all-ages art activity everyone will love to try.

_______

More Corn Syrup Paint Art

As mentioned earlier, I feature lots of corn syrup paint activities on this blog. You may be interested in:

Textured Octopus Craft

Sea Star Art

Sea Turtle Hatchling Art

Painted Turtle And Lizard

Spooky Hands Craft

Sunflower Heart Craft

All these art projects yield gorgeous results.

_______

[Read more…] about Corn Syrup Paint Sunflowers

Filed Under: art, autumn, fall, gardening, preschool, summer Tagged With: corn syrup painting, painting, sunflowers

Gadget Printmaking Poppy Art

November 10, 2022 by Annette Kaminsky Leave a Comment

Try this beautiful gadget printmaking poppy art project today! It introduces participants to a new and unusual way to paint.

_______

It started with a large dot print made with a pie pan, tempera paint, and a paintbrush. The intent was to make a simple red poppy print with a black round center. But afterward, I decided to add paint markings with gadgets to add more color and definition. The result is super striking gadget printmaking poppy art that’s easy and fun to do.

This poppy art is perfect for a Remembrance Day project. Red poppies are a symbol of lives lost to war since World War I. They especially serve as reminders of this each year on November 11, the Remembrance Day holiday in our country.

How to make stunning gadget printmaking poppy art.

_______

Follow me on Pinterest for more early learning ideas.

_______

Poppy Art Supplies

Gadgets used as painting tools make interesting prints, and you can find them all over your home. Here are the gadgets I use for this large-scale art activity:

  • 9-inch round cake or pie pan
  • Jumbo circular bubble wand and tray
  • ground meat chopper
  • spools
  • bottle sponge brush
  • round sponge brush

A few simple supplies complete the list of items needed to make poppy art:

  • tempera paint colors in bright red, yellow, green, pink, and orange
  • 12-inch x 16-inch sturdy white paper
  • green construction paper
  • green marker
  • ruler
  • scissors
  • glue stick
  • flat plate or tray

_______

Gadget Printmaking Poppy Art Steps

Simple steps to create beautiful poppy art with a gadget printmaking technique. The art project introduces participants to a new and unusual way to paint.

_______

First, lay out a large sheet of sturdy paper on a table.

Next, pour red paint on a tray or flat plate. Dip the bottom of a round cake or pie pan in the paint, and press it down on the paper background to make the flower head.

Then dip a bubble wand into orange paint and press it in the middle of the dot. The bubble wand tray holds the paint perfectly for this step.

Afterward, press a sponge bottle brush into the green paint, and make a print in the center.

Then dip a spool into black paint, and press it into the very center of the flower.

Bubble wand, sponge bottle brush, and spool paint prints add color and definition to this gadget printmaking poppy art project.

_______

Next, draw on a stem with a green marker. If desired, use a ruler to keep the stem line straight.

Finally, cut a simple leaf from green fadeless construction paper, and glue it onto the stem.

_______

Poppy Art Color Variations

The gadgets and paint colors used for enhancing the red poppies can be varied. In this art project, a bubble wand, bottle brush, and two spools are the gadgets used.

Try this beautiful gadget printmaking poppy art project today! It introduces participants to a new and unusual way to paint.

_______

A ground meat chopper paint print adds detail to the flower center below.

A bubble wand and ground meat chopper paint print add color and definition to this gadget printmaking poppy art project.

_______

Remembrance Day Poppy Art

Simple steps to create beautiful Remembrance Day poppy art with a gadget printmaking technique. The art project introduces participants to a new and unusual way to paint.

_______

This next project employs the bubble wand tray for the large dot print. The tray is not as big as the cake or pie pan, so can be used with a smaller-sized paper base. And it has a scalloped edge, adding character to the poppy dot. This design is my pick for the official Remembrance Day art project for this year.

For the flower center, dip a round sponge brush or small round sponge into black paint, and press it in the middle of the red dot print. Then press a sponge bottle brush into yellow paint, and make a print on top of the black circle. Finish off with a black spool print in the center of the flower.

Tip: Letting the red and black paint dry for a few hours helps the yellow sponge bottle print stand out and remain bright.

Create this beautiful Remembrance Day poppy art with a gadget printmaking technique. The art project introduces participants to a new and unusual way to paint.

_______

_______

More Gadget Printmaking Poppy Art Ideas

Instead of using only red for the large flower petal dot, introduce a few more color choices, such as yellow and orange. The colors will blend in nicely to make red-orange hues, adding shading and texture.

And since poppies come in a variety of colors, you could choose an entirely new color scheme for this project.

Bubble wand, sponge, meat chopper, bottle brush, and spool prints add highlights and detail to the poppy flower art. And the gadget painting technique introduces participants to a new and unusual way to do painting and printmaking.

_______

How to make stunning gadget printmaking poppy art.

_______

Bubble wand, sponge bottle brush, and spool paint prints add color and definition to this gadget printmaking poppy art project.

_______

More Remembrance Day Art Projects

Remembrance Day Butterfly Craft

Remembrance Day Poppy Art

_______

[Read more…] about Gadget Printmaking Poppy Art

Filed Under: art, autumn, fall, gardening, preschool, Remembrance Day Tagged With: flowers, poppies, printmaking, Remembrance Day

Pumpkin Painting Process Art

October 29, 2022 by Annette Kaminsky Leave a Comment

A super fun pumpkin painting process art activity tailor-made for early learners. Gold glitter glams up the pumpkins big time.

_______

This pumpkin painting process art activity is easy and effortless to do. It looks a little messy but really isn’t at all. Your little learners will be very eager to participate in this unique art project.

_______

Follow me on Pinterest for more early learning ideas.

_______

Supplies To Collect

Gather the following supplies for this creative painting activity:

  • tempera paints
  • paint brushes
  • napkins
  • small pumpkins
  • paint palettes
  • gold glitter
  • spray adhesive
  • large disposable tablecloth

_______

Pumpkin Painting Process Art Set Up

To offer this painting activity, first cover a table with a disposable tablecloth or one that can easily be wiped down afterward.

Then set out a small pumpkin for each child participating.

Next, add tempera paints to paint palettes. Place a paintbrush, filled palette, and napkin next to each pumpkin.

A no-fuss painting invitation with real pumpkins and tempera paint. A process art activity everyone will love.

_______

Invite children to choose a pumpkin and paint it any way they like.

A super fun way to decorate pumpkins with tempera paint. An all-ages art project everyone will love.

_______

Encourage little artists to wipe their brushes on the napkin provided when switching hues.

As a finishing touch, have them generously sprinkle gold glitter on top of their pumpkin. This glams up each one big time.

Gold glitter glams up painted pumpkins big time, and is a welcome addition to this showy process art activity.

_______

After leaving the pumpkins to dry overnight, spray them generously with a craft adhesive to help the glitter stay on.

Now the pumpkins are ready to be displayed or taken home.

_______

Choosing Paint Colors

In this post, I feature primary tempera paint colors. A little yellow and/or white is added to each hue to lighten and brighten it up, as the paint colors are quite intense coming straight out of the jug. There are lots of brown hues on the decorated pumpkins, as little learners never tire of large-scale color mixing. Feel free to choose an entirely different color scheme for your pumpkin art project.

Note: I briefly touch on this pumpkin painting process art activity in a post titled “Pumpkin Color Activities.”

_______

Clean Up

A little handwashing and spot cleaning on the floor take care of cleanup quickly. Most of the glitter and paint are usually contained by the tablecloth. And if there are traces of glitter around the room, I say: “A little glitter never hurt anyone.” The added sparkle is welcome!

An easy and fun pumpkin painting process art activity everyone will be eager to try. Gold glitter adds glamour to the pumpkins.

_______

Collaborative Pumpkin Process Art Project

Another way to do this fabulous art activity is to set out one large pumpkin. Give all children a chance to paint it, working in groups of two or three. Each day the pumpkin can be redecorated, giving it an entirely new look. Just remember to add the glitter at the last painting session.

_______

More Pumpkin Activities

Eye Dropper Pumpkin Art

Glow In The Dark Pumpkin Art

Pumpkin Tablescape Pretend Play

Edible Playdough Pumpkins

Pumpkin Color Activities

Pumpkin Playdough Activities

Pumpkin Collage Art

_______

[Read more…] about Pumpkin Painting Process Art

Filed Under: art, autumn, crafts, Food Art, preschool, sensory Tagged With: painting, process art, pumpkins

Fall Leaf Salad Spinner Art

October 27, 2022 by Annette Kaminsky Leave a Comment

This fall leaf salad spinner art activity is perfect for showcasing the bright colors of the season. It is easy and fun for little learners to do.

_______

Fall is well underway in our area of the world, and the leaves on the trees have turned bright shades of red, orange, and yellow in the past few weeks. The colorful leaves provide wonderful inspiration for art projects, and this fall leaf salad spinner art activity is one of my favorites.

_______

Follow me on Pinterest for more early learning ideas.

_______

Supplies to Collect

For this fun and easy art project, gather the following supplies:

  • salad spinner
  • white cardstock paper
  • red, yellow, green, and orange tempera paint
  • paint pots
  • teaspoons
  • leaf tracer
  • pencil
  • scissors

_______

A beautiful painted leaf made with a salad spinner painting technique. This process art project is bound to be a hit with your little learners.

_______

The Fall Leaf Salad Spinner Art Project

To do this art project, pick a leaf to trace and cut from white cardstock. I feature a maple leaf, as it fits nicely in a salad spinner and has an interesting shape. Cut out a few paper leaves for each child participating.

Next, pour red, yellow, orange, and green paint into small containers, and add a teaspoon to each paint pot.

Then have participants take turns placing a paper leaf in the spinner, dripping paint colors on top, and spinning the salad spinner as fast as they can.

How to make beautiful fall leaves with a salad spinner painting technique. An easy and fun all-ages art project.

_______

The resulting paint patterns are always a delightful surprise, and the arty leaves are display-worthy. And they make a great addition to year-end school memory albums.

A beautiful way to create painted fall leaves using a salad spinner technique. And it's so easy and fun.

_______

Note: I previously featured maple leaf salad spinner art in a Canada Day post. You can download a leaf template (available in that post) to use for this art activity if you wish.

_______

Beautiful fall leaves created with a salad spinner painting technique. The arty leaves are display-worthy and would be a great additions to year-end school memory albums.

_______

The salad spinner cleans up surprisingly well with soap and water at the end of the art session.

_______

Related: Maple Leaf Theme Activities

_______

[Read more…] about Fall Leaf Salad Spinner Art

Filed Under: art, autumn, fall, preschool, trees Tagged With: fall, painting, process art, spin art

  • « Go to Previous Page
  • Page 1
  • Interim pages omitted …
  • Page 5
  • Page 6
  • Page 7
  • Page 8
  • Page 9
  • Interim pages omitted …
  • Page 17
  • Go to Next Page »

Primary Sidebar

Hi, I'm Annette Kaminsky. I am a preschool teacher who loves to share easy and fun early learning activities. Thanks for visiting my blog. Feel free to stay awhile!

Subscribe Via Email

Recent Posts

  • Salt Painting Planet Art May 3, 2025
  • Spring Bunny Sensory Bin April 19, 2025
  • Tin Foil Egg Printing April 17, 2025
  • Lentil Easter Bunny Sensory Bin April 15, 2025
  • Unicorn Store Dramatic Play Center March 25, 2025
  • Easter Store Dramatic Play Center March 23, 2025
  • Origami Heart Wreath February 28, 2025
  • Black History Month Mixed Media Art February 26, 2025
  • Pink Shirt Day Necklace Craft February 20, 2025
  • Origami Heart Valentines February 9, 2025

Categories

Topics

block play bunnies butterflies Chinese New Year Christmas Christmas craft color colors dramatic play Easter flowers hearts holiday jewelry leaves leprechauns light table loose parts painting paper crafts playdough pretend play printables printmaking process art pumpkins rice bin scented playdough science experiment scissor skills sensory bin sensory play sensory tray shamrocks skeletons snakes snowflakes spiders spring St. Patrick's Day sunflowers tablescapes trees Valentine's Day water play

Copyright © 2025 · Lifestyle Pro on Genesis Framework · WordPress · Log in