• Skip to secondary menu
  • Skip to main content
  • Skip to primary sidebar

Putting The Pretty In Preschool

Finding Beauty In Everyday Early Childhood Experiences

  • Home
  • About Me
  • Winter
  • Chinese New Year
  • Blog
  • Valentine’s Day
  • Contact Me
  • Easter Activities

preschool

Edible Playdough Turkey Craft

November 22, 2023 by Annette Kaminsky Leave a Comment

_______

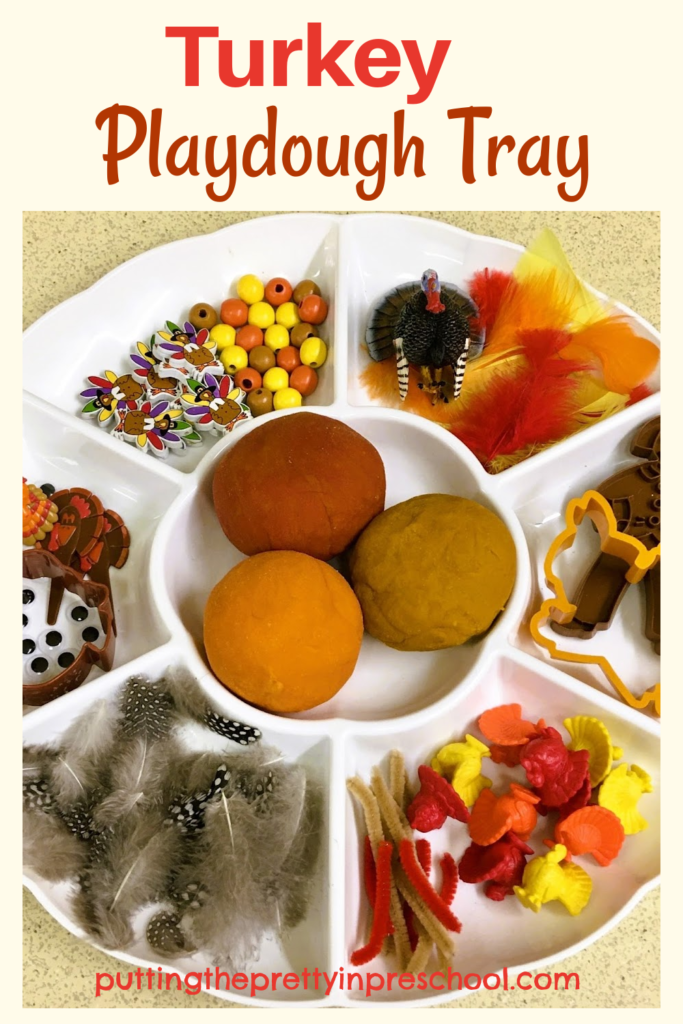
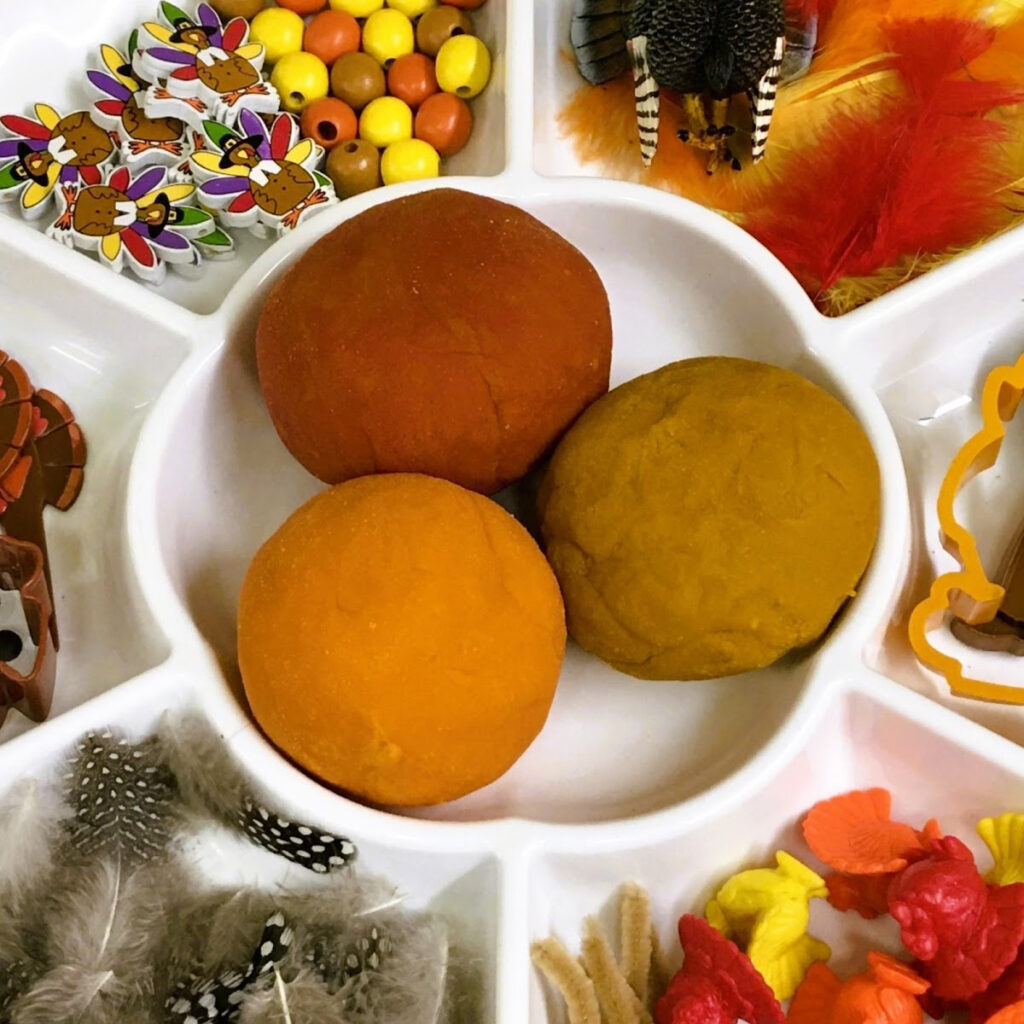
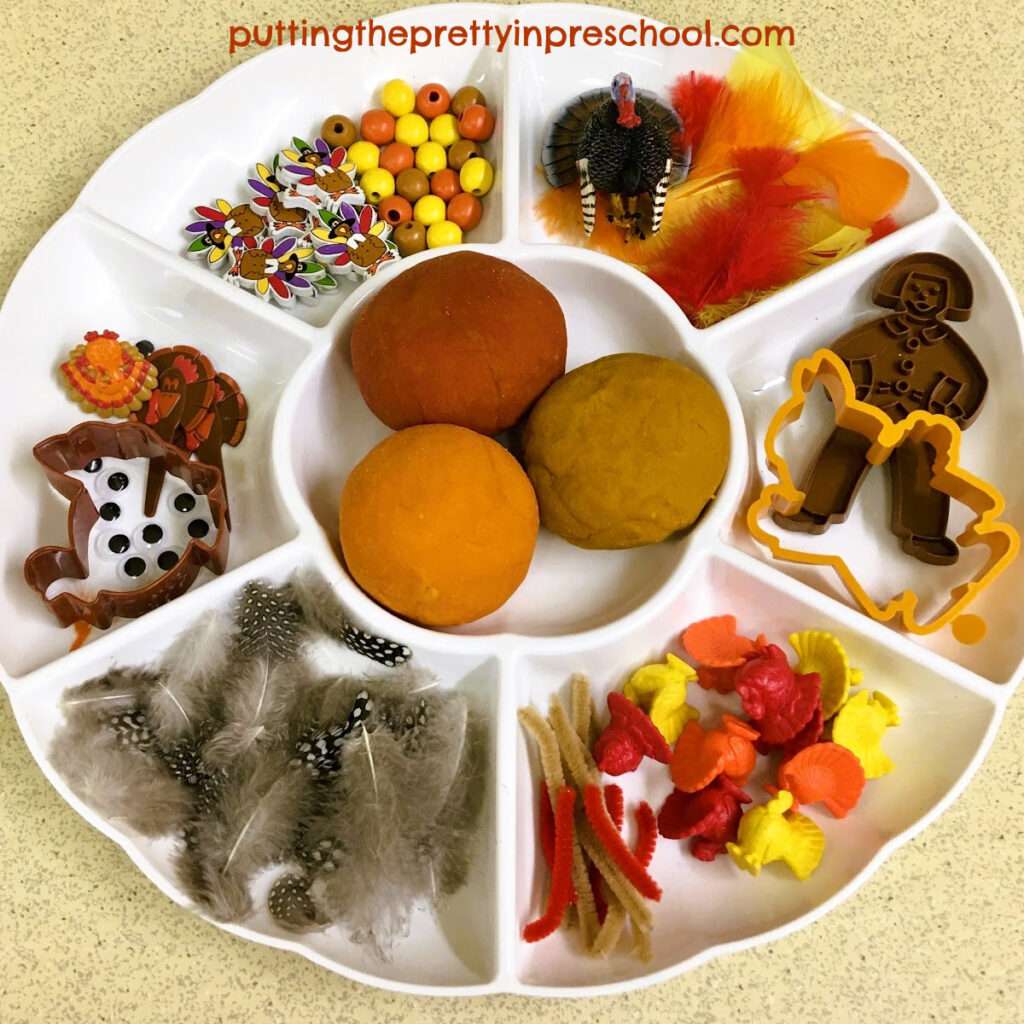
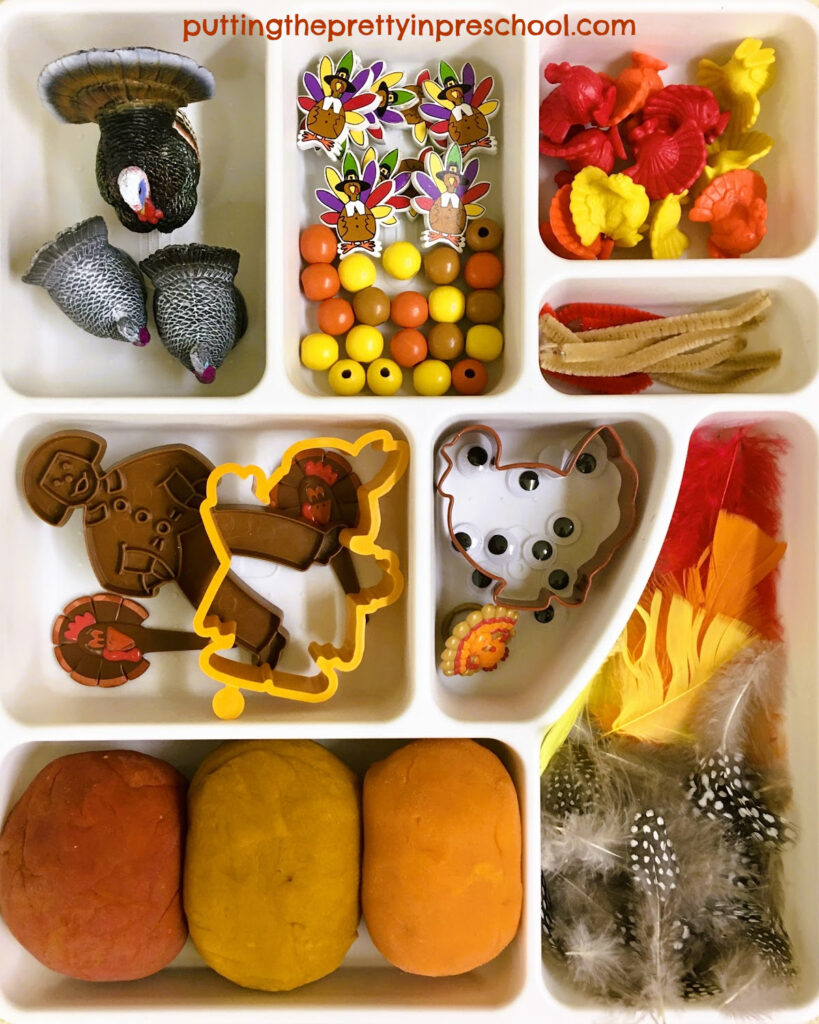
Here’s a sweet, edible playdough turkey craft just in time for Thanksgiving Day. It is suitable any time of the year for a farm animal theme. It is simple to make and uses five easy-to-find ingredients.

_______

Follow me on Pinterest for more early learning ideas.

_______

Supplies To Collect

Gather the following supplies for this color-infused playdough turkey:

  • chocolate frosting
  • vanilla frosting
  • powdered sugar
  • candy corn
  • white candy eyes
  • small serving plate
  • large mixing bowl
  • large spoon for stirring
  • knife

_____

Making The Edible Playdough

_______

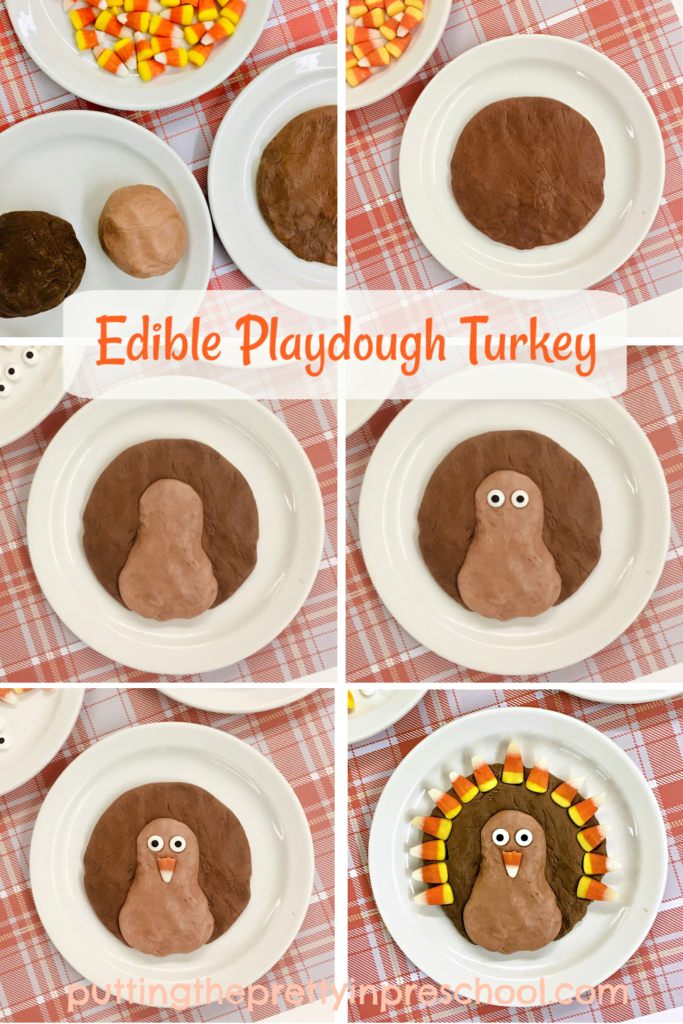
To make this edible playdough, first select a large bowl for the ingredients.

Next, empty half a container of vanilla frosting into the bowl.

Then scoop in an equal amount of powdered sugar.

With a large spoon, stir the powdered sugar and frosting together.

Afterward, knead the ingredients thoroughly, adding more powdered sugar or frosting if necessary, until the dough is a non-sticky playdough consistency.

Make a similar batch of playdough using chocolate frosting, incorporating powdered sugar with the brown icing.

Then form a ball of vanilla playdough and a smaller one of chocolate. Knead the two balls together to get a light brown shade.

Finally, add a little vanilla playdough to a ball of chocolate. Knead them together to get the medium brown shade.

_______

Little learners will love to help make this tasty edible playdough, and will especially enjoy the kneading part. Discussions about color mixing, spheres, and small and large sizes can be introduced during the playdough and turkey-making process.

_______

The Edible Playdough Turkey

Fashioning the playdough turkey is almost as easy as making the two colors of dough.

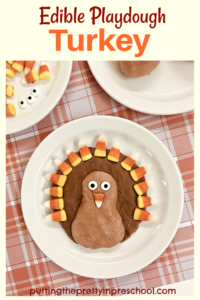
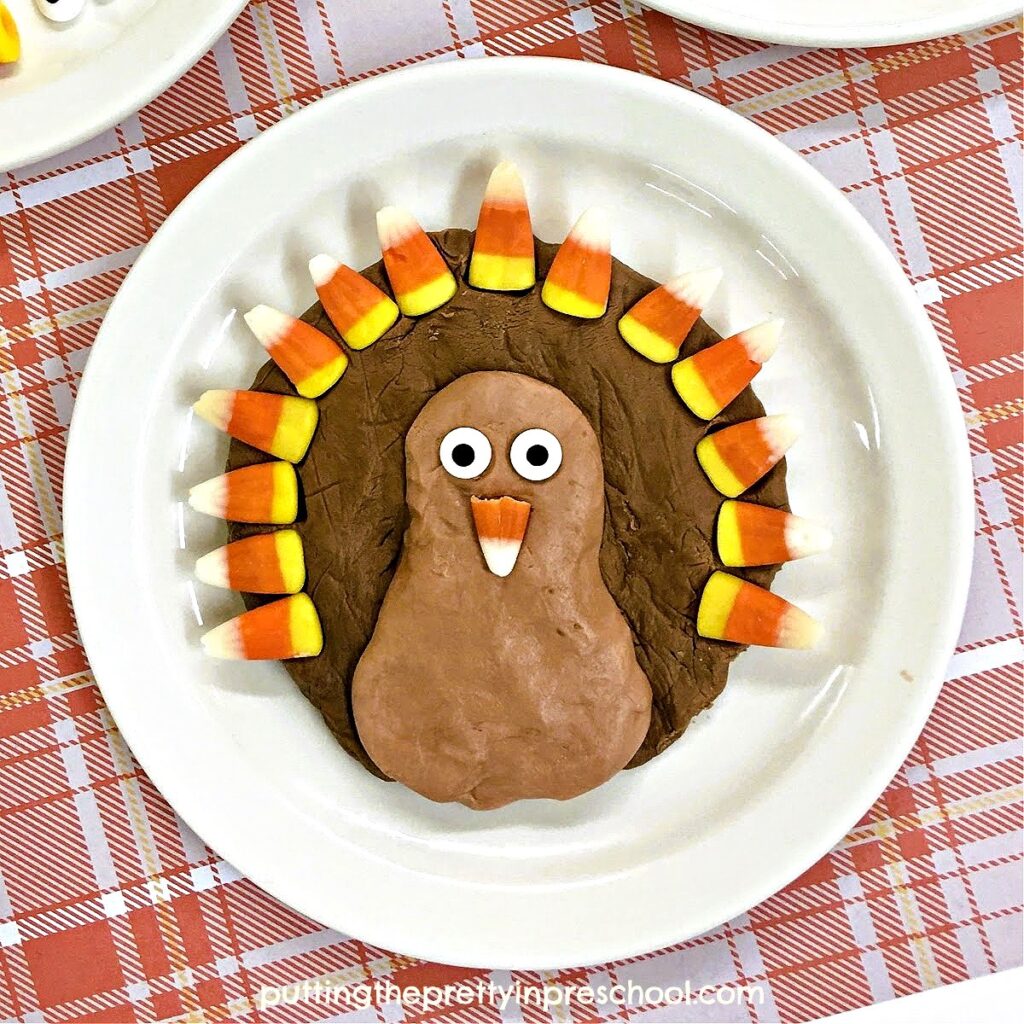
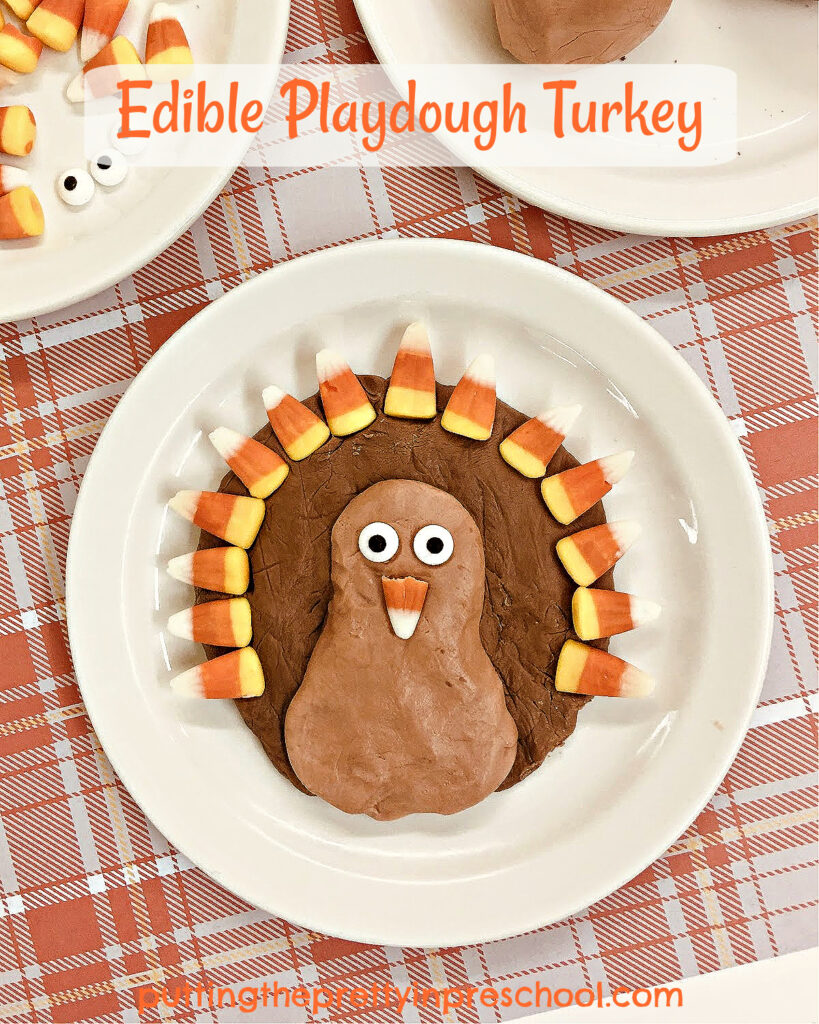
First, form a ball of medium brown playdough and flatten it into a circle on a dessert plate.

Next, make a light bulb shape from the light brown playdough and press it on top of the circle, designing a turkey head and neck.

Then add two candy eyes and a candy corn beak.

Tip: Slice off the wide end of a piece of candy corn with a knife to make a shorter beak if desired.

Finally, position candy corn pieces all around the edge of the large playdough circle.

_______

You may have noticed that this playdough is super sweet. It’s a good idea to encourage participants to design their turkey first and then snack on some of the extra supplies.

After the turkeys are made and participants have had the chance to do a little snacking, wrap leftover frosting playdough in saran wrap and place it in a jar or plastic bag. Store the playdough and part containers of frosting in the fridge to use another time.

_______

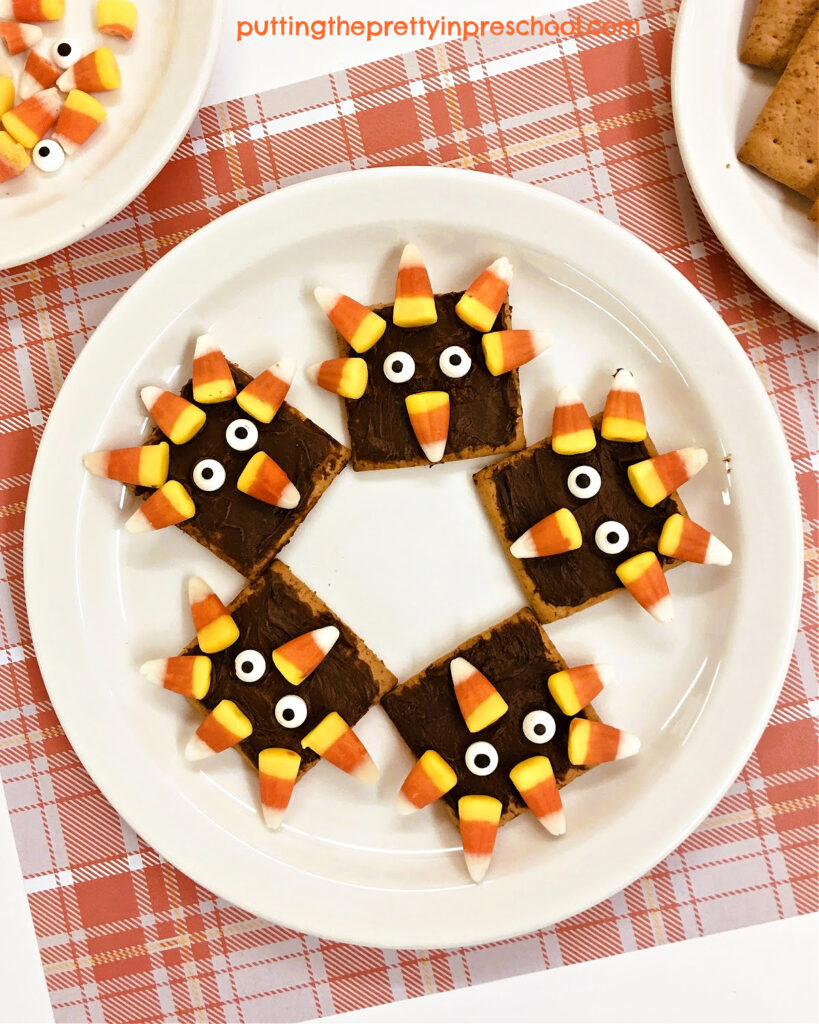
Festive Graham Cracker Turkeys

_______

The leftover frosting and candy eyes will come in handy for desserts, so nothing will go to waste. One idea is to spread a thin layer of chocolate or vanilla frosting on graham crackers. Add two candy eyes to each one, and five candy corn pieces around the upper edges. Slice off the wider end of some of the candy corn pieces and place them under the eyes for beaks. You’ll end up with festive turkey treats that will quickly be gobbled up by your little charges.

_______

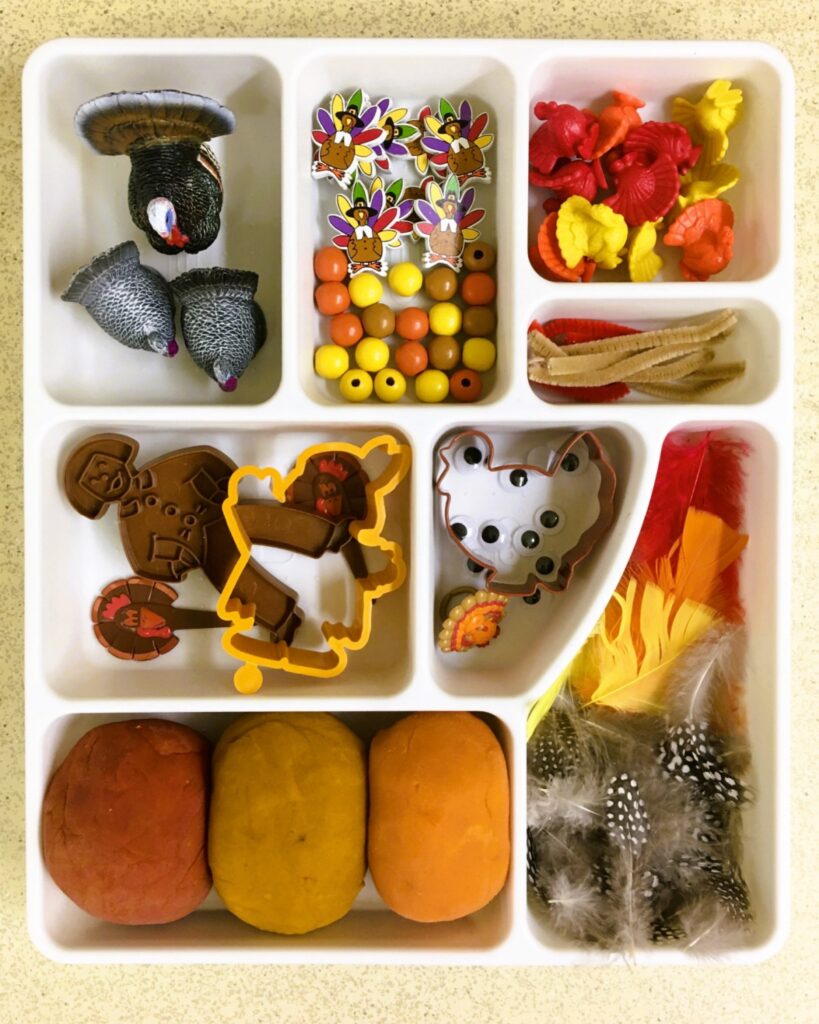
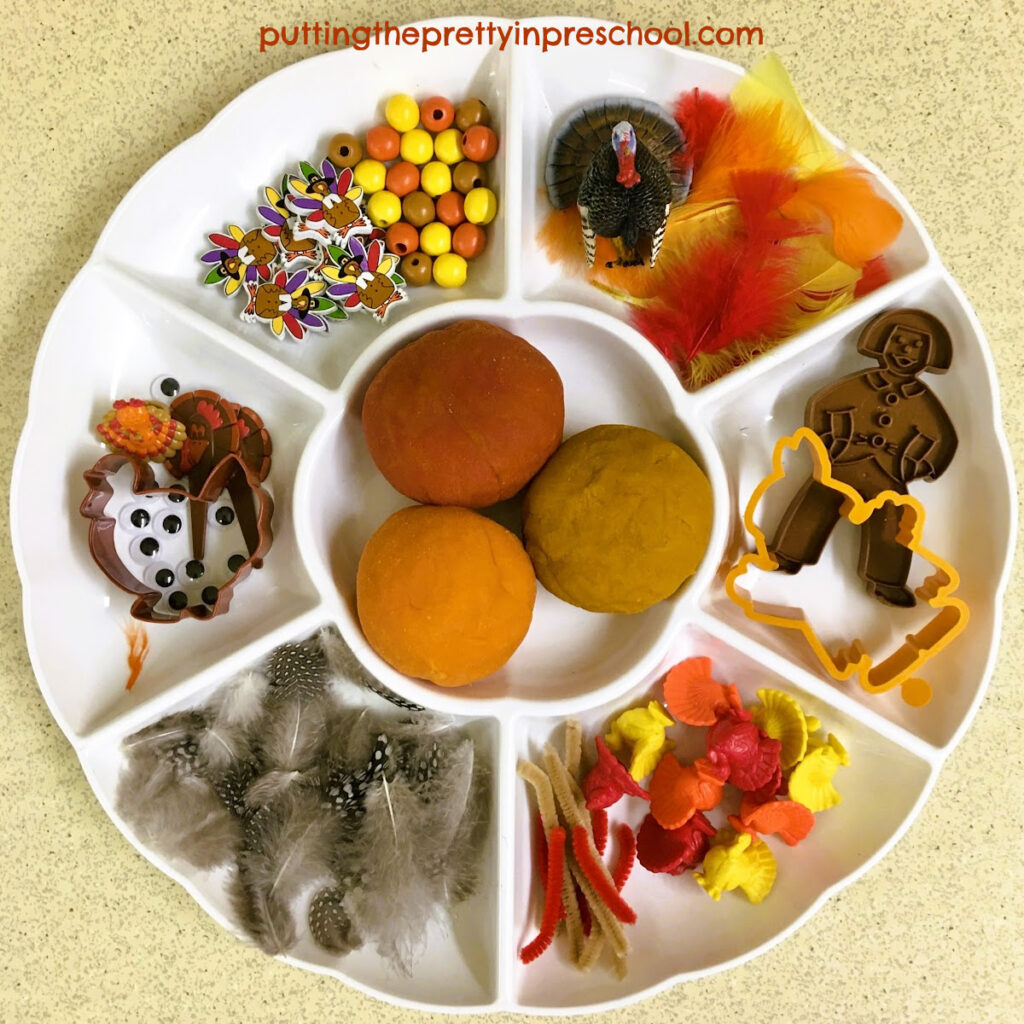
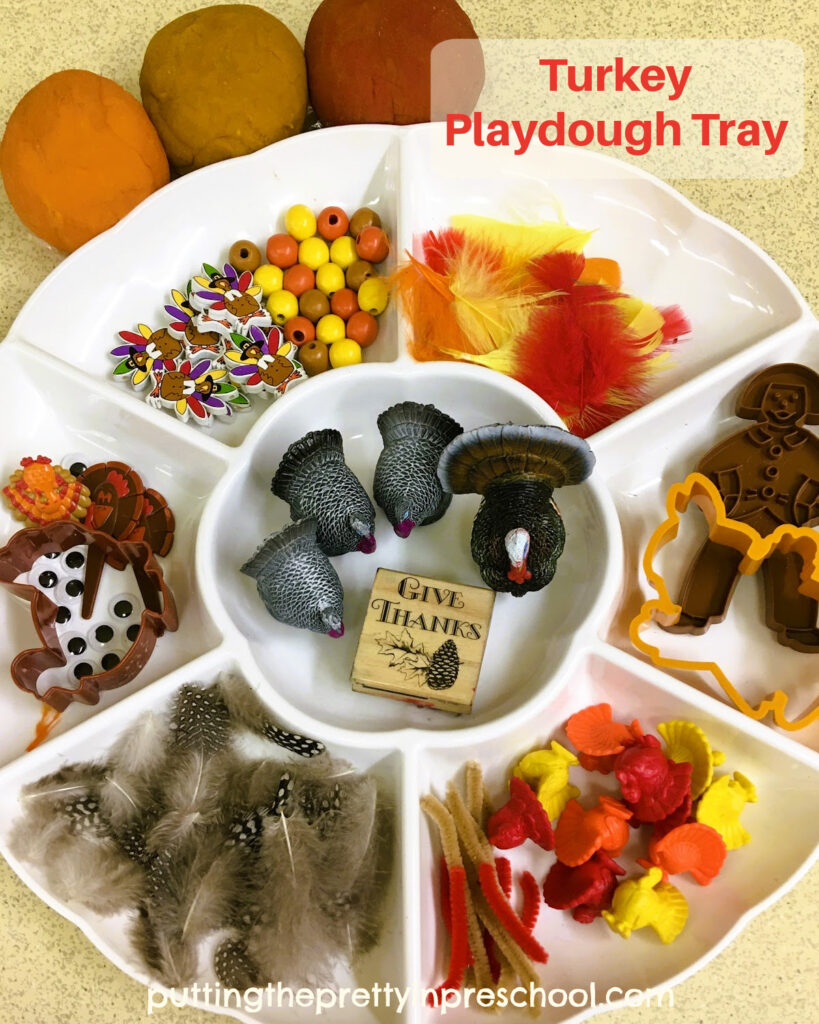
Non-Edible Playdough Turkey

The tasty turkey can be made with a basic playdough recipe instead of the sweet, edible dough. You can leave the playdough uncolored to create a white farm turkey or add varying amounts of brown gel icing color to small batches of playdough to get similar turkey colors as with the edible playdough turkey.

_______

More Turkey Activities

Paper Plate Turkey Craft

Turkey Sensory Tubes

Coffee Playdough Turkey

Turkey Playdough Tray

_______

More Playdough Recipes and Activities

Apple Playdough Tray

Scented Playdough Activities

Pumpkin Playdough Activities

Orange-scented Playdough Invitation

Chocolate Mint Playdough

Santa Claus Playdough Tray

Valentine’s Day Playdough Activities

St. Patrick’s Day Playdough Tray

Easter Playdough Tray

_______

[Read more…] about Edible Playdough Turkey Craft

Filed Under: art, autumn, crafts, desserts, farm animals, Food Art, playdough, preschool, Thanksgiving Day Tagged With: playdough, snacks, turkeys

Turkey Playdough Tray

November 5, 2023 by Annette Kaminsky Leave a Comment

_______

Turkeys are a big part of fall, and this turkey playdough tray celebrates them. Three rich fall playdough colors are featured, along with turkey-themed loose parts.

_______

Follow me on Pinterest for more early learning activities.

_______

Turkey Playdough Ingredients

All three playdough colors in the tray are made with my go-to basic recipe, with an icing color added.

For the orange playdough, gather the following ingredients:

  • 2 cups flour
  • 1 cup salt
  • 4 teaspoons cream of tartar
  • 2 cups water
  • orange icing color
  • 3 tablespoons oil

_______

How To Make Turkey Playdough

_______

To make the orange playdough, start by adding the first three ingredients to a sturdy pot and mixing them together.

Next, mix a half teaspoon of orange icing color in two cups of water, stirring well. Then blend in 2 tablespoons of oil. Add the oily, colored water to the dry ingredients and combine.

Afterward, heat the pot on the stove on medium heat.

Stirring frequently, cook until the mixture is no longer glossy and the dough forms a ball.

Then scoop the dough onto a cutting board.

Knead when cool, adding one tablespoon more oil.

Finally, store the playdough in a sealed plastic bag.

_______

Gold and Copper Playdough Colors

To make the gold playdough, stir a generous amount of buttercup yellow icing color into the water before mixing it with the oil and dry ingredients.

To make the copper playdough, stir in copper icing color instead of orange or yellow.

_______

Turkey Playdough Loose Parts

_______

Including loose parts in the turkey playdough invitation adds interest and offers more opportunities to develop finger and hand strength. The following loose parts are in the tray:

  • turkey game counters
  • life-like turkey figurine
  • pioneer and turkey cookie cutters
  • turkey wooden beads
  • turkey ring and cupcake topper
  • orange, red, and yellow spherical beads
  • yellow, orange, and red feathers
  • spotted brown feathers
  • small wiggly eyes
  • red and tan pipe cleaner sections

_______

Turkey Playdough Invitation

The orange, buttercup yellow, and copper playdough hues are complementary colors, so they go well together.

The turkey and pioneer cookie cutters are on point with the theme.

_______

Little learners have the opportunity to craft a turkey using playdough, feathers, and wiggly eyes. Cut and bent pipe cleaners work well for creating turkey feet and snoods.

The turkey counters and life-like turkey figurine provide models for creating playdough turkeys and are great for incorporating counting activities.

The fall-hued beads, turkey ring, and cupcake topper add interest to the manipulative play invitation.

_______

Besides being appropriate for a Thanksgiving or turkey theme, the beautiful playdough colors in the tray are perfect for any fall theme.

_______

More Turkey Activities

Paper Plate Turkey Craft

Turkey Sensory Tubes

Coffee Playdough Turkey

_______

[Read more…] about Turkey Playdough Tray

Filed Under: autumn, fall, farm animals, playdough, preschool, Thanksgiving Day Tagged With: farm animals, loose parts, playdough, Thanksgiving Day, turkeys

Skeleton Sunflower Seed Bin

October 30, 2023 by Annette Kaminsky Leave a Comment

_______

If you need an easy sensory bin idea for a skeleton theme, this skeleton sunflower seed bin is for you. Set it up in minutes, and you’ll have a super engaging sensory invitation your little learners will be happy to explore.

_______

Follow me on Pinterest for more early learning ideas.

_______

Supplies To Collect

_______

The following supplies are in the sunflower seed sensory bin:

  • sunflower seeds
  • skeleton figurines
  • skeleton arm scoops
  • toy bones
  • skull reusable ice cubes
  • toy eyeballs in different colors
  • skull treat holders
  • skull cups
  • clear non-breakable jars
  • silver bowls and serving spoons

_______

The Skeleton Sunflower Seed Bin

_______

Striped sunflower seeds are the base for this seedy skeleton bin. They are economical to buy and provide a unique sensory experience. In my active world tray, two large bags of seeds work nicely. For a smaller bin such as a bus tub or saucer sled, one large bag would be enough.

The sunflower seeds bring plenty of color, so there is no need to dye anything. This saves a lot of preparation time.

The toy skeletons, skulls, and bones are supplies easily scooped up at dollar and party stores, or the seasonal section of a big box store.

_______

It’s always nice to see the excited look of children when they discover a new sensory bin invitation, and their reaction to this bin did not disappoint. There was lots of imaginative and creative play.

_______

Skeleton Lentil Bin Sensory Play

To keep the interest in skeleton sensory play going, offer the same supplies in a lentil-based bin. The red lentils are another base ingredient that brings its own color to the sensory invitation.

_______

_______

More Sunflower Seed Sensory Play

After children have had plenty of time to explore the skeleton-themed accessories, swap them out for a pumpkin or sunflower and dinosaur-themed bin using the same striped sunflower seeds as a base.

_______

More Skeleton Activities

Skeleton Preschool Theme

Glam Skeleton Sensory Bin

Skeleton and Eyeball Waterplay

Glam Skeleton Playdough Tray

Floral Decorated Skeleton

Skeleton Treasure Blocks

Spaghetti and Eyeball Sensory Bin

Q-tip Skeleton Craft

_______

[Read more…] about Skeleton Sunflower Seed Bin

Filed Under: autumn, fall, preschool, science, sensory Tagged With: lentils, sensory bin, sensory play, sensory tray, skeletons, skulls, sunflower seeds

Pumpkin Sensory Activities

October 29, 2023 by Annette Kaminsky Leave a Comment

_______

Pumpkin carving is a fun annual activity, and children love to get it on it. After the large fruits are carved or sliced, there are a few effortless, super-engaging pumpkin sensory activities children can do before saying goodbye to the showy gourds.

_______

Pumpkin Cross-Section Exploration

If you happen to have a very lop-sided pumpkin that wasn’t chosen for carving, use a sharp knife to carefully cut it from top to bottom into two cross-sections for everyone to view. This provides your little charges a novel way to investigate the inside of a pumpkin, and it is much easier for them to scoop out and feel the fibrous strands and pumpkin seeds this way.

_______

When the fruity exploration is over, store the pumpkin parts and slimy pumpkin seed mixture in the fridge for more sensory play at another time.

_______

Follow me on Pinterest for more early learning ideas.

_______

Pumpkin Sensory Bin

_______

To set up a tantalizing pumpkin sensory bin activity, first place two pumpkin halves into a generous-sized container. A large green active world tray is up to the task and color coordinates with the pumpkin parts perfectly.

Next, set tablespoons, serving bowls, and food storage containers in the bin.

Then add non-breakable or disposable plates with a slimy pumpkin seed and fibrous strand mixture to the sensory play center.

_______

Afterward, make a goopy, cornstarch and hair conditioner mixture for the bin. Green apple playdough thinned with a bit of water works well for the slimy mixture, and you can use older playdough which has been stored in the fridge for it.

An alternative is to mix a cup or two of cornstarch with half the amount of water to get a thick but flowing consistency, and then squirt and blend in about half a bottle of apple-scented hair conditioner to make it slippery and aromatic. Add more cornstarch or water if needed. Squirt in a generous amount of green food coloring to give the mixture a deeper green hue.

_______

Finally, scoop the cornstarch and green apple conditioner mixture into the pumpkin halves and invite your little learners to explore the bin.

_______

Note: Apples and pumpkins are commonly used together in pies, as their scents and tastes are complementary. The two scents also work nicely together in sensory play.

_______

Washing up afterward is part of the fun, as your little charges will love seeing the water turn green.

_______

Green Apple Goop Pumpkin Play

_______

In this tactile autumn activity, green apple playdough, often called cloud dough, is turned into a goopy mixture with the addition of a little water. Just scoop the thinned dough into a serving bowl and set it in a sensory table next to a carved and hollowed-out pumpkin for your little learners to use in hands-on play.

_______

Golf Tee Pumpkin Play

_______

This last pumpkin sensory activity is less messy than the above slimy, goopy versions. Simply set a carved or uncarved pumpkin out on a table along with small, child-sized hammers and a container of golf tees. Invite little learners to use a hammer to gently pound the golf tees into the pumpkin. This is a great activity for practicing eye-hand coordination. Two children can share in this activity at a time, providing an opportunity for cooperative, synergetic play.

_______

More Pumpkin Activities

Edible Playdough Pumpkins

Eye Dropper Pumpkin Art

Pumpkin Painting Process Art

Pumpkin Tablescape Pretend Play

Glow In The Dark Pumpkin Art

Pumpkin Color Activities

Pumpkin Playdough Activities

_______

[Read more…] about Pumpkin Sensory Activities

Filed Under: apples, autumn, fall, gardening, preschool, pumpkins, science, sensory Tagged With: apples, pumpkins, sensory bin, sensory play, sensory tray

Q-tip Skeleton Craft

October 28, 2023 by Annette Kaminsky Leave a Comment

_______

Out shopping this fall, I couldn’t help but notice the beautiful skull art in craft and home décor stores. Pastel skull heads were one of my favorite finds, and this colorful dyed Q-Tip skeleton craft is inspired by them. It is super fun to do, so why not give it a try.

_______

Follow me on Pinterest for more early learning ideas.

_______

Supplies To Collect

_______

For this cute skeleton craft, gather the following supplies:

  • Q-tips
  • liquid food coloring
  • paint pots or small jars
  • paint brushes
  • black fadeless construction paper
  • white paper
  • paper in pastel shades
  • thin marker
  • scissors
  • paper towel roll
  • white glue
  • glue stick
  • glue paddle

_______

How To Dye Q-Tips

_______

Before setting out supplies for this craft, dye a package of Q-tips in various pastel shades.

To dye Q-tips, pour liquid food colors of choice into small paint pots or jars, and mix in a little water. My chosen colors were turquoise, orange, violet, and neon green.

Next, quickly dip each soft Q-tip end into a jar of liquid color and lay the Q-tips out to dry onto paper towel strips.

When dry, gather the Q-tips and sort them by color into a compartment tray.

_______

The Q-tip Skeleton Craft

The first thing to do when making a Q-tip skeleton is to select or craft a skull to use. Here are three options:

  • Draw a skull on white or pastel paper using a marker, and fill in the eye socket and teeth details. Then cut it out.
  • Select a sticker or crafted skull.
  • Use a skull rubber stamp/ink pad to print the skull.

On a last-minute shopping trip, I was happy to find a package of skull-themed paper doilies, from which I cut a few skull heads. They work perfectly for the craft as they can be painted.

_______

After picking out a skull design and painting it with a pastel shade if desired, use white glue or a glue stick to tack it near the top of a black piece of fadeless construction paper.

Next, lay out Q-tips in the shape of a skeleton below the skull. Whole Q-tips work fine for the rib cage and backbone, and Q-tips cut into various lengths with a pair of scissors are best for the arms and legs. Q-tip ends are perfect for the little fingers.

_______

When you have a design that you are happy with, use a glue paddle to add white glue to the Q-tip ends, and carefully affix them one by one to your skeleton design.

_______

A group of crafted Q-Tip skeletons would be eye-catching if displayed together, as each pose is bound to look different.

_______

Q-tip Skeleton Arm

Instead of making a whole skeleton out of Q-tips, trace an arm from black construction paper, cut it out, and glue Q-tip pieces to it. This Q-tip craft version draws attention to the many bones in the hands, and the two bones in the lower arm.

_______

Q-tip Skeleton Transient Craft

If you are short on time but would still like to offer a Q-tip skeleton-building experience, this craft project could be set up as a transient craft invitation.

_______

More Skeleton Activities

Skeleton Preschool Theme

Glam Skeleton Sensory Bin

Skeleton and Eyeball Waterplay

Glam Skeleton Playdough Tray

Floral Decorated Skeleton

Skeleton Treasure Blocks

Spaghetti and Eyeball Sensory Bin

_______

[Read more…] about Q-tip Skeleton Craft

Filed Under: art, crafts, fall, preschool, science, sensory Tagged With: color experiment, skeletons

Spaghetti and Eyeball Sensory Bin

October 27, 2023 by Annette Kaminsky Leave a Comment

_______

On a recent trip to a Dollar store, I picked up a pair of skeleton arms to add to my growing supply of bony resources. In the checkout line, a man turned around, smiled, and announced “Grandma’s spaghetti scoops.” I took the comment in humor, and immediately thought it would be fun to use the skeleton props in a spaghetti and eyeball sensory bin. The sensory invitation was a hit with my little learners, and I highly recommend trying it.

_______

Follow me on Pinterest for more early learning ideas.

_______

Supplies To Collect

For this ooey-gooey sensory bin, gather the following supplies:

  • saucer sled
  • large package of spaghetti noodles
  • big pot
  • orange tempera paint
  • toy eyeballs
  • pair of skeleton arms
  • two bowls
  • painting aprons

_______

Spaghetti and Eyeball Sensory Bin Preparation

_______

To prepare this slimy sensory bin, cook a large package of spaghetti noodles in a big pot.

Next, pick a bin or tray to hold the cooked noodles. A saucer sled is a good size for this sensory invitation. It is neither too small nor too large to hold this amount of noodles. A bus bin or similar-sized storage tub would work nicely too.

Then slide the noodles into your bin of choice, and spread them around.

_______

Afterward, mix three parts of orange tempera paint with one part of water. Pour the thinned paint over the noodles so that it looks like spaghetti sauce.

Next, add toy eyeballs to the bin to represent meatballs.

Finally, place two bowls and a pair of skeleton arms in the slippery, mushy bin. The skeleton arms will serve as spaghetti scoops.

_______

The Spaghetti and Eyeball Sensory Bin

In offering this noodle-based sensory bin to little learners, you’ll find out which children love to get covered in paint, and which ones prefer not to. Not everyone will want to explore the bin, but it will likely be a huge hit with most.

A saucer sled sensory bin is perfect for two children to play in at a time.

_______

Having participants wear a painting apron is encouraged, as well as setting up a hand washing station close by.

Washing hands in a tub after exploring the noodle bin is as fun as playing in it. The orange water and bubbles created by handwashing will delight little learners and add to the sensory experience.

_______

Taste-Safe Spaghetti Sensory Bin

To make this spaghetti and eyeball sensory bin taste safe, use a mildly spiced spaghetti sauce instead of tempera paint for the noodle-based sensory activity.

_______

More Skeleton Activities

Skeleton Preschool Theme

Glam Skeleton Sensory Bin

Skeleton and Eyeball Waterplay

Glam Skeleton Playdough Tray

Floral Decorated Skeleton

Skeleton Treasure Blocks

_______

[Read more…] about Spaghetti and Eyeball Sensory Bin

Filed Under: autumn, dramatic play, fall, preschool, pretend play, sensory Tagged With: pasta, sensory bin, sensory play, sensory tray, skeletons

Eye Dropper Pumpkin Art

October 26, 2023 by Annette Kaminsky Leave a Comment

_______

This eye dropper pumpkin art project is super easy to set up and loads of fun to do. Participants will want to make a few watercolor-painted pumpkins, so you will end up with a bunch of pumpkin art to display at home or in the classroom.

_______

Follow me on Pinterest for more early learning activities.

_______

Supplies To Collect

Gather the following supplies for this no-fuss pumpkin art project:

  • liquid watercolors
  • eye droppers or pipettes
  • paint pots
  • non-permanent black marker
  • permanent black marker
  • paper towel roll
  • pumpkin template
  • scissors and pencil
  • newspaper or waterproof tablecloth

_______

_______

Eye Dropper Pumpkin Art Preparation

Preparation for this eye dropper pumpkin art project is super quick. Start by tracing pumpkins onto one or two sheets of paper towel. Choosing a thick paper towel brand is recommended.

Next, mix liquid food colors and water into paint pots, and add an eye dropper or pipette to each one. In this project, my colors of choice are orange, yellow, and magenta, as they go nicely together.

Afterward, cover an art table with newspaper or a waterproof tablecloth.

Then set up art stations with liquid watercolor pots, eye droppers or pipettes, and paper towel pumpkins.

_______

The Eye Dropper Pumpkin Art

To create the gorgeous eye dropper art, invite your little learners to draw a mouth, nose, and eyes on a paper towel pumpkin using a black permanent marker.

Then direct your little charges to use the eye droppers or pipettes to squirt all three colors on their pumpkins. In no time the large fruits will be covered in brilliant hues.

_______

Let the arty pumpkins dry in the spot they were created or move them to a new place to do so. The painted pumpkins will likely be very wet, but by the end of the day, they will be totally dry.

_______

Eye Dropper Scary Pumpkin

If children use a non-permanent black marker to draw a face on their pumpkin before wetting it with liquid watercolors, the marker color will bleed during the art process. The pumpkins will have an ominous, scary look.

_______

Rainbow Pumpkin Art

You can choose to skip having your little artists draw a face on the paper towel pumpkin and get them right to work squirting liquid food colors on it. Adding a few more watercolor hues makes creating a rainbow pumpkin possible.

_______

Paper Towel Rainbow Art

If you run out of paper towel pumpkins for your eager art session participants, allow them to spread watercolors directly on rectangular or square sections of a disposable towel roll. They’ll be happy to use these as a canvas to continue exploring this watercolor painting technique.

_______

More Pumpkin Activities

Pumpkin Painting Process Art

Glow In The Dark Pumpkin Art

Pumpkin Tablescape Pretend Play

Edible Playdough Pumpkins

Pumpkin Color Activities

Pumpkin Playdough Activities

_______

[Read more…] about Eye Dropper Pumpkin Art

Filed Under: art, autumn, fall, gardening, preschool Tagged With: painting, process art, pumpkins, watercolors

Skeleton Treasure Blocks

October 24, 2023 by Annette Kaminsky Leave a Comment

_______

Children love using loose parts in pretend play centers and sensory trays, and they make playful playdough accessories. I also enjoy featuring them in treasure blocks, and these skeleton treasure blocks are among my favorites.

_______

Supplies In the Treasure Blocks

_______

The following supplies are featured in the skeleton treasure blocks:

  • wooden treasure blocks with two clear panels
  • skeleton figurines
  • skeleton and bone metallic necklace pieces
  • green, orange, and purple pompoms
  • orange bead necklace
  • white, green, orange, purple, and black beads
  • skull treat holder
  • squishy eyeballs
  • toy bones

_______

Follow me on Pinterest for more early learning ideas.

_______

The Skeleton Treasure Blocks

_______

Treasure blocks are fillable wooden blocks with two clear or transparent panels.  They are perfect for holding natural and found objects and sensory loose parts. They can be used in many different ways, and I highly recommend having a set or two in your collection of educational supplies.

Bendable skeleton figurines in purple, green, and orange, are the highlight of my skeleton blocks. They are featured in a large square sensory block, and in the rectangular block. The neon skeletons set the color scheme for most of the rest of the supplies.

Bright, sparkly green, orange, and purple pompoms are included in the orange skeleton block and also have a moment of their own in a small square block.

_______

Similarly colored small beads accent the block with two skeletons.

Skull and bone necklaces that are cut apart make tiny, exquisite loose parts for a second small square block.

_______

Strips cut from a metallic orange bead necklace provide the sensory base for the second large square block. Bones are featured on the middle layer, and white squishy eyeballs are layered on top.

Individual beads cut from the orange bead necklace are also featured in the third small square treasure block.

A small skull treat holder fits perfectly inside the last square block.

_______

Other Skeleton Activities

Skeleton Preschool Theme

Glam Skeleton Sensory Bin

Skeleton and Eyeball Waterplay

Glam Skeleton Playdough Tray

Floral Decorated Skeleton

_______

[Read more…] about Skeleton Treasure Blocks

Filed Under: autumn, block play, display, fall, preschool, sensory Tagged With: block play, skeletons, treasure blocks

Painting With Corn

October 21, 2023 by Annette Kaminsky Leave a Comment

_______

This painting with corn process art activity is quick and easy to do and offers young children an unexpected way to paint. It can be completed in a few different ways, adding variety and sensory options to the art experience.

_______

Follow me on Pinterest for more early learning ideas.

_______

Supplies To Collect

Gather the following supplies for painting with corn:

  • corn ear and husk
  • box or serving tray
  • large sheets of sturdy art paper
  • 8 ½ x 11-inch cardstock paper
  • tempera paint
  • paint pots
  • paint tray
  • teaspoons
  • sharp knife

_______

Painting With Corn Techniques

Corn Painting In a Tray

The first way to paint with corn is to set a piece of sturdy paper into a low-edged box or serving tray.

Next, spoon globs of paint in the colors of your choice onto the paper.

_______

Then shuck an ear of corn and drop it in the box or tray. Or use an ear of corn that is already shucked for the art activity.

Tip the box or tray carefully from side to side to move the corn ear around, and you’ll soon have a completed piece of art.

_______

For a little more control, paint the ear of corn instead of spooning paint onto the art paper. When the corn cob is covered in paint, drop it into the box or tray. Then tip the box from side to side as in the process above.

_______

Painting By Hand Rolling Corn

A second way to paint with corn is to forgo using a box or tray for the art process. Simply set a large piece of sturdy paper on a table covered with newsprint or a washable tablecloth.

_______

Then drop globs of paint onto the paper and roll the corn over them with your hands as if you were using a rolling pin.

_______

Or paint the corn ear first and then roll it in different directions over the paper.

This rolling corn technique just might go over best with little learners, as they love to mingle with the paint.

_______

Corn Half Paint Prints

The third method of painting is to start by cutting an ear of corn in half with a sharp knife, aiming to get a smooth sliced end on each half.  

Next, spoon tempera paint colors into pie tins, disposable plates, or paint trays.

Dip the sliced end of one corn ear half into a paint color and press it onto the paper.

_______

When switching colors, wipe the paint-filled edge of the corn with a paper towel sheet before dipping it in a new hue.

_______

Corn Cob Paint Print

In the last method of painting with corn, the goal is to make a realistic corn cob by using a printmaking technique. In this art activity, a corn cob and a husk are used to make paint prints.

_______

For the art project, set out an ear of shucked corn. Save one of the green husks to use.

With a paintbrush, first thoroughly paint a corn ear with yellow tempera paint.

Next, press the corn cob on a piece of 8 ½ x 11-inch cardstock paper, slightly rolling it back and forth with your fingers.

Remove the corn cob from the paper.

Then paint one side of a husk and press it down on the paper next to the corn print. Make a second husk print on the other side of the cob. Afterward, add a couple more husk prints around the corn.

_______

You may wish to try all of the above painting with corn methods as each adds an interesting twist to the art activity. Which corn process art painting technique is your favorite? Share in a comment below.

_______

Related: Corn Theme Activities

_______

[Read more…] about Painting With Corn

Filed Under: art, autumn, fall, gardening, preschool Tagged With: corn, painting, process art

Apple Playdough Tray

October 15, 2023 by Annette Kaminsky Leave a Comment

_______

Tis the season of all things apple, and here’s a tantalizing apple playdough tray to add to your rotation of fall activities. It features playdough in three different scents and colors. The aromatic apple-themed sensory activity also works well for a nutrition or fruit and vegetable theme.

_______

Follow me on Pinterest for more early learning ideas.

_______

Apple-Scented Playdough Recipe

Gather the following easy-to-find supplies for this silky apple-scented playdough recipe:

  • apple-scented hair conditioner
  • cornstarch
  • large bowl
  • green food coloring
  • measuring cup
  • spoon for stirring

To make the simple no-cook recipe, first scoop 2 parts of cornstarch into a large bowl. Next, add one part apple-scented hair conditioner and mix it with the cornstarch using a stirring spoon. Then knead the scented dough ingredients together to make a smooth dough. If the dough is a bit crumbly, add a tad more hair conditioner. If it is a little slimy, add a bit more cornstarch. A playdough recipe couldn’t be any easier to make.

Apple themed playdough invitation with apple cutting board, ice cube tray, cookie cutters, leaves, and gems.

_______

Optional: Mix in a generous amount of green food coloring with the apple-scented hair conditioner before adding it to the cornstarch to get a light green color of playdough. You can also add the food coloring at the end. In this case, the playdough will look marbled with green at first and turn an even shade of light green after it has been used in a playdough invitation.

While you are making this recipe, it may not look like it will form a smooth playdough. Be assured that it will.

This dough becomes more mouldable as it is being handled. Round balls and other shapes are easy to form once it is warmed up a little with little human hands!

When using the dough for a second or third time, set it out and let learners add a tad more conditioner to their dough. If it gets a little mushy, have them work in a bit of cornstarch. They will love doing this.

_______

Apple-Scented Playdough Variations

_______

Since many apples come in varying combinations of red, green, and yellow hues, you can use other conditioner colors such as strawberry hair conditioner with red food coloring added to make red dough, and coconut hair conditioner with yellow food coloring added to make yellow dough.

Color mixing is a favorite activity for little learners, and they will relish the chance to mix all three colors of playdough together.

_______

Apple Playdough Tray

This apple playdough tray is easy to set up for little learners. Three colors of playdough are featured, but little learners would be more than happy to use only one scented playdough variety for the activity.

_______

In the tray are:

  • red, green, and yellow playdough
  • apple cookie cutters
  • alphabet letter wood stamps
  • leaf pie edgers
  • red, green, and yellow acrylic apple gems
  • green, red, and yellow apple counters
  • yellow, green, and red beads
  • brown pipe cleaners
  • drinking straws

Scented hair conditioner is an effortless ingredient to use in playdough, especially when only one or two other ingredients are required. Checking for it at dollar stores is an economical alternative.

_______

Having a bulk container of cornstarch ensures that there will be enough of this ingredient to make the playdough for a group of students. Using one cup of cornstarch to one-half cup of conditioner makes a recipe big enough for one or two children to share.

Loose parts such as yellow, green, and red apple counters, acrylic gems, and beads add interest to the tray.

_______

Pipe cleaners cut in half and wrapped around a pencil make curly caterpillars. Cut straws can be used to poke holes in the playdough and represent how caterpillars dig holes in apples and burrow inside.

Lowercase alphabet letter wood stamps offer an opportunity to spell the word apple.

_______

More Apple Activities

For more apple-themed activities, check out the following blog posts:

Apple Theme Activities

Watercolor Apples With Markers

Apple Print Activities

_______

[Read more…] about Apple Playdough Tray

Filed Under: apples, autumn, fall, preschool, sensory, trees Tagged With: apples, loose parts, playdough, scented playdough, sensory tray

  • « Go to Previous Page
  • Page 1
  • Interim pages omitted …
  • Page 6
  • Page 7
  • Page 8
  • Page 9
  • Page 10
  • Interim pages omitted …
  • Page 32
  • Go to Next Page »

Primary Sidebar

Hi, I'm Annette Kaminsky. I am a preschool teacher who loves to share easy and fun early learning activities. Thanks for visiting my blog. Feel free to stay awhile!

Subscribe Via Email

Recent Posts

  • Salt Painting Planet Art May 3, 2025
  • Spring Bunny Sensory Bin April 19, 2025
  • Tin Foil Egg Printing April 17, 2025
  • Lentil Easter Bunny Sensory Bin April 15, 2025
  • Unicorn Store Dramatic Play Center March 25, 2025
  • Easter Store Dramatic Play Center March 23, 2025
  • Origami Heart Wreath February 28, 2025
  • Black History Month Mixed Media Art February 26, 2025
  • Pink Shirt Day Necklace Craft February 20, 2025
  • Origami Heart Valentines February 9, 2025

Categories

Topics

block play bunnies butterflies Chinese New Year Christmas Christmas craft color colors dramatic play Easter flowers hearts holiday jewelry leaves leprechauns light table loose parts painting paper crafts playdough pretend play printables printmaking process art pumpkins rice bin scented playdough science experiment scissor skills sensory bin sensory play sensory tray shamrocks skeletons snakes snowflakes spiders spring St. Patrick's Day sunflowers tablescapes trees Valentine's Day water play

Copyright © 2025 · Lifestyle Pro on Genesis Framework · WordPress · Log in