• Skip to secondary menu
  • Skip to main content
  • Skip to primary sidebar

Putting The Pretty In Preschool

Finding Beauty In Everyday Early Childhood Experiences

  • Home
  • About Me
  • Winter
  • Chinese New Year
  • Blog
  • Contact Me
  • Black History Month
  • SHOP
  • Valentine’s Day

display

Lighted Dinosaur Small World

August 16, 2024 by Annette Kaminsky Leave a Comment

Tweet
Share
Share
Pin

_______

If there’s one thing I know, young children love playing with animal figurines. And in the realm of animals, dinosaurs are among their favorite. Setting up these fascinating creatures in a lighted dinosaur small world adds interest to their play.

_______

Follow me on Pinterest for more early learning ideas.

_______

Supplies To Collect

The following easy-to-find supplies are in the dinosaur small world setup:

  • dinosaur figurines
  • artificial grass panels
  • artificial palm branches
  • wood slabs
  • small logs
  • small rocks
  • fillable eggs
  • marbles
  • blue placemat
  • sturdy blue paper
  • table cover
  • stage light

_______

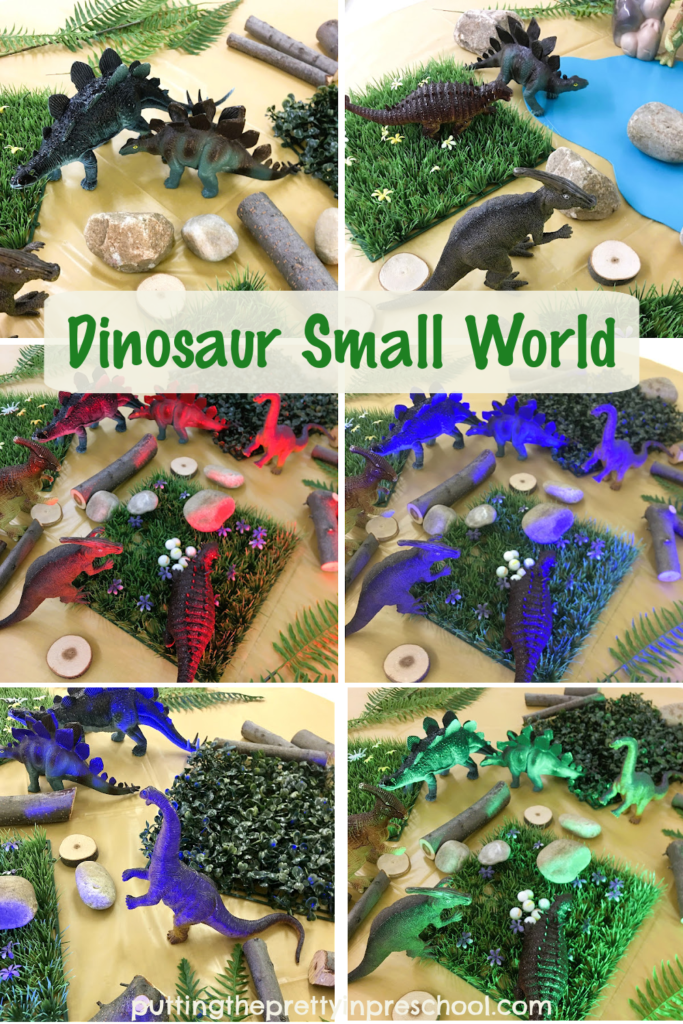
The Lighted Dinosaur Small World

_______

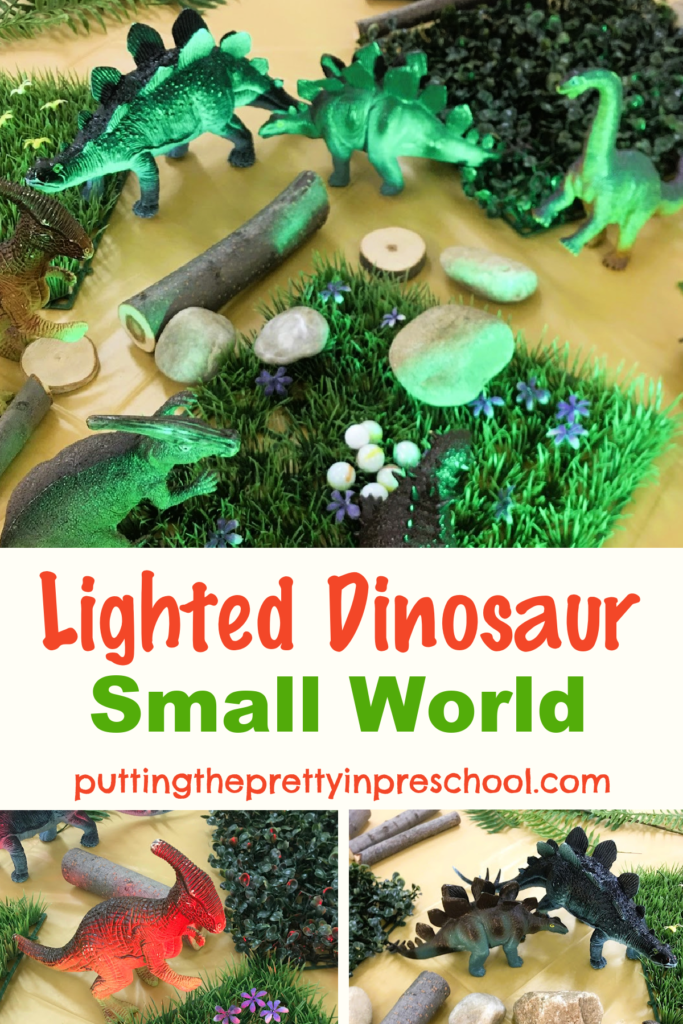
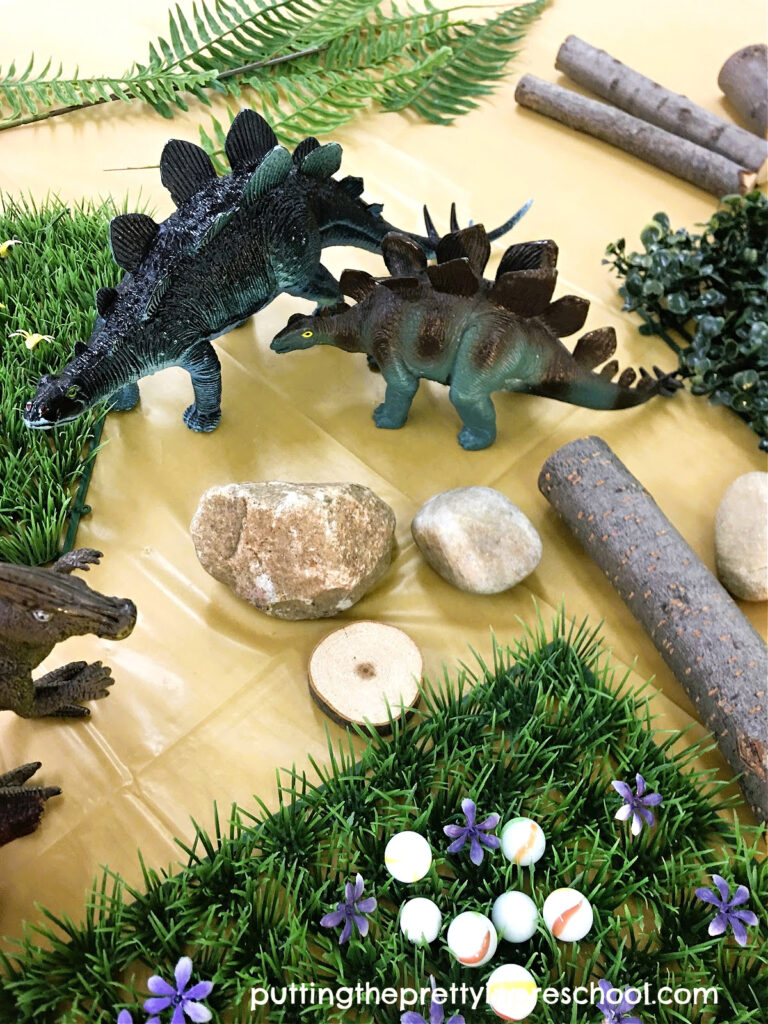
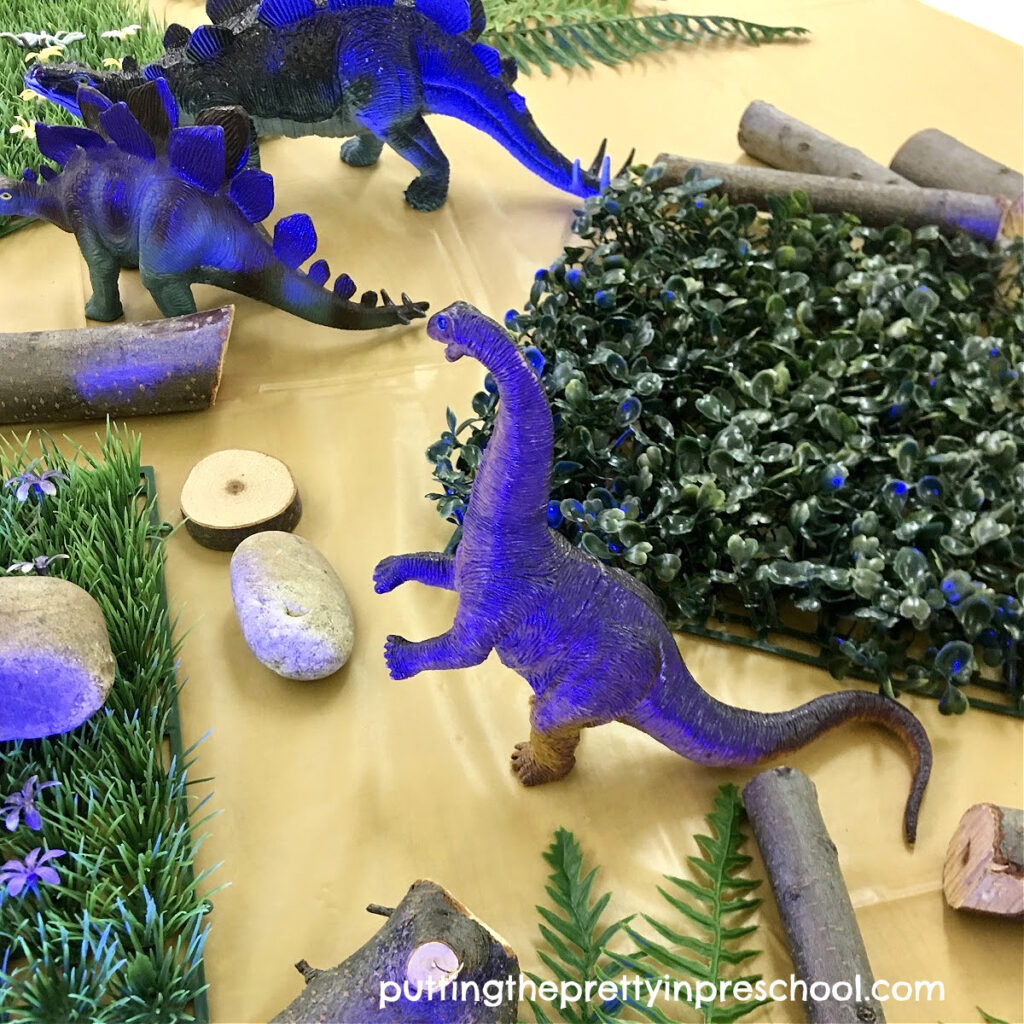
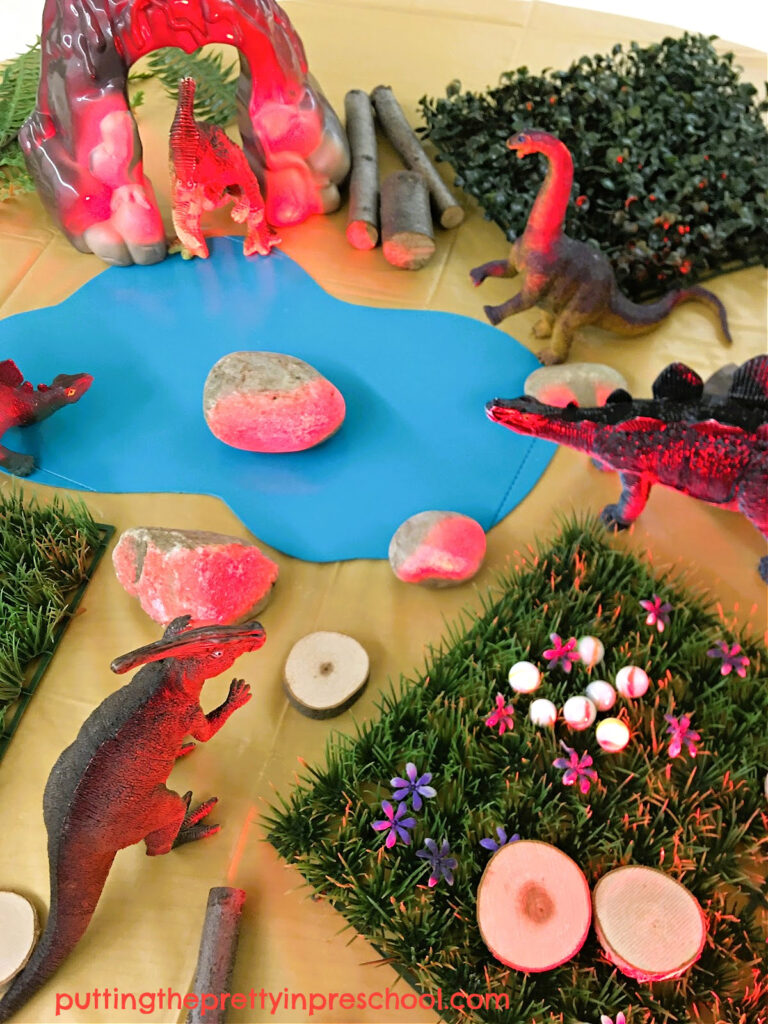
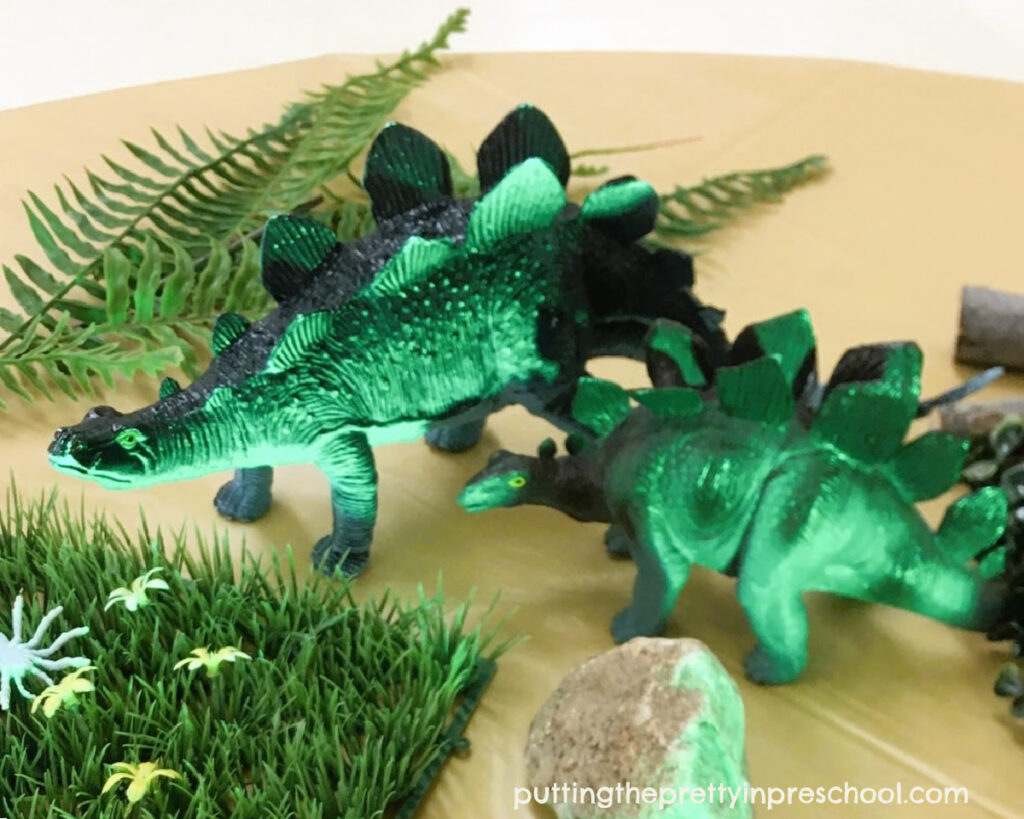
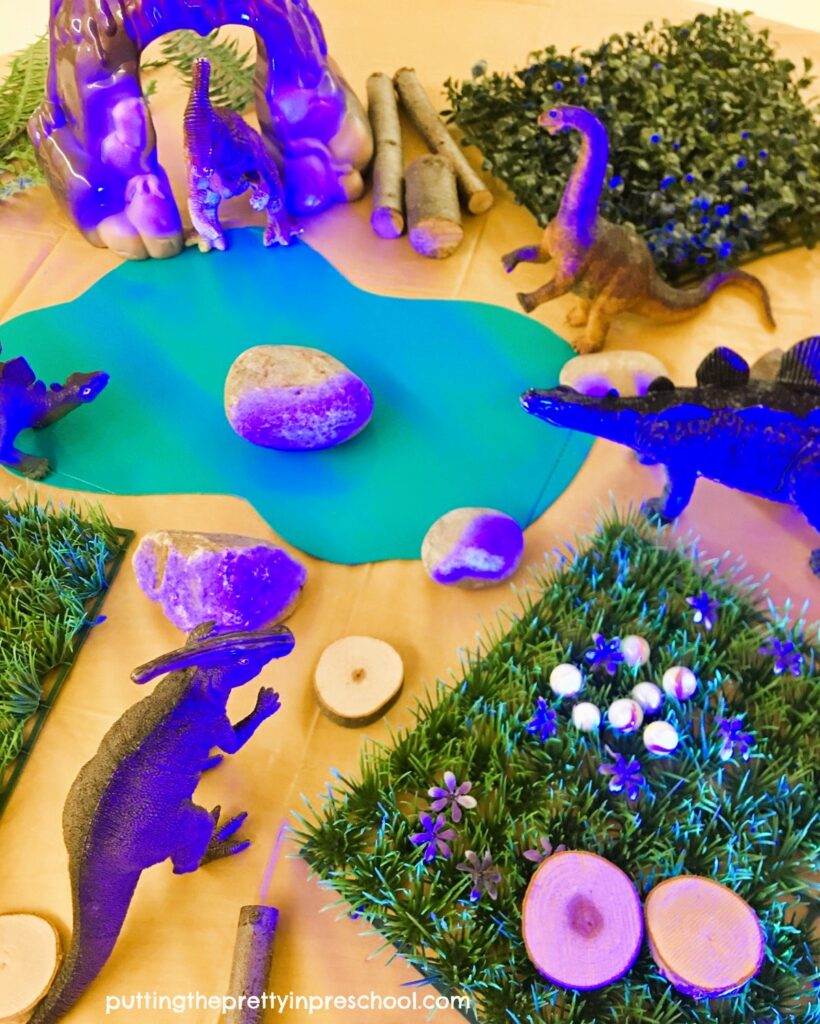
This dinosaur-themed setup works perfectly on a table, or in an active world tray. I chose to decorate the table with a gold table cover. It fits the natural color scheme and works well with a professional stage light.

Artificial grass panels and palm branches provide ample ground cover for the dinosaur figurines.

_______

Small rocks, logs, and wood slices add nature pieces to the play invitation.

Fillable eggs and marbles are the dinosaur eggs, from which babies can hatch from.

_______

Curved lines cut from around the edge of a blue placemat or sturdy piece of paper provide a pond and add a dose of color to the scene.

_______

Shining a professional stage light on the display adds interest and beauty to the play invitation. The idea was inspired a stunning dinosaur display at a local museum.

_______

_______

_______

More Dinosaur Activities

Dinosaur and Sweet Potato Vine Activities

Dinosaur and Sunflower Sensory Bin

Polar Dinosaur Sensory Play

Dinosaur Valentine Craft

_______

More Small Worlds

Reptile Active World Tray

Cherry Blossom Tree Small World

Hockey Game Small World

Polar Bear Small World

Christmas Small World on the Light Table

_______

[Read more…] about Lighted Dinosaur Small World
Tweet
Share
Share
Pin

Filed Under: dinosaurs, display, preschool, pretend play, reptiles Tagged With: dinosaurs, light, small worlds

Balloon Painting Flower Art

July 28, 2024 by Annette Kaminsky Leave a Comment

Tweet
Share
Share
Pin

_______

This balloon painting flower art is quick and easy to do and can make a room look cozier in no time. It is an unexpected, novel way to create art. Since children love activities with balloons, they’ll surely enjoy participating in this art invitation.

_______

Supplies To Collect

Gather the following supplies for this large-scale art project:

  • round balloons
  • tempera paints in a variety of colors
  • paper plates
  • 18-inch x 24-inch sturdy paper
  • paintbrushes and paint pots
  • sponge dish wands
  • thin metallic garland
  • white glue and glue paddle
  • scissors
  • waterproof table cover

_______

_______

Balloon Painting Flower Art Set Up

To set up this art project, start by covering an art table with a waterproof table cover.

Next, blow up round balloons to about 1/3 their usual size. Small balloons work fine for this project.

Then pour tempera paint in a variety of colors onto paper plates.

Afterward, drop paint into small plates or paint pot lids and add a sponge dish wand into each one.

Set out the paint trays, balloons, dish wands, and large sheets of sturdy paper on the art table. Your painting invitation is now ready to go.

_______

The Balloon Painting Flower Art Project

_______

To create eye-catching balloon art flowers, press a balloon into one of the paint colors, lift it off, and carefully press it down onto a piece of sturdy paper.

Tip: The firmer a paint-dipped balloon is pressed on paper, the bigger the print. Pressing the balloon down gently creates a smaller print.

_______

Continue to make balloon prints. It’s fun to create flowers in hues of blue and green in addition to more commonly seen colors.

_______

Afterward, dip a sponge dish wand into a contrasting paint color and stamp a circle in the center of each flower-shaped print.

_______

When the roundish prints are dry, cut them out.

Then dip a paintbrush into a pot of green tempera and paint leaves and stems on a large sheet of cardstock paper.

For a shimmery look, add a line of white glue to each leaf and press on a strip of thin metallic garland.

_______

Next, glue the round, bold, balloon-painted flowers on top of the stems using white glue or a glue gun.

To embellish the flower centers, add a circle of glue to each one and affix a strip of thin metallic garland to each of them.

_______

You will have large-scale, stunning flower art ready for display.

_______

_______

Related:

Tulip Art Painting Project

Dish Wand Print Flower Art

Flower Theme Activities

Mother’s Day Crafts and Gifts

_______

[Read more…] about Balloon Painting Flower Art
Tweet
Share
Share
Pin

Filed Under: art, display, flowers, preschool, summer Tagged With: balloons, flowers, painting, printmaking

Paper Plate Sun Craft

May 3, 2024 by Annette Kaminsky Leave a Comment

Tweet
Share
Share
Pin

_______

A few weeks ago, I was looking for tableware for a space kitchen dramatic play center and found speckled and silver supplies that fit the bill. These metallic rainbow plates gleamed next to the iridescent silver ones I chose, and caught my attention. It was a no-brainer to use them in an easy and cute paper plate sun craft.

_______

Supplies To Collect

Just the following few supplies are needed for this simple sun craft:

  • 9-inch metallic rainbow party plates
  • bright yellow cardstock paper
  • marker
  • glue stick
  • scissors and pencil

_______

Follow me on Pinterest for more early learning ideas.

_______

Preparing The Paper Plate Sun Craft

_______

Craft preparation is easy for this paper plate sun craft. First, use a marker to draw lines along the ribs on the edge of 9-inch rainbow plate backs. The lines will be about two inches long.

Next, cut circles from bright yellow cardstock, about 6 inches in diameter.

Then choose a marker in a matching color to use for creating sun faces.

Set out a paper plate front side down and a pair of scissors for each child participating.

_______

The Paper Plate Sun Craft

For this craft, invite children to cut along the lines on the back side of their plate. This is great scissor skill practice.

_______

Next, have each participant draw a face on their yellow circle using a color that matches one of the metallic plate hues.

_______

After turning their paper plate right side up, give each child a glue stick to affix their yellow paper face to the center of their sun.

Finally, encourage participants to bend up every other fringed section on the edge of their plate to enhance the sun’s rays and create a 3D effect.

_______

The shiny, adorable paper pate suns beg to be displayed and will look cute together tacked to a bulletin board or wall.

_______

Variation of the Paper Plate Sun Craft

As an alternative to using metallic plates for this craft, offer plain white paper plates. Invite children to paint or color their plate yellow or orange, snip sun rays around the edge, and then glue on a round yellow paper face.

_______

Related:

Scented Moon Playdough

Outer Space Pretend Play

_______

[Read more…] about Paper Plate Sun Craft
Tweet
Share
Share
Pin

Filed Under: art, crafts, display, preschool, space, summer, weather Tagged With: paper plate crafts, scissor activity, scissor skills, space, sun craft

Moon Colors Art Project

April 20, 2024 by Annette Kaminsky Leave a Comment

Tweet
Share
Share
Pin

_______

This “moon colors” art project is inspired by a gorgeous spiral montage of 48 moon hues photographed over the years by Marcella Pace. The stunning image was selected by NASA as the Astronomy Photo of the Day and is available as an art print.

The surface of the moon is a dull grey color due to the combination of minerals present. The moon appears lighted because it reflects light from the sun. It sometimes appears to change colors due to its position in the sky and the atmospheric conditions present. At times it can appear red, pink, yellow, orange, or even blue. The impending arrival of these uniquely hued full moons is regularly announced on social media platforms such as Facebook or X, giving everyone a heads-up about when to search for them in the night sky.

Since I love to feature objects in unexpected colors in creative activities, this art activity features moons in a variety of colors using a simple salt and glue technique. I previously debuted this popular art activity on a grey paper moon base in a post titled Salt and Glue Moon Art.

_______

Follow me on Pinterest for more early learning ideas.

_______

Colors of the Moon Art Supplies

Gather the following supplies for this striking moon art project:

  • 8 ½ inch x 11-inch cardstock paper in red, pink, yellow, orange, blue, turquoise, purple, and green hues
  • 9-inch x 12-inch black cardstock
  • white glue
  • glue paddle
  • disposable plate
  • table salt
  • small bowls or paint cups
  • spray adhesive
  • hot glue gun
  • table cover

_______

Colors of the Moon Art Process

To prepare this easy-to-do art activity, cut circles about 7 ½ inches in diameter from gray cardstock.

Next, set up a station for each child participating with a

  • cardstock paper circle
  • small bowl of salt and a teaspoon
  • container of white glue and glue paddle
  • disposable plate

_______

Invite little learners to drizzle white glue on their circle-shaped paper in a random manner.

Then have them sprinkle salt from a teaspoon over the glue, and shake excess salt onto their disposable plate.

Let the colorful art projects dry overnight.

To help preserve the moon art, spray each salted circle with adhesive spray. Hairspray works fine for this task too.

When thoroughly dry, adhere each salt and glue moon to a 9-inch x 12-inch sheet of black cardstock or construction paper background using a hot glue gun.

Display the striking moons on a bulletin board or wall. They will look amazing together!

_______

Different Moon Colors Explained

Red Moon

When the sun illuminates the whole moon in a lunar eclipse, it can appear red.

This moon is commonly called a “blood moon.”

_______

Yellow or Orange Moon

A yellow or orange moon is called a Harvest Moon since it is usually seen in late summer or early fall during harvest time. The moon can appear orange or yellow when it is close to the horizon.

_______

_______

Pink Moon

The pink moon is the first full moon in April, and it only occasionally looks pink.

_______

Purple Moon

Although it doesn’t look purple the second full moon in April is called a purple moon. It has been photographed as purple in Marcella Pace.

_______

Blue Moon

The moon rarely appears blue. When it does look blue, the hue is the result of a huge amount of dust or smoke in the air due to a volcanic eruption or forest fire.

_______

Green Moon

There have been no sightings of a green moon. But it is fun to reimagine the moon in a green hue using the salt and glue art technique.

_______

Turquoise Moon

Like a green moon, a turquoise moon won’t be spotted in the night sky. It is also fun to create in art.

_______

Moon Colors In Art

Depicting different colors of the moon is popular in digital art and photos, and there are many beautiful moon artworks available. Why not join in the fun and create colorful moon art using the salt and glue technique?

_______

Related:

Scented Moon Playdough

Starry Sky Sensory Bin

Space Father’s Day Craft

Space Restaurant Dramatic Play

Watercolor Planets With Markers

Outer Space Pretend Play

Earth Day Heart Art

Earth Day Craft

Space Loose Parts Play

Space Theme Light Table

_______

[Read more…] about Moon Colors Art Project
Tweet
Share
Share
Pin

Filed Under: art, display, preschool, science, space Tagged With: colors, moon

Squish Painting Shamrock Art

March 15, 2024 by Annette Kaminsky Leave a Comment

Tweet
Share
Share
Pin

_______

This March I needed to get new art up quickly, and decided to have my little learners participate in a squish painting shamrock art project. Squish painting is a quick and satisfying art activity that little children love to do. Using folded hearts for the art project, the shamrock art is effortless to create.

_______

Follow me on Pinterest for more early learning ideas.

_______

Supplies To Collect

Gather the following supplies for this seasonal squish art activity:

  • magenta, green, and white tempera paint
  • magenta and green cardstock paper
  • manila tag paper
  • ruler, pencil, and scissors
  • paint pots and spoons

_______

_______

The Squish Painting Art Project

To prepare this activity, start by tracing and cutting out hearts from sturdy paper. Manila tag paper works well for the project. It comes in 9 x 12-inch, 12 x 18-inch, or even 18 x 24-inch paper sizes. The larger-sized paper allows for cutting bigger hearts.

When finished with the cutting part, fold the hearts in half. 

Next, mix a little yellow into the green tempera paint to create a lighter brighter color.

Then set out green and white paint pots, and add a spoon to each one.

_______

Invite participants to spoon each paint color onto their hearts, then fold one side over the other.

Have children rub their hands over their heart halves to smooth out the paint.

Finally, ask them to open their hearts to see the new design created.

Shamrock Art Display

_______

To make a shamrock using the squish-painted hearts, group the hearts into three leaflets. Glue them to a large cardstock background or tape them to a wall. Then cut a long, thin petiole from green cardstock paper. Affix the petiole to the shamrock design.

_______

Variation of the Squish Painting Shamrock Art Project

_______

Introduce a new tempera paint color for an interesting way to vary this squish painting shamrock art project. Since shamrock plants also come in a purple variety called purple oxalis, using magenta paint instead of green is a natural fit for changing up the activity. 

_______

Related:

Shamrock Leaf Print Art

St. Patrick’s Day Sheep Craft

Shamrock Paper Plate Lion

Leprechaun Gnome Craft

_______

[Read more…] about Squish Painting Shamrock Art
Tweet
Share
Share
Pin

Filed Under: art, display, gardening, preschool, St. Patrick's Day Tagged With: painting, shamrocks, St. Patrick's Day

  • « Go to Previous Page
  • Page 1
  • Page 2
  • Page 3
  • Page 4
  • Interim pages omitted …
  • Page 8
  • Go to Next Page »

Primary Sidebar

Hi, I'm Annette Kaminsky, a preschool teacher who loves sharing learning through play activities for young children. Thanks for visiting my site. Feel free to stay awhile!

Subscribe Via Email

Recent Posts

  • Expanding Balloon Science Experiment May 18, 2026
  • Earth Day Spin Painting April 21, 2026
  • Easter Bunny Scavenger Hunt April 4, 2026
  • Celebrate Diversity Coloring Pages March 1, 2026
  • Lunar New Year Lantern Craft February 11, 2026
  • Black History Month Positive Affirmations Art January 29, 2026
  • Snowflake Cafe Dramatic Play Set January 19, 2026
  • Pastel Christmas Letterhead and Envelope December 20, 2025
  • December Kindness Activities November 30, 2025
  • Fall Forest Sensory Bin November 30, 2025

Categories

Topics

apples bunnies butterflies Chinese New Year Christmas Christmas craft color colors dramatic play Easter fall flowers hearts holiday jewelry leaves leprechauns light table loose parts painting paper crafts playdough pretend play printables printmaking process art pumpkins rice bin scented playdough science experiment scissor skills sensory bin sensory play sensory tray shamrocks skeletons snakes snowflakes spiders spring St. Patrick's Day sunflowers tablescapes Valentine's Day water play

Copyright © 2026 · Lifestyle Pro on Genesis Framework · WordPress · Log in