• Skip to secondary menu
  • Skip to main content
  • Skip to primary sidebar

Putting The Pretty In Preschool

Finding Beauty In Everyday Early Childhood Experiences

  • Home
  • About Me
  • Winter
  • Chinese New Year
  • Blog
  • Valentine’s Day
  • Contact Me
  • Easter Activities

trees

Neon Finger Paint Tree Art

October 19, 2022 by Annette Kaminsky Leave a Comment

Gorgeous neon finger paint tree art inspired by the picture book "The Tree In Me" by Corinna Luyken. An all-ages, easy-to-do art activity. A free tree template is included.

_______

After reading the poetic book “The Tree In Me” by Corinna Luyken, I especially fell in love with the exquisite, gorgeous illustrations. The beautiful artwork is the inspiration for this neon finger paint tree art activity.

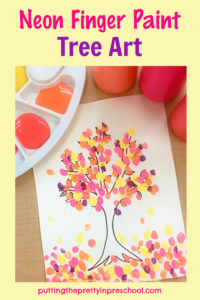
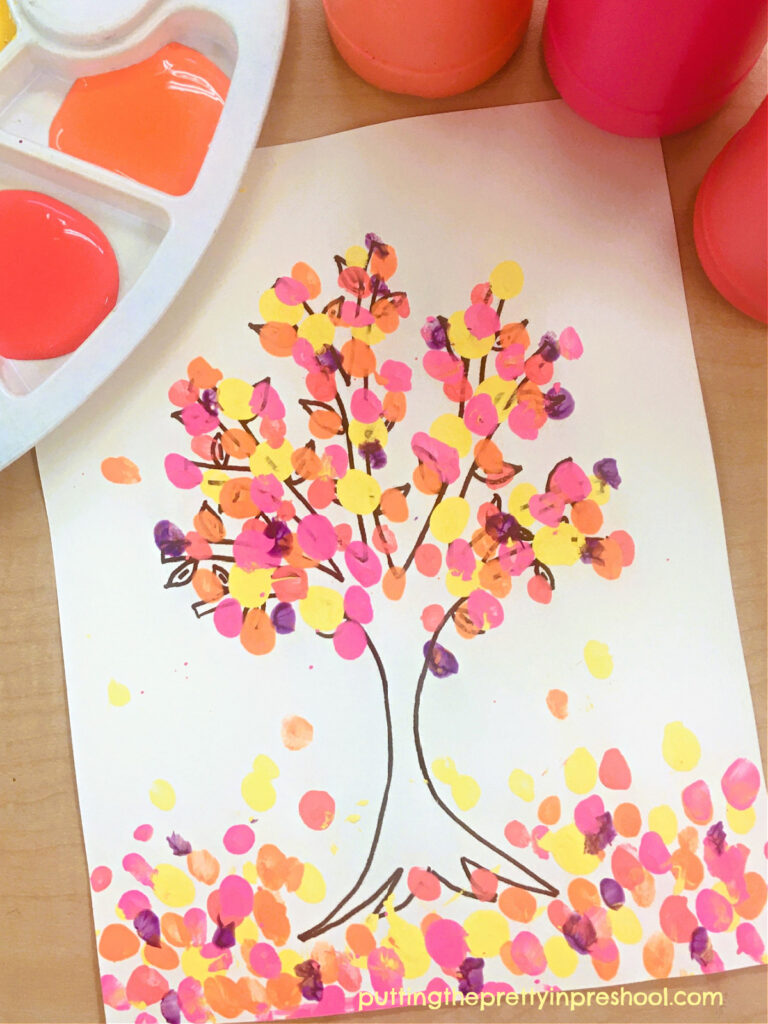
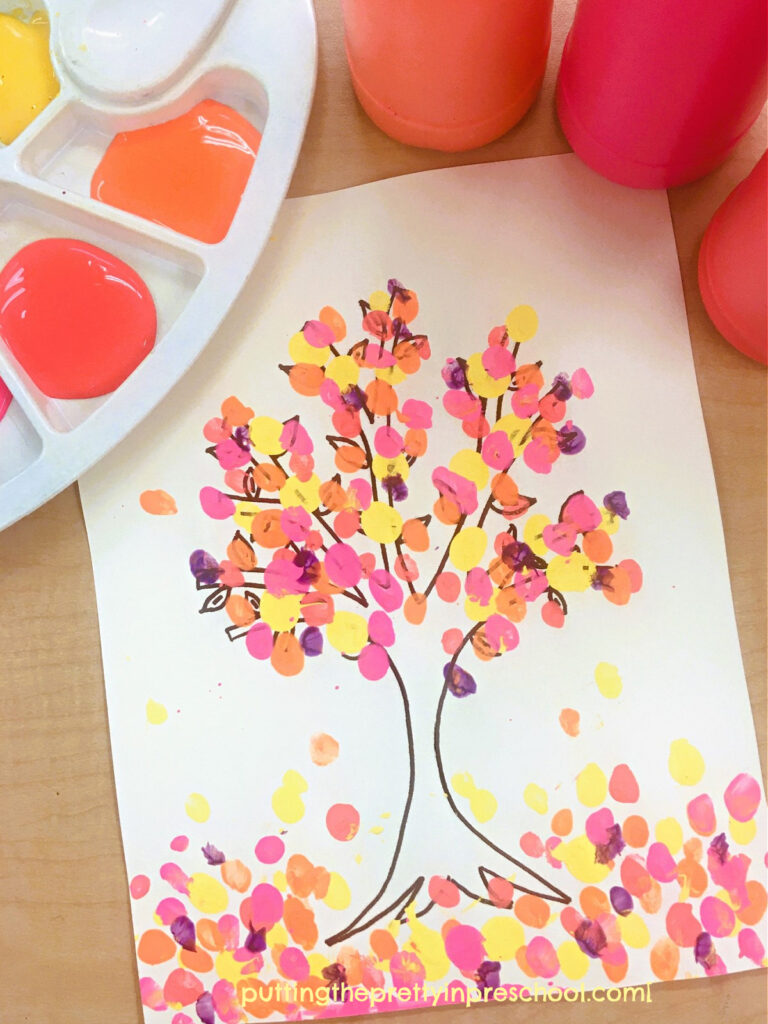
Neon colors, especially pink, balanced by soft yellow hues and touches of grey, are used often in the story. Author/illustrator Luyken states that she picked these radiant colors because she has a soft spot for neon, and wanted to give the story a more universal feel. I know that little learners will love using neon colors in tree art too.

A beautiful, picture-book-inspired neon fingerpaint tree art project the whole family can do. A free tree template is available to download.

_______

Follow me on Pinterest for more early learning ideas.

_______

Supplies To Collect

For this cheery tree art activity, only a few supplies need to be gathered:

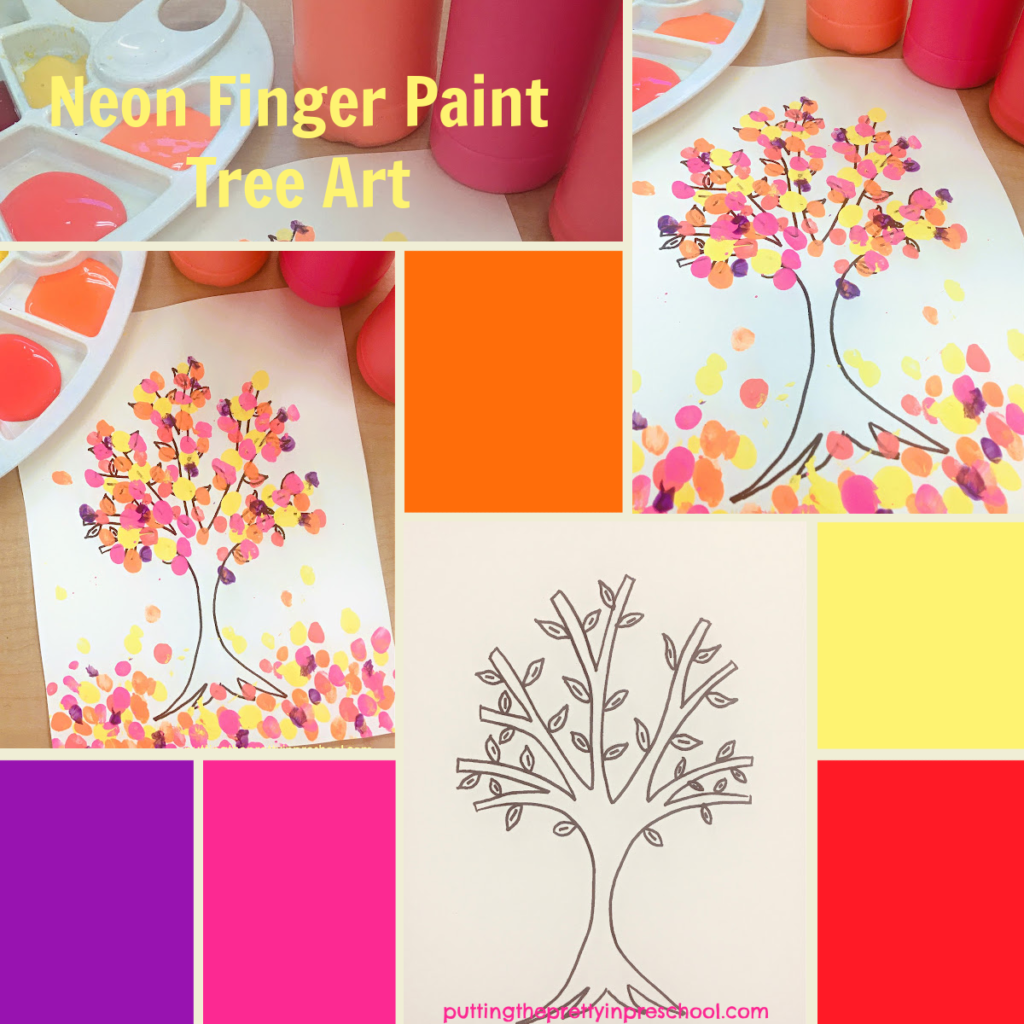
  • neon pink, red, orange, and purple finger paint or tempera paint
  • yellow finger paint or tempera paint
  • paint tray
  • white or cream 8 ½ x 11-inch cardstock
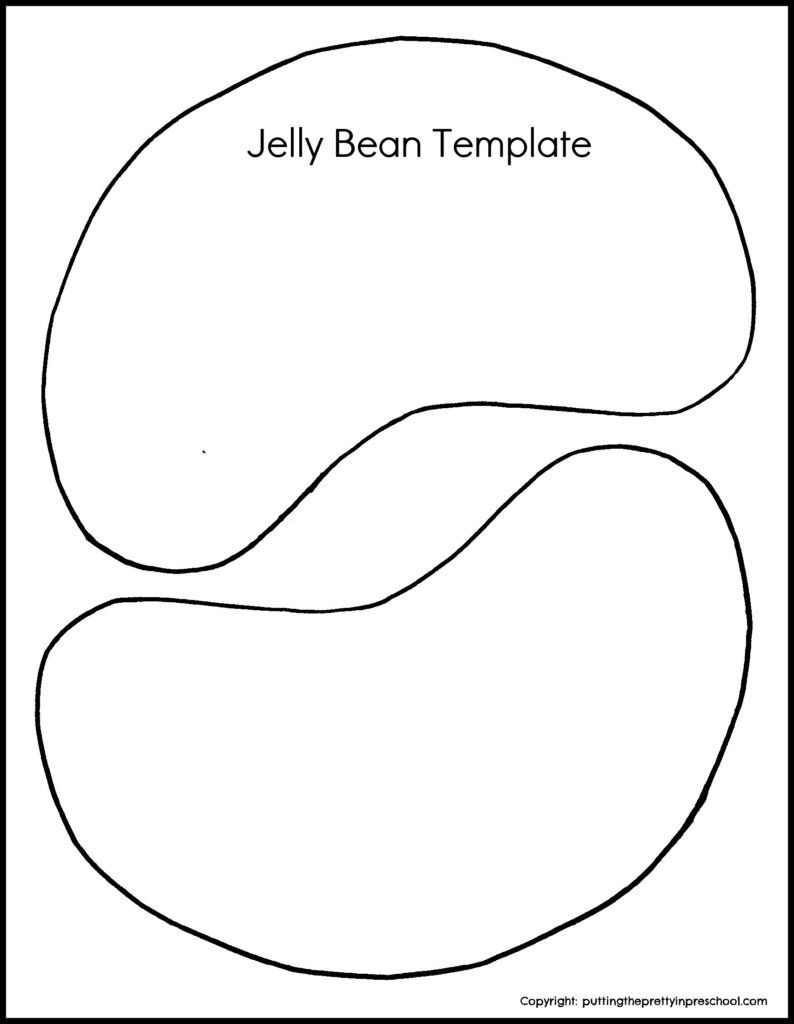
  • tree template

_______

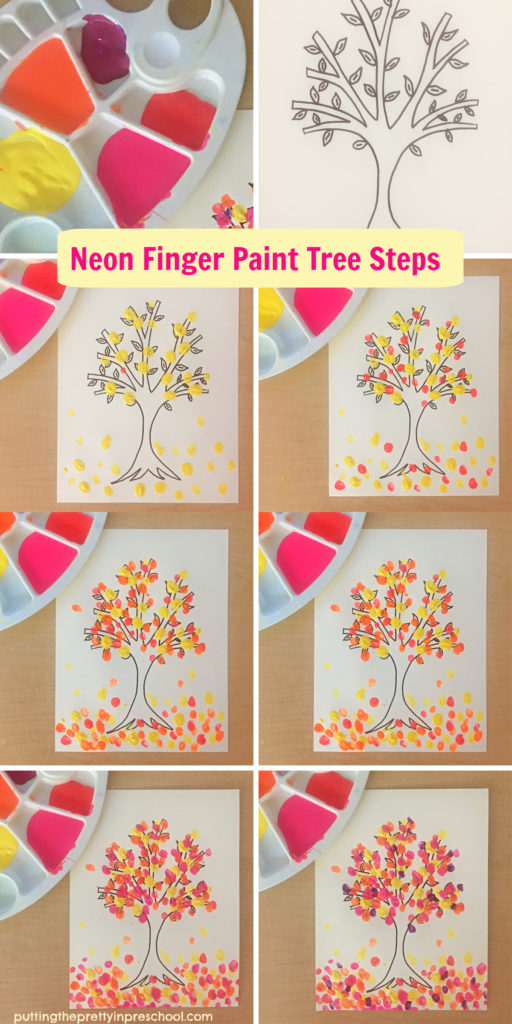
The Neon Finger Paint Tree Process

Steps to create beautiful neon finger paint tree art. A picture-book-inspired art project that is easy to do. A free template is included.

_______

This painting activity is easy to set up and do, and early learners will get excited about having the chance to finger paint.

Before starting the art project, read the storybook “The Tree In Me,” or view a video version of the story. Discuss the colors used for the illustrations, along with the many tree-related activities the children in the story participate in.

Next, set out a paint tray with neon finger paints or tempera paints. I feature neon pink, red, and orange tempera paints in this art project. I didn’t have neon yellow paint, but bright yellow paint works fine with neon colors.

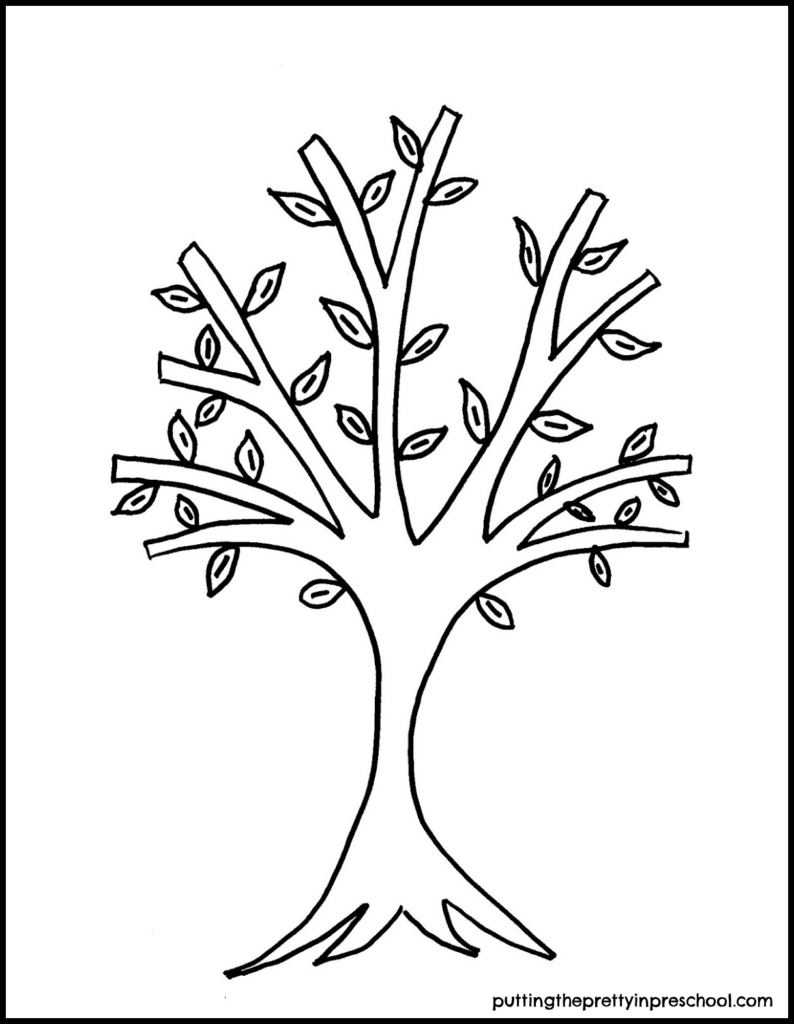
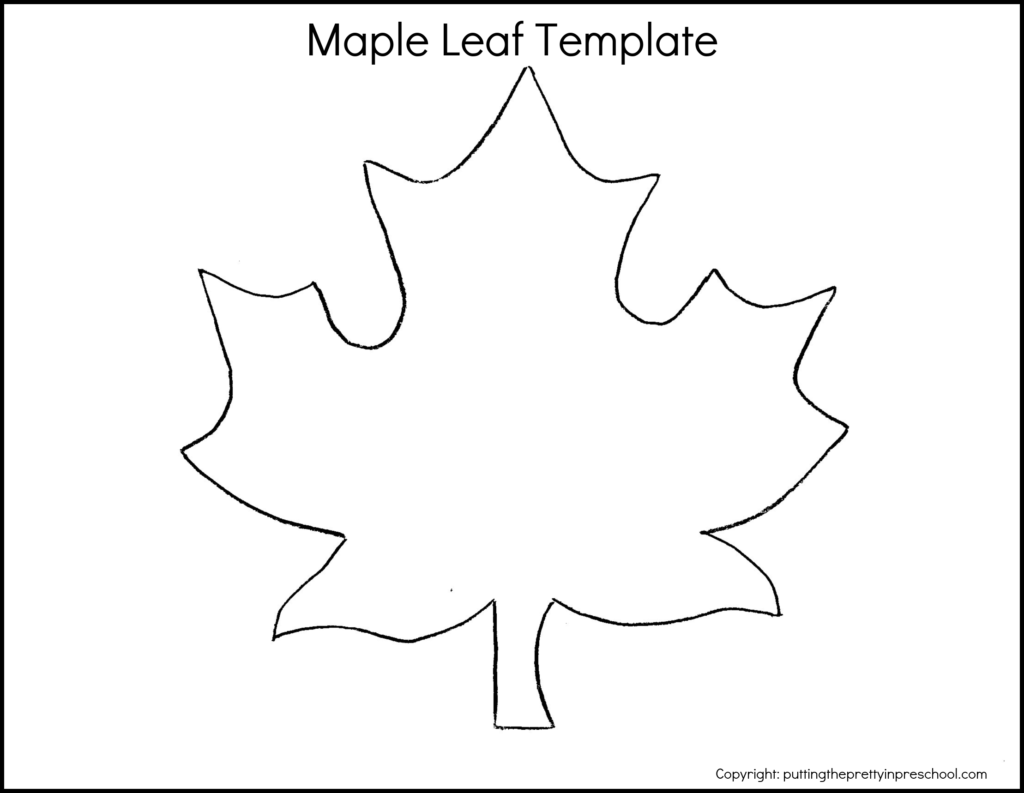
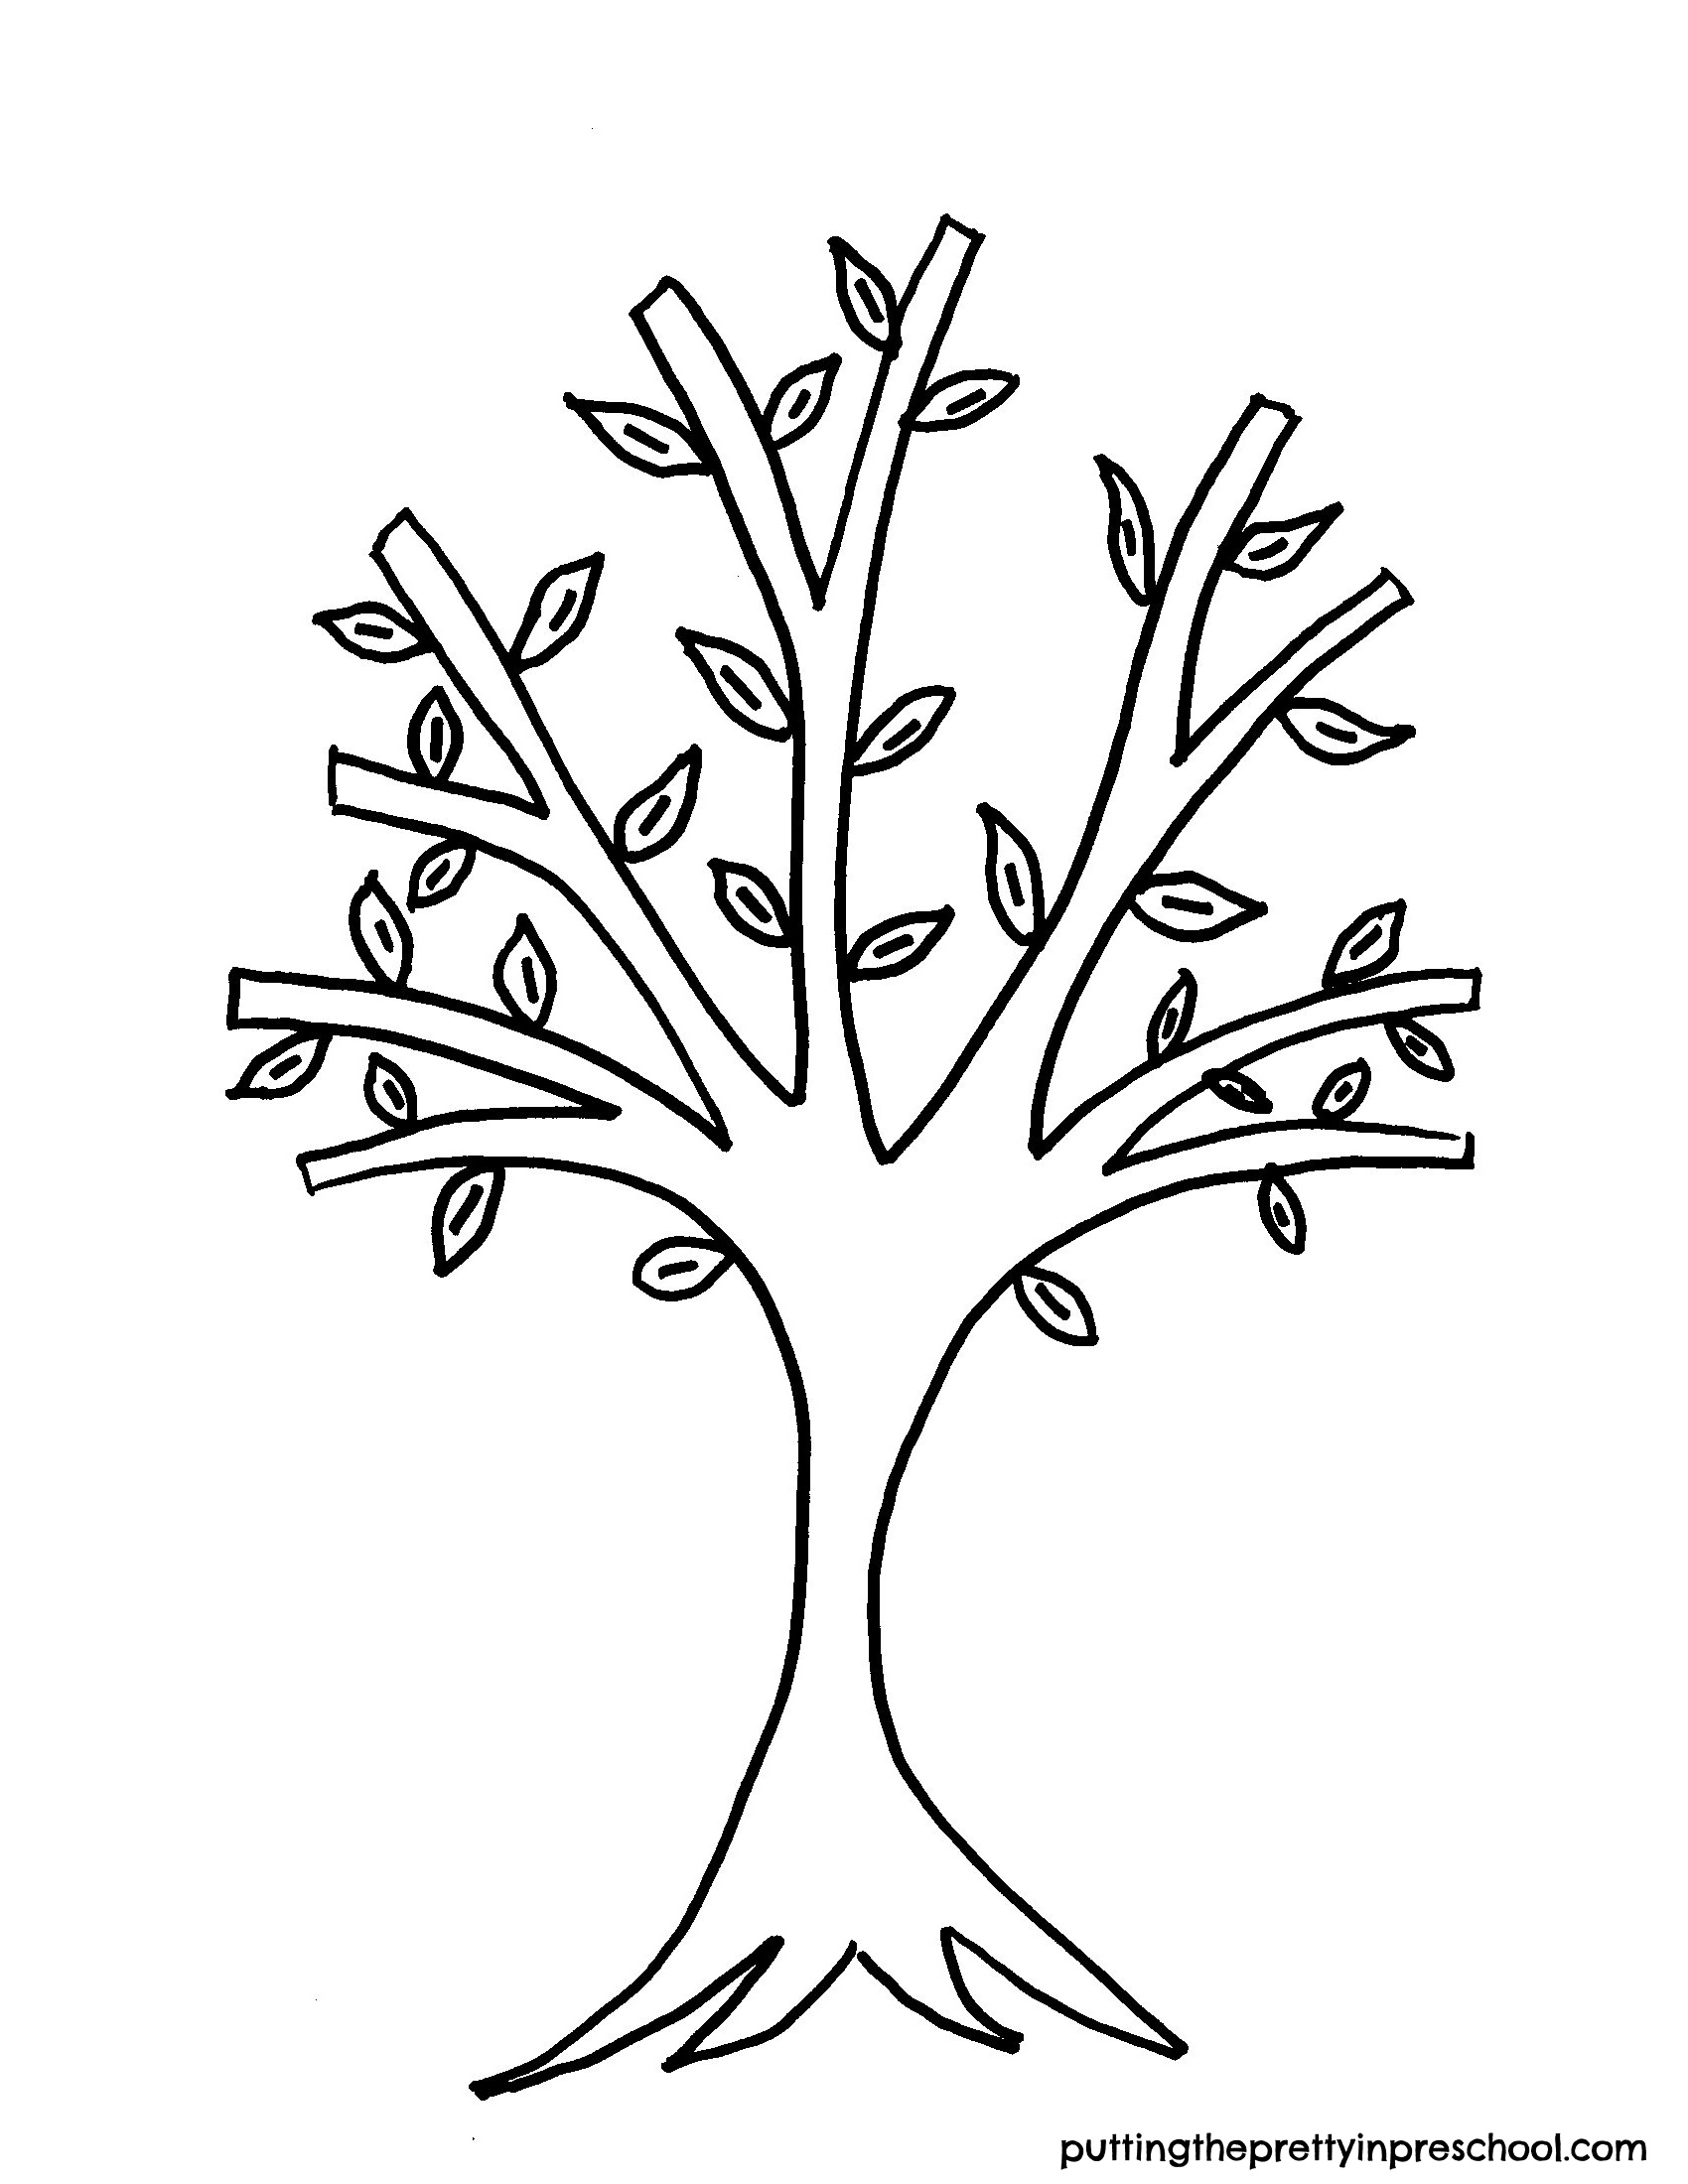
Afterward, select a tree template to use for the art. Feel free to download this template for the painting activity.

A free tree template to download for art and craft activities.

_______

Tree Printable

This printable is for individual or one classroom use only.

_______

Invite early learners to dip a fingertip into the paint colors and finger paint their tree template. While they are working, talk about the colors of paint available and the ones they choose to use.

A beautiful, picture-book-inspired neon fingerpaint tree art project the whole family can do. A free tree template is available to download.

_______

Finger Paint Tree Art Benefits

Aside from facilitating language development, this finger paint tree art improves eye-hand coordination and develops fine motor skills. And it offers children a chance to create with unique, dynamic paint colors.

The artwork in “The Tree In Me” is joyful and whimsical, and complements the heartwarming text. Neon finger paint tree art is a terrific follow-up activity to reading the story.

Gorgeous neon finger paint tree art inspired by the picture book "The Tree In Me" by Corinna Luyken. An all-ages, easy-to-do art activity. A free template is included.

_______

Related: Book-inspired Tree Art

_______

[Read more…] about Neon Finger Paint Tree Art

Filed Under: art, autumn, fall, preschool, sensory, trees Tagged With: finger painting, neon colors, painting, picture books

Color Magic Milk Experiment

October 8, 2022 by Annette Kaminsky Leave a Comment

Try this mesmerizing color magic milk experiment today! A maple leaf frame adds an artistic twist to the kitchen science experiment.

_______

Have you ever done the color magic milk experiment? It is quick and easy to do, and participants are always in awe of the results. In this version, I add artistic flair by giving the experiment a leafy twist.

_______

Follow me on Pinterest for more early learning ideas.

_______

Supplies To Collect

Just a few supplies are needed for this simple but stunning kitchen science experiment. Gather the following:

  • 2 liters milk  
  • red, yellow, and blue food coloring
  • dish detergent
  • large round serving tray
  • maple leaf frame (optional)

_______

The Color Magic Milk Experiment

Effortlessly perform this color magic milk experiment in four easy steps. A maple leaf frame enhances the kitchen science experiment.

_______

To do this experiment, start by pouring a layer of milk into a food tray. Using homo milk is recommended, but 1% and 2% will also work.

Note: Outdated milk is a great choice for this experiment.

Next, float a maple leaf frame on the milk. (My frame is a cardboard cutout purchased at a dollar store.)

Note: The leaf-themed frame adds interest to the experiment, but is not necessary for it to work.

Then drip yellow, red, and blue food coloring inside the frame.

This next step is where the magic happens… Squirt a drop of dish detergent onto each pool of colors. Watch the colors instantly race to the edge of the frame, swirling around as they go.

After the initial color burst, check back after ten minutes and you will see a variety of hues slowly starting to fill in the maple leaf shape.

Watch the color magically spread around the maple leaf frame in this kitchen science experiment.

_______

At this point, you can add a little more food coloring and a tiny bit of dish detergent for more color play.

The colors slowly fill out the maple leaf frame in this color magic milk experiment with an artistic twist.

_______

View this maple leaf color magic science experiment as a video.

_______

The Science Behind This Color Experiment

Although milk is made of mostly water, it also contains fat and protein. These are both sensitive to changes in the milk. When dish soap is added to the tray, it breaks up the surface tension of the milk and is attracted to the fat molecules. The fat molecules try to scurry away but end up bonded with the soap molecules. The movement of the food coloring makes this process visible. As more and more soap and fat molecules bond, the color movement slows down and eventually stops.

Since the fat content in milk is super important in this experiment, homo milk works the best. But 2% and 1% milk (which I often have handy) also show stunning results.

_______

Try this mesmerizing color magic milk experiment today! A maple leaf frame adds an artistic twist to the kitchen science experiment.

_______

Related: Color Explosion Science Experiment

_______

More Leaf Activities

Five Leaf Art Activities

Fall Leaf Salad Spinner Art

Light Table Leaf Exploration

Eye Dropper Leaf Art

Maple Leaf Activities

_______

[Read more…] about Color Magic Milk Experiment

Filed Under: autumn, fall, preschool, science, sensory, trees Tagged With: color, leaves, science experiment

Spin Painting Maple Leaf Art

June 29, 2022 by Annette Kaminsky Leave a Comment

Try this gorgeous spin painting maple leaf process art project today! It's a simple and satisfying activity the whole family will love to do!

_______

This spin painting maple leaf art activity is perfect for Canada Day, fall, or any time of the year. Early learners will LOVE using a salad spinner to make it! You will not find a simpler or more satisfying process art project.

Salad spinner art brings back memories of going to our local fair in the summer when I was young. There would always be a station with spin art, and it was my favorite activity to try.

_______

Follow me on Pinterest for more early learning ideas.

_______

Supplies To Collect

For this easy and stunning spin painting art project, gather the following supplies:

  • salad spinner
  • white cardstock paper
  • tempera paint
  • paint pots
  • teaspoons
  • maple leaf tracer
  • pencil
  • scissors

_______

Salad spinner process art maple leaf! It features colors seen in Canadian landscapes and decor.

_______

Creating Spin Painting Maple Leaves

Steps to make gorgeous maple leaf spin art. A simple and satisfying activity the whole family will love to do!

_______

To offer this process art project, trace and cut maple leaves from cardstock. Make them just big enough to fit in the bottom of the salad spinner you are using. Feel free to download this template to use as a tracer.

Download this free maple leaf template for art and craft activities.

_______

Maple Leaf PrintableDownload

_______

Set a cut leaf in the bottom of the salad spinner. I purchased an economical one just for art. But a salad spinner you have handy in your kitchen works just fine. The paint washes out surprisingly easily.

Next, place the cut maple leaf inside the spinner and cover it with the lid.

Using tempera paints in paint pots, invite your early learner to generously drip paint in colors of choice onto the leaf. I feature paint colors commonly found in our Canadian landscape and home décor. Red and white paints would work well for Canada Day. And of course, tempera paints in fall colors would look beautiful.

Try this gorgeous spin painting maple leaf process art project today. Using colors featured in Canadian landscapes and decor, it is perfect for Canada Day or any time of the year.

_______

Invite your little learner to spin the salad spinner for at least ten seconds.

Take off the lid and admire the beautiful result together.

After the first project, your little learner will want to make a few more. And the whole family may wish to get in on this gorgeous spin painting maple leaf art activity!

_______

Try this gorgeous salad spinner maple leaf art project today. Using colors seen in Canadian landscapes and decor, it is perfect for Canada Day or any time of the year.

_______

Related:  Valentine’s Day Process Art

_______

[Read more…] about Spin Painting Maple Leaf Art

Filed Under: art, autumn, Canada Day, fall, preschool, trees Tagged With: leaves, maple leaves, painting, spin art

Jelly Bean Theme

April 16, 2022 by Annette Kaminsky Leave a Comment

_______

A few weeks ago, I set out to make an Easter display that would work for a wall art tree. I thought of incorporating the “Jelly Bean Prayer,” and wondered if there was such a thing as a jelly bean tree. To my delight, an online search revealed a variety of references to “jelly bean tree,” and provided inspiration for other activities. So in addition to changing up the display, I came up with this fun and tasty Jelly Bean Theme. The post includes free printables and a few facts about the colorful candy.

_____

10 Jelly Bean Facts

  • Jelly beans are bite-sized candies with hard, crunchy shells and soft, chewy centers.
  • These sweet candies are associated with Easter in Canada and the United States.
  • Part of the appeal is their egg shape and tiny size. This makes them terrific Easter egg fillers.
  • There are eight basic colors and flavors, which often have a fruity taste.
  • Over time, jelly beans were created in many different color schemes, often matching seasonal celebrations.
  • Jelly beans became popular in the 1960s.
  • The most common order for eating the candies is: red, purple, green, yellow, and black.
  • Jelly beans are used as an art medium, and there are mosaic art pieces made with them.
  • President Ronald Reagan liked them a lot, so artist Peter Rocha made a jelly bean portrait of the president.
  • There is a National Jelly Bean Day (in the US) on April 22.

_______

Follow me on Pinterest for more early learning ideas.

_______

Jelly Bean Theme Activities

There are a number of easy, educational jellybean activities to do at home or school.

Tasting Jelly Beans

Give participants jelly beans in the colors red, purple, green, yellow, and black. Chart the order each child eats the jellybeans.

What order would you eat these jelly beans in? Try this candy tasting activity and record the results.

_______

Incorporate language and math sequencing by describing color and taste, and using words such as first, next, and last.

_______

Jelly Bean Sorting

Invite children to sort jelly beans by color. This flower-shaped paint palette is perfect for individual color sorting.

A flower-shaped paint palette makes the perfect tray to sort jelly beans by color.

_______

Candies On Display

Jelly beans look attractive stored in mason jars. The filled jars could be part of a tablescape display or food table.

Store jelly beans in jars for a tablescape or food table display. Have a "Guess The Number Of Jelly Beans In The Jar" contest.

_______

How Many Jelly Beans Are In The Jar?

Fill a jar with jelly beans, and have participants guess the number of candies in the jar. Then count the jellybeans together. For early learners, a baby food jar or small bottle would be a good size to use.

_______

Cupcake Liner Easter Party Favors

Add pipe cleaner handles to sturdy Easter-themed cupcake liners. Fill the liners with Easter-colored jelly beans and hand them out as Easter basket party favors. Or fill plastic Easter eggs with jelly beans.

_______

Jelly Bean Prayer Wall Display

Over-sized paper jelly beans for a "Jelly Bean Prayer" tree display. Download the free printable for art, book-making, and display opportunities.

_______

Download this free template for a Jelly Bean Prayer tree display. I used it to cut out large jelly beans from different colors of cardstock paper. Then I wrote a line of the prayer on each one and added them to a tree theme wall display.

Download this oversized jelly bean template for art, book-making, and display use.

_______

Jelly Bean PrintableDownload

This printable is for individual or one classroom use only.

_______

Jelly Bean Art

Use this same printable for children to paint or color and cut out gigantic paper jelly beans.

Or have children dictate or write a page for a jelly bean storybook, and then decorate the background.

_______

J Is For Jelly Bean Craft

Invite children to glue jelly beans onto a paper letter J. How fun!

"J Is For Jelly Beans" in this tasty craft. Reinforce the letter J sound with this fun and easy activity.

_______

Jelly Bean Tree Craft

Print copies of this tree template on white cardstock paper. Set them on an art table along with white glue and jelly beans. Invite children to glue jelly beans on the tree.

This could also be a transient art activity offered in a tray.

How fun! Decorate a tree template with jelly beans. Glue the tasty candies on for a finished project. Free tree printable available.

_______

Jelly Bean Artists

There are artists who work with jelly beans as a medium, or as a subject in their art. Who knew?

Peter Rocha and Kristen Cummings are two notable jelly bean artists. Their creations can be viewed on the Jelly Belly Company’s “The Jelly Belly Bean Art Gallery” web page. Their candy art can also be viewed on my Pinterest Board Jelly Bean Kids Activities/Jelly Bean Artists.

_______

Storybooks Incorporating Jelly Beans

The flavorful candies make an entertaining subject for storybooks. Here are a few books incorporating jelly beans:

Arthur’s Jelly Beans by Marc Brown 

Arthur and his friends participate in a “Spring Fling” party, which includes a jelly bean hunt of course!

Jellybean Mouse by Philip Roy

Happy the mouse isn’t excited to go on a laundromat errand but discovers a jellybean machine once there. The day’s adventure becomes just the excitement the spunky mouse is seeking.

The Jellybeans And The Big Dance by Laura Numeroff and Nate Evans

A group of girls with different interests meet at a dance studio, and slowly become friends. They eventually discover that just as jellybeans come in different flavors but go well together, they get along great. They decide to call themselves “The Jellybeans.”

There are three more books in this friendship and team-building series:

  • The Jellybeans and the Big Book Bonanza
  • The Jellybeans and the Big Camp Kickoff
  • The Jellybeans and the Big Art Adventure

Jelly Bean Tree by Toni Yuli

This story isn’t about jelly beans, but the main character, a giraffe, is called Jelly Bean. It’s reason enough to include the colorfully illustrated, endearing story in the theme.

_______

[Read more…] about Jelly Bean Theme

Filed Under: art, crafts, display, Easter, literacy, Math, party, preschool, sensory, spring, themes, trees Tagged With: art, crafts, jelly beans, sensory tray

Lemon -scented Christmas Playdough

December 19, 2021 by Annette Kaminsky Leave a Comment

Christmas playdough infused with cut lemon cypress sprigs and cut silk poinsettia leaves and bracts.

_______

This lemon-scented Christmas playdough activity incorporates lemon cypress branches and cuttings from silk poinsettias. The plant-themed playdough experience evolved from not being able to go on a well-loved field trip this Christmas season.

Most December months our preschool visits a local greenhouse. The children view a vast poinsettia display, smell a lemon cypress tree, participate in a scavenger hunt among cut Christmas trees, and go on a hayride. Then they plant a paperwhite bulb. The trip is always a highlight for preschool families.

This year the field trip wasn’t possible, so I decided to bring a small, feathery needled lemon cypress tree to preschool for the children to view, smell, and use in playdough activities. I wanted to include other seasonal plants as well but realized that most popular Christmas plants are somewhat toxic or poisonous to humans.

Chartreuse green lemon cypress trees for sale during the Christmas season.

_______

My preschoolers loved this playdough invitation and your children will enjoy it too.

_______

Playdough Recipes

To offer this lemon-scented Christmas playdough invitation, start by making a favorite playdough recipe. Or use my go-to basic recipe:

Ingredients:

  • 2 cups flour
  • 1 cup salt
  • 4 teaspoons cream of tartar
  • 2 cups water
  • 3 tablespoons oil

_______

Add the first three ingredients to a sturdy pot and mix them together.

Stir two tablespoons of oil into two cups of water.

Add the water and oil to the dry ingredients and combine.

Heat on the stove on medium heat.

Stirring frequently, cook until the mixture is no longer glossy and the dough forms a ball.

Place the dough on a cutting board.

Knead when cool, adding in one more tablespoon of oil.

Store the playdough in a sealed plastic bag.

_______

A lemon jello playdough works beautifully too. Substitute lemon jello for cherry jello in the recipe.

_______

The Lemon-scented Christmas Playdough Invitation

For this scented playdough invitation, start by showing little learners a potted dwarf lemon cypress tree. This small, fine-textured evergreen is hand-trimmed to have a Christmas tree shape and is sold in pots at Christmas time.

Next, have your little charges rub a branch and experience the resulting lemon fragrance.

Give each child a lump of playdough, a few lemon cypress branches, and a pair of scissors.

Offer lemon cypress sprigs with scissors, cookie cutters, and erasers in a fragrant Christmas playdough activity.

_______

Have them cut the bright yellow-green sprigs into pieces and add them to their playdough. Using the scissors to cut the playdough is fine for them to do too, as it strengthens their little fingers.

Then give little ones a few silk poinsettia leaves and bracts to cut and blend in.

Scissor Invitation with playdough and silk poinsettia leaves and bracts.

_______

Offer additional supplies such as rolling pins, plastic pie cutters, wooden sticks, and Christmas-themed cookie cutters and erasers.

Lemon cypress scented holiday playdough invitation with cut silk poinsettia leaves and bracts.

_______

When blended, the plant parts add pops of seasonal color to the playdough and give it a Christmassy look.

Offer this lemon cypress scented playdough invitation with cut silk poinsettia leaves and bracts.

_______

Tip: A coleus plant can be substituted for silk poinsettia leaves and bracts, as it isn’t poisonous. I plan to take one indoors to save for this activity next fall.

_______

Other Ways To Experience Lemon Cypress Plants

Let your little learners use a mortar and pestle to grind and crush lemon cypress branches. A pleasant, citrus aroma will soon fill the air.

Using a mortar and pestle with lemon cypress sprigs brings out the lemon fragrance.

_______

Or invite little ones to add Christmas decorations to the tiny tree.

Decorate a potted lemon cypress tree with Christmas decorations.

_______

_______

More Playdough Recipes and Activities

Apple Playdough Tray

Edible Playdough Turkey

Scented Playdough Activities

Pumpkin Playdough Activities

Fall-themed playdough tray with pumpkin playdough.

_______

Gingerbread Playdough

Orange-scented Playdough Invitation

Chocolate Mint Playdough

Christmas Playdough

Santa Claus Playdough Tray

Valentine’s Day Playdough Activities

St. Patrick’s Day Playdough Tray

Set out this fun St. Patrick's day playdough tray for your little learners to explore. Three different colors of playdough are featured.

_______

Easter Playdough Tray

_______

[Read more…] about Lemon -scented Christmas Playdough

Filed Under: Christmas, playdough, preschool, trees Tagged With: Christmas, playdough, sensory play

Eye Dropper Leaf Art

November 7, 2021 by Annette Kaminsky Leave a Comment

Stunning eye dropper leaf art that is quick and easy to create. An all- ages activity using supplies commonly found in the home.

_______

Young children love variety in painting tools, so they will welcome this eye dropper leaf art activity. Using liquid watercolors ensures that the art will be bright and cheerful. And who wouldn’t want to squeeze in just a little more splashy color before the winter season sets in!

The large leaves for this project are inspired by the many leaf paintings by American artist Georgia O’Keefe.  Georgia loved the colors and shapes in fall leaves and painted them to completely fill her canvasses.

_______

Supplies To Collect

For this easy-to-do art activity, collect the following:

  • liquid watercolors
  • paper towel roll
  • eye droppers or pipettes
  • paint containers
  • leaf templates

_______

Creating The Eye Dropper Leaf Art

Steps to creating beautiful eye dropper leaf art on paper towel designs.

_______

Draw or trace large leaves onto a paper towel roll. You may need two attached sections for each leaf if you go big, as Georgia O’Keefe did. I used oversized wall art leaves as templates and cut out a few different types.

Mix liquid watercolors of choice with a little water, and pour into paint trays. Featured are magenta, orange, and green hues.

Invite children to use eye droppers or pipettes to drip paint on their paper towel leaves.

A paper towel pattern accents the design in this eye dropper-painted maple leaf.

_______

When filled with color, dry the leaves on a flat surface.

Tip: Maple leaf designs work especially well for this activity. Little learners enjoy accenting their many curves and pointy edges.

Eye-catching leaf painting activity using an eye dropper technique.

_______

The colorful leaves can be displayed as-is, or mounted on cardstock.

Note: Because paper towel is so absorbent and the colors spread quickly, large shapes are perfect for this craft. And a paper towel canvas adds a unique texture to the art.

Eye dropper painting technique on paper towel leaves.

_______

Variations Of This Eye Dropper Leaf Art Project

Invite your little charges to drop paint onto leaves cut from sturdy art paper. I used 11-inch x 14-inch, 98 lb, mixed media paper for the leaves.

Steps to create eye dropper and blow dryer painted leaves.

_______

The paint will pool and start to blend slowly. As the art dries, invite little learners to check back periodically to observe the color changes.

In the completed project, I used a blow dryer set on low to hurry the drying process. It was fun and created a uniquely blended earthy-hued color combination.

A blow dryer painting technique yields beautiful results on a maple leaf cut out.

_______

Tip: For young children, I recommend inviting them to blow the paint around with straws instead of a blow dryer.

Copy paper also works for this drippy art activity. Below, the maple leaf is cut from 11-inch x 17-inch paper and decorated in two colors. This version dries the quickest.

Eye dropper painting on a maple leaf with magenta and orange liquid watercolors.

_______

Little learners can get overwhelmed with having to decorate a large canvas. But with this activity, bigger is better!

_______

[Read more…] about Eye Dropper Leaf Art

Filed Under: art, autumn, fall, preschool, trees Tagged With: fall crafts, leaves, maple leaves, painting

Chinese Money Tree Activities

February 2, 2021 by Annette Kaminsky Leave a Comment

Easy to do, creative Chinese money tree activities that give early learners a chance to use shiny gold coins and loose parts in art and sensory play while learning about a world-renowned celebration.

_______

Chinese money trees have been part of Chinese New Year celebrations since the 1980s and are a symbol of luck and wealth. People buy money trees for their homes and place them in strategic places. They also purchase and display shiny, metallic tree ornaments laden with gold coins. Here are art and sensory Chinese money tree activities your early learners will enjoy.

_______

Chinese Money Tree Tray

Set a tree-drawing inside a wooden tray. Add containers with Chinese coins and green and gold gems.

Invitation to decorate a Chinese money tree with gold coins and acrylic gems.

_______

Feel free to download this template for the project.

_______

Tree PrintableDownload

This printable is for individual or one classroom use only.

_______

Invite your little learners to decorate the tree.

Invitation to decorate a Chinese money tree with gold coins and acrylic gems.

_______

[Read more…] about Chinese Money Tree Activities

Filed Under: art, Chinese New Year, gardening, preschool, sensory, trees Tagged With: Chinese New Year, loose parts, printables, sensory tray

Color Explosion Science Experiment

January 1, 2021 by Annette Kaminsky Leave a Comment

A simple color explosion science experiment with dramatic results. Just three kitchen supplies are needed to carry out this experiment.

_______

This dramatic color explosion science experiment is one of the simplest ones you will find. It uses ingredients you probably have in your home, is easy to set up, and shows stunning, instant results.

_______

Supplies To Collect

  • serving tray
  • milk
  • food coloring (1 – 4 colors)
  • liquid dish soap
Kitchen supplies to carry out the color explosion milk experiment.

_______

Conducting The Experiment

Pour a thin layer of milk into a serving tray placed on a table. I use an inexpensive 12-inch x 12-inch tree-shaped vegetable tray to add interest to the experiment. About three cups of milk will provide a nice layer in a serving tray this size.

Squeeze drops of food coloring in different parts of the tray. Use one, two, three, or even four colors. Primary colors work well.

Squirt a little dish soap in a few color pools.

_______

Pools of food coloring in the color explosion milk experiment.

_______

The food coloring immediately explodes to the tray edges, blending and making new colors.

Try adding a bit more food coloring, and one more squirt of dish soap. I add a little more blue, red, and yellow to the bottom right section because most of the color has moved to other areas of the tray. I squirt a tad more soap on top. There isn’t a noticeable change right away. In fact, after the initial color burst, nothing much seems to happen.

A second dose of food coloring and dish detergent are added in this color explosion milk experiment.

_______

But wait! The experiment doesn’t end here. Leave the tray on the table undisturbed, and check back a few times over the next half-hour. The food coloring slowly moves through the milk and fills the tray.

Each time you look, new color designs are visible on the surface of the milk.

A monster appears in this color explosion milk experiment.

_______

Gradually, the whole tray is color-infused.

Red, blue, yellow, and green colors fill the tray in this color explosion milk experiment.

_______

This color explosion science experiment is perfect for introducing to a group of early learners. At preschool, I like to set it out just before snack time and have students take a second look at what has happened after they are done eating. Then everyone has another look at the tray just before going home.

_______

Related: Pumpkin Color Changing Milk Experiment

_______

Color Explosion Experiment Take Two

In the above demonstration of the science project, I use 2% milk. Below, I show the results of the same experiment done with 1% milk. This time I add drops of color and a squirt of dish soap only once. The food coloring added is generous.

Food coloring pools in the color explosion milk experiment.

_______

In checking back in ten minutes after the initial explosion, the color has moved away from the edge of the tray towards the center.

Bright colors start to spread from the edges of the tray in this color explosion milk experiment.

_______

In twenty minutes the tray looks like this:

Color spreads on the surface of a milk filled tray after dish detergent and fat molecules bond. The food coloring shows the movement of the molecules.

_______

The colors spread further.

Bright colors take over in this color explosion milk experiment.

_______

Finally, they settle in pastel shades.

Pastel colors settle in this color explosion milk experiment.

_______

Tip: Save milk that has expired for this experiment. I successfully use milk five weeks past the expiration day for this second demo.

_______

The Science Behind The Color Explosion Experiment

Although milk is made of mostly water, it also contains fat and protein. These are both sensitive to changes in the milk. When dish soap is added to the tray, it breaks up the surface tension of the milk and is attracted to the fat molecules. The fat molecules try to scurry away but end up bonded with the soap molecules. The movement of the food coloring makes this process visible. As more and more soap and fat molecules bond, the color movement slows down and eventually stops.

Since fat content in milk is super important in this experiment, homo milk works the best. But as seen above, 2% and 1% milk (which I had handy) also show stunning results.

Color-changing experiment using milk, food coloring, and dish detergent.

_______

[Read more…] about Color Explosion Science Experiment

Filed Under: Christmas, preschool, science, sensory, trees Tagged With: colors, experiment, trees

Christmas Tree Decorating Center

December 23, 2020 by Annette Kaminsky Leave a Comment

This festive Christmas tree decorating center for early learners features mini trees and child-friendly, nonbreakable decorations.

_______

This Christmas tree decorating center has been a staple in my preschool classroom for many years. I introduce it every year in place of setting up a large Christmas tree. The center is effortless to put up, and the supplies store in one tub. During the festive holiday season, decorations on the tree get put up and taken down by little learners on a regular basis.

In preparation for this tactile center I purchased a variety of small Christmas trees one year just after Christmas Day. They were deeply discounted…around $5.00 Canadian per tree. Now every December I place them on a table covered with a soft white tablecloth and add child-friendly decorations.

_______

Setting Up The Christmas Tree Decorating Center

After arranging the branches on the Christmas trees, I gather small baskets and fill them with non-breakable Christmas decorations.

Baskets of child-friendly decorations for a Christmas tree decorating center.

_______

Making the cut are:

  • red, silver, and gold bells
  • Scandinavian bells
  • bell garland
  • pine cones
  • gold and red apples
  • foam hearts
  • metal toys
  • elves and Santas
  • metallic glitter flower clip ons
  • angel craft tree toppers

You might notice that there are lots of bells on the list. I love including opportunities for musical exploration.

A string of lights on the table adds ambiance.

Mini Christmas trees set up for early learners to decorate with child-friendly decorations.

_______

A rich, thick garland embellishes this red tree.

Red Christmas tree decorated with lots of garlands.

_______

To see a closeup of all the trees view this Christmas Tree Decorating Center video.

_______

Most people already have their trees up and decorating completed by now. But sale shopping opportunities are just around the corner. Keep a lookout for economical mini trees and child-friendly decorations to set up a Christmas tree decorating center dazzling with your own flair.

_______

Decorated Christmas trees at an early learning center.

_______

[Read more…] about Christmas Tree Decorating Center

Filed Under: Christmas, display, preschool, sensory, trees Tagged With: Christmas, Christmas tree, sensory play, trees

Christmas Tree Art

December 21, 2020 by Annette Kaminsky Leave a Comment

Dazzling, easy to do Christmas tree art painting activity. An all-ages art project.

This Christmas tree art is quick to set up and simple to do. And it gives early learners a chance to explore color shades and brightness.

Dazzling, easy to do Christmas tree art painting activity. An all-ages art project.

_______

Supplies to Collect

  • green, yellow and white tempera paint
  • 12-inch x 18-inch sturdy paper
  • paint palettes
  • paintbrushes
  • paper towel squares
  • metallic green star confetti
  • gold and green Christmas gift bows

_______

Making The Christmas Tree Art

Cut long, narrow triangles from large sheets of sturdy paper. Shown below is manila paper.

Pour dark green, medium green, yellow, and white tempera paint into artist palettes. This color scheme works well when children keep the colors separate or do a lot of blending.

Invite your early learners to paint a triangle. They will embrace painting a unique shape.

Christmas tree art set up with white, yellow, and green paint hues.

_______

A paper towel works well to dab excess paint from the brush before switching to a new color. This is a helpful tip from Patty Palmer’s book “Draw, Paint, Sparkle.”

Painting technique to use when switching paint colors.

_______

Next, have your little charges sprinkle on metallic stars while the paint is still wet. They will loooove doing this too!

Painted triangular tree ready to be topped with a Christmas gift bow.

_______

When the tree art is dry, spray on unscented hairspray from an aerosol can to help the stars stay on. (This is the first year I searched for unscented hairspray to use as a fixative. It was worth the time and slightly greater expense.)

Lastly, have your little learners pick a Christmas gift bow to stick on top of their tree.

A Christmas gift bow is the topper for this painted Christmas tree craft.

_______

Discussing triangle shapes, using beautiful finishing touches, seeing how white added to darker green makes different shades, and noticing how yellow lightens and brightens green are some learning possibilities for this craft.

And these Christmas tree art projects look absolutely beautiful displayed together.

Dazzling, easy to set up Christmas tree art project.

_______

[Read more…] about Christmas Tree Art

Filed Under: art, Christmas, preschool, trees, winter Tagged With: Christmas tree, painting, trees

  • « Go to Previous Page
  • Page 1
  • Page 2
  • Page 3
  • Go to Next Page »

Primary Sidebar

Hi, I'm Annette Kaminsky. I am a preschool teacher who loves to share easy and fun early learning activities. Thanks for visiting my blog. Feel free to stay awhile!

Subscribe Via Email

Recent Posts

  • Salt Painting Planet Art May 3, 2025
  • Spring Bunny Sensory Bin April 19, 2025
  • Tin Foil Egg Printing April 17, 2025
  • Lentil Easter Bunny Sensory Bin April 15, 2025
  • Unicorn Store Dramatic Play Center March 25, 2025
  • Easter Store Dramatic Play Center March 23, 2025
  • Origami Heart Wreath February 28, 2025
  • Black History Month Mixed Media Art February 26, 2025
  • Pink Shirt Day Necklace Craft February 20, 2025
  • Origami Heart Valentines February 9, 2025

Categories

Topics

block play bunnies butterflies Chinese New Year Christmas Christmas craft color colors dramatic play Easter flowers hearts holiday jewelry leaves leprechauns light table loose parts painting paper crafts playdough pretend play printables printmaking process art pumpkins rice bin scented playdough science experiment scissor skills sensory bin sensory play sensory tray shamrocks skeletons snakes snowflakes spiders spring St. Patrick's Day sunflowers tablescapes trees Valentine's Day water play

Copyright © 2025 · Lifestyle Pro on Genesis Framework · WordPress · Log in